Skip to content

Normalize Volume Easily

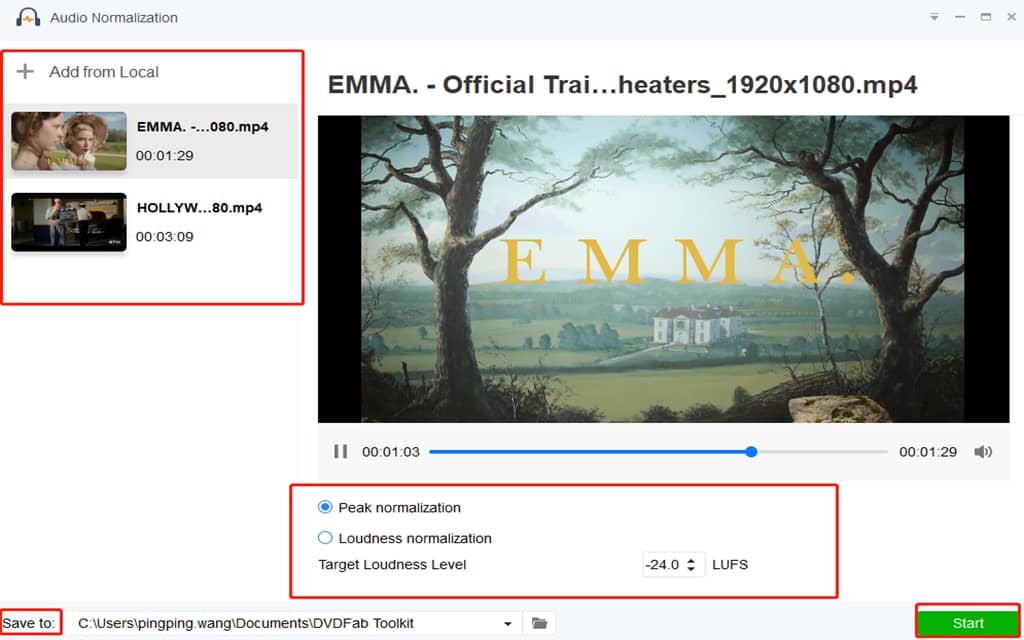
Audio recording sometimes can be too loud or nearly inaudible. That’s why we often need to deal with an audio or video file that has an unbalanced volume. The best way to fix this issue is to normalize the audio. What is audio normalization? It means to change its overall volume to a target level. And it should be clear that audio normalization is not compression that changes volume over time in varying amounts. This audio normalization tool is needed to help you balance volume without effort. Being as a consumer-oriented tool, it simplifies the normalization process, even if nonprofessionals know how to use it. In addition, it offers two methods to normalize audio: peak normalization and loudness normalization. No difficulty will be encountered during this whole audio normalization process.

  • Normalize Your Volume While Enjoying

    This audio normalization tool is user-oriented, trying to amuse users while normalizing audio. It is designed with an insert player so that you can normalize the volume while enjoying the audio or video.

  • Add Multiple Files to Normalize

    This audio normalization tool allows you to add multiple files from the local and normalize them in packs, greatly improving efficiency. No more need to normalize a file one by one.

  • Offer Two Types of Audio Normalization

    Two types of audio normalization are offered. One is peak normalization and the other one is loudness normalization. Pick up one type per your need.

  • Provide Fast Normalize Speed

    Being user-oriented, this normalization tool is applied with advanced techs just to avoid you wasting a lot of time to do the normalization thing. In a nutshell, everything needed is provided by this software.

  • Safe, Clean, and Reliable

    There is no need to worry that this audio normalization tool will bring your computer virus or slow down its speed because this tool is guaranteed to be reliable.

  • Simple to Follow

    This tool is designed very simple-to-follow to make sure that everyone, especially the beginners, can normalize audios without any difficulty.

How to Normalize an Audio

3 simple steps to normalize your audio

  • Step 1: Locate the “Normalization” tool and add your file

    Let’s assume you have already had this audio normalization tool on your computer. Then the first thing to do is double click its desktop icon to launch up it. Next, locate the “Normalization” tab and click to enter after which press that “+” button to add your file.

  • Step 2: Choose a normalization type and start

    If you need to add one more file, please feel free to press the “Add from Local” button on the left upper corner. If don’t, you can pick up the peak normalization or loudness normalization per your need and do other adjustments as well.

  • Step 3: Output your file

    Don’t hush to click that “Start” button. Another important thing to do is to select an output location through the folder icon on the bottom of the interface. When everything is ready, then press the “Start” button to initiate the audio normalization process.

Use cases for normalizing audio

Situations when we need to normalize audio

  • Normalize audio when some effects are applied

    Audio and videos are normally edited by people to get better effects so that they are qualified to be shared or posted on social websites. Compression, modulation effects, or some other process are often be applied while people dealing with audio files. Yet these effects or processes are highly possible to reduce your gain. In this situation, audio normalization is able to help raise the gain. It should be noted that no actual process takes place during your normalization which is just a relative boost of your signal. Your sound comes out sounding the same as it went in. No need to worry about downloaded MP3 from YouTube with poor voice quality.

  • Normalize audio when your recorded audios are unbalanced

    Many people, maybe including you enjoy to produce their own audio or videos to record our life. Yet most of us are nonprofessionals. Then it happens all the time when our record audios are too loud which may kill your audience’s ears or the audios are nearly inaudible causing audience miss a lot of details. This is the time we need to normalize our audio. Let’s suppose that you have an audio file whose loudest peak is -10db while you want the loudest peak to be closer to -5db.

Toolkit Audio Normalization

Fix your unbalanced volume in audio & video files

More Than An Audio Normalization

Toolkit is created not merely as an audio normalization tool. You might have already noticed that the Toolkit is an all-in-one solution for your needs of editing, such as video, audio, image, even subtitles. It is made up by five major tool parts: Video Tools, Audio Tools, Image Tools, Watermark Tools, and Subtitle Tools. And each tool part includes multiple small tools. The audio normalization tool is part of the Audio Tools. Besides it, there are other seven small tools available if you need to edit your audios. For instance, you can utilize the “Merge” tool to combine several audio files as a whole one, or use the “Trim” tool to get rid of unwanted audio parts and only keep the desired part.