
Top 3 Video to Image Converter: Convert Video to JPG Picture
Summary: Converting video to pictures happens a lot in daily life. To do this, you need to find a qualified video to image converter to help you. Concerning what you need, this article will show you the top 3 video to picture converters for you.
Have you ever wondered how video works? Why the images in a video can move? A video is made up of a series of still images. When these images are viewed at a certain speed, they will fool your eyes into thinking the object is moving. Imagine a video as a flipbook and these images as a pad of paper with an image on every single page. When you are flipping the book fast, these images on every page seem to be alive. Why did we explain this? Because there are many people often finding themselves needing to convert their home videos to a succession of images to make a memorable album or capture pictures from a video to make an interesting snapshot. Are you one of them? We explained this so that you will know that you can extract pictures from a video. Even though video to picture is no longer difficult as people though, you still need to search for a qualified converter to help you accomplish it. In this article, we packed up the top 3 best video to image converter with high quality for you.
Top 1: DVDFab Toolkit
DVDFab Toolkit is a must-have handy toolbox supporting an array of functions, 18 in total for now. It aims to simplify all the editing things, especially for people who are just involved in editing, whether video editing, audio editing, or image editing.
How to achieve video to picture with it?
DVDFab Toolkit is very easy-to-use, offering basic functions for the user. Now let’s explore together how to capture pictures from a video with it, along with learning its other functions. Detailed tutorials are offered below.
Step 1: Run this video to image converter
First thing first, to run this video to imager converter you have to download and install it. DVDFab Toolkit is compatible with the Windows system. Directly click this downloading button below, you can have this tool on your computer after a few clicks. Once you have installed it, double-click its icon on the desktop to run it.
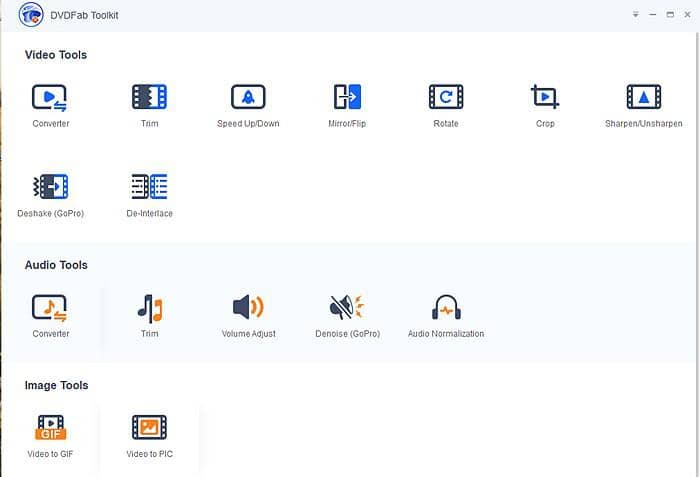
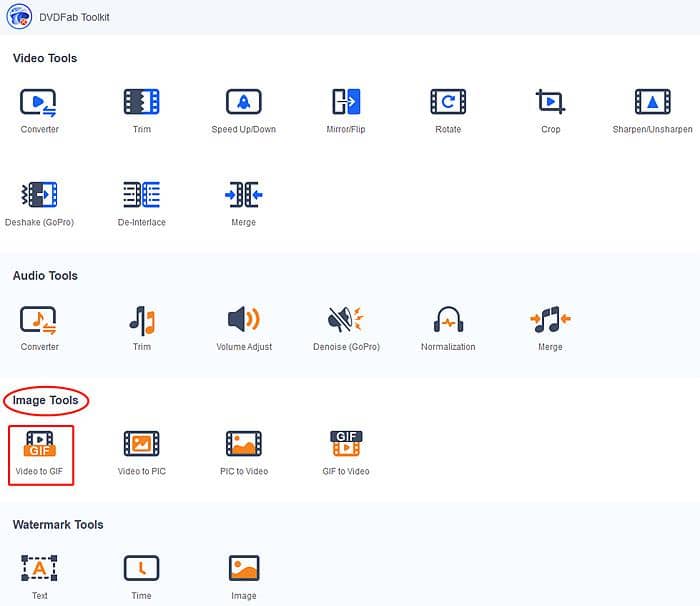
Note: Once you start this tool, you can observe that its interface is very clear to understand. These 18 tools are divided into three main categories: Video Tools, Audio Tools, and Image Tools according to their functions.
Video Tools: It includes 9 tools, involving almost all the tools you might use in everyday life, such as video converter, trim video, adjust your video speed, rotate your video, etc.
Audio Tools: Compared to the “Video Tools” category, this category includes fewer tools: Converter, Trim, Volume Adjust, Denoise (GoPro), and Audio Normalization.
Image Tools: Only two tools are included in this category, yet they still share the same importance as the other tools. Obviously, if you want to save still images from a video file, you need to ask this video to picture tool for help.
Now, let’s move to the next step to see how this video to picture converter works.
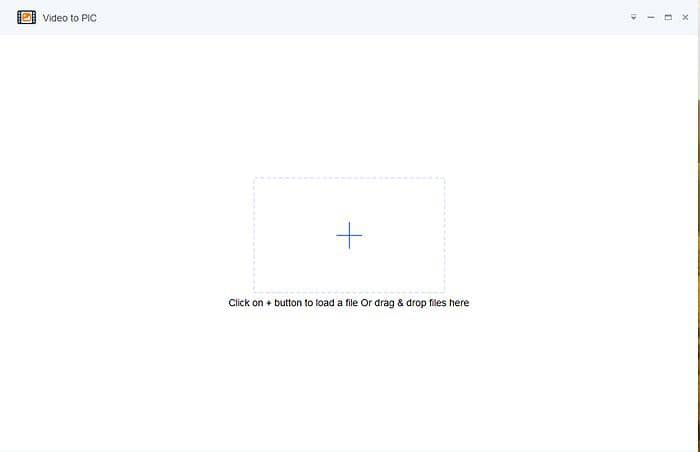
Step 2: Add your video
By using the Add files button, represented by the “+”, or by dragging and dropping, you can add your video where you hope to extract images from to DVDFab Toolkit. It is pretty easy, right?
Step 3: Preset values and customize your picture
Here comes the critical step of the video to the image process. As soon as you have added your video, you will come into a new interface in which some factors need to be introduced. Don’t worry. Let’s start bit by bit.
1. Before converting video to images, you might need to set a specific range in the video so that pictures are extracted between these mentioned points. That’s when you need “Start Time” and “End Time” options. You can directly input the time number you desired or you can click that up and down triangle to set time. Alternatively, you can slide these two markers. Duration, as you have noticed, shows how long your video clip is.
2. Below these time settings, you can see two options: Take a snapshot every second(s) and Take a snapshot every frame(s). By adjusting the number in the boxes behind, you can decide how many pictures you want to extract from your video.
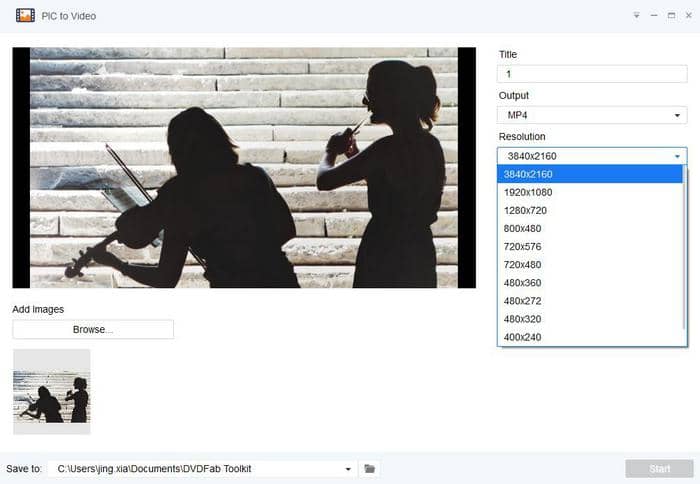
The last thing needs to be explained is the “Save image as” option. It should be pointed out that DVDFab Toolkit is not just a video to JPG converter, it can also convert videos to images in PNG format.
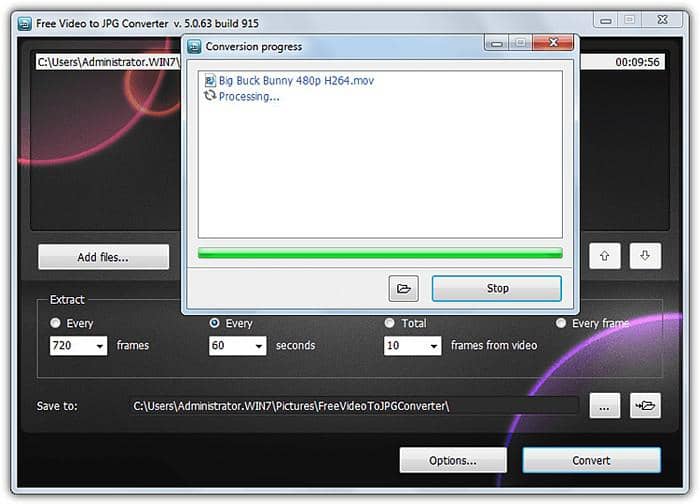
Step 4: Initiate the process
When you have preset everything, you can hover the mouse over the file folder icon listed on the bottom of the interface to select your output location. And then, you can hit that green “Start” button to start the video to JPG/PNG conversion process. Normally speaking, the extraction times are reasonable and will differ depending on your video length and how many frames are being extracted.
Apart from DVDFab Toolkit, there are also, as we have mentioned earlier, many other available videos to picture converters. VLC media player and VirtualDub are one of them.
Optional 1: VLC Media Player
The VLC media player also plays a role thanks to its robust functions. Speaking of changing video to picture things, you can achieve this through the main user interface. Here is a guide for you.
Generally speaking, five steps are needed.
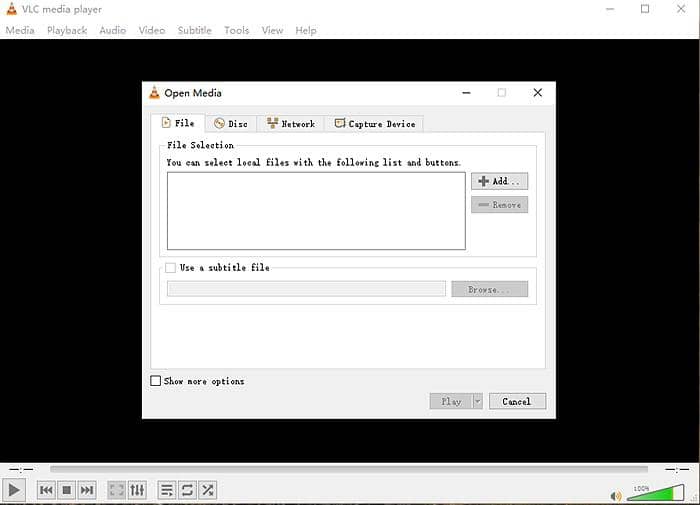
1. Same as the first step of using DVDFab Toolkit, you are supposed to download and install VLC media player on your computer to get ready.
2. Open the VLC media player, hit the Tools tab and find the Preferences option on the bottom of the drop list.
3. A new interface pops up along with your hitting from which you can find “Show Settings” on the bottom of it and check the “All” option.
4. As soon as you select the “All” option, another new panel is switched in. Expand Video>Filters to find and click Scene Video Filter. Remember to press “Save” when you have preset everything.
5. Play your added video file and then the images will automatically start saving.
Despite its versatile capabilities, VLC has some drawbacks you may have noticed as well.
First, you can not decide where to output your video file by yourself.
Two, to capture images from a video you have to leave the video running while extracting images from it.
Third, When you are done with video to image, you have to untick the “Scene Video Filter” box. Otherwise, this software will do it again even though you don’t need to extract pictures from videos.
Fourth, as you can tell, this software is featured in so many settings. For a new person, he may need to take a while to know how to operate it.
Optional 2: Free Video to JPG Converter
To save frames from a video file to a sequence of JPG images, you can also take Free Video to JPG Converter into account. It offers multiple ways for users to convert video to images. You can extract an image every number of frames, extract an image every number of seconds, take a total number of frames from the video, or extract every single frame. Seeing from this aspect, it is very similar to DVDFab Toolkit. Now, let’s how this program works. Here are some steps.
1. Download and install this program on your device.
2. Launch it to add video files which can be achieved by clicking that Add files button or by dragging and dropping.
3. Set your extract criteria and optionally a different save location to the default. Then, you can start the conversion process.
Though Free Video to JPG Converter is much easier to operate compared to the VLC media player, it still has some shortages. For example, the total frame from a video setting of 10 doesn’t produce an equal split of 10 frames.
Conclusion
Other tools can do a similar task. Yet, these three are widely used than the other ones due to their robust capability a video to JPG conversion. However, among these three ones, DVDFab Toolkit is always highly recommended. Not only because it is so easy to operate and understand, but also because it offers so much more for users instead of only converting video to images. If you need to read more articles about how to take a picture from a video, you can click here. Just remember, meeting your needs is all DVDFab Toolkit wants.
Today, we are going to look at the best solutions to the question how to speed up a video on android and find out the best android apps for you. Next, let’s take a look together!
By Echo - Feb 24, 2025
This post has everything you need concerning how to make a GIF a wallpaper not only on Windows 10, but also on smartphones like iPhone. With handy tools, you will fast master how to make GIF wallpaper so as to add space to your computer or mobile backdrop instead of watching static background all the time.
By Echo - Feb 20, 2024
The past few decades saw leaps and bounds of technological development, including the media technology. Gone are the days that a photographer or a cameraman have to carry a heavy lens to record something, now you can just do that with a light mobile phone in your pocket, thanks to the development of technology, and the image quality is by no means inferior to what an expert camera can bring, which results in the ever increasing number of images each of us have on our mobile phones. Yes as we are all artist of our own life recording, why not bring those images together and make them a video? A good image to video makers would do! Check out what image to video makers are recommended ahead.
By Echo - May 10, 2023