
How To Screenshot On Thinkpad Lenovo in Simple Steps
Summary: How to screenshot on thinkpad: In this article we have layed out step by step guide on various ways to capture and save screenshots on Lenovo Thinkpad. In addition, we have reviewed an efficient photo editing tool that can enhance the utility of your screenshots for adding annotations, cropping, and adjusting quality.
Table of Contents
The convenience of simply taking a screenshot of your screen has increased the demand for a quick and efficient shortcut to taking screenshots on a laptop. Most laptops offer a simple way to take screenshots with a click of a button, while others vary depending on their make and other factors. That being said, you will see various tools and applications to take screenshots with advanced features. If you are here for “how to screenshot on thinkpad”, we have discussed different ways and tools to take screenshots on a Thinkpad.
Take Screenshot On Thinkpad: Why and How?
Let alone saving your time, taking screenshots of your screens to help in various other ways. For instance;
- You can share your progress in steps.
- It helps in saving a webpage for future reference.
- If you wish to capture an important or favorite scene from TV shows or movies, taking screenshots is the quickest (and the only) way.
- It speeds up your work efficiency.
- You can quickly share information without following lengthy steps to save files.
- If you wish to add annotations to the screenshots for a better explanation, it is more efficient.
How To Screenshot On Thinkpad Laptop
On the other hand, depending on the type of computer you have and the software that is running on it, taking a screenshot is different. On the Lenovo ThinkPad, there are a few different methods to go about it, depending on the make and software used. So, if you are wondering “how to take a screenshot on ThinkPad”, we have created a guide to walk you through different ways to take screenshots on Thinkpad lenovo.
How To Take Screenshot In Lenovo Laptop Windows 10
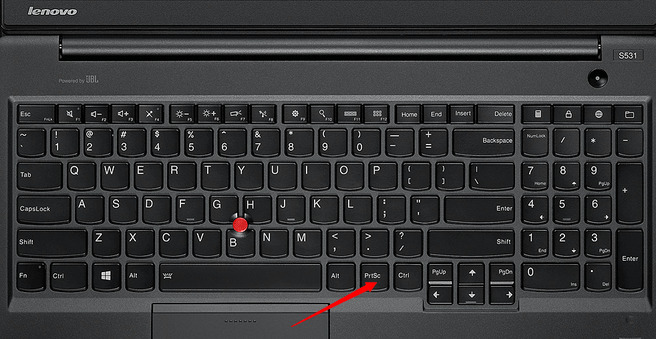
How to take screenshot on Thinkpad with Windows 10 is the quickest and easiest way using the “Windows” key and Prt Sc key. You will find the “Prt Sc” key at the bottom right portion of your keyboard, just next to the 'Alt' key on your laptop in Lenovo Thinkpad.
- Press both “Windows” and “Prt Sc” keys at the same time.
- When you press the keys, you will notice that your screen dims for a brief moment.
- You will see a pop at the bottom showing that your device has successfully captured a screenshot that is ready for use.
- To retrieve the image, navigate to the 'Screenshots' folder in your Files folder.
Another simple method of taking a screenshot is to hit the Windows key and the letter 'W' at the same time. On the right-hand side of your screen, you'll see a sidebar menu appear. From there, select the 'Screen Sketch' tool from the toolbar. Make any changes you desire, and then click on the “Save” button to save them.
How To Take Screenshot In Lenovo Laptop Windows 7
You may notice some differences in functionality if you aren't running Windows 10, but it isn't that difficult to adapt. All you have to do is;
- Navigate to the screen you want to capture
- Press the “Prt Sc” key on your keyboard.
- Your image will be saved to the clipboard.
- You can later paste the image into Microsoft Paint or any other graphic-editing programme of choice to edit or crop.
- To paste your screenshot, hold down the “Ctrl key” and the “V key” at the same time.
In addition, if you wish to, you can also mark certain areas of your image with the tools in Paint. When you're finished, click on the 'Save' button or simply press Ctrl + S to save your photo.
How To Take A Screenshot On A Thinkpad With Snipping Tool (Windows 10)
In this section, we have covered how to take screenshot on Thinkpad using the built-in “Snip & Sketch” feature on your Lenovo laptop. Let’s have a look at a few simple steps you can follow to take screenshots quickly and easily.
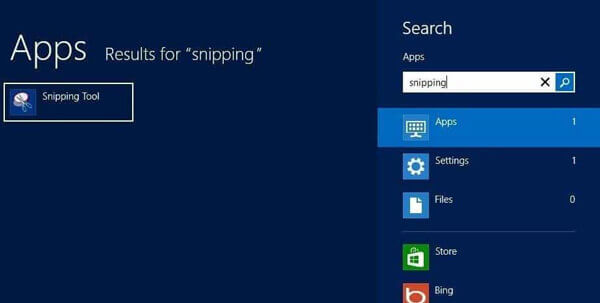
Step 1: Go to the “Search Bar”, type in the “Snipping” command, and click on the search box. It will direct you to the Snipping Tool application on your computer.
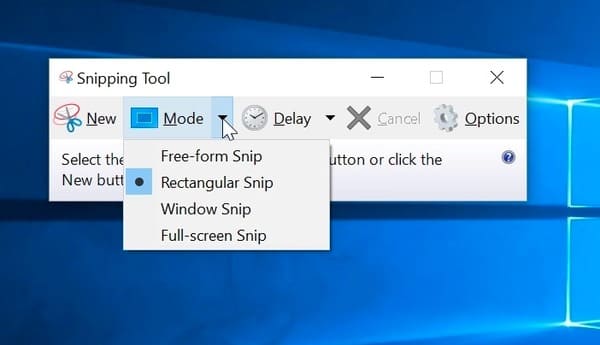
Step 2: Once the Snipping Tool has been started, you can select the desired screenshot mode by clicking on the New button. There are various screenshot modes available in the tool, including; the “Free-form” Snip, “Rectangular” Snip, “Windows” Snip, and “Full-screen” Snip.
Step 3: Proceeding further, you can use your mouse to choose a specific part of your screen by clicking and dragging it. Then click and drag the mouse cursor to the right. In the pop-up box, you may choose to save the customized snapshot by clicking the Save Snip icon.
However, “how to screenshot on a ThinkPad” is not the only concern. Adding annotations, cropping, or sometimes enhancing quality comes into consideration as well. Despite the fact which way you choose to take screenshots, you may be needing a tool to enhance the quality or add some effects depending on your needs.
Add Annotations And Enhance Photos With DVDFab Photo Enhancer AI
Amongst all the hassle, different models, and software, why not use a single programme that allows you to make your photos look better. Rather than browsing through a long list of steps that you need to follow through on each model, DVDFab Photo Enhancer AI offer the same, efficient, quick, and convenient working on all platform and software.
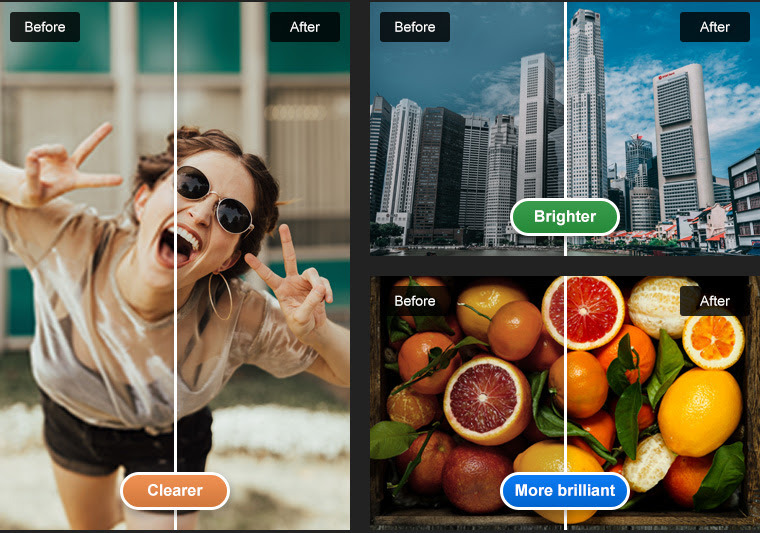
DVDFab Photo Enhancer AI has deep convolutional neural networks that have been trained on millions of professionally improved samples to upscale pixelated photographs without sacrificing image quality. You can also add cartoon effects to images, remove noise in photos, sharpen photos blurry photos, and colorize black and white photos, among other things. What's more, DVDFab Enlarger AI is a good tool as a video upscaler to help you to get AI upscaling video.
In addition, in a few simple steps, you can conveniently download and install the DVDFab Photo Enhancer AI. Let’s have a look at these few simple steps you can follow to enhance your images in seconds.
1. Download and Install DVDFab Photo Enhancer
You can download the DVDFab Photo Enhancer on the website. Once you click the link, it will save a setup file. Once the download is complete, click and run the file.
2. Launch DVDFab Photo Enhancer
Once the programme is installed on your system, it will create a desktop icon; click to launch the file. This software offers a simple and straightforward user interface.
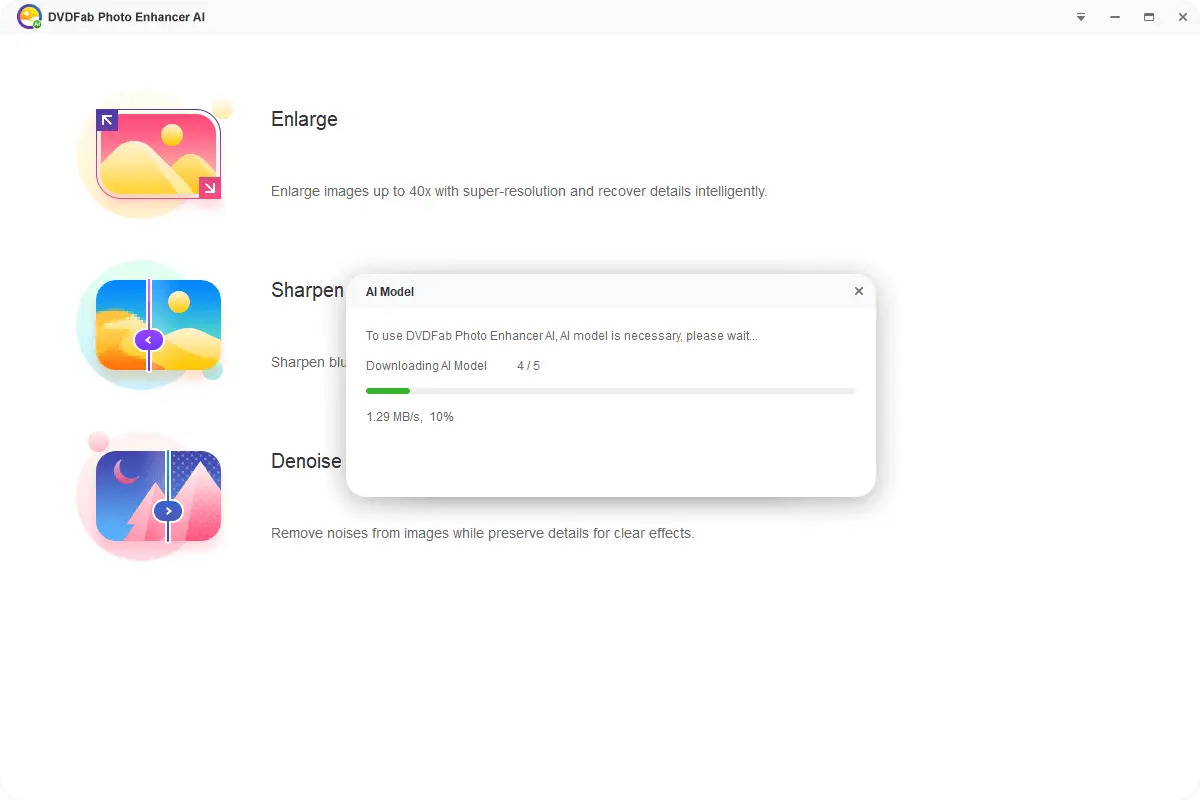
3. Choose the AI module
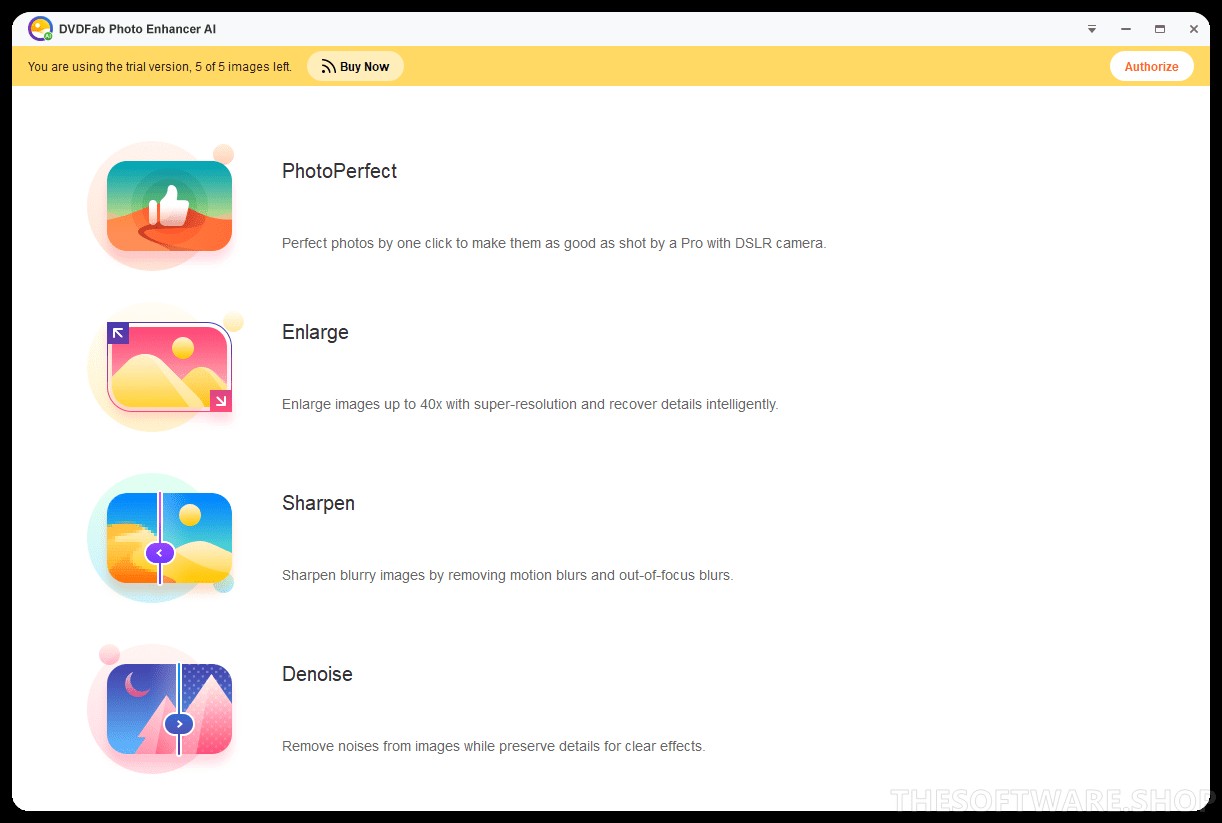
Once you have launched the programme, you will see different modules including PhotoPerfect, Enlarger, Sharpen, Denoise, and others. To automatically enhance your screenshots taken on the laptop, choose AI mode. Once you choose your desired module, it will download the required files.
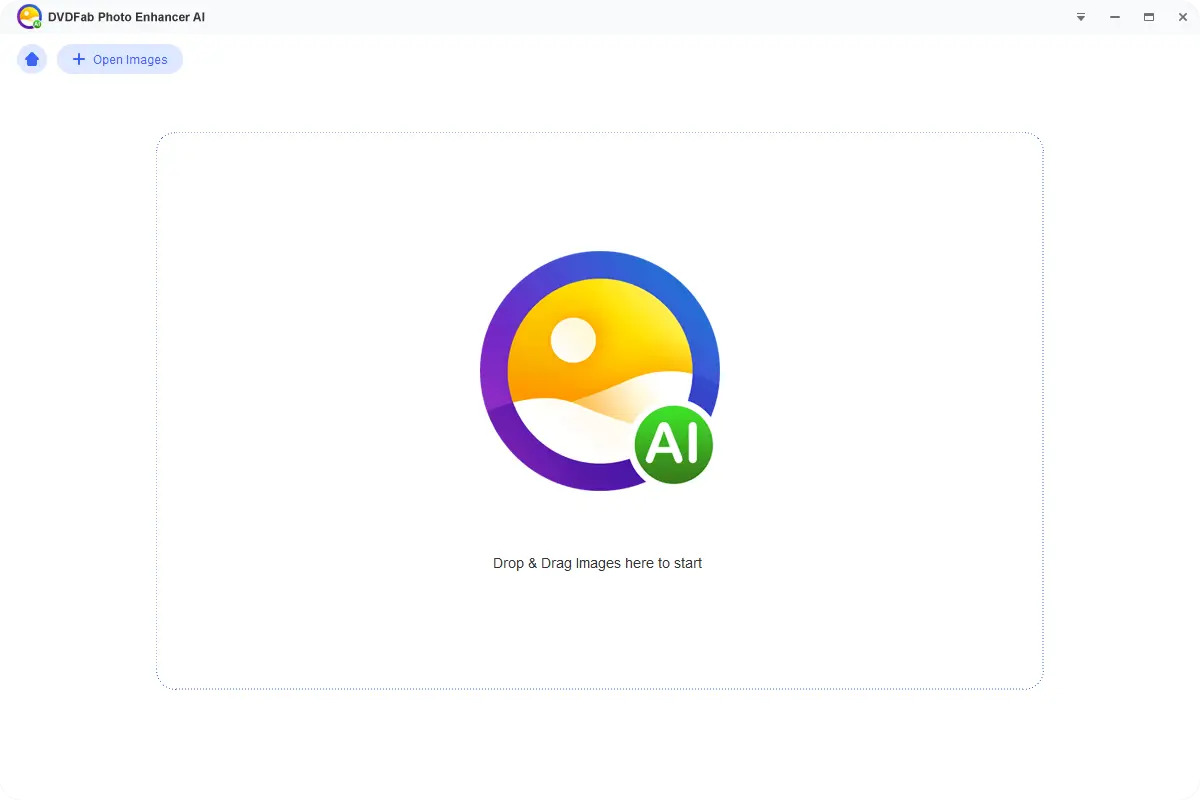
4. Upload Files
In the top left corner, you will see the “Add Images” icon with a “Home” icon. You can either click on “Add Images” or simply drag and drop the files on the main screen.
5. Customize Your Images
DVDFab Photo Enhancer AI automatically adjusts your image to enhance the quality. Moreover, before saving the final image, you can customize the settings as per your requirements to get the desired output.

You can see the live preview alongside editing, which makes it easier to see the final results before saving your file.
6. Save Your Files
Once you are satisfied with the outcome, save the final image.
DVDFab Photo Enhancer AI is an overall amazing tool to professionally edit your images and add annotations as per your requirements. Moreover, the DVDFab Photo Enhancer AI tool can be a great addition to your work and creative endeavors, when it comes to functionality and performance.
DVDFab Photo Enhancer AI Main features
Unlike other alternatives, DVDFab Photo Enhancer AI offers a plethora of other benefits that make your editing professional alike with ease of use, including;
- Upsize Photos: Increase the size of images by up to 40 times their original size without sacrificing any quality.
- Denoise: Remove background noise from photographs in order to improve image clarity and definition.
- Sharpen: Improve the clarity of hazy photographs, sharpen edges, and add more detail to bring photos to life.
- Enhance Image Quality: With a single click, DVDFab Photo Enhancer AI enhances your images to look like they were taken with a DSLR camera.
- Cartoonize Images: Draw cartoons on your photographs and convert them into pop art by applying cartoon effects to the images.
- Colorize Black and White Photos: With the help of cutting-edge artificial intelligence technology, you can transform your black and white images into colored photographs.
- Waifu: It is a tool in DVDFan Photo Enhancer AI that can upscale 2D/3D waifu photos up to 40 times without sacrificing quality.
Moreover, the proper functioning of any programme is significantly affected by the system requirements. If you wish to achieve optimal functioning of the DVDFab Photo Enhancer AI tool, your system must match the following requirements for Windows;
- Windows: 10 (64-bit)
- Processor: Intel i3 or above
- RAM: 4GB or above
- Hard Disk: 40GB free hard disk space or above
- Graphics Card: NVIDIA Graphic Card along with more than 3GB of available memory
- Compute Capability: Higher than 3.5
This programme works offline. However, to register your account you require a live Internet connection.
Conclusion
Amongst various techniques for how to screenshot on Lenovo Thinkpad, the default technique to screenshot on Lenovo is the most straightforward. Nevertheless, there are fewer to no editing options and annotation tools available in this mode of operation. Hence, to better utilize your screenshots, It is highly recommended that you utilize a good editing tool like DVDFab Photo Enhance AI. Moreover, a few laptops come with built-in features that allow you to take a screenshot, which is not adequate. On the other hand, utilizing a programme that also allows you to edit, highlight, and annotate your photographs gives you an edge.
FAQs
Windows 10 automatically save screenshots in the default folder. To view, edit, or share your screenshots, go to "This PC. Choose “Pictures”. Tap the “Screenshots” folder to access your screenshots taken by the “Windows + Prt Scr” command.
Where “Snip and Sketch” is the quickest and easiest way to capture your screen, it does not feature an “automatic save” function. With Windows 10, when you capture screenshots by using the “Win+Shift+S” keyboard shortcut, they are saved to the clipboard. You will get a desktop notification when the screenshot is saved to clipboard. However, to view, edit, and use it, you have to paste it into another image editing application like paint.
There are different key combinations to capture and save your screenshots. The combination of the “Shift + Ctrl + Print” key will capture and transfer a screenshot of a section of a window to the clipboard. To save screenshot on your system, you can use “Windows key + Print” key combination. The shortcut keys “Alt + Prt Scr” will capture and save screenshot to “Pictures” folder in PC.
 Can Wii Play DVDs? Best Methods to Watch DVD on Your Wii!
Can Wii play DVDs? This is probably the most frequent question asked by Nintendo Wii lovers. And you might be disappointed to find out that the answer is No. But thanks to the advancement of technology, you can play DVDs on a Wii as long as you get the right method.
 Best Alternative to Remini Photo Enhancer 2025
You must have got an idea about what we will be discussing today by reading the title itself. Well, as you have deduced that we will be speaking about the best alternative of Remini AI photo enhancer, wouldn’t it be nice if just have a brief look at Remini first?
 Can Blu-ray Players Play 4K Ultra HD?
Can I play 4K movies on my Blu-ray player? If you are wondering "Can Blu-ray plays 4K" and "Will 4K Blu-ray play on a regular Blu-ray player", you are on the right page! This post offers the optimal solution to watch your 4K movies on a standard Blu-ray player when you have no 4K Blu-ray player at hand. Read on for more details.