
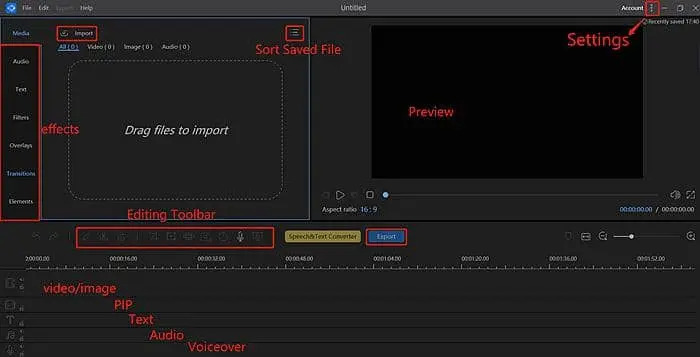
Edit and Trim Mp4 DVDFab Video Editor User Guide
Summary: To edit, convert, or trim mp4, having an all-in-one converter saves time and effort. DVDFab offers basic and advanced features in standard and pro versions respectively. With this comprehensive guide from downloading the software to installation, activation, and using different features and tools, you must not worry about your next project.
Table of Contents
Amongst a plethora of video editors, find the one that does all the job for you. Whether you want to trim mp4 video, edit, rip or convert files, the best video editor saves you a lot of time, hassle, and money. There are various offline and online video editors to trim mp4 files along with a variety of features, but not all work as well as they claim.
Trim Mp4 with DVDFab Video Editor
DVDFab Video Editor is an editor you have never seen before, and it offers the most essential features in its free version. In addition, Video Editor provides you with a platform to experiment with ideas and have a good time trying out different things.
It does not only converts between various music and video formats but also includes rudimentary editing features and parameter tweaks unlike other
All-in-one Video Converter
- It supports more than 1000 video formats.
- You can convert videos to any format, audio or video.
- Convert and support playback on variable devices from PC to Mac, mobile devices, and home theatre systems.
A simple yet powerful video editor
DVDFab Video Editor is a simple but incredibly powerful video editor that enables you to produce visually appealing, high-quality files using a variety of professional-grade tools and functions.
- There are hundreds of filters, overlays, and transitions to choose from.
- You can speed up, rotate, or otherwise enhance mp4.
- It allows you to combine movies, audio, and photos to create spectacular audiovisual masterpieces.
Must-have Multimedia Editing Toolbox
DVDFab Video Editor is an essential multimedia editing toolkit with nifty features, including:
- 20+ useful tools
- Supports all formats
- Conversion of video, audio, and images
- Convert and trim mp4
- Crop and rotate videos and images
- Make GIFs or screenshots from videos
- Online youtube to mp4 trim
- Add or extract subtitles and audio from videos
Function
DVDFab Video Editor allows you to create, edit, or trim mp4 with the ease of using simple-to-use built-in tools, including;
- Split: Mp4 trim for lengthier video recordings into smaller snippets.
- Crop: Adjust the frame of your video or picture to keep the portion of the desired frame in the final video output.
- Flip: It allows you to mirror your video or image. You can flip and mirror videos and pictures, both horizontally and vertically.
- Rotate: you can rotate videos by 90 and 180 degrees clockwise or counterclockwise.
- Duration: By adjusting the duration, you can keep whatever you want in the final file without having to crop any fragments out.
- Speed: To produce special effects, increase or decrease the speed of video or audio by 0.2x to 5x.
- Detach Audio: You can separate audio and video from one another with a single click, allowing for more precise editing.
- Custom Video Effects: DVDFab allows you to change the contrast, saturation, and brightness values to make the video effects more personalised.
- Picture in Picture (PIP): this tool is used technique used to show a picture in a picture to a person who is looking at it.
- Zoom: You can zoom in at any point in your video with the zoom feature.
- Snapshot: If you want to make a still picture in a movie, use the freeze frame function.
- Chroma: Post-production is a breeze for those who utilize want to eliminate the green backdrop from videos.
- Speech and text: DVDFab offers quick speech to text, and vice versa automatic convert.
If you're a new Video Editor user seeking to edit or trim mp4, DVDFab Video Editor offers all tools in one place. DVDFab is easy to use and quick to install.
Let's have a look at how to trim an mp4 video and edit it the way you like.
DVDFab Video Editor Activation and Setup
Before getting onto how to trim mp4 online or offline with DVDFab Video Editor, let’s have a look at the installation and activation process.
DVDFab video editor's full capability can be unlocked with the purchase of the full version. When you open the software, there is an “activation” button in the upper-right corner of the window. You can find the activation code in your inbox.
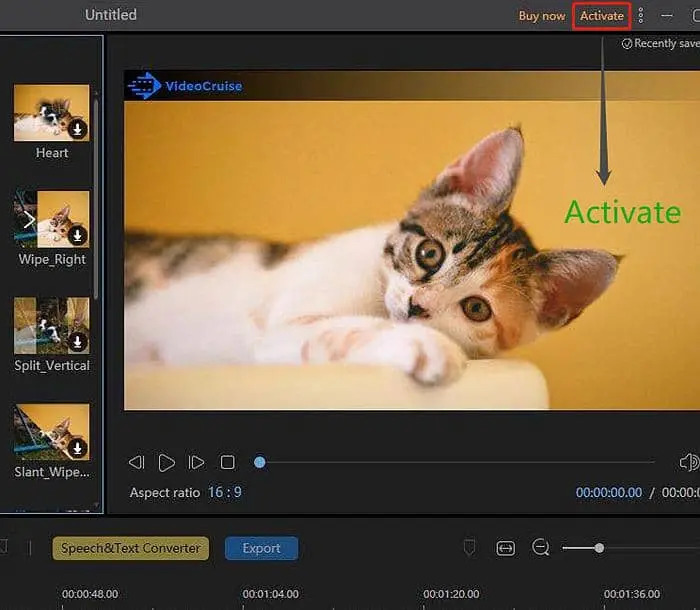
Once you enter the activation code here, click OK. After activating Video Editor you can edit videos free.
Settings and Configuration
Once you activate the DVDFab Video Editor, you will see the “Three Dots” icon in the upper-right corner. Setting DVDFab converter or editor allows you to do the following;
- You can change the default photo, text, transition, and filter duration.
- Set default aspect ratio based on your requirements.
- Choose your preferred subtitle language.
How to Trim an Mp4 Video: Step by Step User Guidance
After setting your editor, you are good to start trimming or editing your videos.
If you want to trim the mp4 file or remove some sections from your video, you can use DVDFab cruise to do so by following a few simple steps.
Step 1: Upload Files
When you upload the video in DVDFab video converter by “drag and drop” or choosing files from the device.
Step 2: Choose “Edit Video”
On the right of the video, you will see a “video edit” icon. Click video edit and you will see your video timeline.
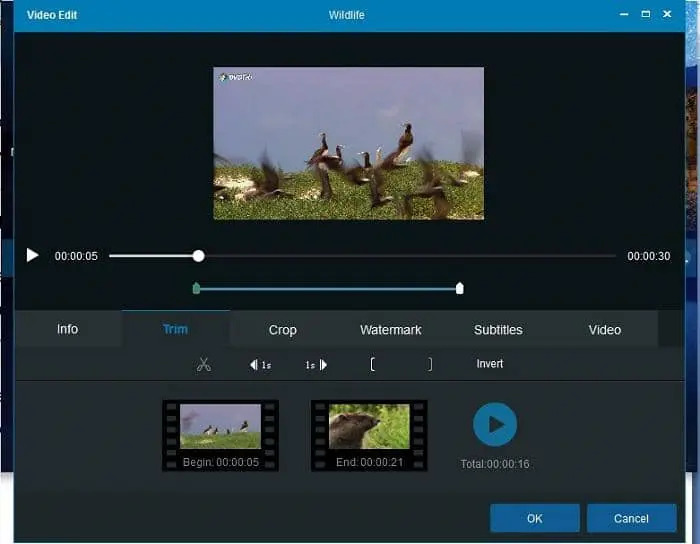
Step 3: Trim mp4 video
On the video timeline, it will show you a play head. Slide it to the point where you want to trim the video. Click the "trim" button, in the toolbar.
You must understand the difference between trim and split. Split cuts the video at some point. Whereas, trim means “split plus delete”.
If you want youtube to mp4 trim, there is an option “upload online”. When you upload the video from an online source, the converter downloads the video and uploads it in the timeline. You can conveniently edit and trim mp4 online without needing to download the video.
Edit Video with DVDFab Video Editor
Not only you can convert and trim your videos or audios in DVDFab, but it also allows you to download videos from YouTube to mp4 trim and convert.
Mosaic
Creating impressive effects is a breeze with DVDFab Video Editor.
- First, import your file into Video Editor and it will show in the timeline section.
- Choose it and click the "Mosaic" button in the toolbar, or right-click the video and select "Mosaic" from the menu.
- When you click "Add," a yellow rectangle will appear on the left.
- Adjust the size of the rectangle to where you want it to blur.
- Once you apply mosaic, your whole video from the start to the end with be edited.
- After clicking "OK," you can play the effect in the right window to see how it looks.
Mute Video
- Choose "Audio Detach" by right-clicking on the video in the timeline.
- In the timeline, you'll see an audio track.
- Delete the audio track by right-clicking it.
- Once the audio is deleted, you will hear no sound in your video.
Mute a segment
- Select the clip and click the "Set duration" button in the toolbar to set the duration.
- Click the “Mic” icon in the toolbar to silence the selected segment of the video.
- Only this section of the video will be saved, and it will be muted when exported.
Add Text in Video
- Select "Text" from the left-hand menu.
- Select your preferred style of text from the total of 43 effects.
- Once you select the text, it will start downloading.
- Then click the “+” icon on the downloaded text.
- The text will display in the timeline soon after you click the "+" symbol.
- To add text to a specific section of the video, select and set the runtime of your video as well as the text effect.
- To set the duration of the text on video, choose "Set duration".
Alternatively, you can adjust the duration of each file in the timeline by moving the mouse to the edge of the file. If you see a double arrow, move it to the left or right to lengthen or shorten the time period.
Custom Text Settings
- To change the size and font of the text, double-click on the text track in the timeline area.
- It will bring up a new panel.
- You can change the fonts, size, type, align, opacity, and color of your text in the new panel.
- Choose "Preview" to see the video effects before exporting the file.
You can include as many texts as you want in your video.
Add Filters
The filter templates are found under the 'Filter' tab on the left side.
- To apply the selected filter to your movie, drag it to the Filter timeline.
- Click the '+' button, or right-click the filter and choose 'Add to Project.'
- Move the mouse over the Filter's edge until a double arrow appears and set it in the timeline.
- To set the starting and ending point of the filter, hold down the left mouse button and drag the mouse left or right.
- You can also specify the starting and finish times by selecting the filter in the timeline and clicking the 'Set Duration' (clock icon) on the toolbar.
Add Transition
- You can choose your preferred transition style in the left panel
- Drag it to the end of the video to transition to another video clip
- You can also right-click the style and choose '+ Add to Project' to apply the transition effect to the video clip.
- Simply choose 'Apply random transitions' if you wish to apply various transition effects to video segments.
- Select the transition template and click “Apply to all” to apply the same transition effect to the whole clip.
Add Video Overlay
- On the left-hand menu, choose "Overlay."
- Add your favorite effect to your video by downloading it.
- To set the duration of an overlay, select it in the timeline section and click the "clock" symbol.
- Move the mouse to the edge of this overlay if you choose.
- You can alter the duration of a double arrow by moving it to the left or right.
Add Elements
- On the left, click the "Elements" button.
- When you choose your desired element it starts downloading the element and adding it to your video.
- Select the element in the timeline and click the "Set duration" button in the toolbar when you see it.
- Alternatively, you may adjust the duration of elements by moving your mouse to the edge of the element in the timeline section and moving a double-arrow icon.
- Then, in the timeline section, double-click or right-click the element and adjust it using the choices available, such as "Speed," "Reverse," "Rotate," and so on.
- Click "OK" to apply the element.
- You can adjust and change the location of the elements to the length of your imported video.
Add Image, Logo, or Watermark
- To add photos, logos, or watermarks to the Media zone, click “Import”.
- You can add your desired picture/logo/watermark by clicking the '+' button, or by right-clicking and choosing “Add to Project”.
- The image or watermark will be added at the end of the video clip automatically.
- You may easily drag an image to the PIP timeline if you want to use it as a watermark or logo that appears in the film.
- To change the motion and mask of a picture, double-click it or right-click it to crop the picture and drag it to the correct location on the video.
- Then, on the timeline, pick the picture, slide the mouse over the border until a double arrow appears.
- Drag the arrow to the left or right or select the picture on the timeline and then click 'Determine Duration' (clock icon) to set the start and finish times.
Export File
To export your edited video, click on the 'Export' button in the toolbar. DVDFab allows you to export your videos in different ways, including;
Exporting as a Project File
You must know that when you store the file as a project, it is not a genuine media file.
To save the finished file as a project for additional modification;
- Choose “File” in the menu
- Select “Save as”
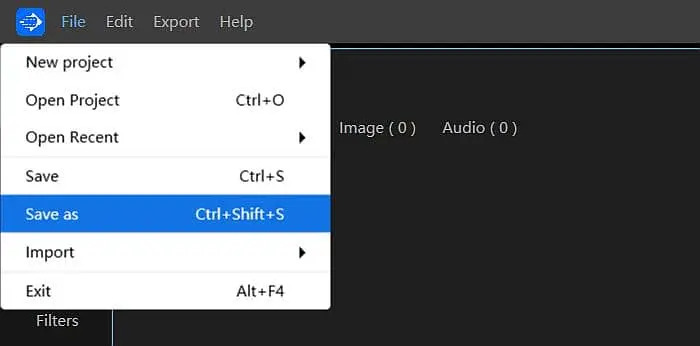
If you want to edit your video later, you can just launch the software and start editing from where you left.
Export as a Video File
Video Editor is compatible with various video formats like MP4, AVI, WMV, MOV, MKV, and GIF, to name a few.
- Choose “Save” in the file from the menu.
- It offers advanced settings to rename the video file.
- You can choose the output file directory.
- Select the video format.
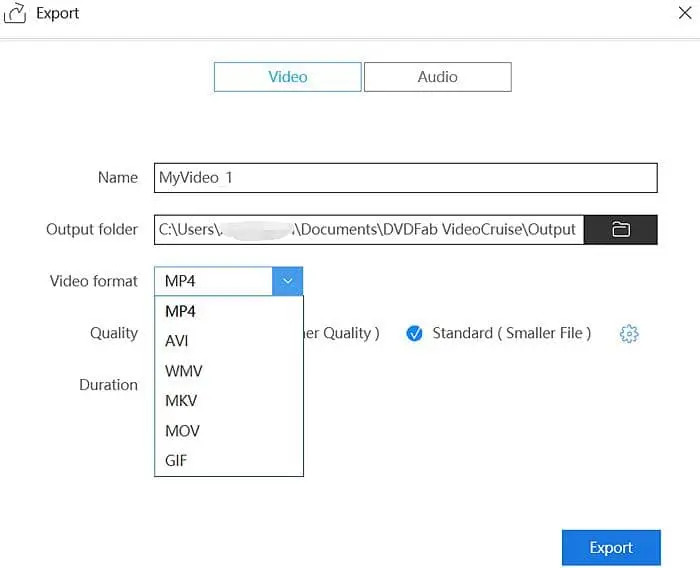
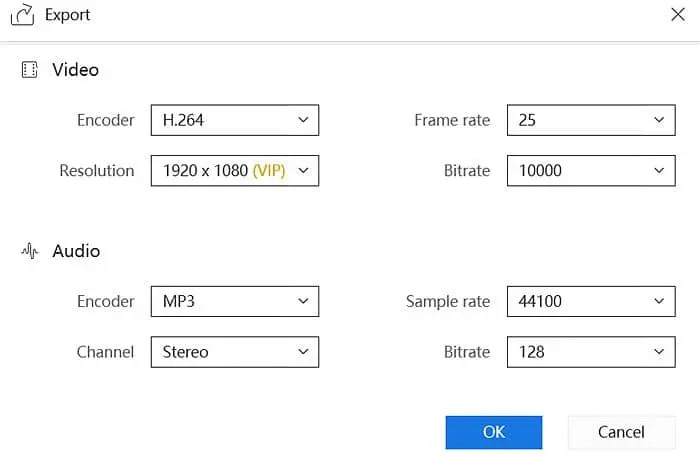
In “Wrench symbol” you can customize the settings to your liking from video codec to the frame rate, resolution, bitrate, and much more.
Export as an Audio File
If you want to export your file as an audio file, you may choose between MP3 and AAC. In the “wrench icon”, you can adjust advanced audio settings like;
- Renaming the audio file
- Output destination
- Audio format
- Encoder
- Sample rate
- Channel
- Bitrate
You can also trim mp4 online, convert, and export it in any format you like.
Conclusion
If you are looking for an all-in-one video editor and converter, DVDFab Video Editor is an all-rounder tool for you to make the most out of your videos. Whether you want to trim mp4 file or edit your videos, DVDFab offer all the essential and advanced tools in one place. By choosing the right software you can eliminate the limitations when it comes to editing videos professionally. DVDFab standard and pro versions offer essential and basic features and tools along with a convenient user interface.
Discover the best free ISO burners for enhancing playback of ISO files on your home theater system. This review covers the most reliable and user-friendly options available, making it the perfect resource for anyone who wants to create DVD discs with ease.
By Diana - Sep 4, 2024
Are you seeking a method to revamp your outdated DVD collection? Here we will introduce the top 6 easy-to-use DVD to MKV converters that can convert your DVDs to high-quality and lossless MKV files and store them on your computer or an external hard drive.
By Wenny - Jun 27, 2025
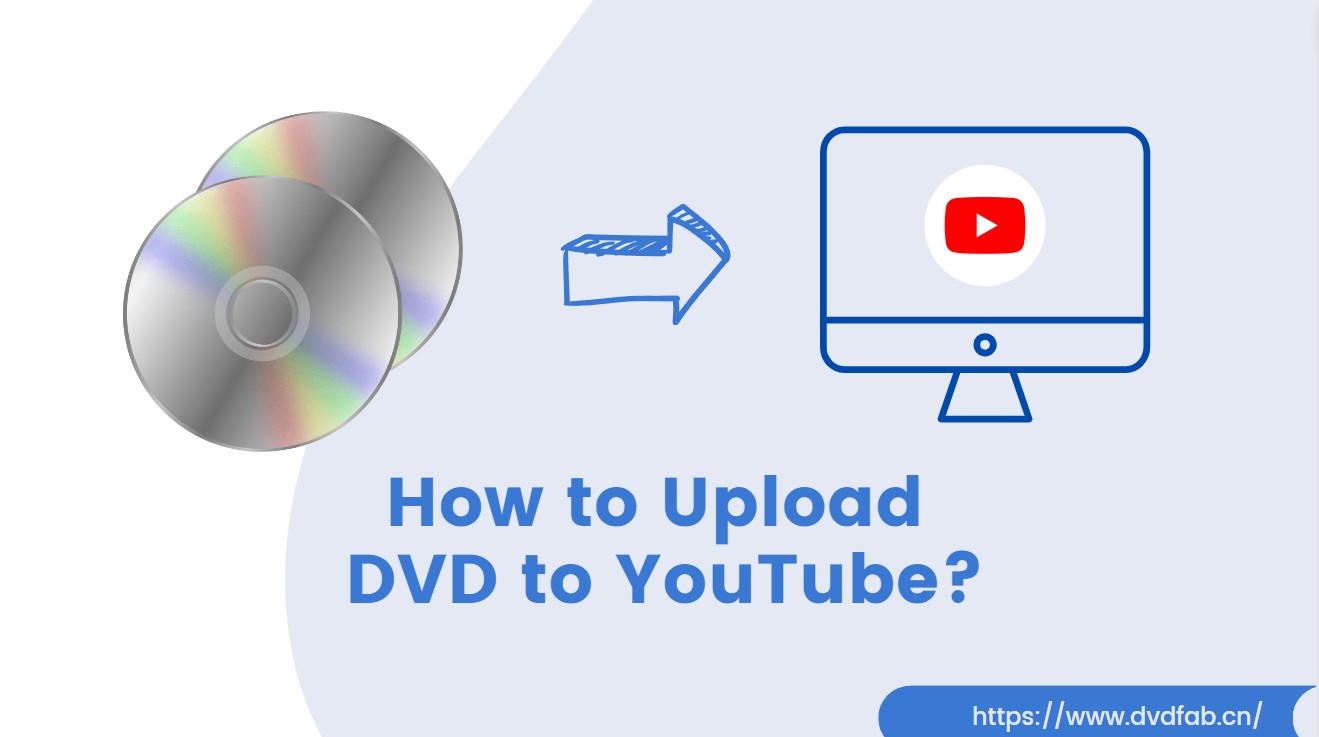
Uploading your DVD to YouTube is an excellent way to share it with the world. By following the steps outlined in this tutorial, you can easily convert and edit your DVDs and upload them to YouTube in no time.
By Wenny - Sep 20, 2024
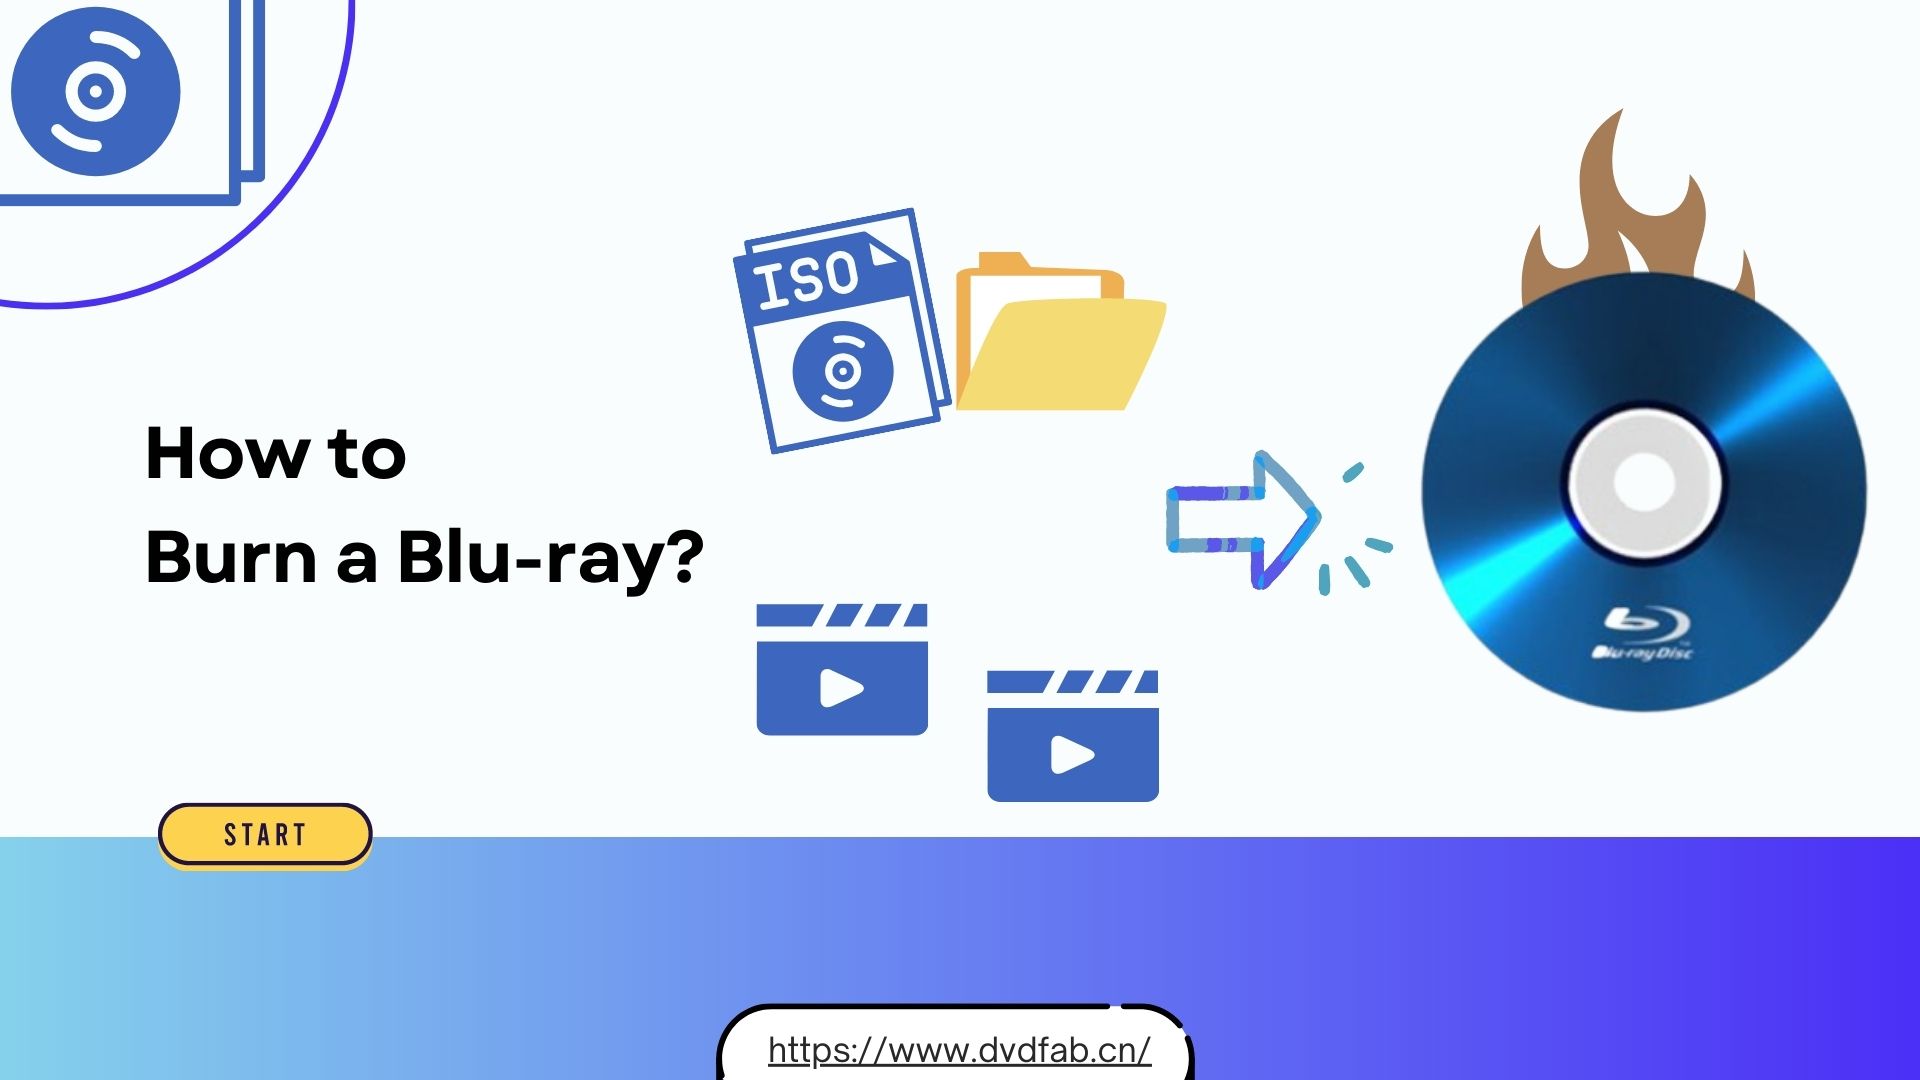
Burning a Blu-ray disc is a great way to preserve your favorite movies or home videos in high definition. This guide walks you through the best Blu-ray burning software and methods to create high-quality Blu-rays on both Mac and Windows.
By Diana - Jul 25, 2025