How to Upload a DVD to YouTube: Convert, Encode, and Upload Without Errors

Summary: Uploading a DVD to YouTube isn't just about ripping the disc; it's about creating a file YouTube accepts, with stable quality and no upload errors. This guide explains how to convert your DVD into a YouTube-ready video, highlights the supported formats and recommended encoding, and clarifies time and size limits.
Table of Contents
Many people still keep favorite memories, school plays, or old home movies on DVDs, and discs burned or pressed in the 2000s do not stay readable forever. In a widely discussed r/DataHoarder thread about salvaging a personal DVD collection, several commenters pointed out that DVD-Rs in particular can develop read errors as the dye layer ages, so getting the content off the disc sooner rather than later matters more than most people assume.
Uploading a DVD to YouTube is not as simple as dragging the disc into a browser tab, though. YouTube only accepts a specific set of digital video formats, and a raw DVD structure is not one of them. Before you can use a DVD to YouTube converter to get your files online, you first need to rip DVD into a format YouTube recognizes. This guide covers which formats and encoding settings YouTube expects, how to convert a DVD into a YouTube-ready file, and how to upload it without running into format or length errors.
What Files can YouTube Upload
When preparing a DVD for YouTube, the most important step is to make sure your converted file matches the accepted formats and recommended encoding parameters. YouTube officially supports a wide range of container formats, including MP4, MOV, AVI, WMV, FLV, MPEG-PS, MPEG-4, 3GPP, WebM, DNxHR, ProRes, CineForm, and HEVC (H.265).
Recommended Encoding Settings
In addition to choosing the right container, YouTube also recommends specific encoding settings to preserve video quality and minimize upload issues.
| Resolution & Frame Rate | Container | Video & Audio Codec | Bitrate Range |
| 1080p @ 30fps | MP4 | H.264 High Profile, AAC-LC, 48 kHz | 8-12 Mbps |
| 4K @ 30fps | MP4 | H.264 High Profile, AAC-LC, 48 kHz | 35-45 Mbps |
| 4K @ 60fps | MP4 | H.264 High Profile, AAC-LC, 48 kHz | 53-68 Mbps |
These video bitrate ranges apply whether you encode in H.264 or in HEVC (H.265), which is also on YouTube's accepted list. HEVC typically produces a file 30 to 50 percent smaller than H.264 at similar visual quality, which is worth considering if your ripped DVD footage is going into a large 4K archive. For audio, YouTube's own guidance calls for AAC-LC at 48 kHz, with 384 kbps for stereo tracks and 512 kbps for 5.1 surround. Most DVD rips only carry stereo or basic surround audio, so staying within these bitrates is rarely a limitation.
One thing the table does not cover is aspect ratio. Many older home-recorded or TV-sourced DVDs were encoded at 4:3, and uploading that footage at its original 4:3 ratio is fine as long as you do not stretch it to fill a 16:9 frame. YouTube's player adds black bars on the sides instead, which keeps the picture from looking distorted.
💡For the full list of formats and the most up-to-date encoding recommendations, see the Supported YouTube file formats - Google Help.
How to Convert DVD to YouTube-Friendly Files
To upload your DVD content, you first need to convert it into a format YouTube accepts. Users digitizing large personal DVD collections on r/DataHoarder generally recommend ripping each disc losslessly first and only encoding to the final delivery format once you are satisfied with the copy, which avoids stacking a second round of compression on top of a rushed one-step conversion. DVDFab DVD Ripper covers both parts of that workflow: it can export discs, ISO files, or VIDEO_TS folders directly into MP4 and other YouTube-ready formats, or output a high-bitrate master first if you want to keep an unconverted archive copy before making the YouTube-ready version.

Friendly reminder: Please do not upload commercial DVD clips without proper permissions or licenses to YouTube. Always adhere to the guidelines provided by these platforms for user content.
Why Choose DVDFab DVD Ripper
DVDFab DVD Ripper is built around getting content off physical discs and into formats other platforms, including YouTube, will actually accept. Instead of treating ripping as a single one-click export, it separates disc reading, format conversion, and light editing into distinct steps, which matters when you're working through older home-recorded discs that may need trimming, subtitle cleanup, or a specific bitrate target before they're upload-ready.
- Reads recent DVD releases and handles common copy protection without extra plugins
- Exports DVD to MP4 using H.264 video and AAC-LC audio, matching YouTube's recommended codecs
- Removes interlacing artifacts from DVDs and lets you fine-tune resolution, frame rate, and bitrate
- Keeps, removes, or extracts subtitles to SRT, and lets you pick which audio tracks to use
- Batch-converts multiple discs or titles in one queue, useful when digitizing a whole DVD collection
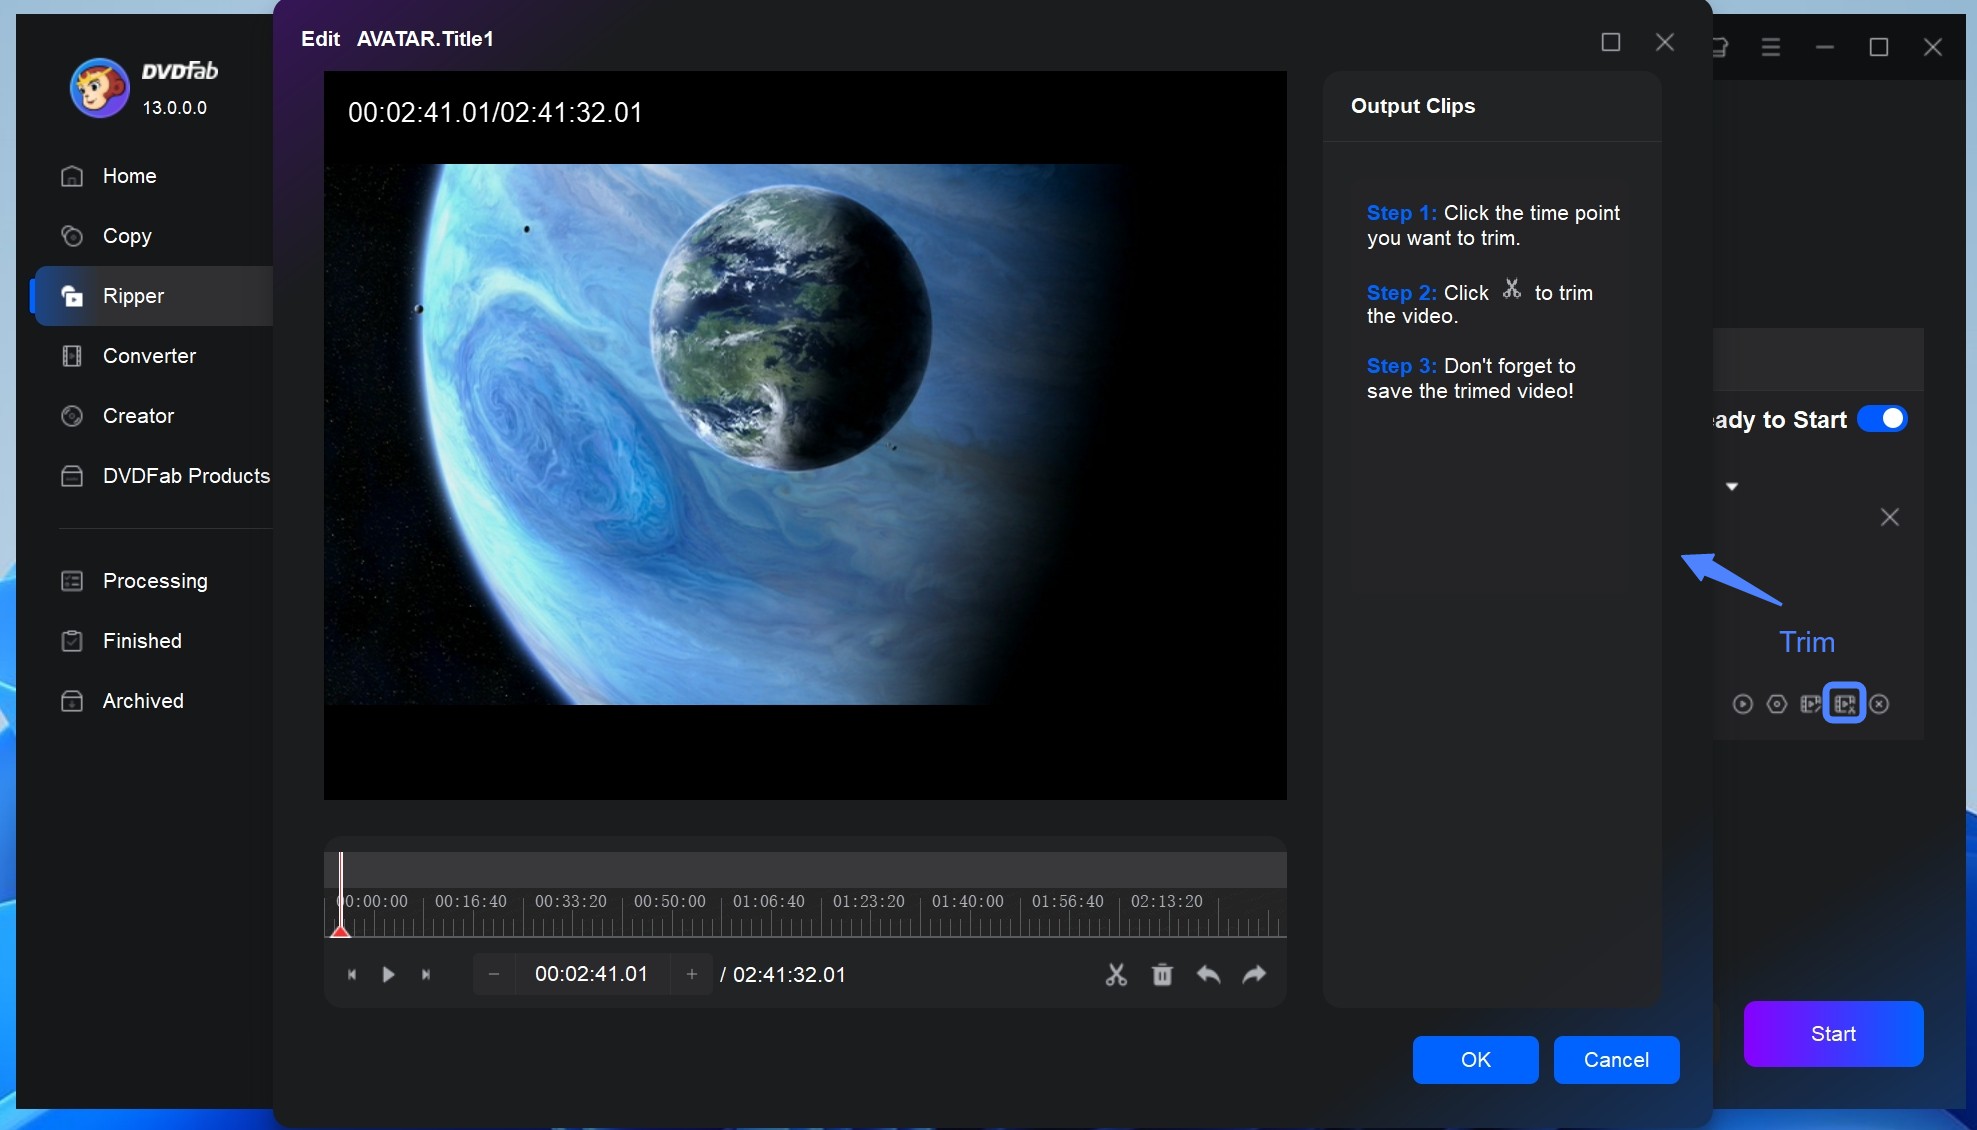
- Includes basic video editing (crop, trim, merge, watermark) to prep clips before export
How to Convert Your DVD for YouTube using DVDFab DVD Ripper
Step 1: Free download and install the latest version of DVDFab on your computer
Free Download Windows 11/10/8.1/8/7
Free Download macOS 10.13 - 15.x
Step 2: Select a module and import your DVD
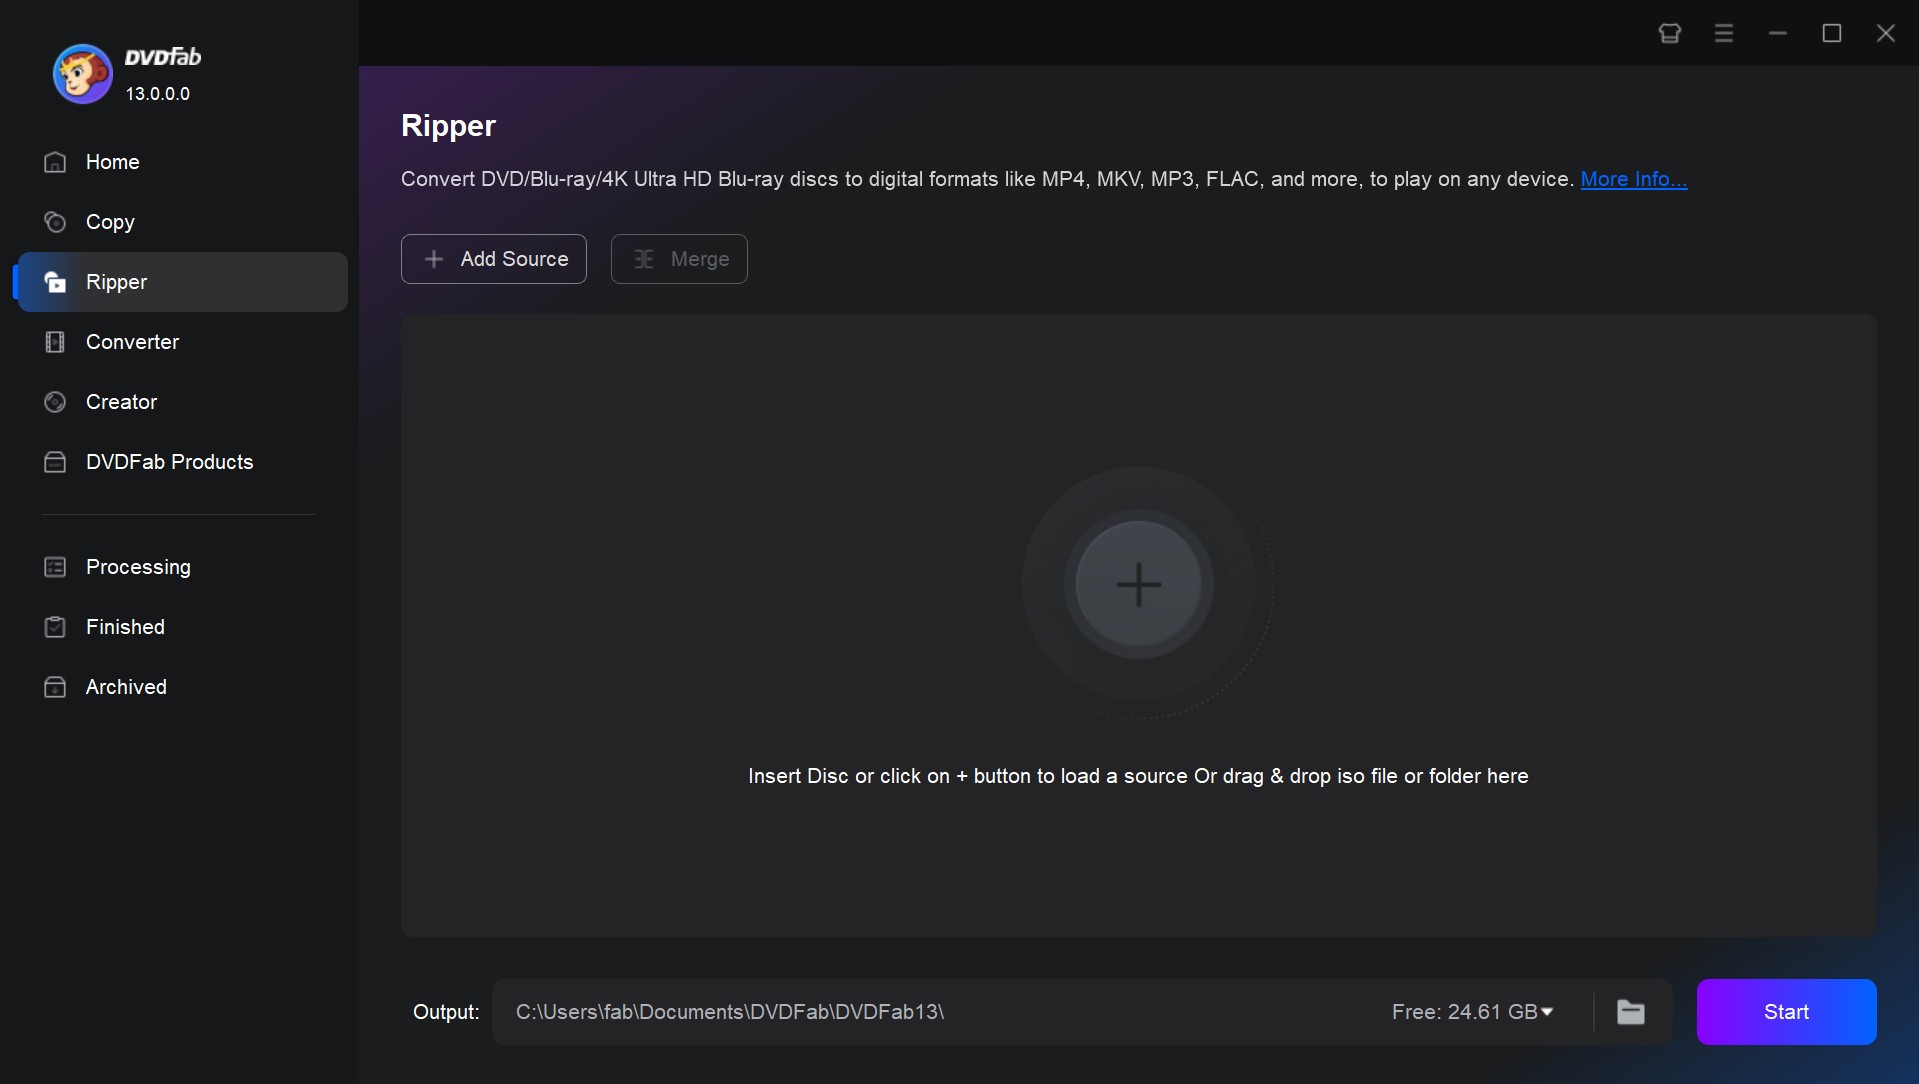
Open the program and choose the Ripper module. Insert a DVD into your optical drive, or add ISO/folder sources with the "+" button.
Step 3: Select titles, audio, and subtitles
Pick the main movie or desired chapters. You can choose preferred audio tracks and subtitles, remove unnecessary ones, or extract subtitles into an SRT file.
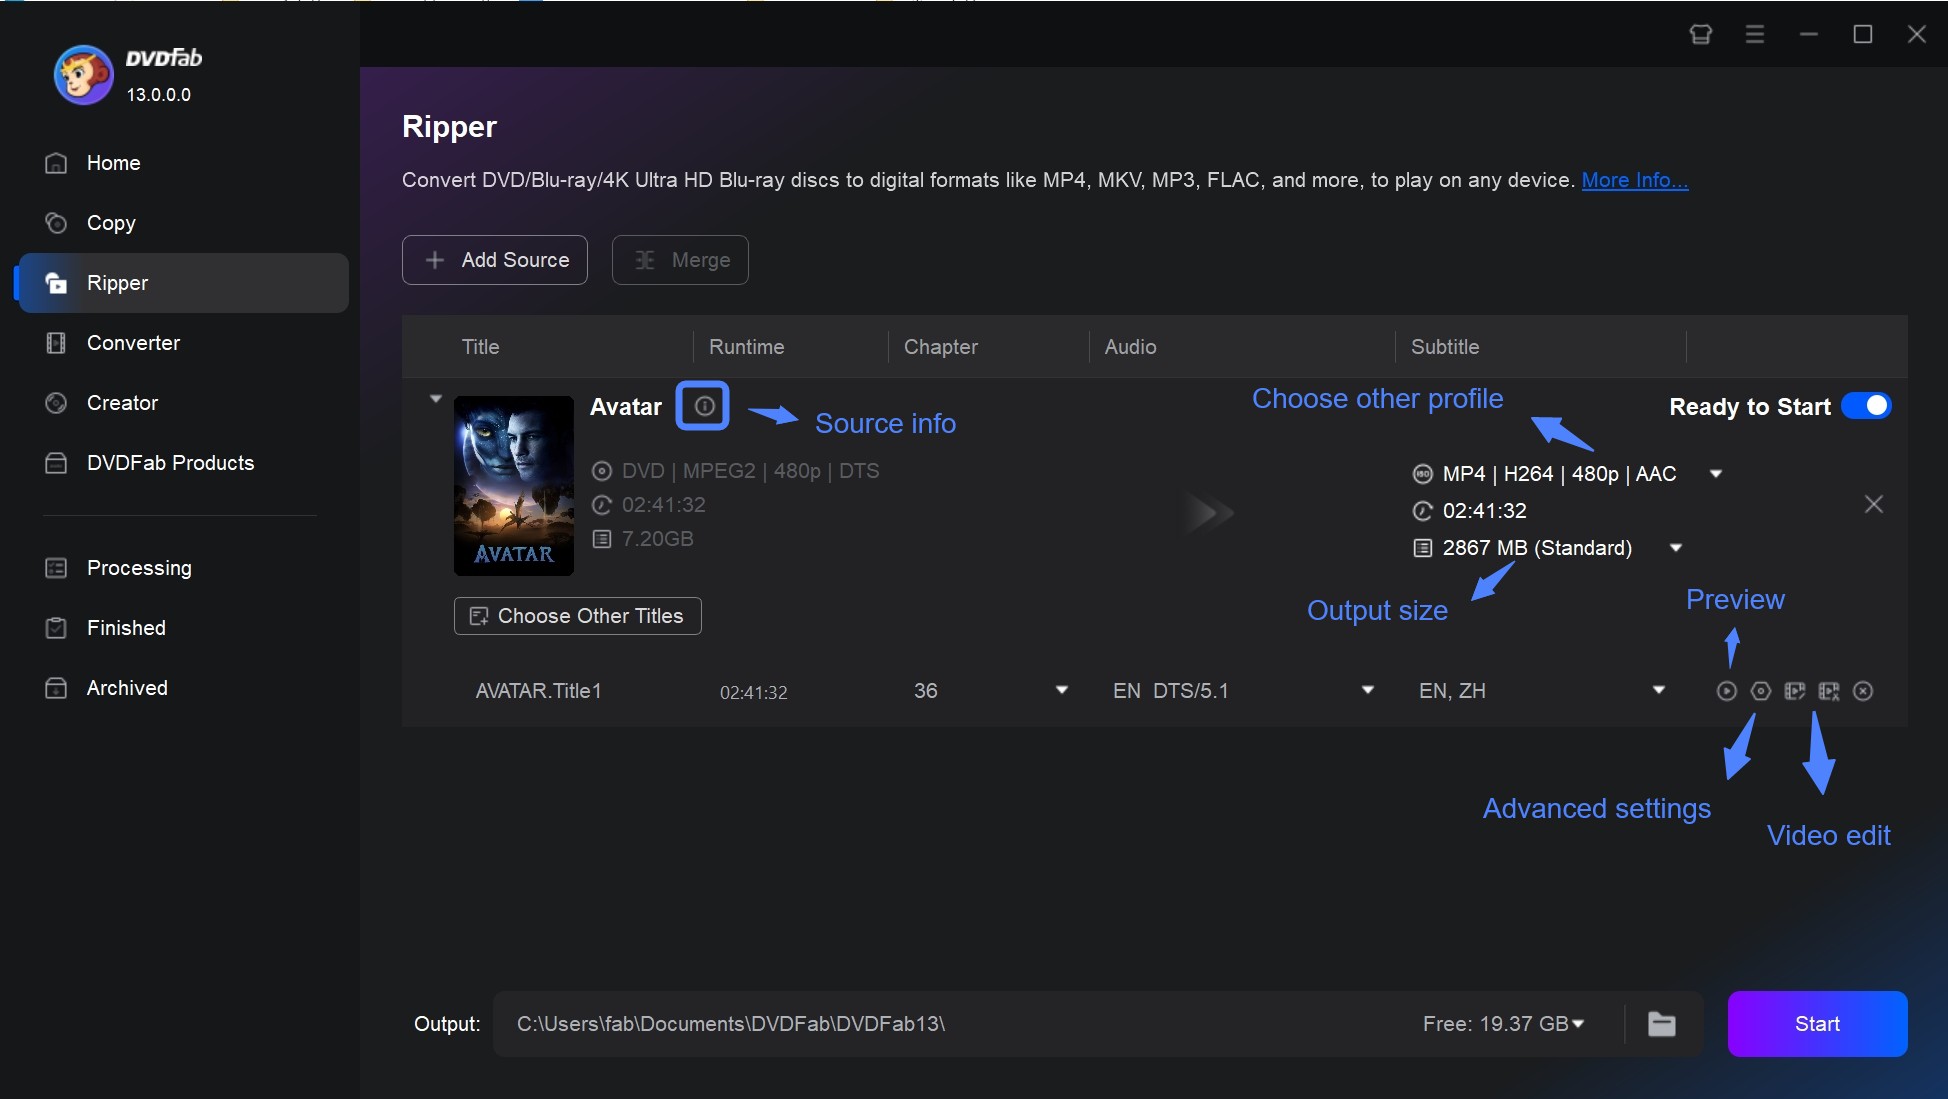
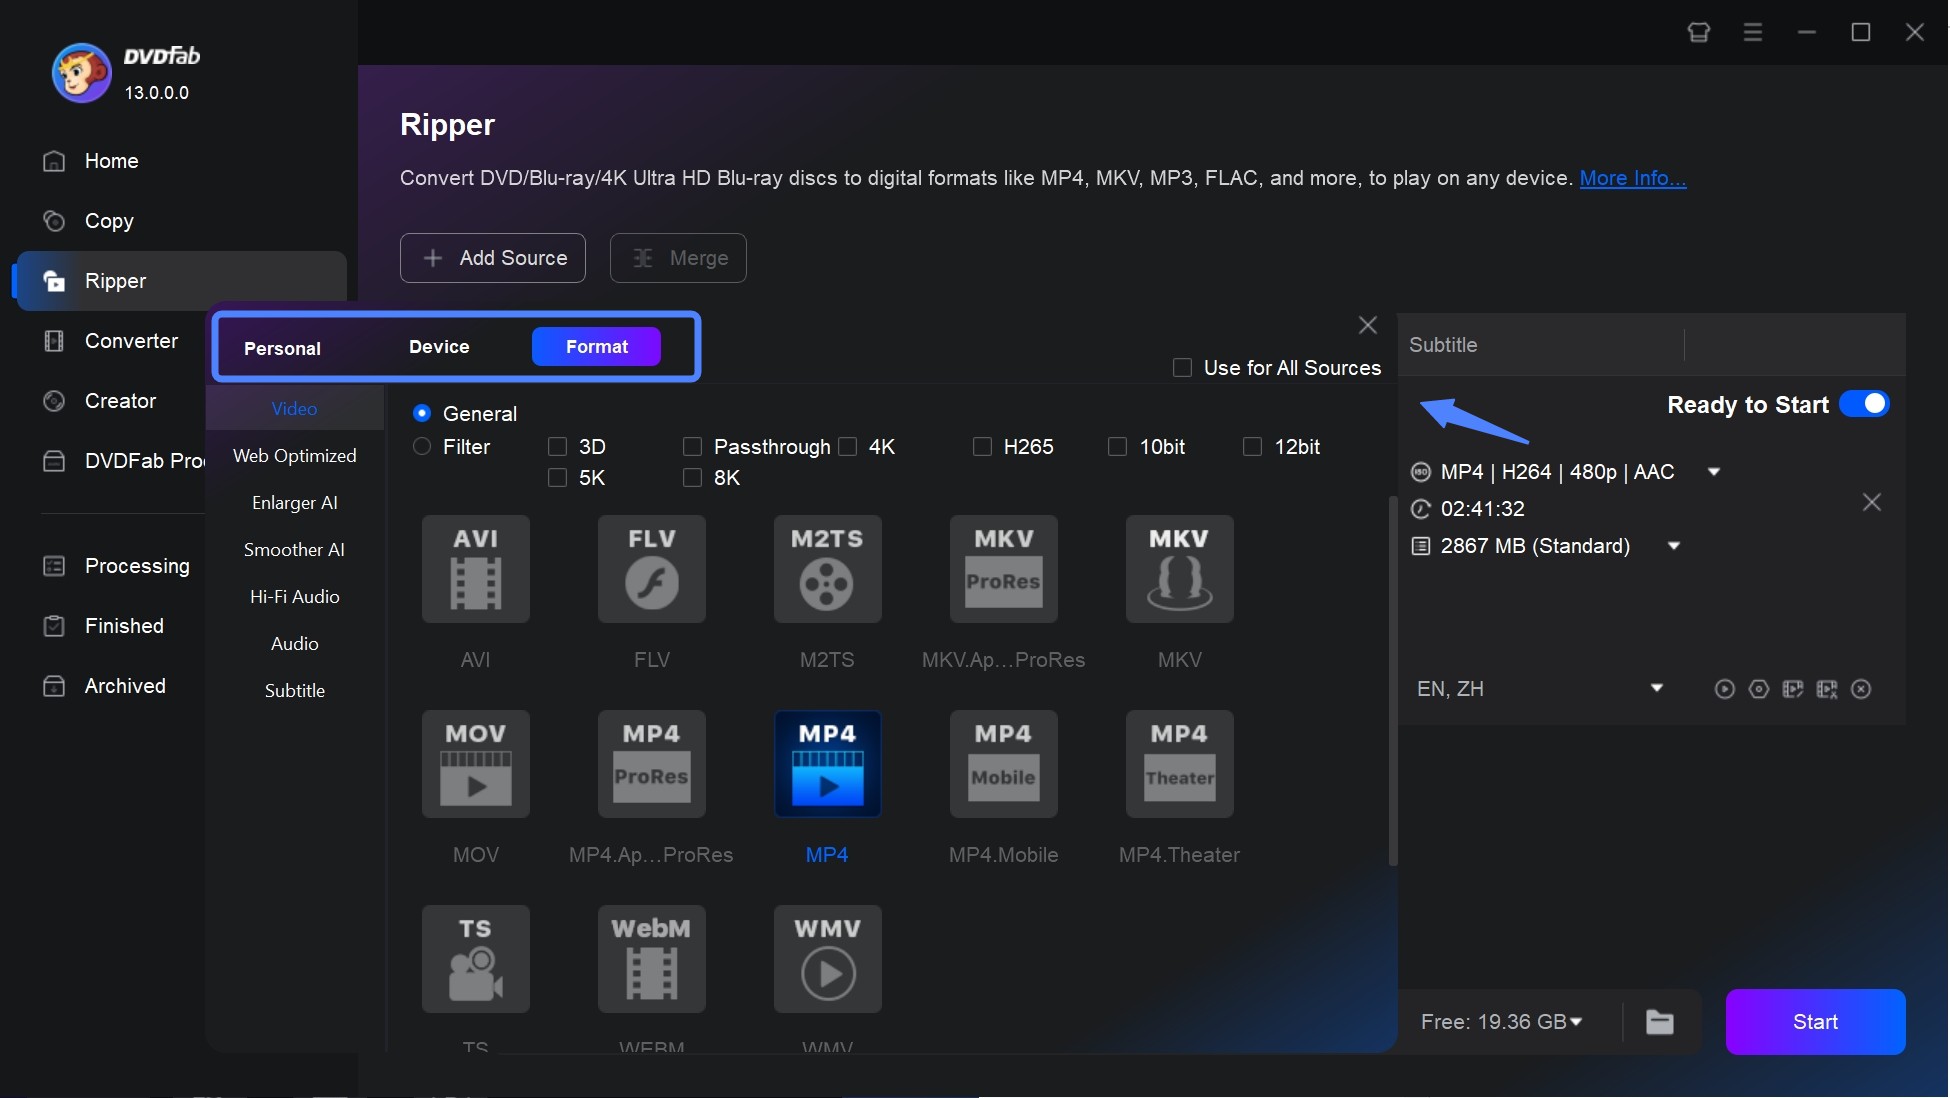
Step 4: From the profile menu, select your preferred YouTube-supported video format.
Step 5: Edit your DVD videos (optional)
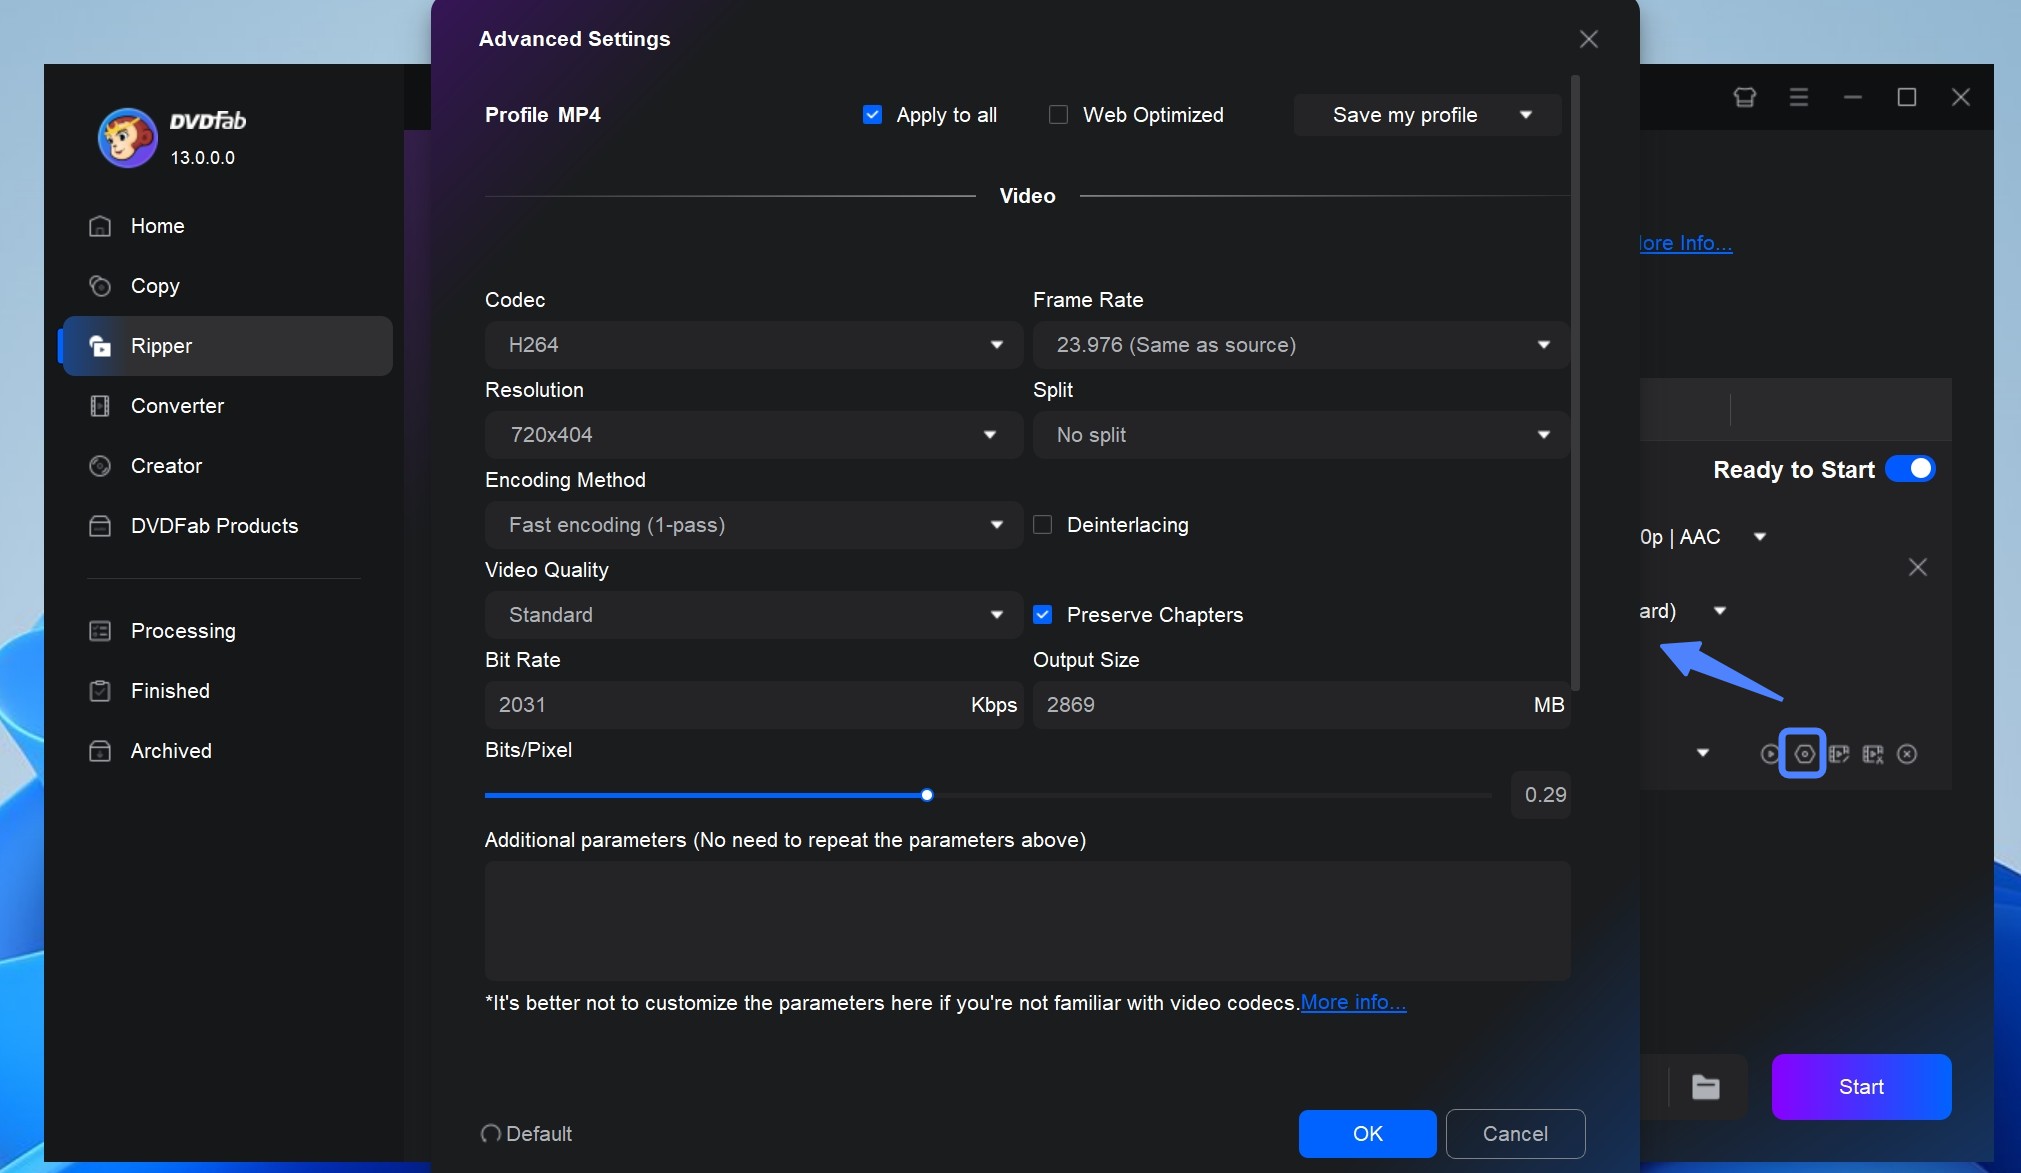
There are two options for your to customize a DVD video. The Advanced Settings allow you to set the parameters of Video, such as Codec, Frame Rate, Resolution, Encoding Method, and Video Quality.
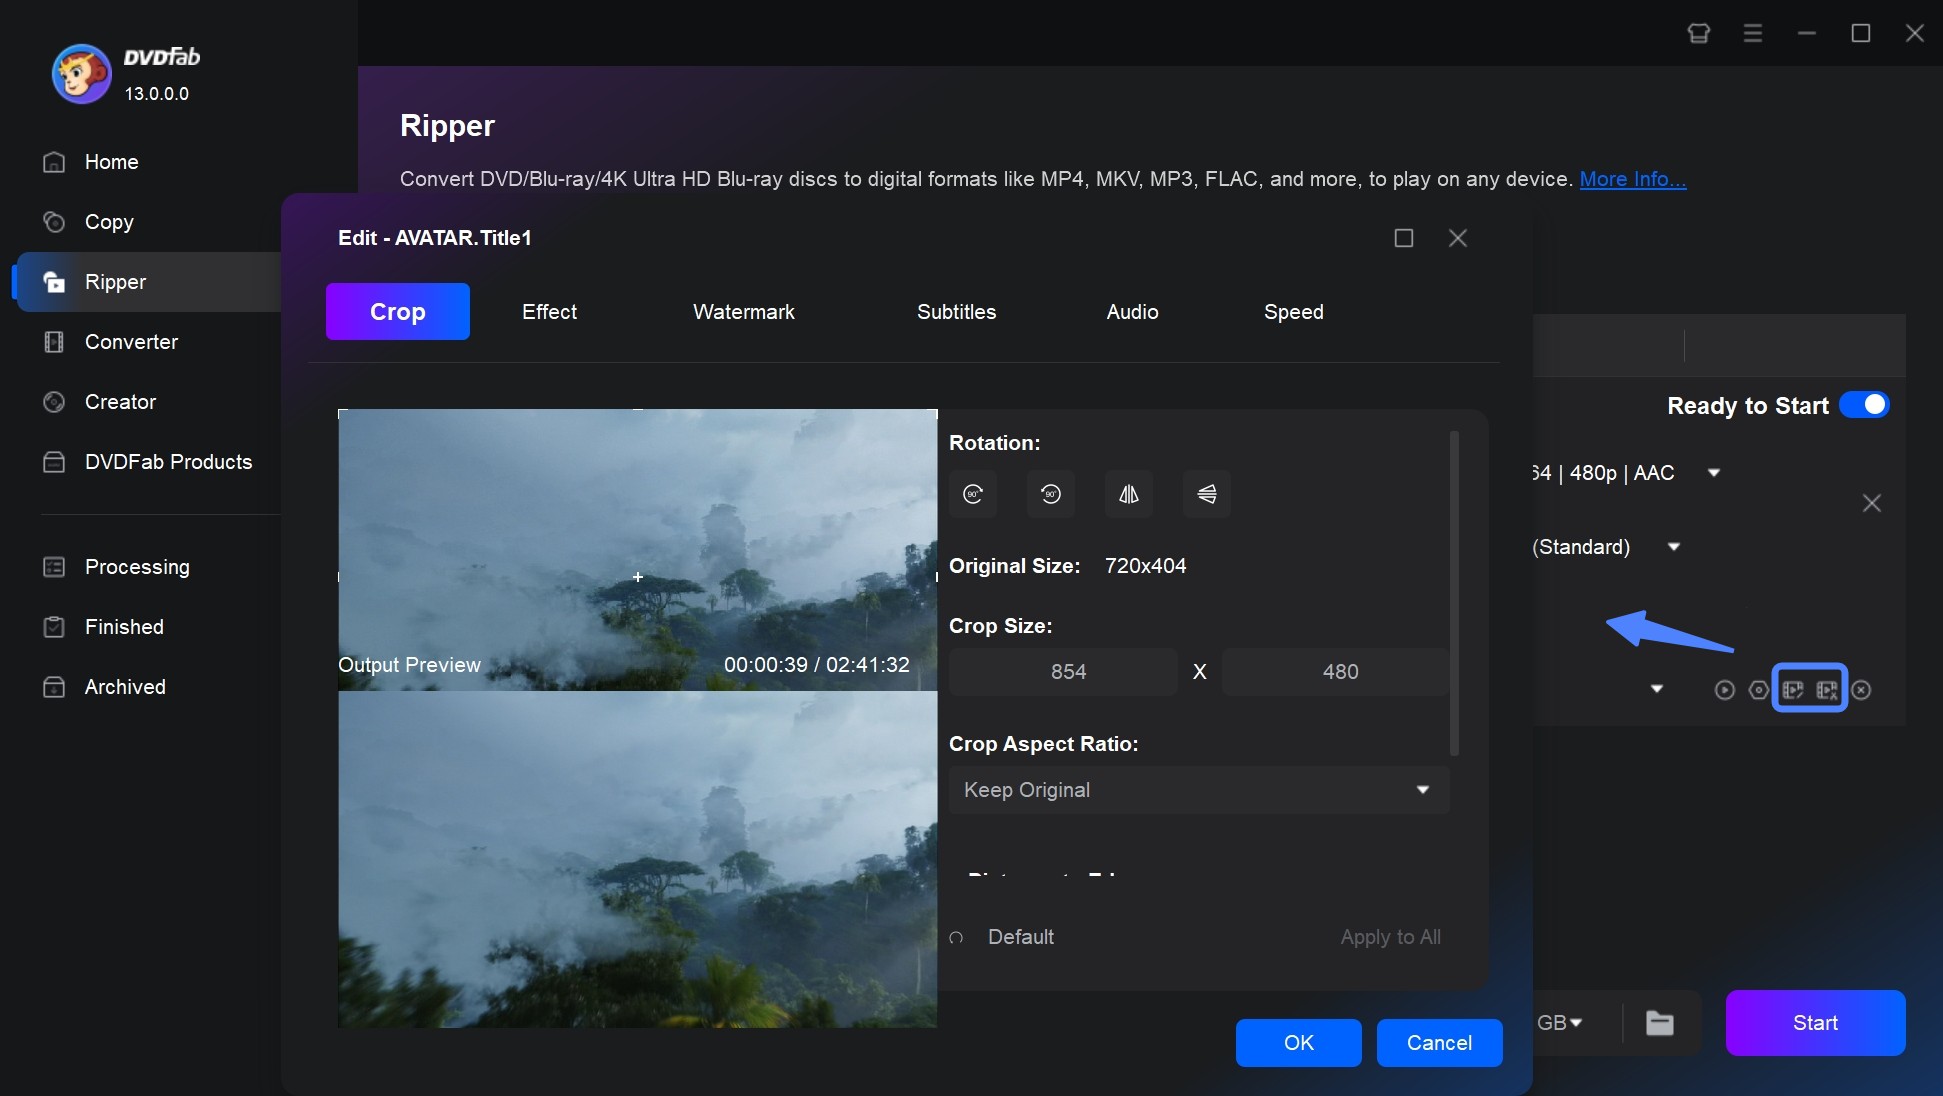
The Video Edit option enables you to crop, trim, merge video, add watermarks, effects and subtitles, and even adjust video color as you like.
Step 6: Set output and start conversion
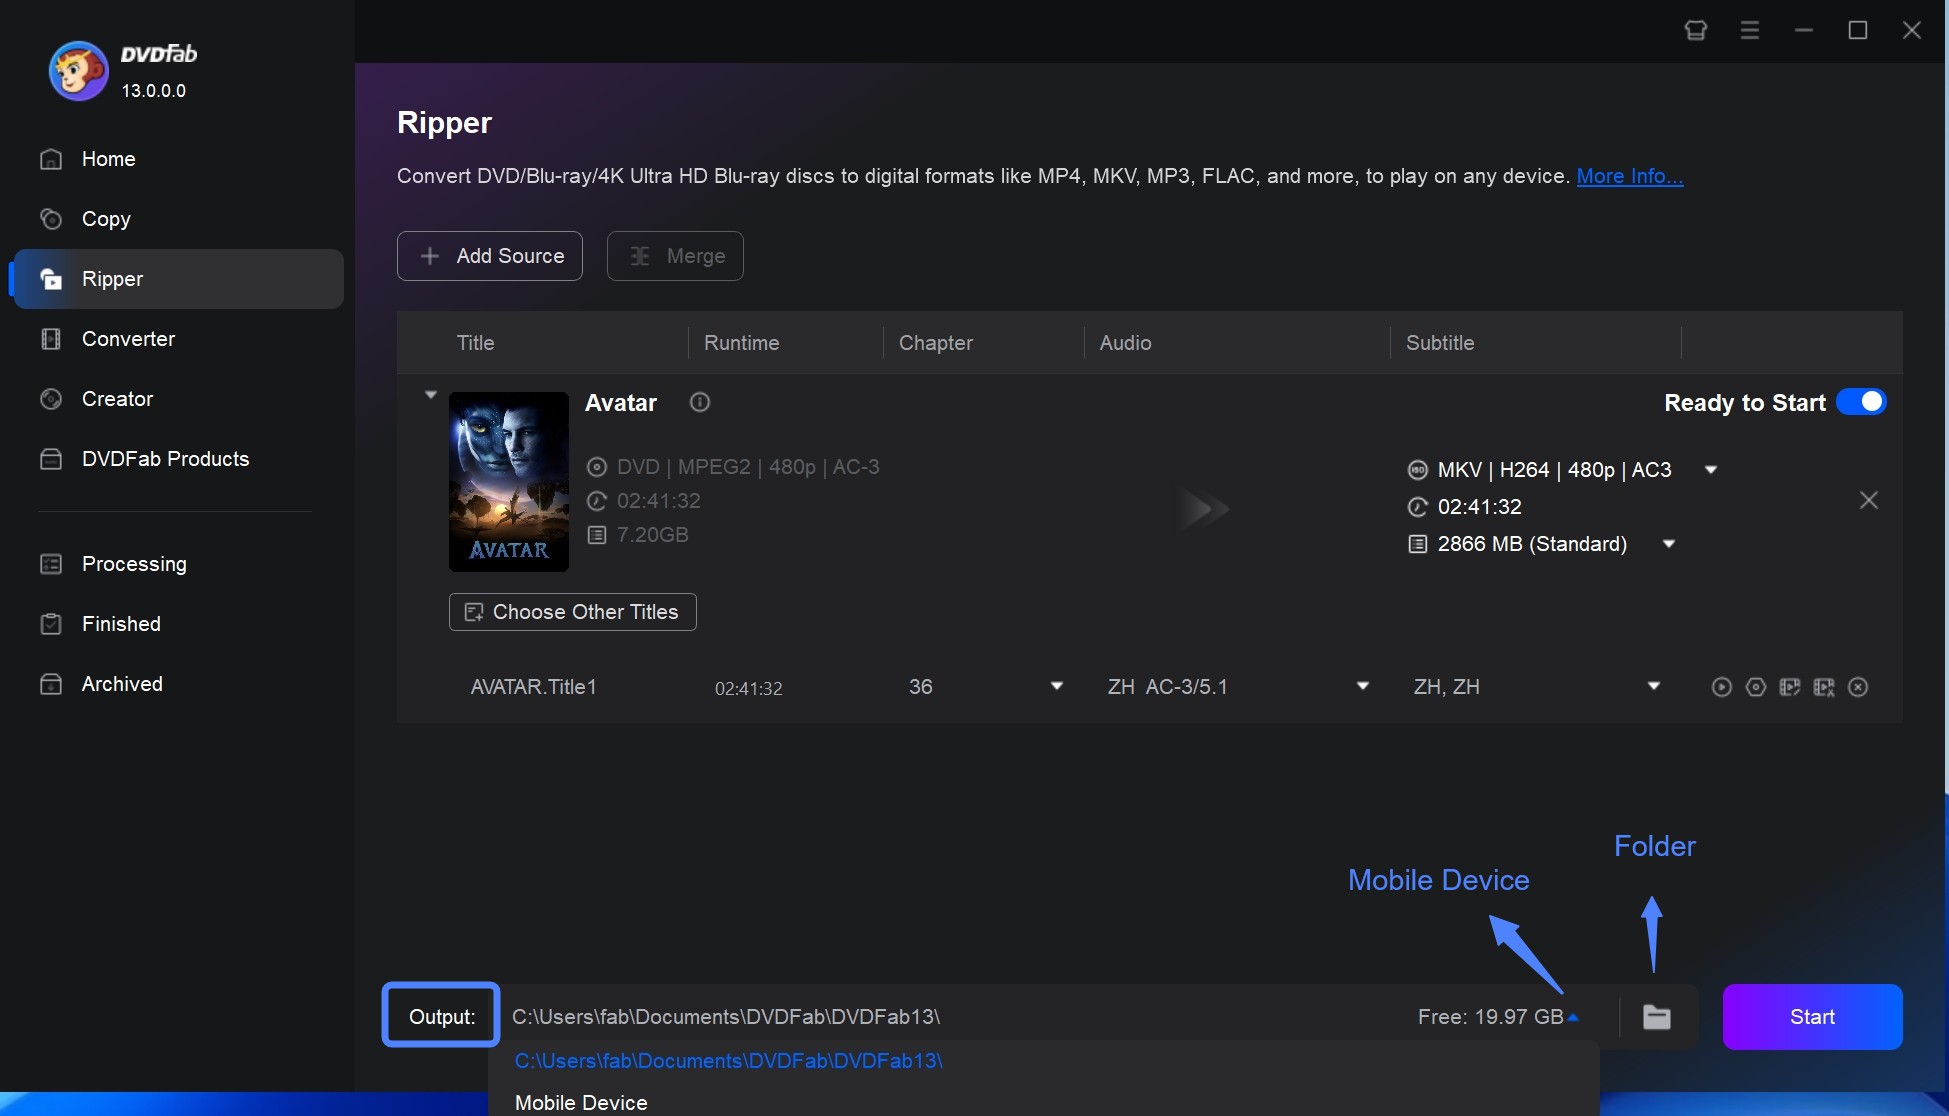
Choose a destination folder and click Start. The program will convert your DVD to AVI, MOV and other video files that can be uploaded directly to YouTube.
How to Upload the Ripped DVD Video to YouTube
Once your DVD has been converted into a YouTube-supported format, the last step is to upload it through YouTube Studio so it processes correctly and plays back on every device.
Upload a video to YouTube from computer:
- Log in to YouTube Studio with your Google account.
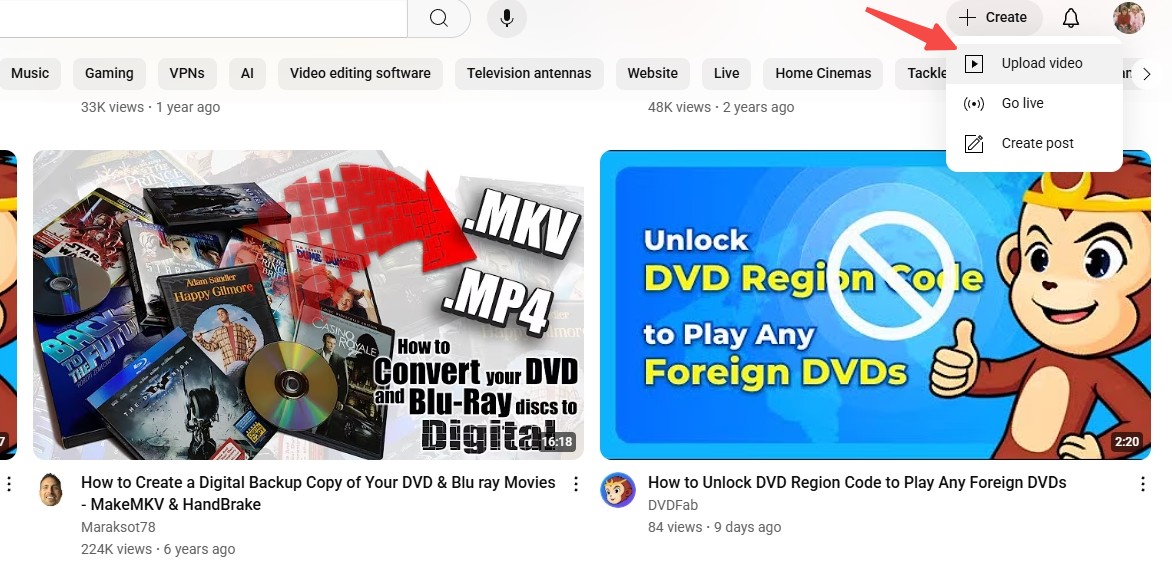
- In the top-right corner, click the "Create" (+) button and choose Upload Video.
- Click "Select Files" and browse to the folder where you saved your ripped DVD video. Choose the file to start the upload.
- Enter details such as the video title, description, tags, and a custom thumbnail. Make sure the description clearly explains the content.
- Choose visibility settings (Public, Unlisted, or Private) depending on how you want to share it.
- Publish and allow YouTube to process the video. For longer files or HD quality, processing may take extra time before all resolutions are available.
YouTube Length & Size Limits
When uploading videos transferred from copy-protected DVD, you also need to pay attention to YouTube's duration and file size restrictions.
Length & File Size Rules
As of early 2026, YouTube sets the following default limits:
- Length: Unverified accounts are limited to 15 minutes per video.
- Extended Uploads: Verified accounts can upload videos up to 12 hours long or 256 GB in size (whichever is smaller).
This means that if you rip an entire DVD (often 2 hours or more), you'll need account verification to publish it as a single file. Otherwise, you can split the video into shorter clips.
Upload Longer Videos: Account Verification
To enable longer uploads, YouTube requires a quick verification process:
- Go to youtube.com/verify while logged in.
- Provide a phone number and confirm with the verification code.
Once verified, your account can upload videos beyond 15 minutes, up to the 12-hour / 256 GB threshold.
- Cut out intros, credits, or blank sections. Tools like DVDFab's built-in editor can trim clips before uploading.
- Follow YouTube's recommended encoding (e.g., 8–12 Mbps for 1080p) instead of using excessive settings.
- If the full DVD exceeds limits, divide it into multiple parts and upload them as a playlist.
FAQs
Q
Is uploading a DVD to YouTube legal?
Uploading a DVD to YouTube is fine when you own the rights to the content, such as home videos, personal recordings, or discs you created yourself. Commercial DVDs, purchased movies, and TV recordings are protected by copyright, and uploading them without permission from the rights holder is not allowed, even if the video is set to Unlisted or Private. YouTube's Content ID system scans uploads for copyrighted audio and video, and a match can get the video muted, blocked, or claimed regardless of its visibility setting.
A
Q
Will YouTube's Content ID system flag video ripped from a TV-recorded DVD?
It can. Content ID matches audio and video against a database of copyrighted material, so home recordings that captured broadcast TV, movies playing in the background, or copyrighted music will often get flagged even when the disc itself was never sold commercially. A match usually results in the video being muted, blocked in some countries, or monetized by the rights holder instead of removed outright. Marking the video Private or Unlisted does not exempt it from this scan, since Content ID checks all uploads regardless of visibility.
A
Q
What are the best YouTube upload settings for ripped DVDs?
For DVD content, the most reliable upload option is MP4 with H.264 and AAC. Use progressive encoding, keep the frame rate the same as the original DVD, and set the resolution to 1080p if possible. These settings result in shorter processing times and consistent quality across devices.
A
Q
Can I convert YouTube Videos to DVD?
Yes, you can convert YouTube videos to DVD by using a YouTube to DVD converter. These converters typically allow you to download videos from YouTube and then burn them onto a DVD. First, you'll need to ensure you have the right to download the video, considering copyright rules. Then, using a YouTube to DVD converter, you can transfer your favorite videos onto a DVD for personal use. Choose a converter that supports high-quality video output so the playback quality holds up.
A
Conclusion
Getting a DVD onto YouTube comes down to two things: converting the disc into a format and bitrate YouTube actually supports, and keeping the upload inside YouTube's length and size limits for your account type. DVDFab DVD Ripper handles the conversion step, from exporting the disc into MP4 to adjusting resolution, frame rate, and bitrate to match the settings covered above. Once the file is ready, upload it through YouTube Studio, choose the visibility setting that fits the content, and verify your account first if the file runs longer than 15 minutes. If you're working through a stack of older DVDs, rip each one losslessly before converting it, so a slow disc or a scratched section doesn't force you to redo the whole process.

 Free DVD Decoder for Windows XP and Windows 11: 3 Ways to Play DVDsBy Diana Smith - Sep 23, 2026
 How to Compress ISO Files: 4 Methods for Storage, Playback, and ArchivesBy Diana Smith - Sep 16, 2026
 How to Rip DVD to Facebook and Upload the Video in 2026By Diana Smith - Sep 15, 2026
![How to Rip DVDs for Plex: Guide to Formats, Tools, and Library Setup [2026]](https://images.dvdfab.cn/media/Screenshot_2026-09-08_at_18.53.34_j36v3l.png/public) How to Rip DVDs for Plex: Guide to Formats, Tools, and Library Setup [2026]By Diana Smith - Sep 8, 2026
How to Rip DVDs for Plex: Guide to Formats, Tools, and Library Setup [2026]By Diana Smith - Sep 8, 2026