How to Burn M4V to DVD on Windows & Mac: 3 Easy Ways

Summary: To burn M4V to DVD for playback on a regular DVD player, use DVD-authoring software instead of copying the M4V file to a data disc. DVDFab DVD Creator provides DVD-5/9 output, customizable menus, subtitle controls, and disc/ISO/folder output on Windows and Mac. Freemake offers a simpler Windows option, while Express Burn adds menu, chapter, and disc-burning controls for Windows and Mac.
Table of Contents
If I want an M4V file to play in a regular DVD player, simply copying the file to a blank disc is not enough. To burn M4V to DVD as a playable movie disc, the video must be authored into DVD-Video structure first, which converts the source to DVD-compatible video, builds navigation data, and prepares the disc for standalone playback.
I focus here on the settings that change the finished disc: DVD capacity, PAL or NTSC, aspect ratio, menus, subtitles, and the target player. The three programs below can burn M4V to DVD, but they differ in authoring depth, output choices, platform support, and free-use limits.
Can You Burn M4V to a Playable DVD?
Yes. A local M4V file can be converted into a playable movie DVD when DVD-authoring software can open the source and encode it for DVD-Video.
A movie DVD is different from a data DVD. Copying the original .m4v file onto a blank disc stores the file, but a normal standalone DVD player may not support that file directly. DVD-authoring software re-encodes the video for DVD-Video and creates the navigation information a DVD player expects. Menus, chapters, audio options, and subtitles can also be added during this stage.
Standard DVD-Video is limited to standard-definition video. NTSC DVD commonly uses 720×480, while PAL uses 720×576. A 1080p or 4K M4V therefore has to be downscaled when it is authored as a standard movie DVD. If retaining the original HD resolution matters more than playback on a traditional DVD player, keep the video as a digital file instead.
The methods below are intended for local M4V files that you own or have permission to use. They do not cover bypassing access controls on purchased or rented content.
How to Convert M4V to DVD with DVDFab DVD Creator
DVDFab DVD Creator is a professional M4V to DVD converters that accepts M4V together with more than 200 video formats and authors them for standard DVD playback. It can create DVD-5 or DVD-9 projects and send the finished project directly to writable media or save it as an ISO image or DVD folder.
The authoring controls cover both compatibility and navigation. You can choose PAL or NTSC, set 16:9 or 4:3, adjust video quality and playback mode, arrange several videos on one disc, select audio and subtitle tracks, and add external SRT or ASS subtitles when needed.
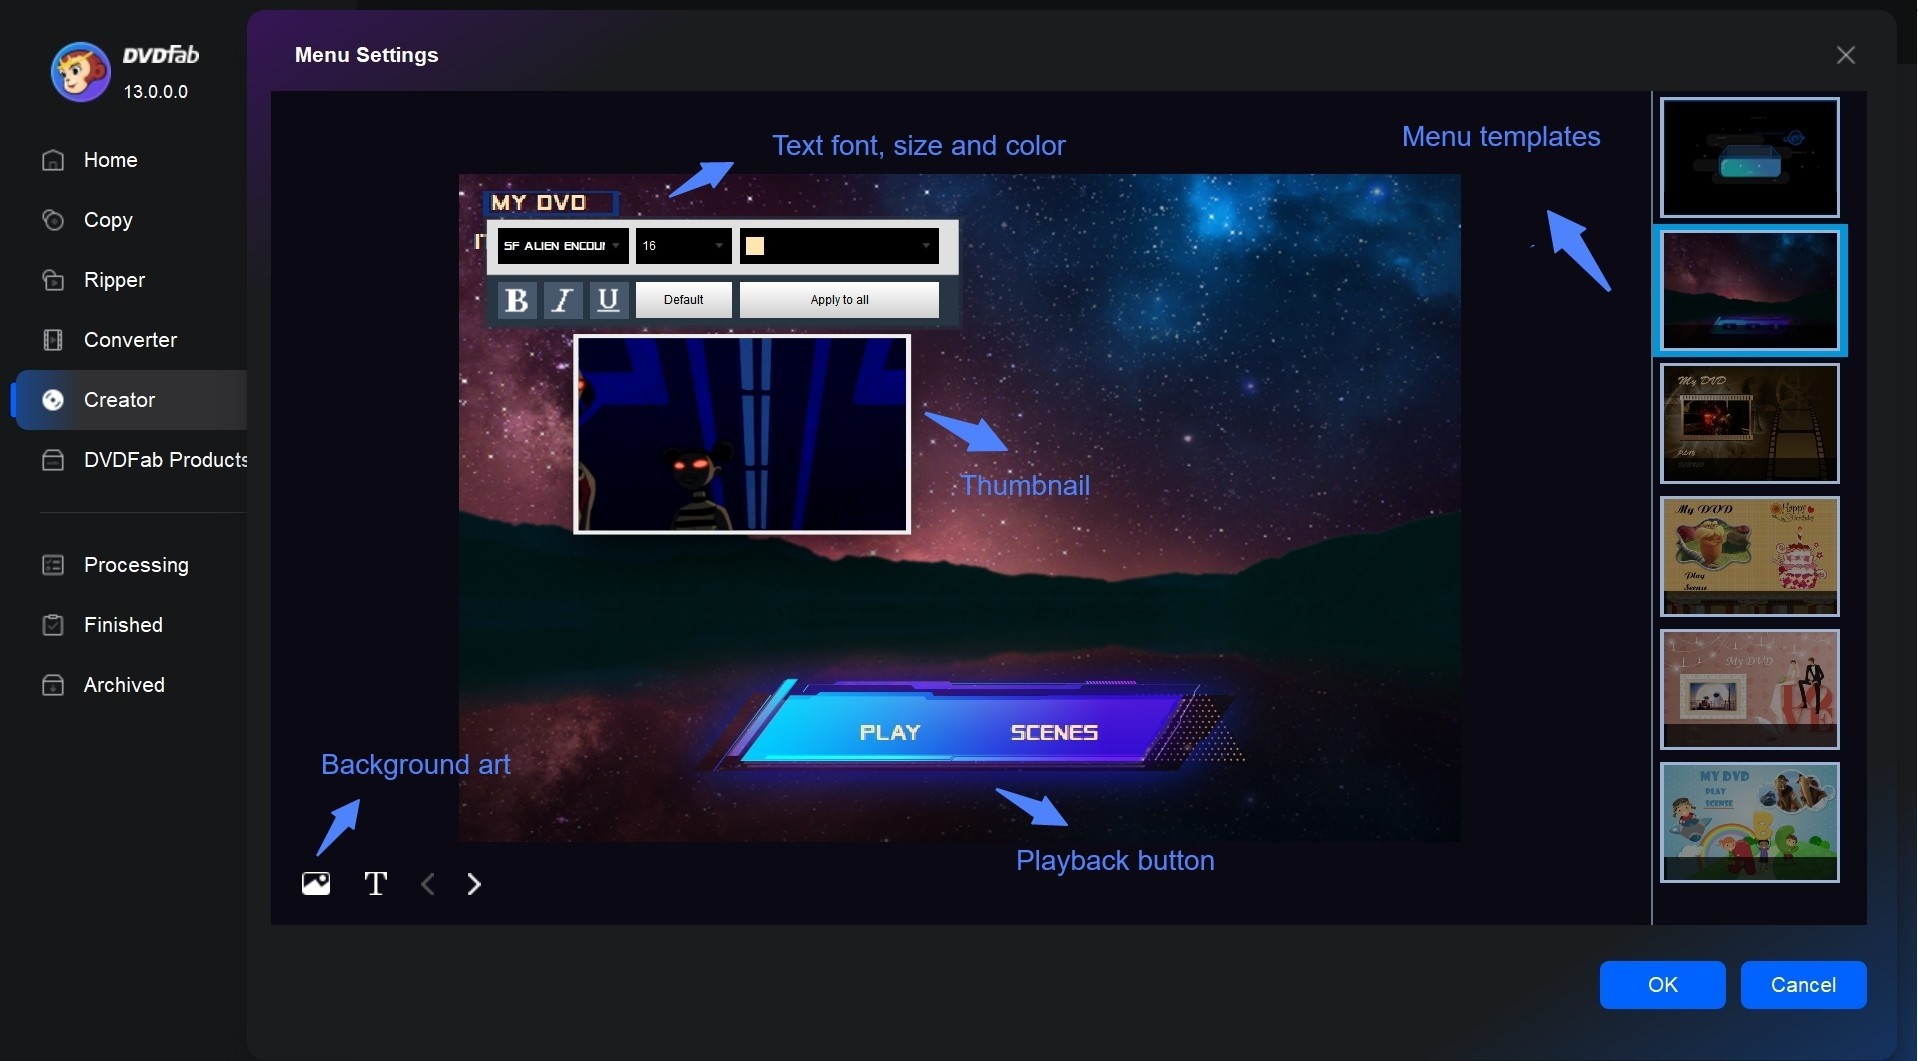
The menu editor goes beyond selecting a preset template. Background art, thumbnails, menu text, font, color, size, and playback buttons can all be changed, and the result can be previewed before burning. A separate video editor can trim or crop the source, add filters or watermarks, and adjust image settings before DVD encoding.
Free Download Windows 11/10/8.1/8/7
Free Download macOS 10.13 - 15.x
M4V-to-DVD Features:
- Direct M4V input: Add M4V together with MP4, MKV, MOV, AVI, WMV, VOB, and other common video formats.
- DVD-5 and DVD-9 authoring: Match the project to single-layer or dual-layer DVD media and adjust video quality for the available capacity.
- PAL/NTSC and aspect ratio: Select the TV standard and choose 16:9 or 4:3 for the intended playback setup.
- Detailed menu customization: Change backgrounds, thumbnails, text, fonts, colors, sizes, and navigation buttons instead of being limited to a preset layout.
- Selectable and external subtitles: Choose subtitle tracks already included with the source or import SRT/ASS subtitle files before authoring.
- Multiple video titles: Put several M4V or other video files on one DVD and arrange their playback order.
- Video editing: Trim, crop, add watermarks or filters, and adjust brightness, contrast, and saturation before authoring.
- Flexible output: Burn a physical DVD or save the same authored project as an ISO image or DVD folder.
Step 1: Open DVD Creator and Add the M4V File
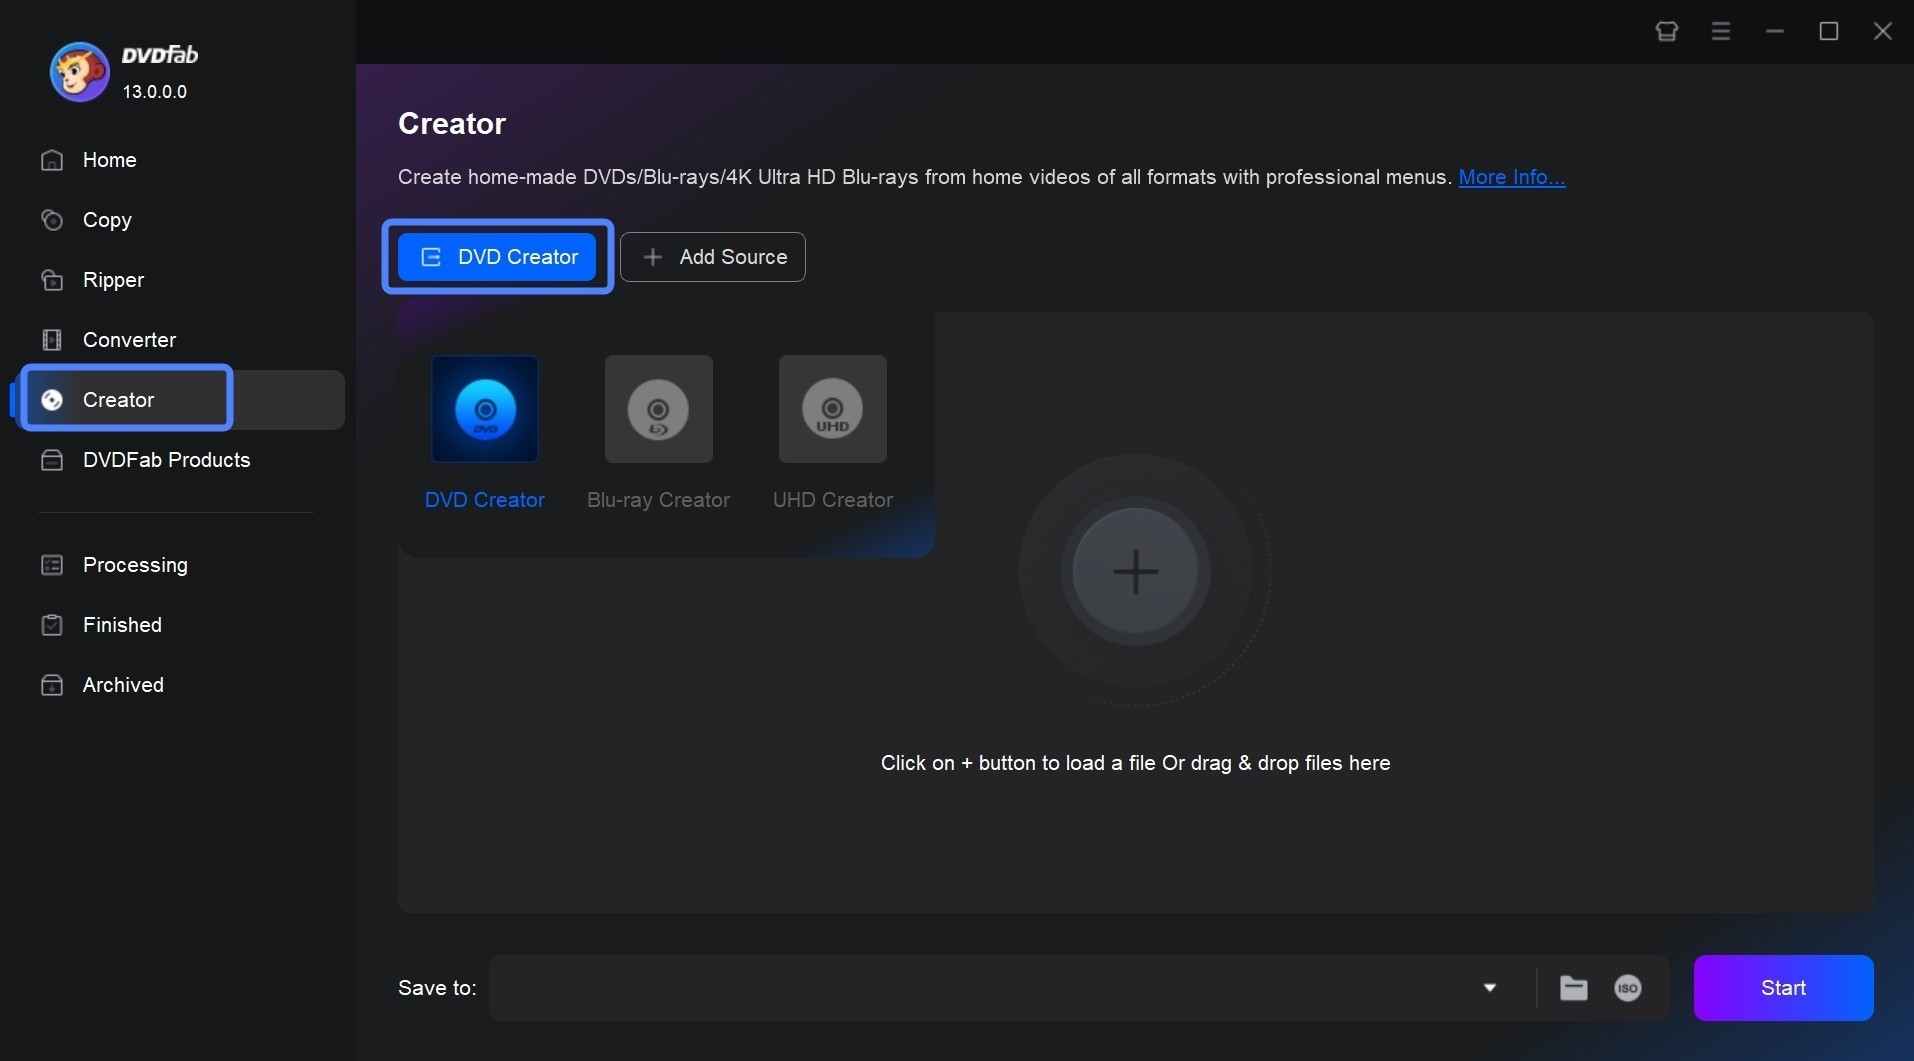
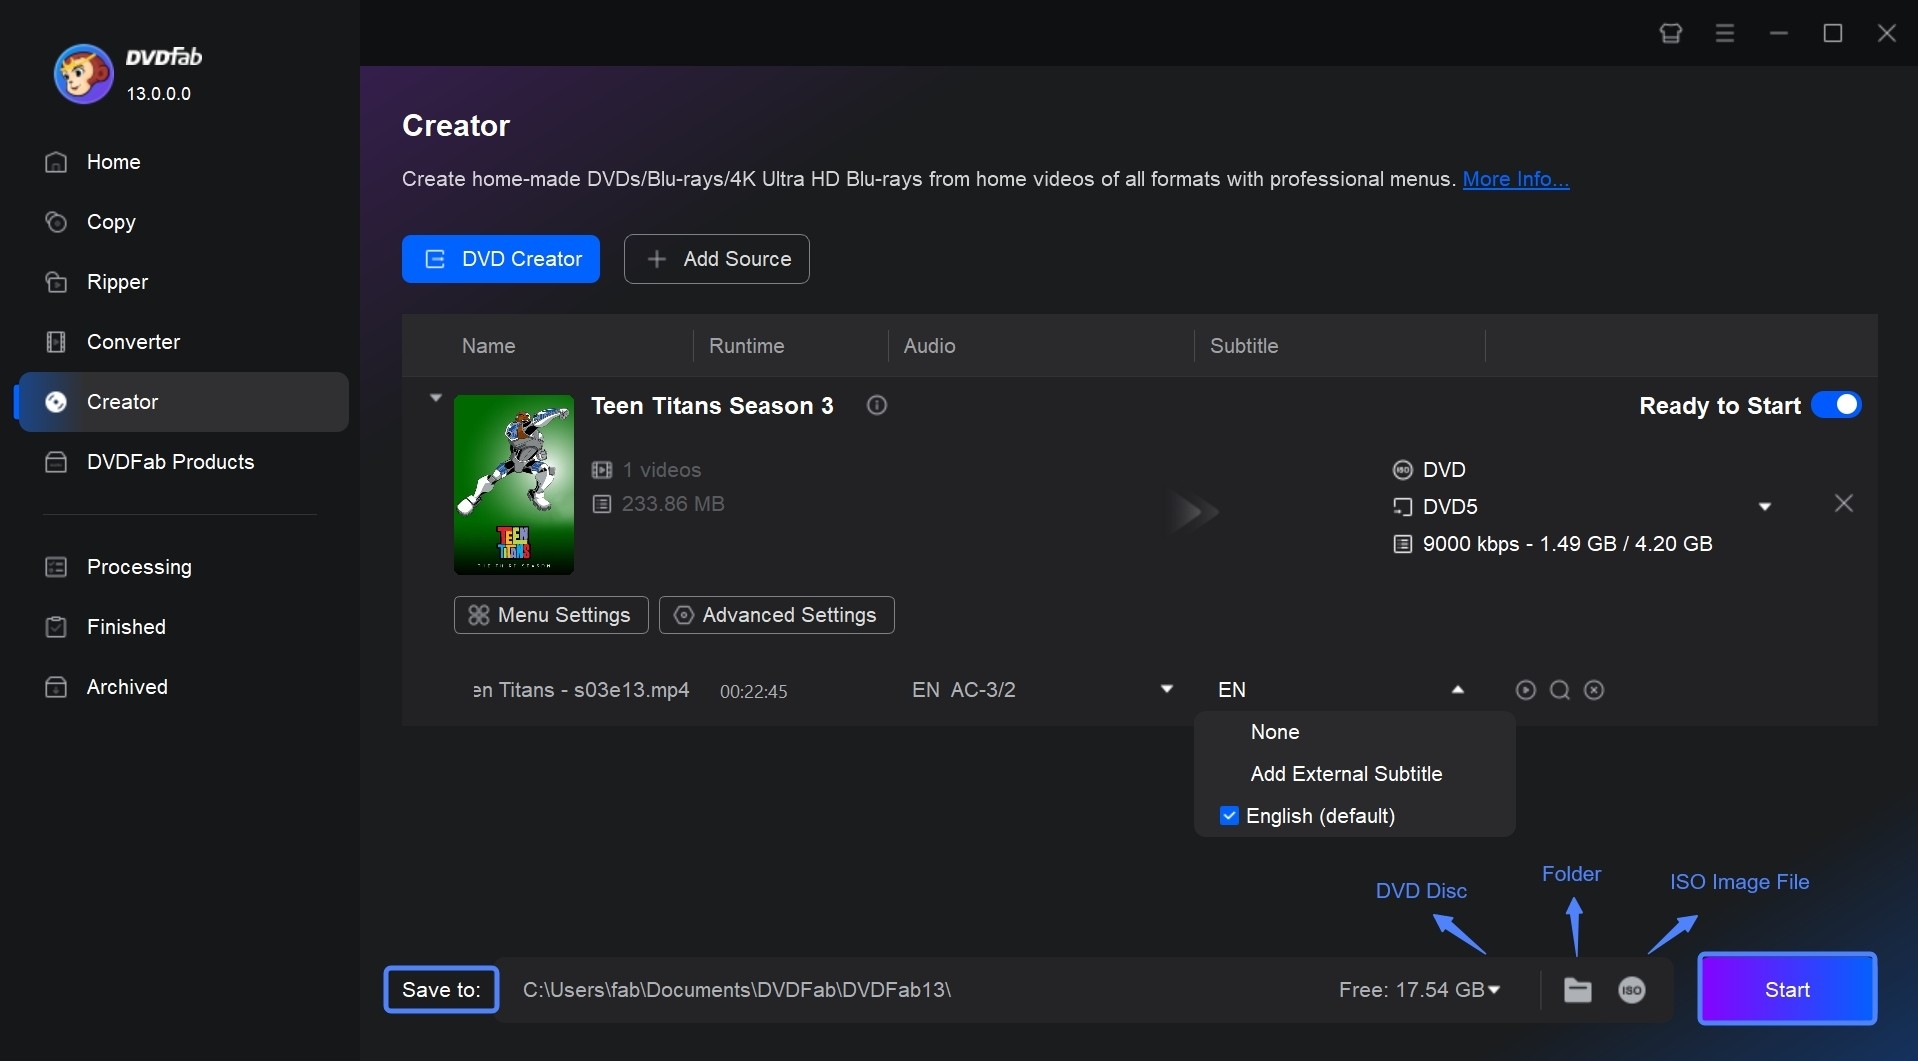
Install and launch DVDFab 13, select Creator, and switch to DVD Creator. Drag the M4V file into the main window or click Add to load it. Several videos can be added to the same project when you want multiple titles on one DVD.
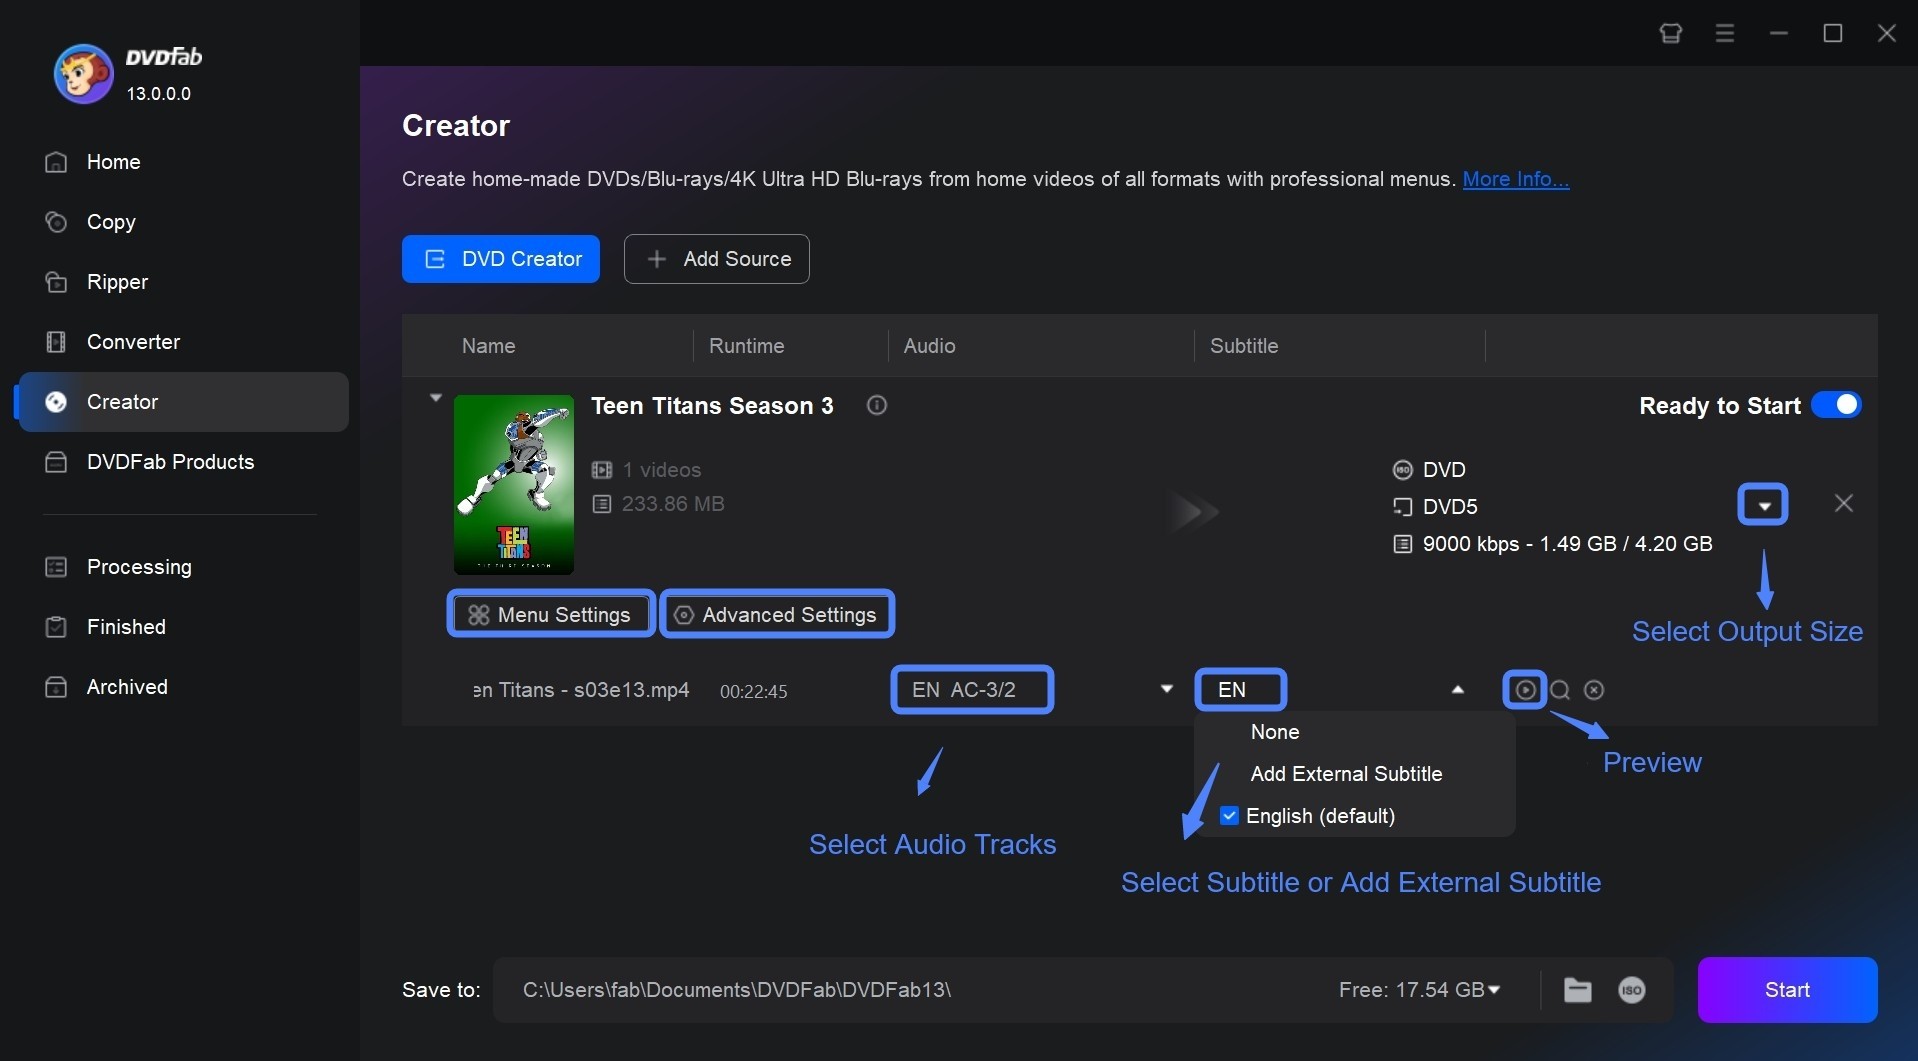
After the source is analyzed, check the runtime and select the audio and subtitle tracks you want on the finished disc. External subtitle files can also be added before authoring.
Step 2: Choose DVD-5 or DVD-9 and Playback Settings
Open Advanced Settings and select DVD-5 or DVD-9 according to the blank disc and the amount of video in the project. Choose NTSC or PAL for the intended playback environment, then set the aspect ratio to 16:9 or 4:3.
You can also adjust video quality, the volume label, and playback mode. Longer projects require more compression when they must fit on a smaller disc, so choosing DVD-5 or DVD-9 can affect the bitrate available to the video.
Step 3: Create a DVD Menu and Set Subtitles
Open Menu Settings when the disc needs a title screen or navigation. You can make a DVD menu from a template and change the background, text, thumbnails, fonts, colors, sizes, and playback buttons before previewing the result.
A menu is particularly useful when the DVD contains several M4V videos because viewers can select individual titles. Audio and subtitle tracks can be chosen from the main screen, while external SRT or ASS files can be imported when the source does not already contain the required subtitles.
Use Video Edit when the source needs trimming, cropping, filters, watermarks, or image adjustments. These edits are optional and are separate from the DVD format and playback settings.
Step 4: Burn the DVD or Save an ISO/Folder
Insert a writable DVD and select the optical drive as the output destination. To finish authoring without writing a physical disc immediately, select an ISO image or DVD folder destination instead.
Click Start to encode the M4V and create the DVD. Test a finished physical disc in the standalone DVD player you intend to use before producing additional copies.
How to Convert M4V to DVD with Freemake Video Converter
Freemake Video Converter provides a direct M4V-to-DVD process for Windows. M4V is included in its supported input formats, so the original file can be added and sent to DVD output without creating a DVD folder in another application first.
Its DVD controls cover the main settings needed for a home movie disc. You can select PAL or NTSC, choose 16:9 or 4:3, add subtitles, select a menu, and check how the project fits on standard or dual-layer media. The authored result can be written directly to a DVD or stored as an ISO image or DVD folder.
Freemake provides text and picture menu templates and lets you use a custom background image. Subtitles can also be added before conversion, although they are encoded into the finished video rather than remaining switchable subtitle tracks. The free version adds a Freemake logo to converted video output; removing that branding requires the corresponding paid pack.
M4V-to-DVD Features:
- Direct M4V input: M4V appears in Freemake's supported video-format list.
- Video DVD authoring: The to DVD output converts the imported video for DVD playback instead of storing the original M4V as a data file.
- PAL and NTSC: Choose the video system used by the target playback environment.
- Aspect-ratio controls: Set 16:9 or 4:3 according to the source and target display.
- DVD menus: Select a text or picture menu or supply a custom background.
- Subtitles: Add subtitle files before conversion; the subtitles are encoded into the video.
- ISO and DVD folder: Save the authored DVD project without immediately using a blank disc.
- Imports M4V directly and creates video DVD output
- Includes PAL/NTSC, aspect-ratio, menu, and subtitle options
- Can save the DVD as an ISO image or folder
- Available for Windows rather than macOS
- The free version adds Freemake branding to converted video output
- Added subtitles are encoded into the video instead of remaining selectable DVD subtitle tracks
Step 1: Add the M4V Video
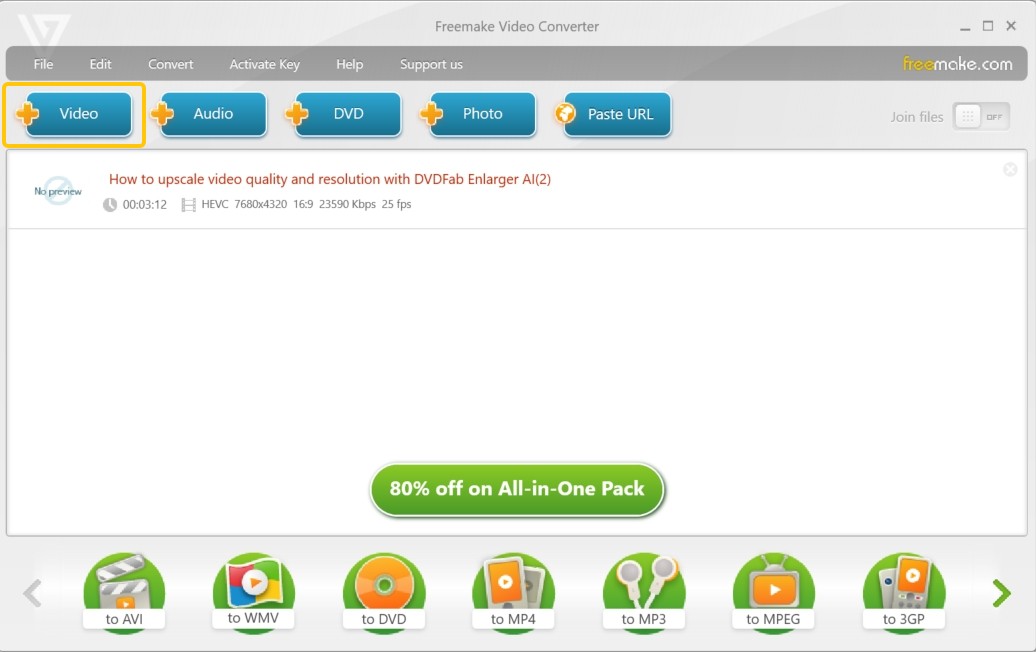
Open Freemake Video Converter and click +Video to select the M4V file. Add more videos if you want several clips on the same DVD.
Step 2: Select DVD Output
Choose the videos you want to include and click to DVD. Check the project size and select settings that match the blank media you plan to use.
Step 3: Set PAL/NTSC, Aspect Ratio, and Menu
Select PAL or NTSC for the target playback environment and choose 16:9 or 4:3. Add a DVD menu or custom background when navigation is needed, then check the audio and subtitle options for the imported videos.
Step 4: Burn the Disc or Save the Project
Insert a writable DVD, select the optical drive, and start the burn. If you do not want to write a physical disc immediately, save the project as an ISO image or DVD folder instead.
How to Burn M4V to DVD with Express Burn Disc Burning Software
Express Burn Disc Burning Software can create a Video DVD directly from M4V files on Windows and Mac. After the videos are added to a Video DVD project, the program re-encodes them for a standard movie disc and prepares them for playback on DVD players.
Its authoring controls focus on disc navigation and recording. Videos can be arranged as DVD titles, chapters can be created and managed, and a menu can be built from more than 20 templates. Menu title and subtitle text, alignment, and background images can be changed before the disc is written.
Express Burn also provides PAL and NTSC output and lets you choose widescreen or standard-format video. Encoding settings control the balance between video quality and disc space, while the final burn screen lets you select the DVD writer, write speed, and number of copies. The recording process includes verification after writing.
Video DVD authoring requires an Express Burn Plus edition that includes DVD authoring. The non-commercial free edition is limited to CD burning, while the full-featured trial can be used to test DVD functions before selecting a license.
M4V-to-DVD Features:
- Direct M4V Video DVD projects: Add individual M4V files or a folder containing M4V videos to a Video DVD project.
- DVD-Video encoding: Re-encode the source video for a standard movie DVD rather than storing it as a data file.
- DVD titles and chapters: Arrange videos in the required order and create chapter points for navigation.
- Menu authoring: Choose from more than 20 menu templates, add a custom background image, and edit menu title and subtitle text.
- PAL and NTSC: Set the video system used by the target DVD playback environment.
- Widescreen or standard video: Match the DVD format to the intended display.
- Burn controls: Choose the recorder, write speed, and number of copies before starting the disc.
- Verification: Check the written disc after the recording process completes.
Step 1: Create a Video DVD Project
Install and open Express Burn, insert a blank DVD, and choose Video DVD when the program asks which type of disc you want to create. This creates a movie-disc project for DVD-player playback instead of a data DVD.
Step 2: Add and Arrange the M4V Files
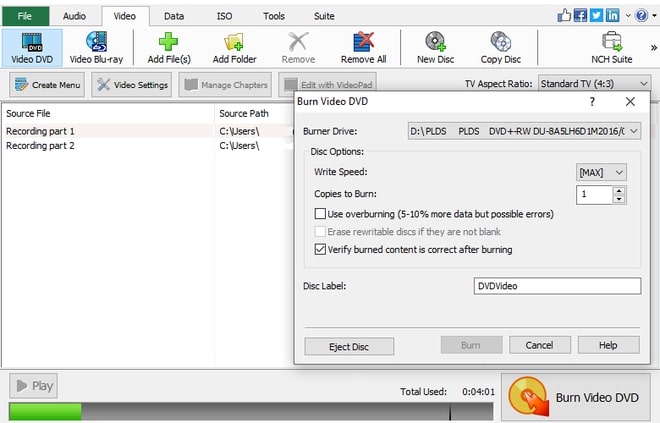
Click Add File(s) or Add Folder to load the M4V videos, or drag the files into the project window. Remove clips you do not need and arrange the remaining videos in the order you want them to appear on the disc.
Step 3: Add a Menu, Chapters, and Video Settings
Click Create Menu when the DVD needs navigation. Enter a title and subtitle, select a template, add a custom image if needed, and save the menu after checking its layout.
Add chapter points when viewers need to jump to specific parts of a title. Before burning, choose the required PAL or NTSC system, widescreen or standard-format video, and an encoding quality that fits the project on the disc.
Step 4: Burn and Verify the Video DVD
Click Burn Video DVD, select the DVD writer, and review the write speed and number of copies. Start the burn and wait until both writing and verification are complete before removing the disc.
Test the finished DVD in the standalone player you plan to use. If the computer can read the disc but the player cannot, check the selected PAL/NTSC system and whether the player supports the recordable DVD media you used.
M4V to DVD Converter Comparison
DVDFab DVD Creator, Freemake Video Converter, and Express Burn all accept M4V for video-DVD creation. The differences become clearer when you compare menu control, subtitles, disc settings, output formats, and operating-system support.
| Comparison Item | DVDFab DVD Creator | Freemake Video Converter | Express Burn Disc Burning Software |
| Compatible OS | Windows 11/10 (64-bit) macOS 12+ | Windows | Windows & macOS |
| Input | M4V + 200+ video formats, including MP4, MKV, AVI, MOV, WMV, FLV, VOB, M2TS and more | M4V + 500+ supported video/audio formats | M4V and other common video formats for Video DVD projects |
| Output | DVD-5/DVD-9 disc ISO image DVD folder | Video DVD ISO image DVD folder | Video DVD ISO creation/burning |
| Menu Control | Extensive: customizable templates, backgrounds, thumbnails, text, fonts, colors, sizes, playback buttons, menu preview, and audio/subtitle switching | Basic to moderate: text/picture DVD menus, menu templates, and custom background options | Moderate: 20+ menu templates, title/subtitle text, text alignment, custom background images, and chapter navigation |
| DVD Settings | DVD-5/DVD-9, PAL/NTSC, 16:9/4:3, video quality, playback mode, volume label, and title order | Disc capacity, PAL/NTSC, 16:9/4:3, audio track, and subtitle settings | PAL/NTSC, widescreen/standard format, encoding quality, chapter points, write speed, and number of copies |
| Editing Features | Extensive: trim, crop, filters, image/text watermark, brightness, contrast, saturation, chapters, and external SRT/ASS subtitles | Cut, join, rotate video, and add subtitles; some additional editing functions require premium packs | Title and chapter organization; additional video editing can be performed through NCH VideoPad |
| Burning Speed | GPU-accelerated video processing with supported NVIDIA, AMD, Intel, and Apple hardware | Standard processing in the free version; paid acceleration options are available | Uses a compatible write speed supported by the optical drive and disc; users can select a slower write speed when needed |
| Watermark | No forced watermark on licensed output; optional custom image or text watermarks can be added | Free converted output includes Freemake branding; a paid pack removes it | No forced watermark on licensed DVD output |
Frequently Asked Questions
Will Converting M4V to DVD Reduce Video Quality?
Yes, particularly when the M4V source is 1080p or 4K. Standard DVD-Video is limited to standard-definition video, so higher-resolution footage must be downscaled and re-encoded. A higher DVD bitrate can preserve more detail, but it cannot retain the original HD frame size on a standard movie DVD.
Can I Burn an M4V Purchased or Rented from Apple Directly to DVD?
These methods are intended for local M4V files that DVD-authoring software can open normally. If purchased or rented content depends on authorized playback through Apple services, the steps here do not cover bypassing those access controls.
Why Does My Burned DVD Play on My Computer but Not on My DVD Player?
First check that you created a Video DVD rather than a data disc containing the original M4V file. If it is already DVD-Video, check the PAL/NTSC setting, the recordable DVD type supported by the player, and whether the disc completed the burn correctly.
Conclusion
A playable M4V DVD starts with DVD authoring rather than copying the original file to a blank disc. Set the disc capacity, PAL or NTSC system, aspect ratio, menu, and other playback options before burning, then test the completed disc on the player you intend to use.
DVDFab DVD Creator combines detailed menu editing, selectable and external subtitles, DVD-5/DVD-9 controls, and disc/ISO/folder output on Windows and Mac. Freemake provides a shorter Windows-based process, while Express Burn emphasizes chapters, menu templates, and physical-disc recording controls. Choose the program whose authoring features match the DVD you need to create.

![YouTube to DVD Converter: 4 Ways to Burn a Playable Disc [2026]](https://images.dvdfab.cn/media/burn_youtube_video_to_dvd_j8vz5l.png/public) YouTube to DVD Converter: 4 Ways to Burn a Playable Disc [2026]By Wenny Yan - Aug 17, 2026
YouTube to DVD Converter: 4 Ways to Burn a Playable Disc [2026]By Wenny Yan - Aug 17, 2026 12 Best Free DVD Authoring Software for Mac & Windows in 2026: TestedBy Diana Smith - Aug 12, 2026
 How to Convert MP4 to ISO: 2026 Tested ConvertersBy Diana Smith - Aug 12, 2026
 How to Burn a DVD on Windows & Mac: 2026 Tested WaysBy Lucy Liu - Aug 4, 2026