How to Burn a DVD for Free: The Complete Guide for Windows & Mac
Summary: This article provides a comprehensive tutorial on how to make a DVD for any purpose. We break the guide down into 5 sections, covering from the preparation, burning movie DVD and data DVD for free, making discs from image files, and solutions for burning errors. Start reading now to learn everything you need to know.
Table of Contents
While cloud storage and endless streaming dominate today's digital landscape, searching how to burn a DVD might feel like a curious step back in time. So, why are you really here?
The answer, of course, is permanence. Burning DVDs gives you truly lasting physical backups: a repository for family videos safe from hackers, or a movie collection that won't disappear with a canceled subscription.
Rest assured, burning a DVD isn't complicated. In this guide, we cut through the confusion and show you exactly tutorial on how to make a DVD for free on both Windows and Mac, covering everything from Windows/Mac built-in burners to specialized third-party software.
Before You Start: What You Need to Burn a DVD
Sharp tools make good work. To successfully make your own DVDs, you'll need the following tools:
Computer. It's where all the following steps will take place.
Blank DVD Discs. You clearly need blank media to write your files onto. Choosing the right disc type will save you time and effort, since you wouldn't want the burn to fail halfway because the disc is full. Here is how to choose based on capacity and reusability:
| Storage Capacity | Reusability | ||
| DVD-5 | 4.7GB around 120-133 minutes of video depending on compression |
DVD±R | Single-write, non-erasable, best for permanent archiving and sharing. |
| DVD-9 | 8.5GB around 240 minutes of video depending on compression |
DVD±RW |
Re-writable, erasable, best for temporary archives or testing discs. |
A DVD Burner Drive. You might be asking, "How do I tell if my computer has a DVD burner?" Sadly, most modern computers no longer come with built-in DVD drives. You can purchase a compatible external or internal burner separately from retailers like Amazon or eBay. We suggest looking into models like the LG BP50NB40 for reliable performance.
DVD Burning Software. Selecting a reliable DVD burner is crucial for making DVDs, especially burning movies to DVDs. There are many best free DVD burners available, and both Windows and macOS offer built-in burning utilities. However, each option provides different capabilities. You must decide which software to use based on your specific needs and whether it can accomplish your goal.
How to Choose the Way to Burn DVDs
Burning DVDs breaks down into three fundamentally different aims: burning a data DVD, burning movie to DVD, and making a DVD from an image file. Here is the essential distinction between these cases:
1. Burn a DVD Movie
Make a DVD from video files (such as MKV to DVD). The DVD is in special format that can be played on any DVD player. This involves a complex process called "DVD Authoring," where the video is encoded and the necessary VIDEO_TS structure is created. Your computer's built-in programs cannot perform this task. You must use a safe, specialized third-party software.
2. Burn a Data DVD
Your DVD acts as a read-only USB drive, intended for backing up general files, photos, or documents. The DVD can only be read by a computer's optical drive. It will not play on a standard DVD player (even if it contains video files). You can use the built-in software (Finder on macOS or File Explorer on Windows) to make such a DVD.
3. Burn a DVD from an Image File
To accurately restore a complete digital copy (or clone) of an entire disc onto a physical blank DVD. The source is typically a single image file, most commonly ISO, but may also include formats like CDR, BIN/CUE, CDI, etc. This is often used for movie backups, operating system installation discs, or games. Since the structure is already created within the image file, you primarily need a DVD copying software.
So, how to burn a DVD depends entirely on what kind of DVD you ultimately want. This article will thoroughly explain the tutorials for all three scenarios for making DVDs, covering every reader's needs.
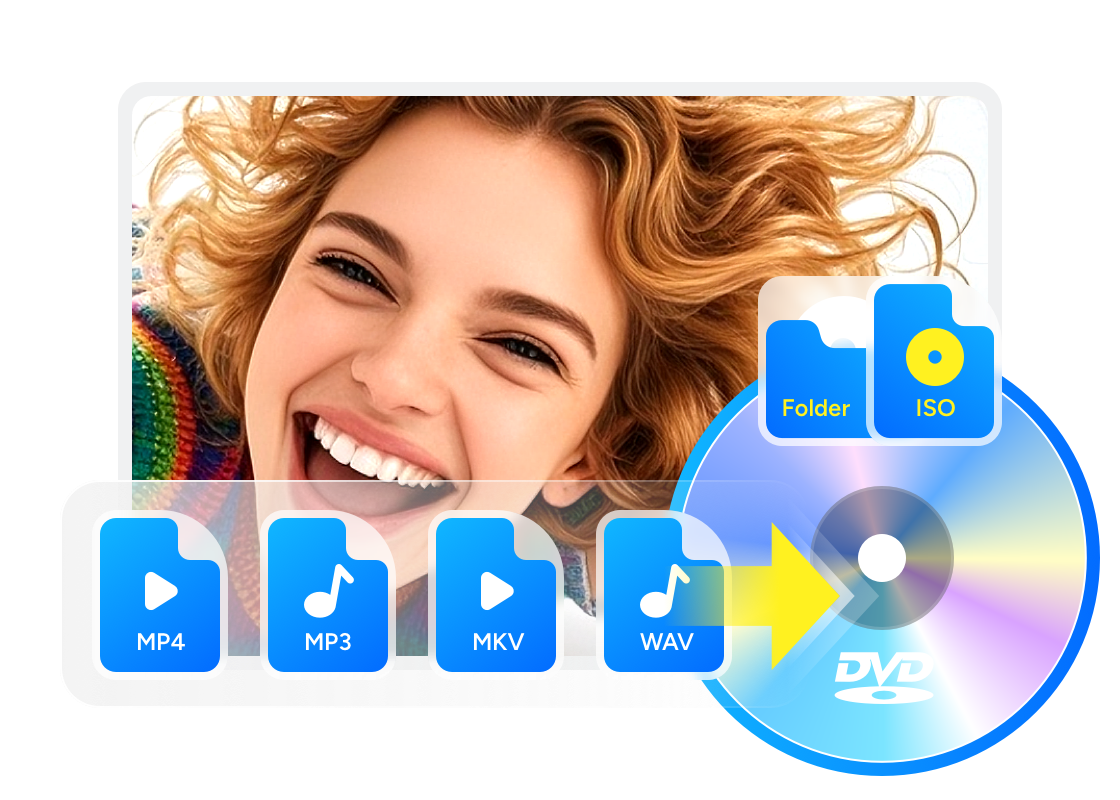
How to Burn a DVD Movie (from MP4/MKV/MOV)
If you want to make a DVD from digital video formats, such as .mp4 and .mkv, so it can be played on any DVD player, you need to download a burning program capable of converting the video file into a format recognizable by standalone DVD players. This type of software is typically called a DVD Creator or DVD Authoring Software. These programs are usually third-party, but choosing a safe and professional one poses no risk to your computer.
To ensure the safety of burning movies to DVD, our team tested multiple software applications that support both DVD authoring and burning. After testing on Windows 11 and macOS Sonoma, we selected the best tool to burn a DVD, DVDFab DVD Creator. In our test, an iPhone-recorded MOV file (abour 2h30m), was successfully burned in around 13 minutes. The menu made with the built-in tool also ran very smoothly when we played the new DVD on a player.

DVDFab DVD Creator
- Burn MP4, MKV, AVI, MOV, FLV, and over 200 video formats to a playable DVD.
- Supports burning video files such as MP4 to ISO files, or folders, facilitating playback on both hardware and software players.
- Offers multiple themed, customizable menu templates to create professional DVDs with navigation menus.
- Includes a video editor allowing you to crop, trim, watermark, import subtitles, adjust brightness, and more.
- Supports custom chapter creation.
- GPU acceleration enhances burning speed and stability.
The following paragraph is the process verfied by our team for how to burn DVDs that will play on a DVD player, with the professional tool, DVDFab DVD Creator.
Step 1: Launch DVDFab and Enter the DVD Creator Module
1. Click the official secure download button above to download DVDFab 13 and follow the prompts to install it.
2. Launch DVDFab 13. In the left sidebar, select the Creator module.
3. Within the Creator module, switch to the DVD Creator feature.

Step 2: Import Video/Movie Files
1. Click "Add Source" in the interface to upload your video files from your local hard drive, or simply drag and drop your video files (such as MP4, MKV, AVI, MOV, etc.) directly into the center area of the program window.
2. Once imported, DVDFab will display your video information and the available functions for the next steps.
Step 3: Customize Your Disc
On the main interface, use the following tools to customize your disc:
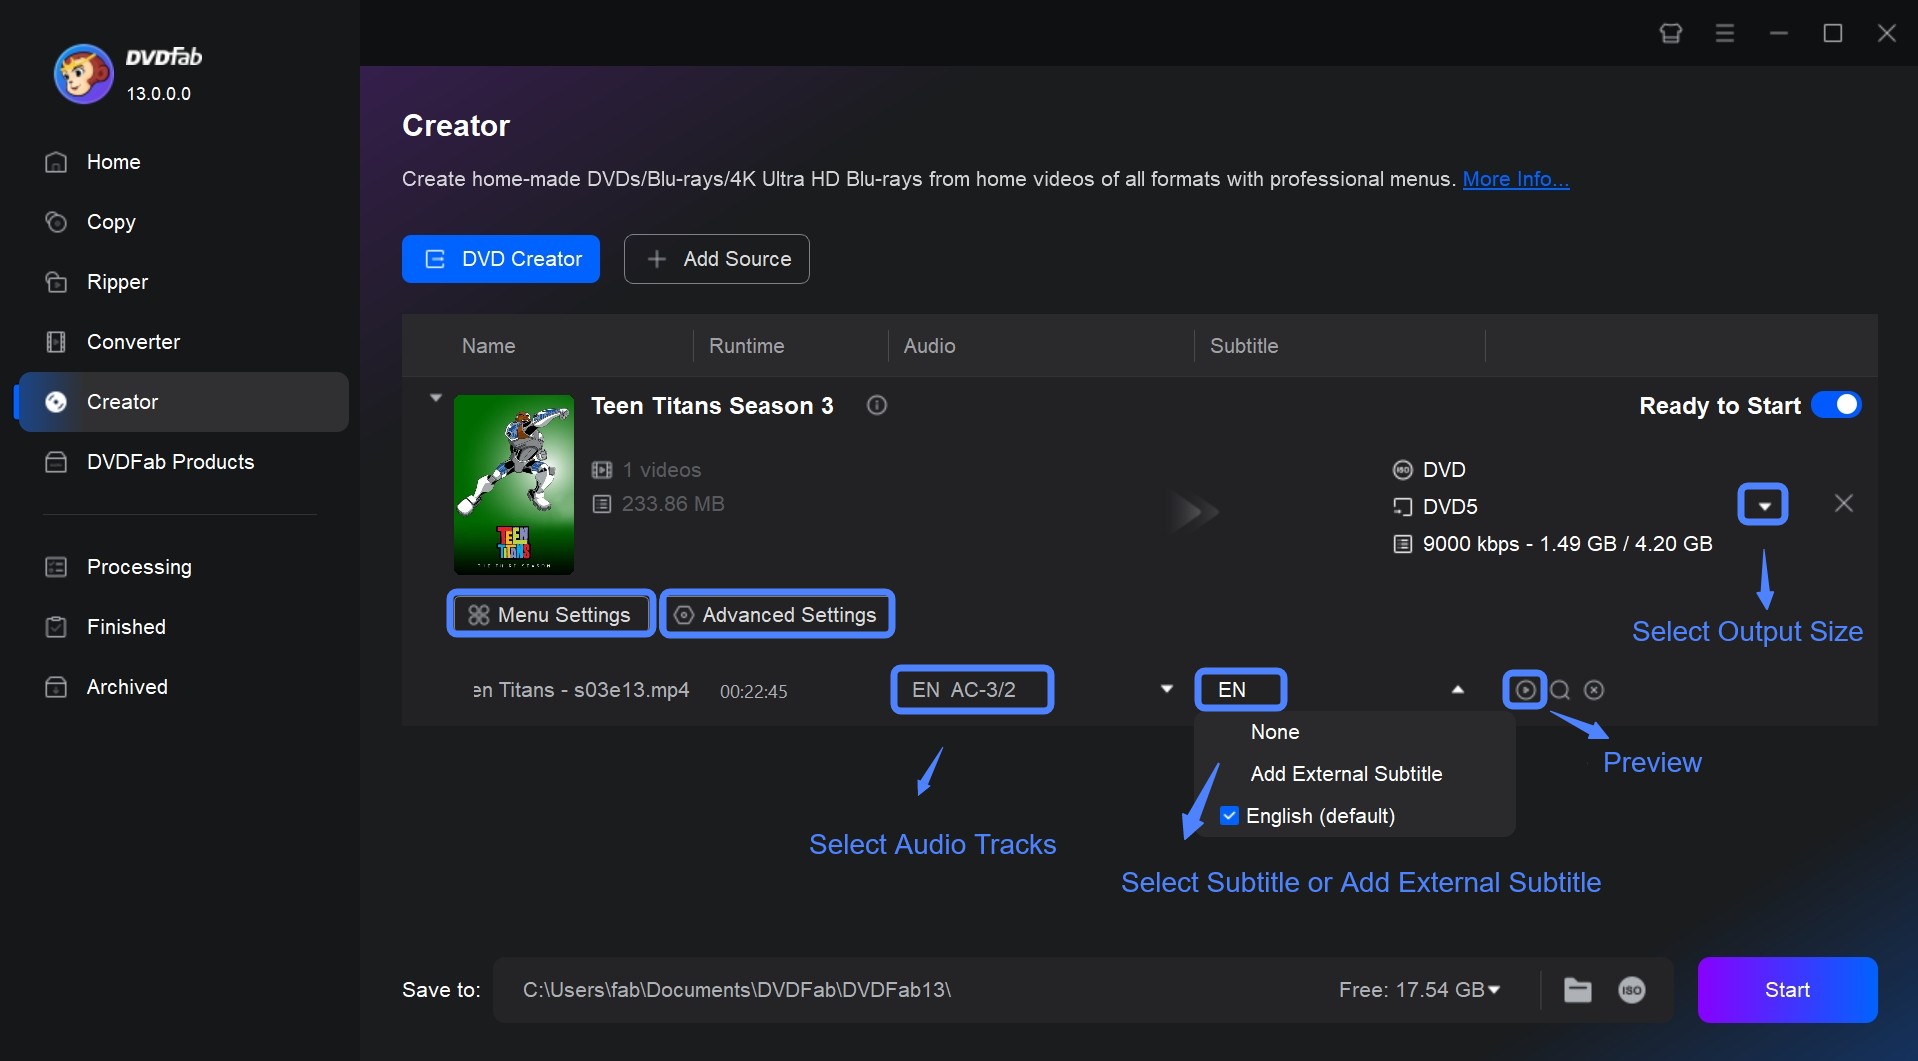
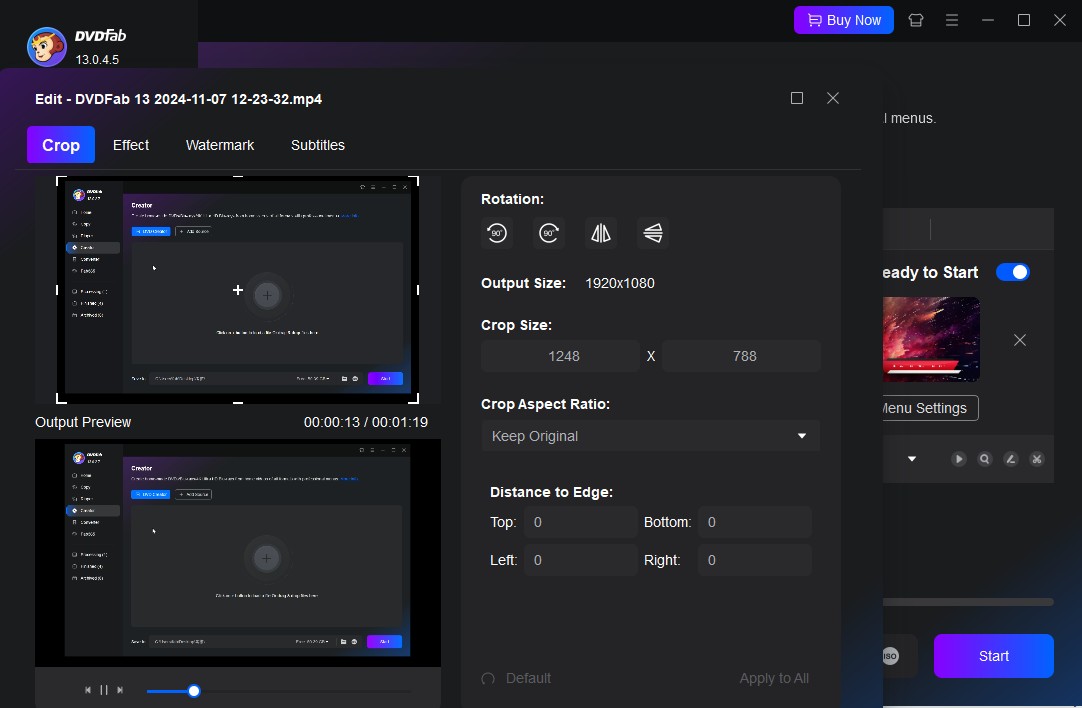
Advanced Settings: Click "Advanced Settings" to set disc playback details. Here you can change the Volume Label, Output Size (DVD-5/9), control Video Quality, select the format compatible with your playback device (NTSC/PAL), adjust the Aspect Ratio (4:3, 16:9), and choose the Playback Mode (Play from Menu, Play the first title, Loop playback). After setting, click OK to return to the main interface.

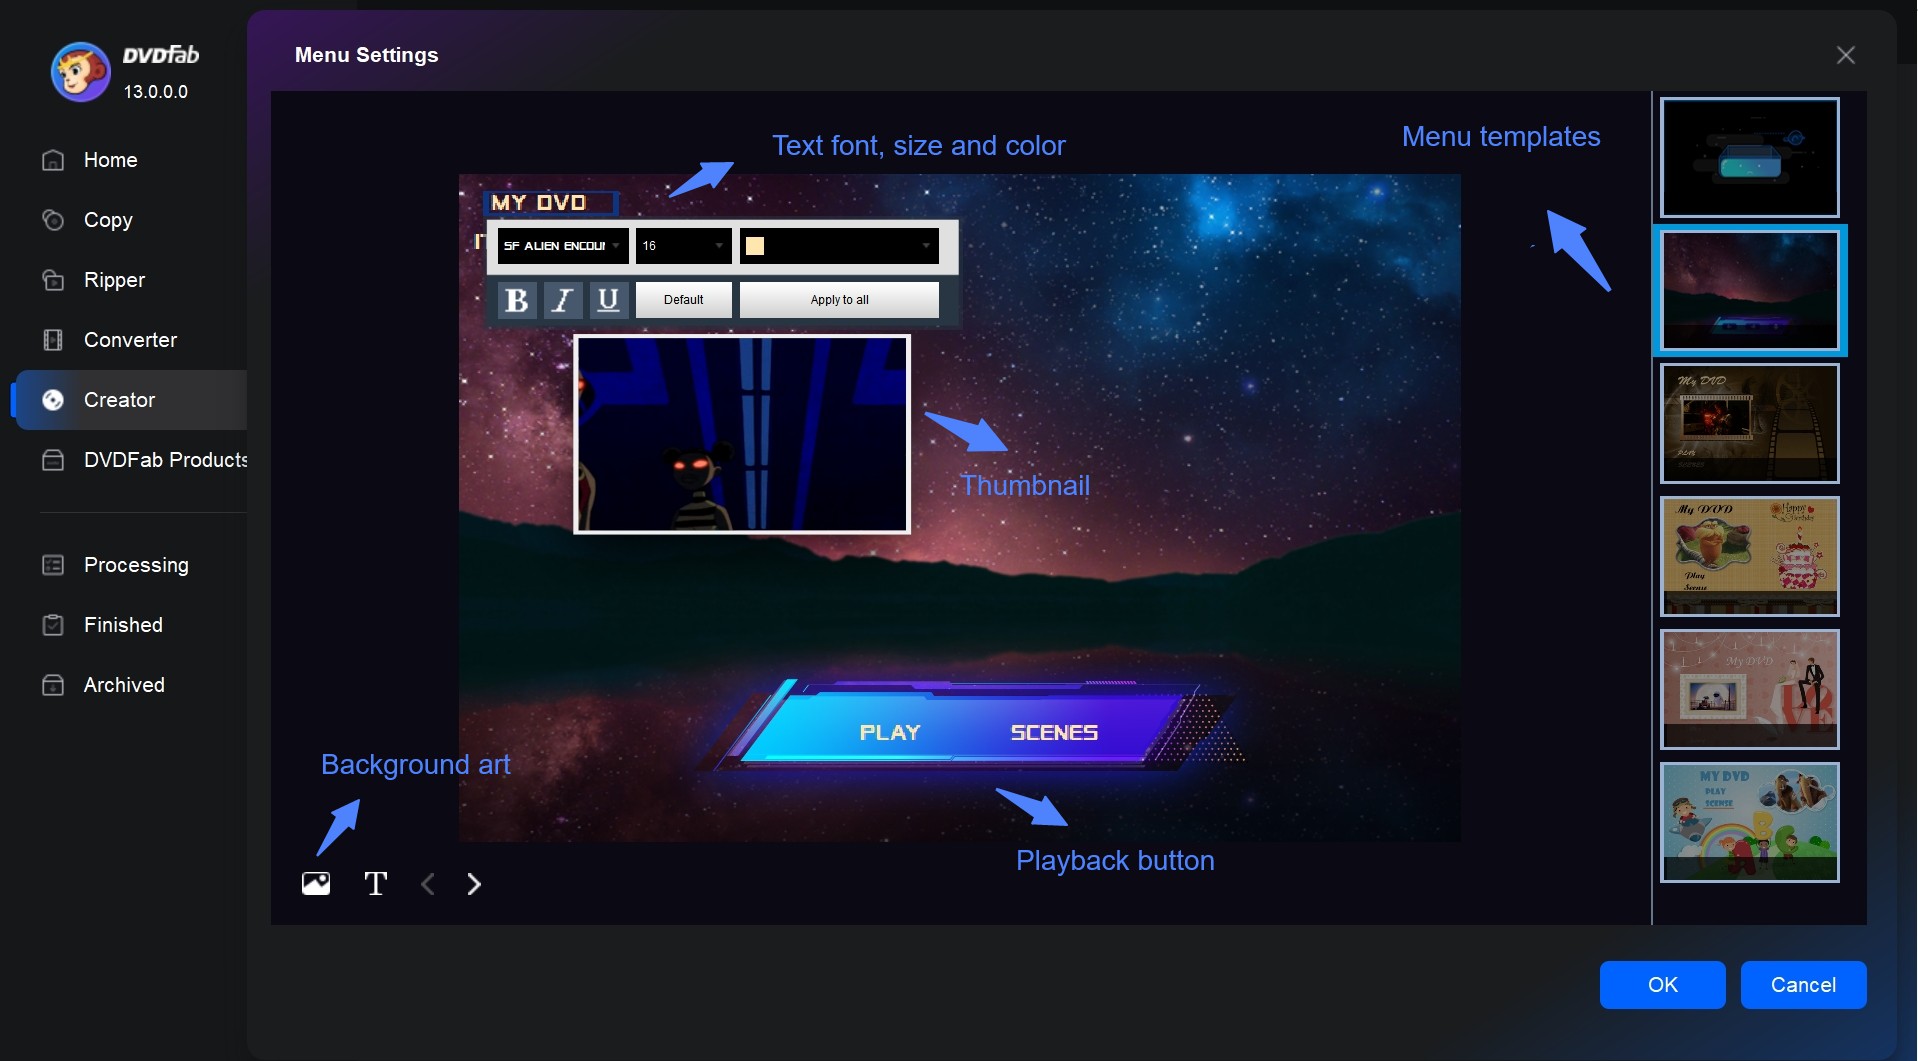
Menu Settings: Click "Menu Settings" to create your interactive disc menu for controlling playback. Choose a template that fits your video's theme from the various provided themes. For more creative ideas, you can also customize the background image, design button text, change widget styles, etc. After setting it up, click OK to return to the main interface.
Subtitle Tracks: Open the subtitle track menu. Select the subtitle tracks you want to keep. If you want to add an external subtitle file, click "Add External Subtitles" and upload the SRT file.
Audio Tracks: Open the audio track menu and select the audio tracks you want to keep.
Video Editing: Click the "Video Edit" or "Trim" module. In the pop-up window, you can edit the video by cropping, rotating, trimming, adding watermarks and filters, adjusting color tone, designing subtitles, and customizing chapters. After editing, click OK to return to the main interface.
Step 4: Select Output Format and Start Burning a DVD
1. Insert a blank DVD. DVDFab DVD Creator supports DVD±R and DVD±RW. Choose based on whether you want the disc to be reusable.
2. In the "Save to" bar, select your DVD burner as the output destination. If you want to burn to an ISO or Folder, click the corresponding icon in the "Save to" bar and choose the saving path.
3. Start Burning. After checking that all settings are correct, click the "Start" button in the lower right corner of the interface. If your computer has a GPU supported by DVDFab (Multi-core CPU, NVIDIA CUDA, AMD, IQS, Video ToolBox), DVDFab will enable GPU acceleration, significantly boosting the burning speed while maintaining stability.
4. After burning video to DVD, safely eject your DVD disc.
How to Burn Data DVDs Free on Windows 11/10/8/7 (Using File Explorer)
If you want to burn DVD on Windows 10/11 for data backup instead of a playable movie DVD, follow these 3 steps:
Step 1: Insert the Disc and Choose the Burning Method
1. Insert the blank DVD into your computer's DVD drive. After insertion, Windows usually pops up an "AutoPlay" window. If it doesn't, open File Explorer.
2. In "This PC" (Windows 11/10/8) or "Computer" (Windows 7), locate and double-click your DVD drive icon.
3. A dialog box named Burn a Disc will pop up, asking you to choose how you want to use the disc.
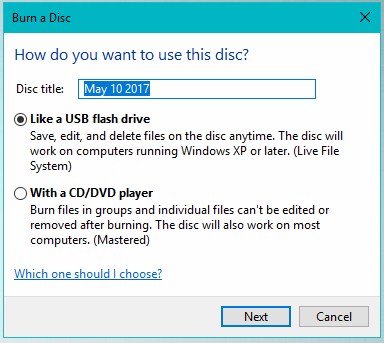
Option a: Like a USB flash drive
- This allows you to drag and drop files onto the disc multiple times, like a flash drive.
- Feature: This method has poor compatibility and may not be readable on other (especially older) computers. It will allow you to rewrite the disc, even if it isn't a rewriteable disc, but it will only work in Windows.
Option b: With a CD/DVD player
- You need to prepare all files at once and burn them together. Once burned, the disc is "Finalized" and no more files can be added.
- Feature: Excellent compatibility, readable by virtually all computers.
For data backup reliability and maximum compatibility, choose With a CD/DVD player. But do not be fooled by the name. Your final disc will still not play in a video DVD player. This is strictly a data disc.
4. After making your choice, click "Next".
Step 2: Add the Files You Want to Burn
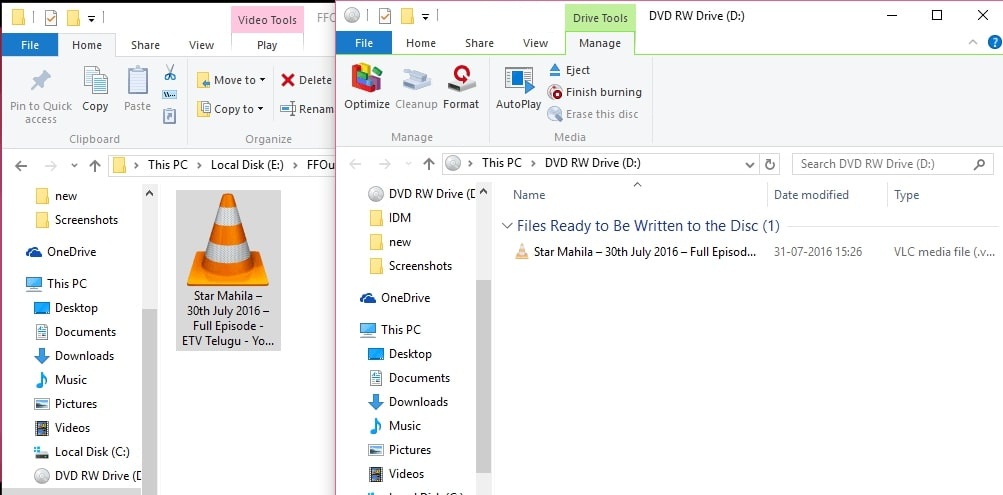
1. After choosing "With a CD/DVD player," the system will open a blank folder window. Do not close this window. This window represents the content of the disc you are about to burn.
2. Open another File Explorer window and locate the files or folders you want to back up (e.g., your "Documents" or "Pictures" folders).
3. Drag the files you need to back up into the blank disc window you just opened. You can also use copy and paste.
Note: Pay attention to the size of the files you are backing up; do not exceed the storage capacity of the DVD.
Step 3: Start Burning DVDs
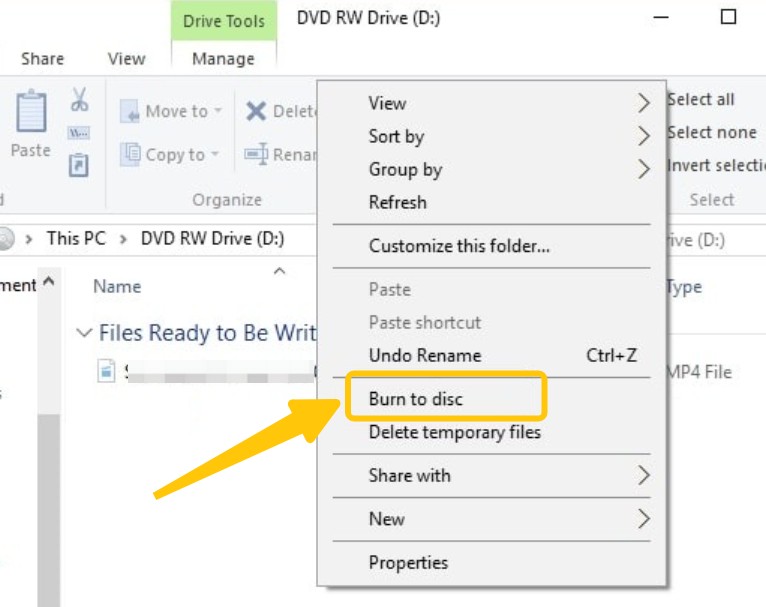
1. Once you have confirmed that all the files you want to back up have been added to the disc window, right-click on the blank space in the window and select "Burn to disc". A wizard window titled "Prepare to burn this disc" will pop up.
2. In the pop-up window, give your disc a title and choose the burning speed. Usually, keeping the default is fine. If the burn fails, you can try lowering the speed.
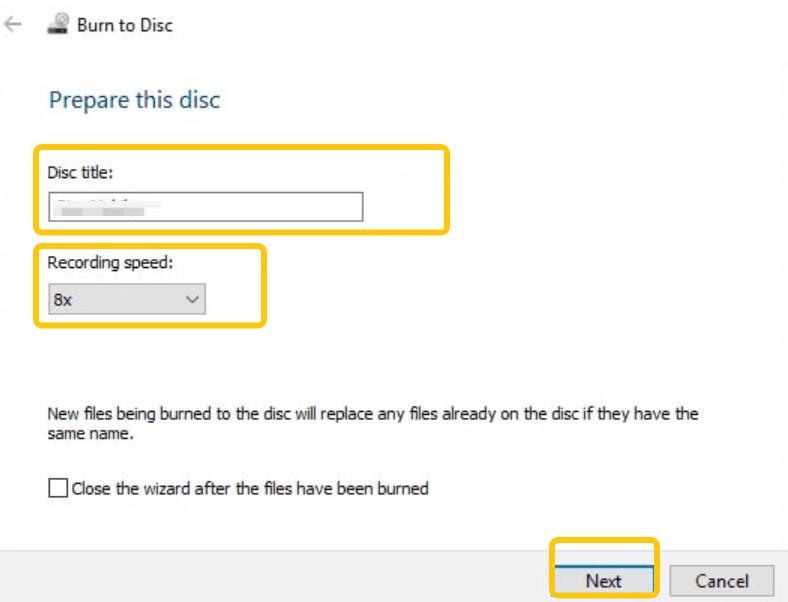
3. Click "Next". Windows will begin burning the disc. This process may take anywhere from a few minutes to a few hours, depending on the size of your files (from a few hundred MB to several GB) and the burning speed.
4. Once the burn is successful, the system will prompt, "You have successfully burned files to the disc." Safely eject your drive.
How to Make a Data DVD Free on macOS (Using Finder)
Wondering how to burn DVD on mac? Here is the tutorial:
Step 1: Insert the DVD and Open It in Finder
1. Insert the blank DVD disc into your optical drive.
2. macOS will recognize the blank disc and automatically pop up a dialog box asking what action you want to perform. Select "Open Finder".

3. If you often burn discs, you can check "make this the default action" so you won't have to select it again.
4. Click "OK". The system will automatically open a new Finder window.
5. If the window does not pop up automatically, you can open any Finder window and click the disc icon with the burn symbol in the "Locations" sidebar on the left.
Step 2: Add the Files You Want to Burn
1. The Finder window you are now seeing (usually titled "Untitled DVD") displays the contents of your disc. Do not close this window.
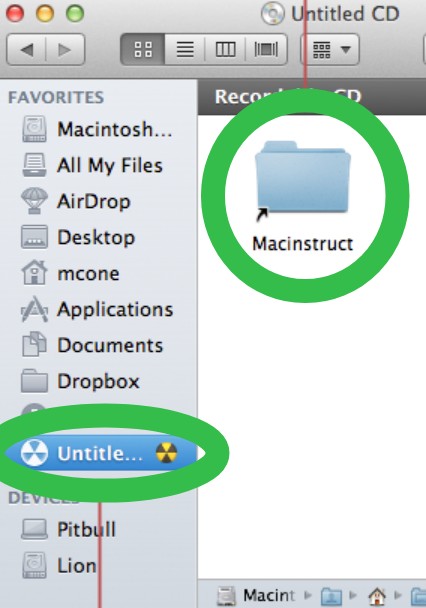
2. Open another Finder window and locate the files or folders you want to back up.
3. Drag these files one by one into the Finder window that represents your disc contents.
Note: Pay attention to the size of the files you need to back up; do not exceed the storage capacity of the DVD disc.
Step 3: Start the DVD Burning
1. Once you confirm that all the files you need to back up have been added, click the "Burn" button located at the top of the Finder window. A confirmation dialog box will pop up.
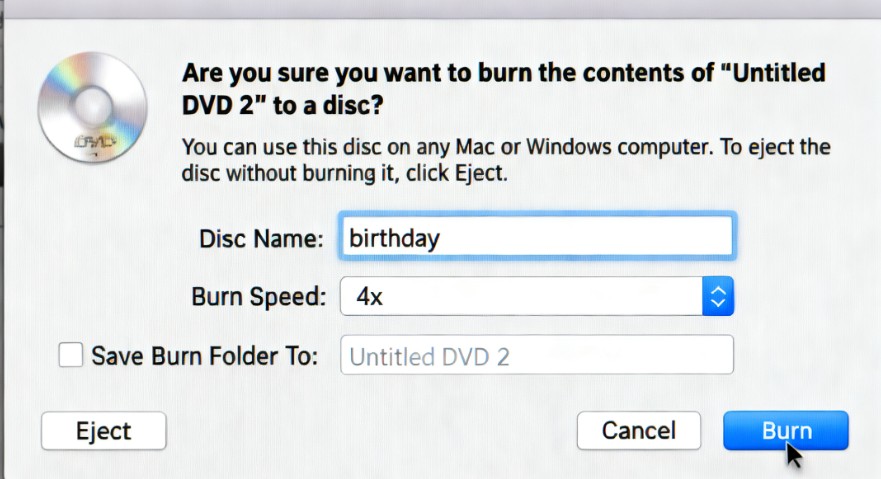
2. In the dialog box, name the DVD in the Disc Name field, and then adjust the burning speed. If the burn fails, you can try selecting a lower speed the next time to improve stability.
3. Click the "Burn" button in the lower right corner of the dialog box to start the burn. You will see a window displaying the progress and remaining time.
4. After the burning is complete, macOS typically performs a verifying step by default, which checks whether the data on the disc exactly matches the original files to ensure burn quality. After verification is complete, the system will chime, and you can automatically or manually eject the disc.
Note: You can burn any file to create a data DVD, but these DVDs cannot be played on a standard DVD player, even if the files you burned are MP4 videos. This is because the disc does not comply with the video disc structure. If you want to convert MP4 to DVD, see the tutorial on how to burn a DVD movie.
How to Make a DVD from an Image File
If you already have a digital image backup of a disc (usually a file with the .iso extension) or a VIDEO_TS folder structure, you won't need authoring software to create the disc structure. The focus of this disc burning process is copying and restoring, not creation. Therefore, we use the professional copying tool, DVDFab DVD Copy, to ensure a 1:1 accurate burning.
Features:
- Burn existing ISO and VIDEO_TS folders (which contain the complete DVD structure) onto blank DVDs.
- Clone/Burn: Create a lossless DVD duplicate, keeping the menu, audio tracks, subtitle tracks, etc., intact.
- Convert DVD to ISO or folder in a few minutes.
- Handle all kinds of DVD encryption, bypassing DVD copy protection.
Below are the steps for how to burn a DVD with DVDFab DVD Copy.
Step 1: Launch DVDFab and Enter the DVD Copy Module
1. Download DVDFab 13 and follow the prompts to install it.
2. Launch DVDFab 13. In the left navigation bar, select Copy.
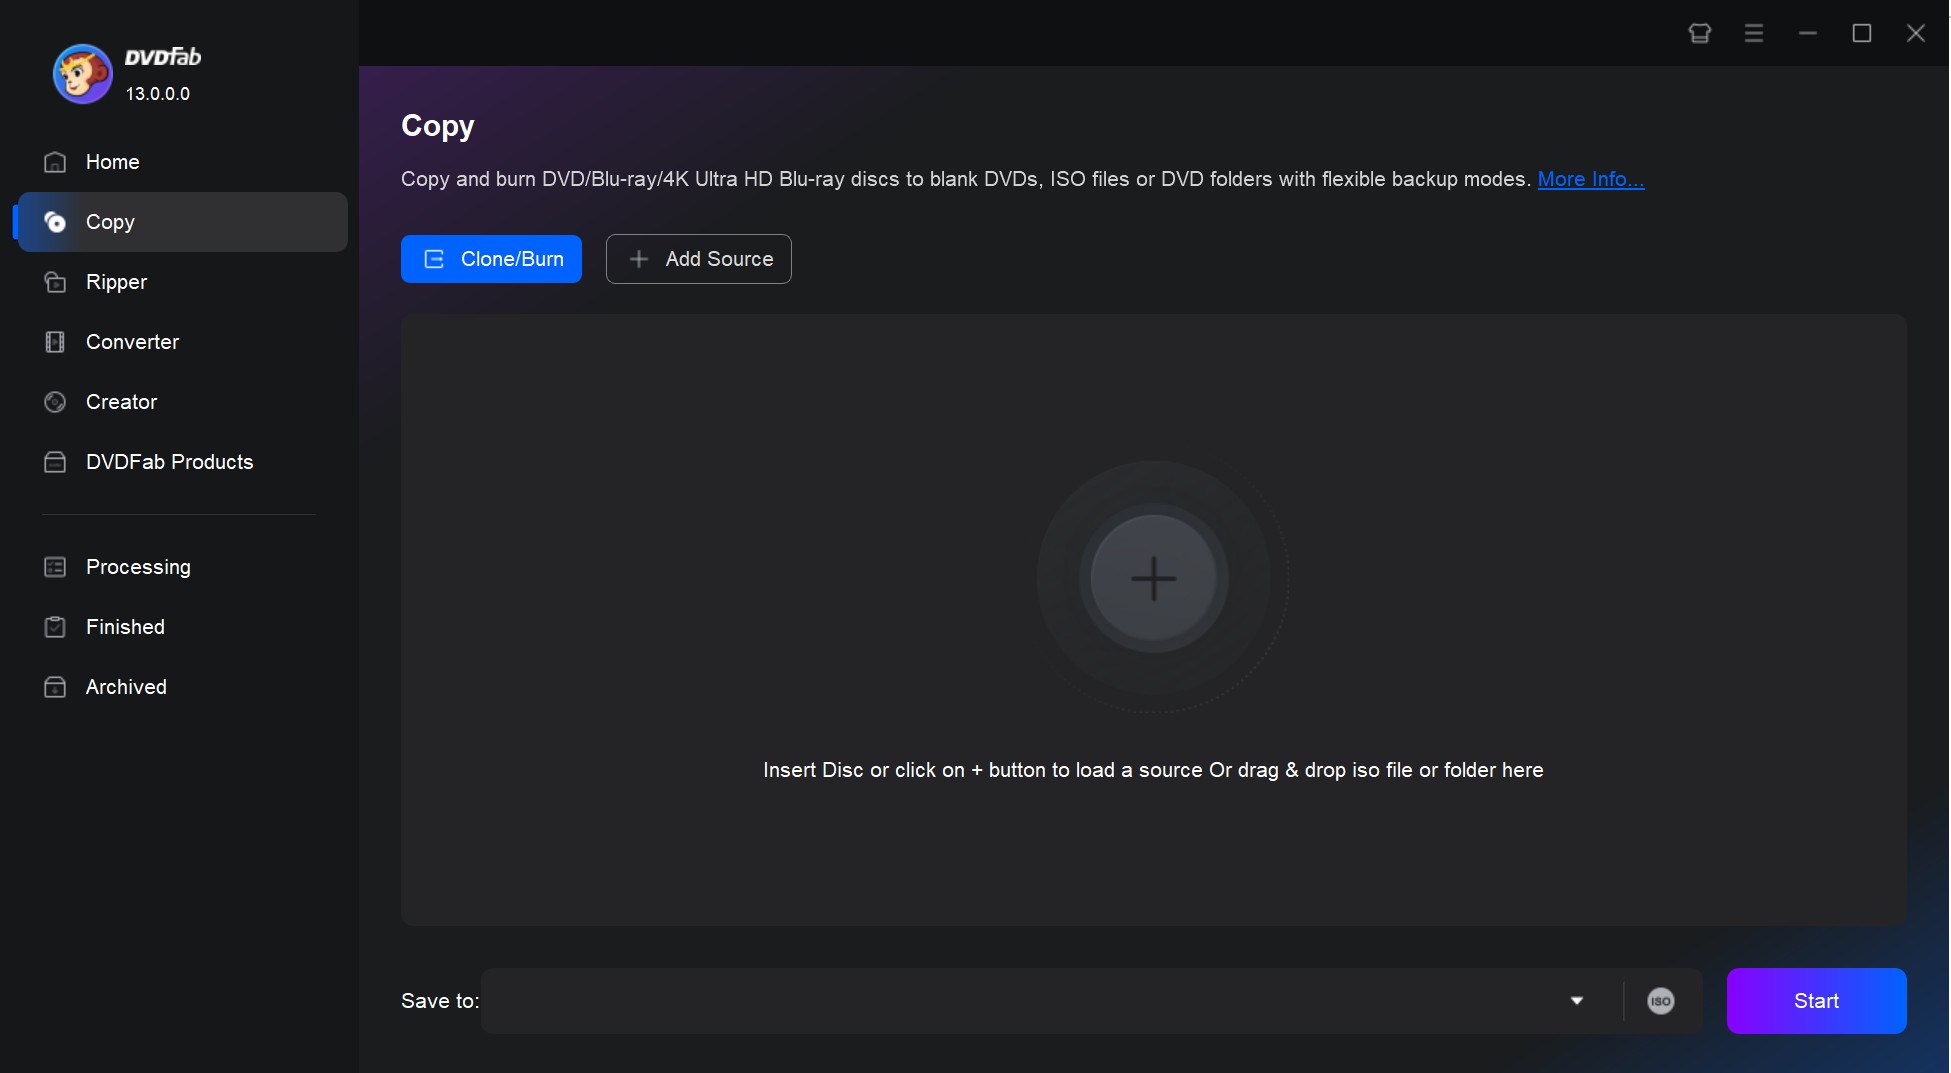
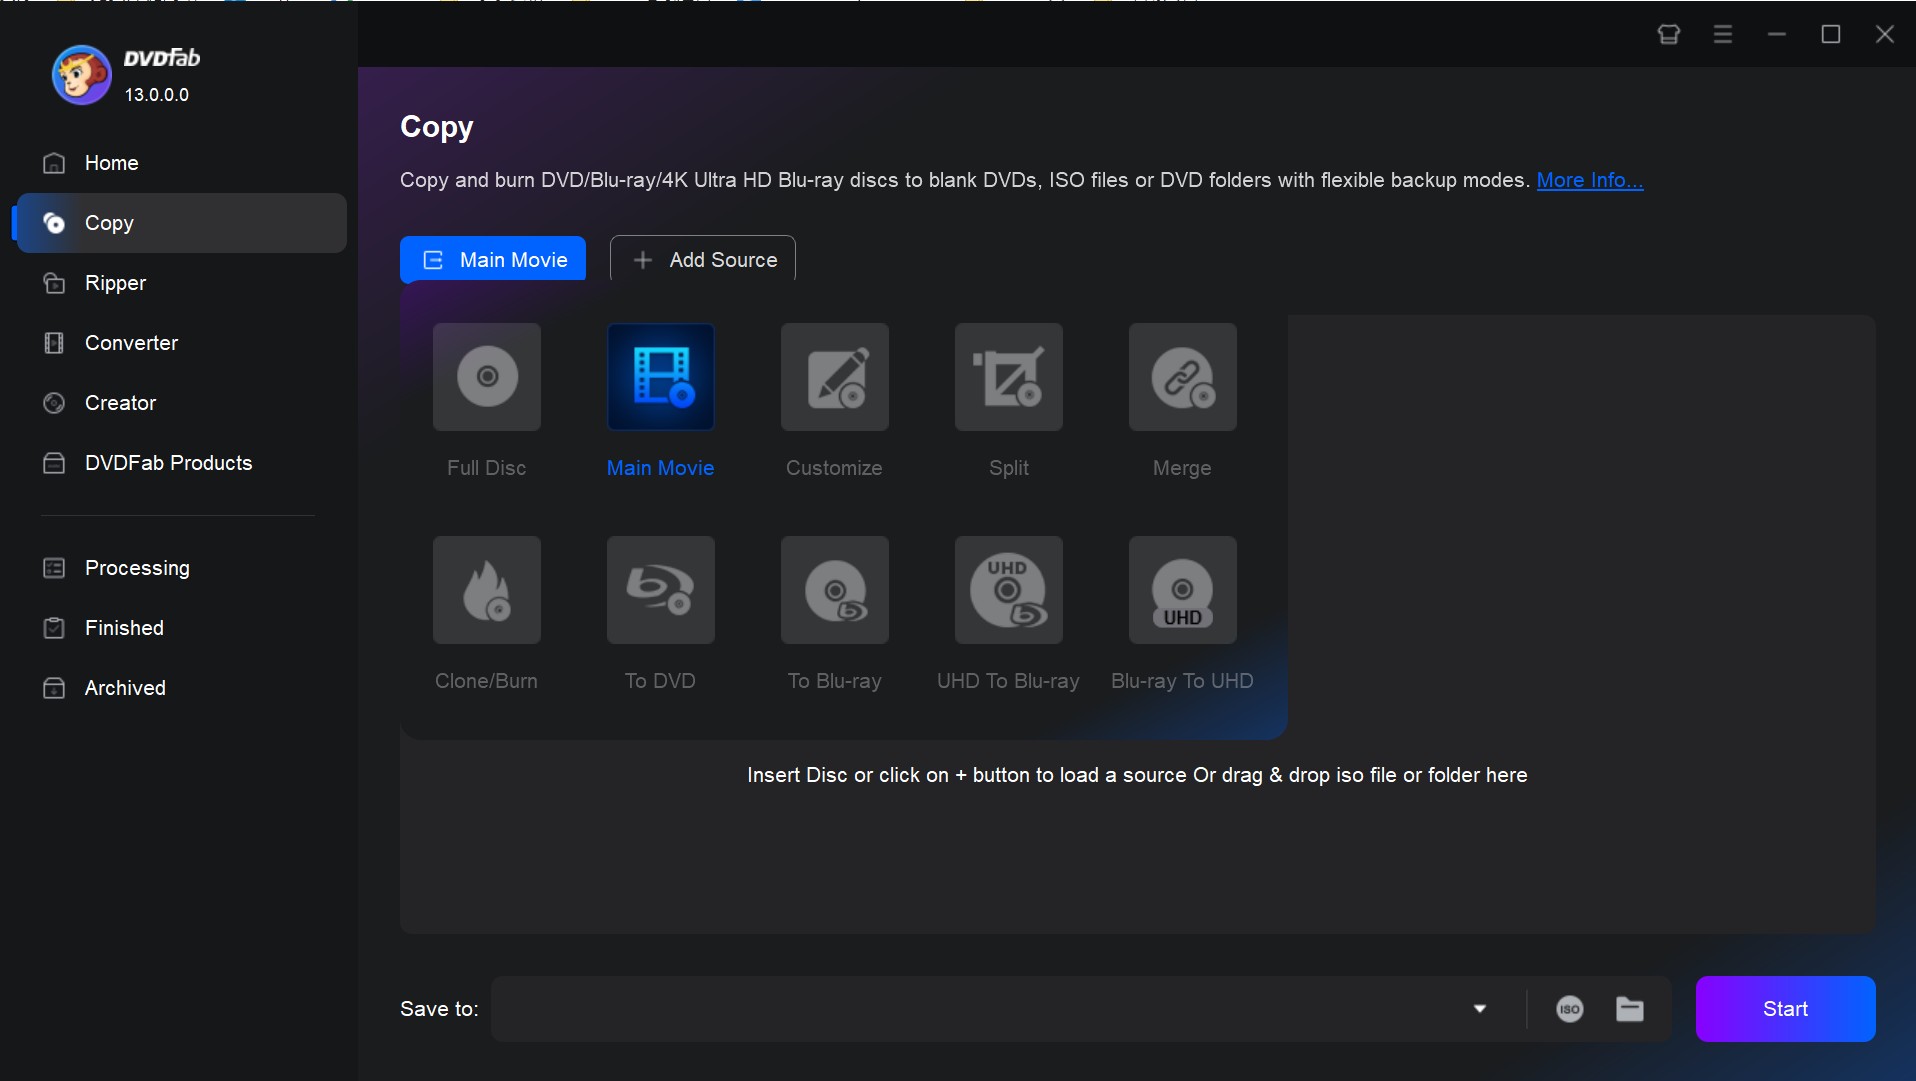
Step 2: Load the Image File (or Folder)
1. Click the "Add Source" button on the interface to upload your ISO file or VIDEO_TS folder. Alternatively, you can directly drag and drop these files into the program window.
2. DVDFab will immediately recognize the image or folder and treat it as a complete DVD source, automatically removing copy protection and Cinavia protection present on the original disc.
Step 3: Customize the Output DVD
1. Select the Copy Mode. DVDFab offers six DVD copy modes: Full Disc, Main Movie, Clone/Burn, Merge, Split, and Customize. Different modes are suitable for different burning situations. Here, we will use the Main Movie mode for demonstration.
2. Click "Advanced Settings" to configure disc playback details, such as changing the Volume Label, Output Size (DVD-5/9), and controlling Video Quality. After setting it up, click OK to return to the main interface.
3. Click "Choose Other Titles". Main Movie mode automatically selects the main movie for burning. If you also wish to burn extras or introductions, manually check them in "Choose Other Titles."
4. The DVDFab main interface provides several dropdown menus: Click the Chapter dropdown menu to select the range of chapters you want to burn. Click the Audio Track dropdown menu to customize the audio tracks you want to keep. Click the Subtitle dropdown menu to select the subtitle tracks to retain.
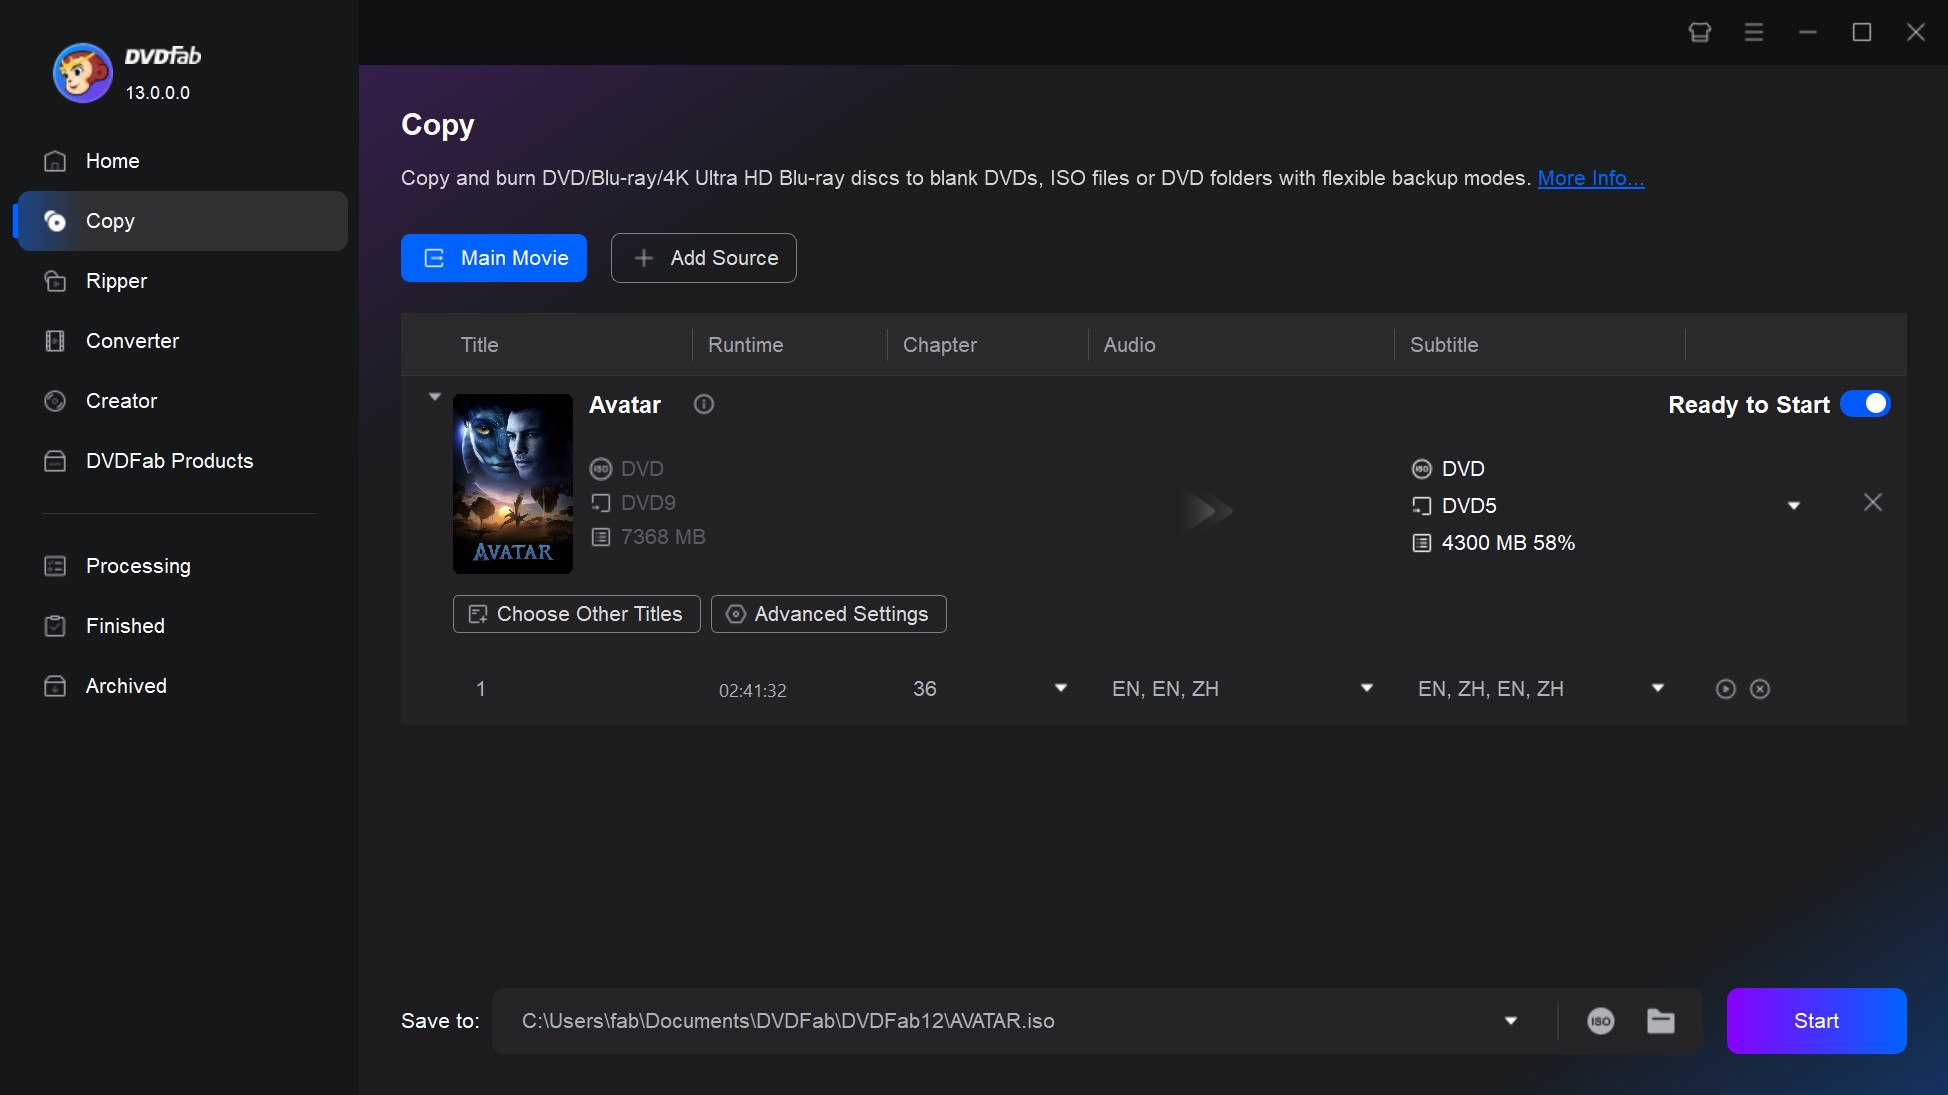
Note: If you choose Full Disc or Clone/Burn mode, you will not have as many customization options, as these modes are specifically designed to retain all content.
Step 4: Start Burning a DVD
1. Insert a blank DVD±R or DVD±RW disc into your DVD burner drive.
2. In the "Save to" bar, select your DVD burner as the output destination. If you wish to burn to an ISO or Folder, click the corresponding icon in the "Save to" bar and select the saving path.
3. Click the "Start" button to begin the burn.
4. After the burning ISO or video_ts to DVD, safely eject the disc from the computer's System Tray.
Why Can't I Burn a DVD? Solutions!
You know how to burn a DVD for free, but it keeps failing? You made your own DVD, but it won't play? You might have entered the "failure feedback loop": you suspect the drive is broken, you buy more expensive blank discs, and you might even yell at your computer. But we bet the problem most people encounter is not your hardware. Below are the most common problems and their effective solutions.
Problem 1: My Burn Failed
| Solution | Details |
| Lower Burning Speed | Data DVD burning using free built-in tools like Windows File Explorer or Mac Finder can be unstable. If you fail repeatedly, try manually setting the speed to a mid-low rate, such as 4x or 8x. While high-speed burning is fast, it demands extremely high stability from the drive and disc. Lowering the speed significantly increases the success rate. If failures persist, switch to a third-party data disc burning tool, such as ImgBurn for Windows or Burn for Mac. |
| Close Resource-Heavy Programs | During the burning process, close all unnecessary background programs, especially large games, video editing software, or any application actively reading or writing files. This ensures that the CPU and memory resources are focused entirely on the burn process. |
Problem 2: My Computer Can't Find the Blank Disc
| Solution | Details |
| Check Drive Drivers | Open the Windows Device Manager. Locate "DVD/CD-ROM drives," right-click your drive's name, and select "Update driver." If the problem persists, try "Uninstall device" and then restart your computer, allowing Windows to automatically reinstall the driver. |
| Try DVD-R | Some older burners may have poor compatibility with DVD+R. If you are currently using a DVD+R, please try switching to a DVD-R disc. |
Problem 3: My DVD Won't Play in My DVD Player
| Solution | Details |
| Use DVD authoirng software | If this happens, it is likely that you mistakenly burned a video file onto a Data DVD. This means the disc only contains a single video file (like Disney movie.mkv). Home DVD players cannot recognize this simple file; they require the professional format containing the VIDEO_TS folder and structure. You must use specialized DVD creation software (like DVDFab DVD Creator) to perform DVD burning like AVI to DVD. |
FAQs about How to Burn DVDs
Is it legal to burn a DVD?
The legality of burning a DVD depends entirely on whether you are infringing on someone else's copyright. It is illegal if you burn copyrighted movies or videos and distribute or sell the resulting DVD. Burning a DVD for the purpose of backing up your personal data files, or burning your home videos onto DVD (such as transferring VHS to DVD) for personal backup and viewing, without infringing on copyright, is generally legal, but this is subject to the regulations in your specific jurisdiction. In short, please strictly comply with local copyright laws when burning DVDs.
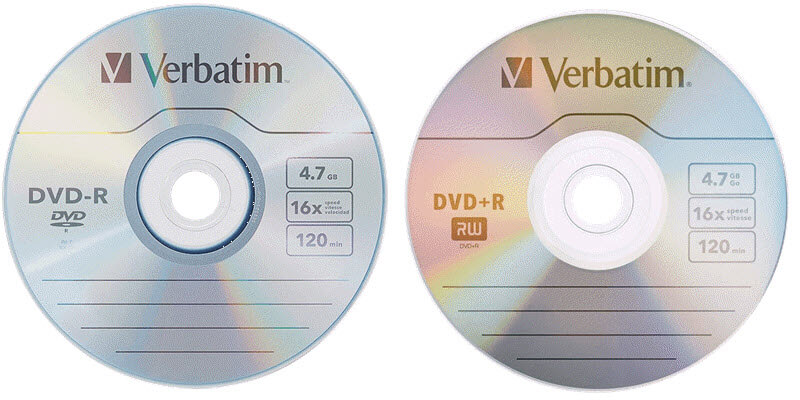
What's the difference between DVD-R and DVD+R?
DVD-R and DVD+R are the two primary formats for non-rewritable, write-once DVDs. They are functionally almost identical but differ in their underlying technology and compatibility evolution. Invented in the early 2000s, DVD-R are compatible for many older DVD players. DVD+R generally offers better compatibility with modern burners and may have a slightly higher burning success rate. However, for casual users today, there is no substantial difference between the two formats, and you can choose the one that is cheaper or more readily available for your DVD burning needs.
Can I burn a DVD using just Windows?
Yes, absolutely, but this is limited to the Data Disc burning process we introduced above. You can burn any kind of files for free, but the compatibility may be poor, and the resulting disc may not play on a dedicated DVD player. For instance, you're able to burn mp3 to DVD with windows built-in tool, but this DVD cannot be played. For burning video files into a playable disc format, you must use specialized software with authoring capabilities.
How do I burn a slideshow DVD?
You cannot directly drag and drop PowerPoint files (.ppt or .pptx) or image files (.jpg) onto a disc and expect a DVD player to recognize them. You need image burning software, such as Freemake Video Converter.
- Save your PowerPoint presentation as images (if applicable).
- Open Freemake Video Converter. Add photos that you want to use in your slideshow using the "+Photo" button.
- Click the "Edit" button to add music, set the time interval between slides, and rearrange the photos.
- Click the "to DVD" button, select the DVD disc destination, and then click "Burn" to start the process.
How can I convert my DVDs to digital?
This is the reverse operation of DVD burning, known as "Ripping." If you want to convert DVD to MP4 and other digital formats, you need to use a tool like DVDFab DVD Ripper. This software supports converting DVDs into over 1000 audio and video formats, allowing for either lossless passthrough or compressed output. Please refer to the official tutorial for specific steps: https://www.dvdfab.cn/resource/dvd/how-to-rip-dvd
Conclusion
You have now learned how to burn your own DVD with free built-in programs and professional tool DVDFab DVD Creator. Whatever your requirements, DVDFab offers the simplest and most professional disc solutions.
Disclaimer: This article is provided for informational and personal backup purposes only. Please read your local laws and regulations and strictly prohibit any commercial burning activities that infringe upon others' copyrights.
 How to Transfer and Burn iPhone Videos to DVD on Windows & MacBy Diana Smith - Jun 11, 2026
 How to Convert AVI to DVD on Windows and Mac in 2026: 6 Best ToolsBy Diana Smith - Jun 10, 2026
 How to Burn a DVD on Mac: 5 Methods That Work on macOS SequoiaBy Diana Smith - Jun 3, 2026
 How to Convert WMV to DVD Free and Easily: Windows / Mac / OnlineBy Wenny Yan - May 27, 2026