
How to Rip DVD to ISO on Windows 10/11 and Mac in 2026

Summary: To convert a DVD to an ISO image, you can rely on dedicated ripping software like DVDFab DVD Copy to simplify the process. To begin, simply insert the disc, select a specific copy mode to prioritize the core content, and choose ISO as the output format to start the backup. Alternatively, Mac users can utilize the built-in Disk Utility to create a .cdr disc image from the physical media, which can then be converted into a standard .iso file using a simple command in the Terminal.
Table of Contents
If you want an easier way to use your DVDs without swapping discs, turning them into ISO files is a simple and reliable option. This process creates an exact sector-by-sector digital copy of your DVD, including the movies, menus, special features, and even the disc's file system, all contained within a single, widely recognized ISO image file.
Unlike MP4 or MKV conversion, an ISO can preserve the DVD structure, including its menus, chapters, and extras.
- In Clone mode, a 1:1 copy preserves the original audio and video data without re-encoding.
- Menus, chapters, and special features remain within the full-disc image.
- You can store the ISO on a hard drive or NAS and mount it with compatible software.
Use these steps only to save content you own or are authorized to access as a local personal backup, where permitted by applicable law. Do not redistribute the resulting files.
DVD to ISO: My First Test for DVD Conversion
💻Working System: 32-bit and 64-bit Windows OS
When I set out to find the best DVD to ISO converter, I wanted to start with the popular tool based on user feedback. After researching several options, I found that DVD to ISO is one of the most highly recommended tools for converting DVDs and CDs to ISO image files. I decided to start my testing with it to understand its strengths and limitations better.
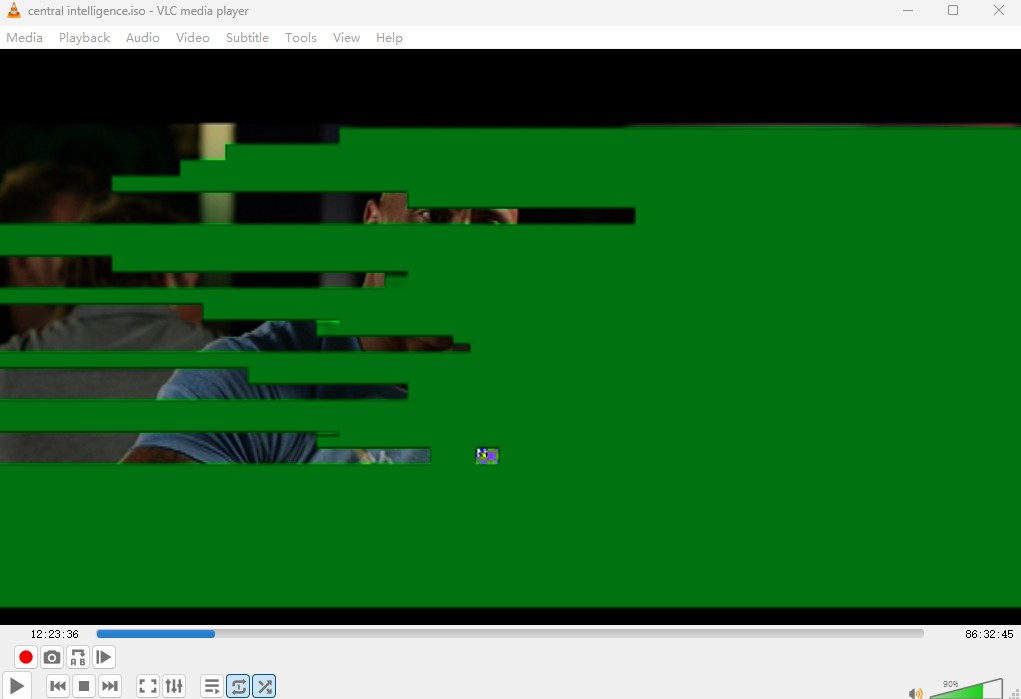
This DVD to ISO tool allows users to easily convert DVDs and CDs to ISO image files on Windows. It supports 32-bit and 64-bit systems and outputs images in ISO 9660 format. I tested the tool on a Central Intelligence encrypted DVD using my external DVD drive connected to my Windows 10. The software immediately recognized the disc, and the process to generate the ISO file took about 16 minutes. While the tool itself was easy to use and didn't require any fancy configurations, there was a major problem with the output: when I tried to play the movie, a green screen appeared, indicating that the tool was unable to handle the copy protection on the DVD.
- Free to use for personal purposes
- Create ISO files from unprotected DVDs without complex settings
- Lightweight and easy to install
- Less reliable for backing up commercial DVDs
- ISO files and DVD folders are not supported as input sources
- No advanced ripping features such as compression or audio track selection
How to Rip DVD to ISO with DVD to ISO
Step 1: Get the DVD to ISO software and install it on your Windows PC.
💡Note: The official download page does not provide a reliable recent release date or maintenance history. Use a trusted download source, and do not continue with installation if Windows cannot verify the installer.
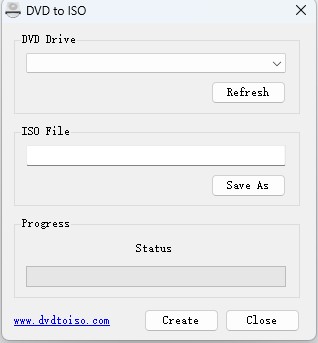
Step 2: Launch the program and select your DVD drive as the source. In the main interface:
- Select your DVD drive as the Source. The software will automatically detect the disc's volume label and capacity.
- Choose a directory on your local drive to save the ISO file, and enter a file name.
Step 3: Click the "Create" button to start ripping. A progress bar will display the conversion status.
While DVD to ISO is a straightforward solution for readable, unprotected homemade discs, my test confirms exactly what many users experience with free tools: a green screen or unplayable file when trying to back up commercial movies.
How to Rip DVD to ISO: Cross-Platform Steps
💻Working System: Windows 11/10/8.1/8/7 & macOS 10.13 - 15.x
DVDFab DVD Copy is a professional tool that can convert any DVD to an ISO file without quality loss. It removes common protections such as CSS, APS, RC, and DADC, ensuring smooth backup of commercial discs. The program supports DVD, ISO, and folder as both input and output and provides six copy modes: Full Disc, Main Movie, Merge, Split, Customize, and Clone/Burn.
I tested DVDFab 13 on my Windows 11 (Intel Core i7-12700K, 32 GB RAM, NVIDIA RTX 3060, external 16× DVD-ROM drive) using a movie DVD The Voyage Home. I chose Full Disc mode and output to ISO, and the software removed encryption and completed in about 6 minutes. I appreciated the GPU acceleration which kept the CPU usage under 20%.
- Support protected DVD content, including common protections covered by cloud updates.
- Clone mode preserves original audio and video data; DVD-9 to DVD-5 compression re-encodes the content to fit.
- Offer customized options, such as selecting audio tracks and subtitles.
- Queue multiple copy tasks, set their priority, and choose an action after completion.
- Create DVD-5, DVD-9, ISO, or folder output.
Step 1: Launch DVDFab DVD Copy and Load the Source
Double-click DVDFab 13, and choose the Copy option. Insert the DVD disc you wish to back up into the optical drive, or navigate to it through the Add button on the main page. If the source is an ISO or a folder, you can simply drag and drop the file onto the main page.
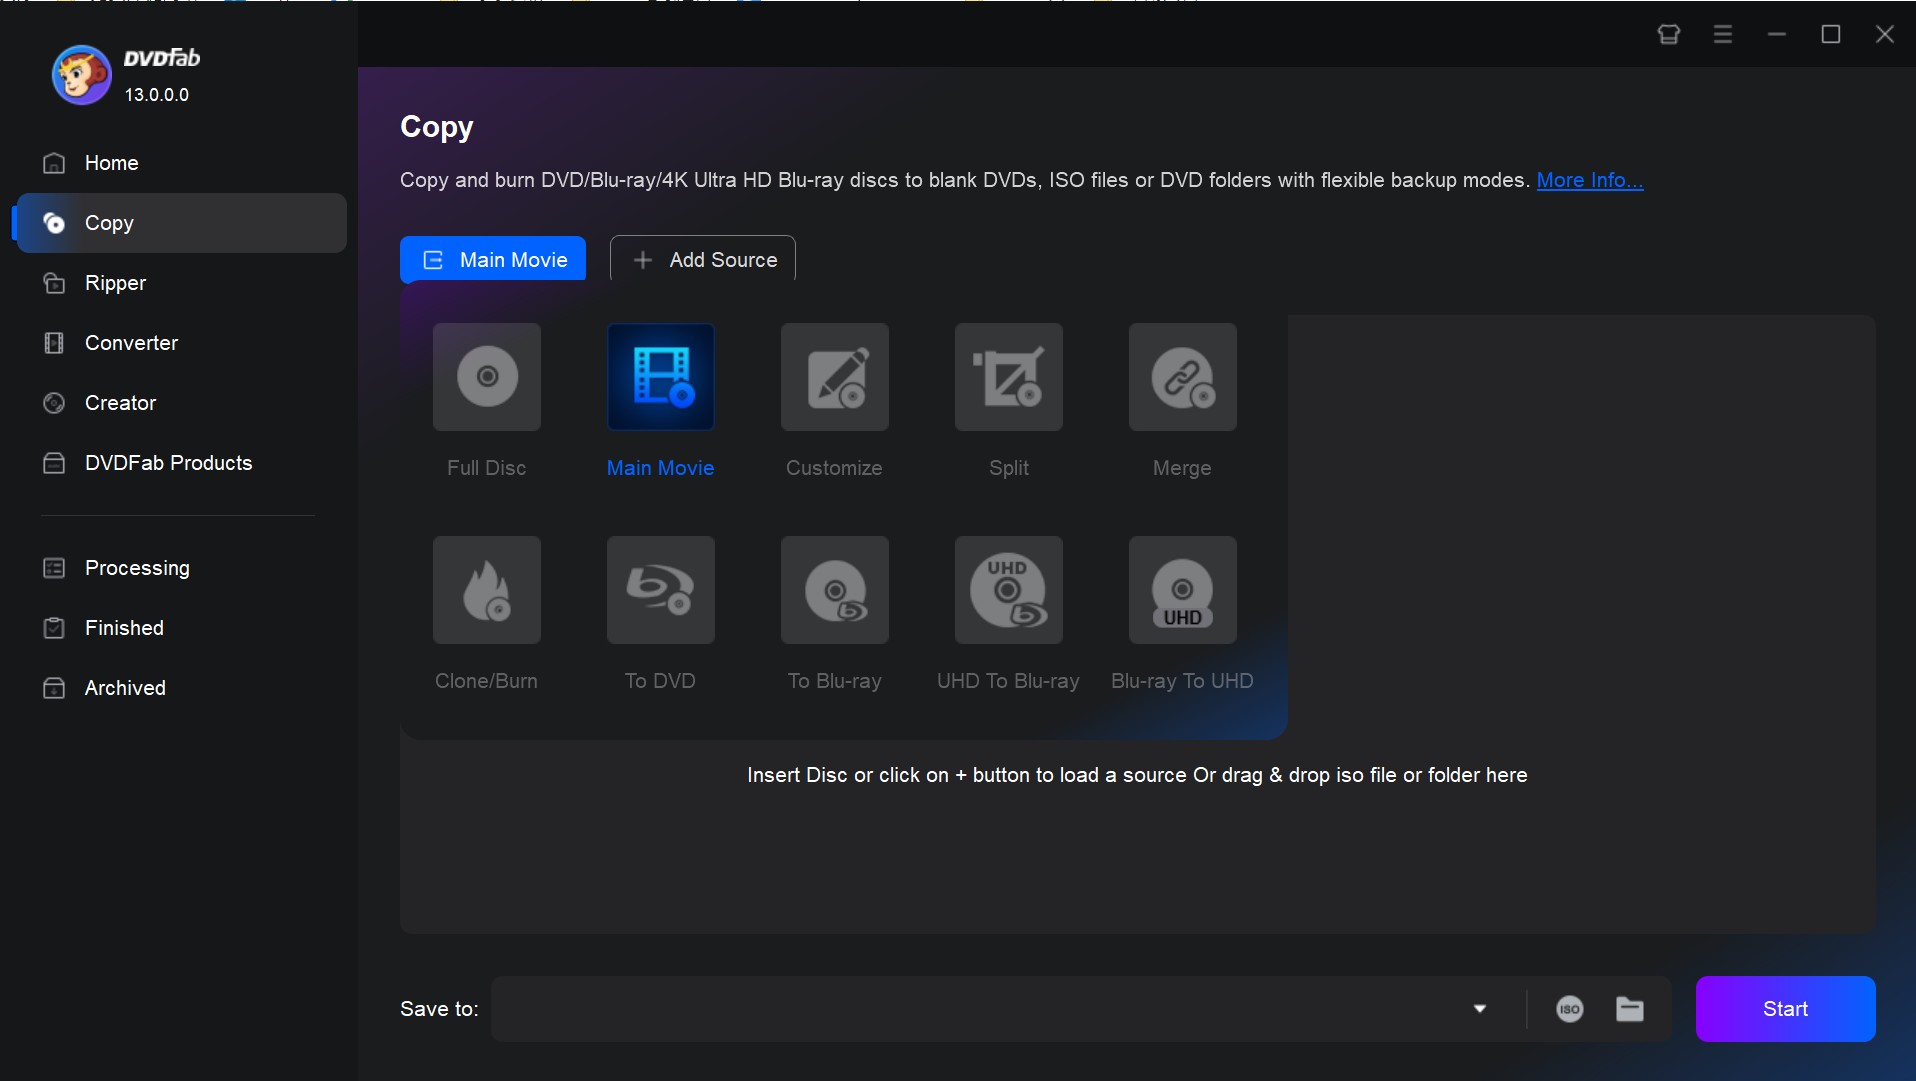
Step 2: Select a Copy Mode and Customize Output
As needed, navigate to the left pane and select your desired Copy mode. Then choose the output DVD size (DVD-9 or DVD-5). You can also define the volume label and change other copy options.
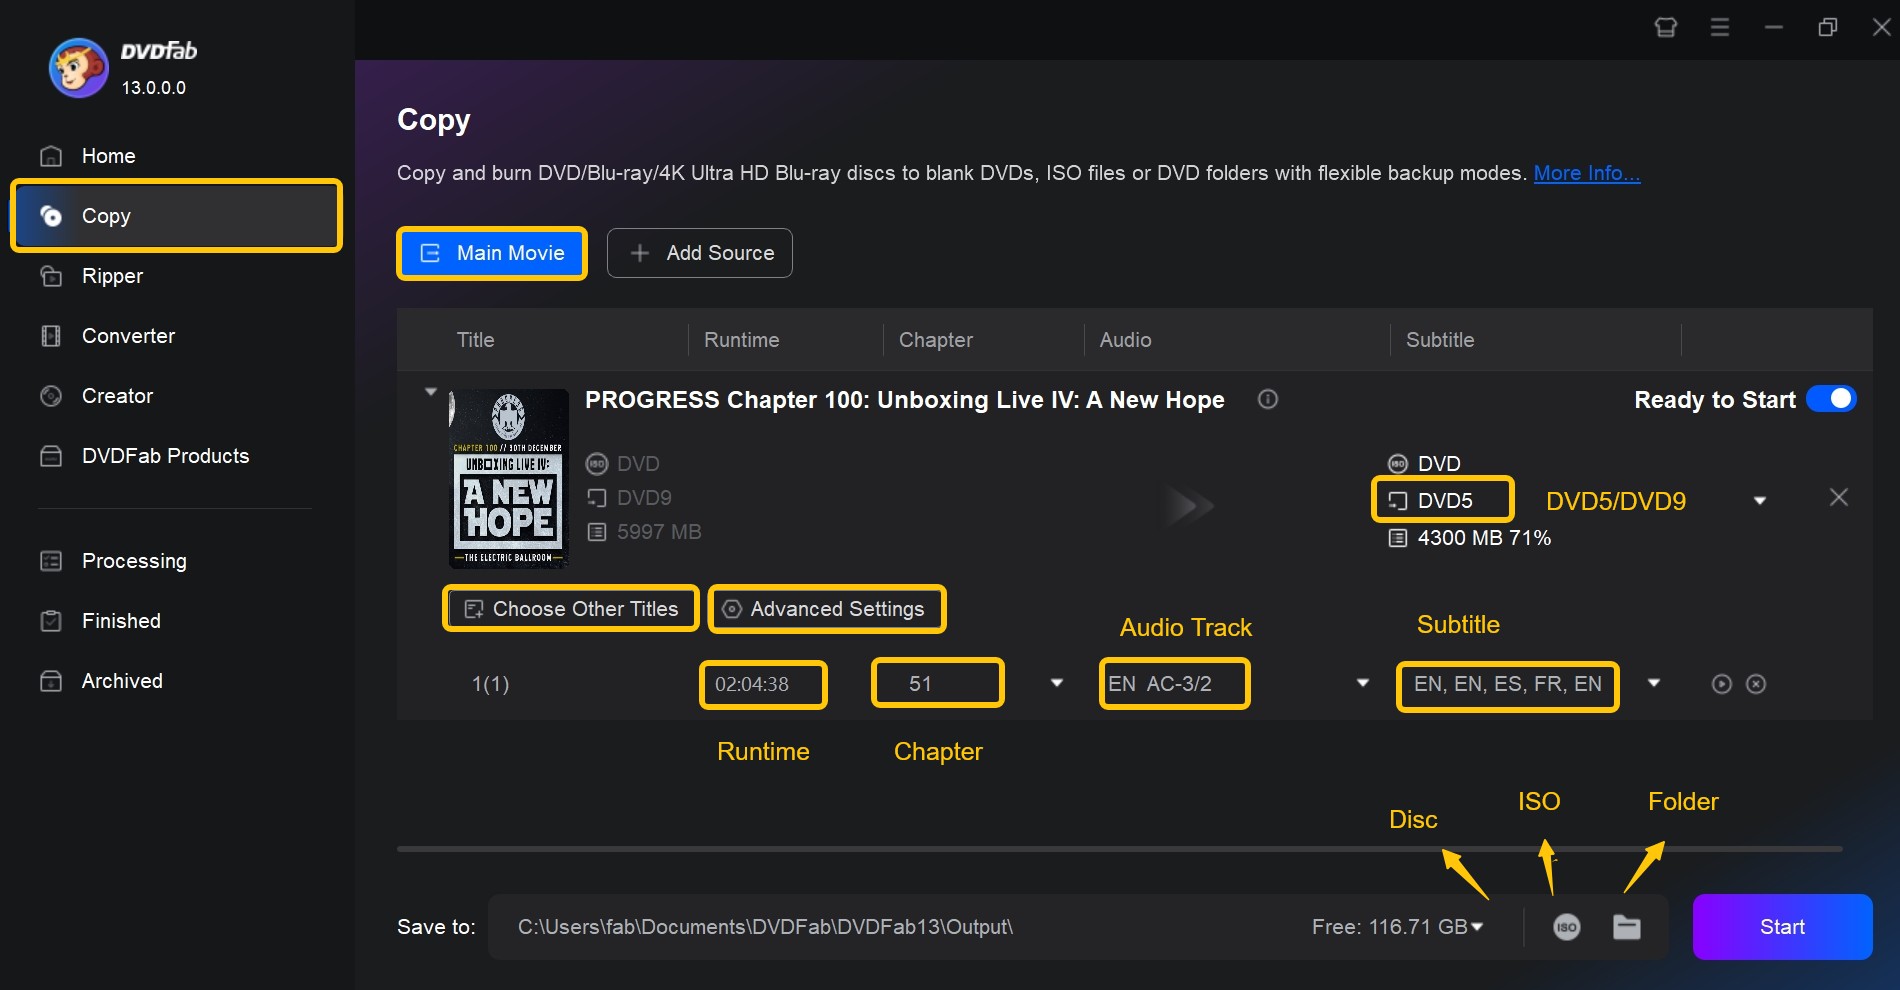
Step 3: Start the DVD-to-ISO Copy
At the bottom of the window, choose your output type: blank disc, ISO file, or folder. Click the Start button to begin the process. DVDFab will handle copying and writing the output according to your settings. During the process you may monitor progress, time remaining, and system resource usage.
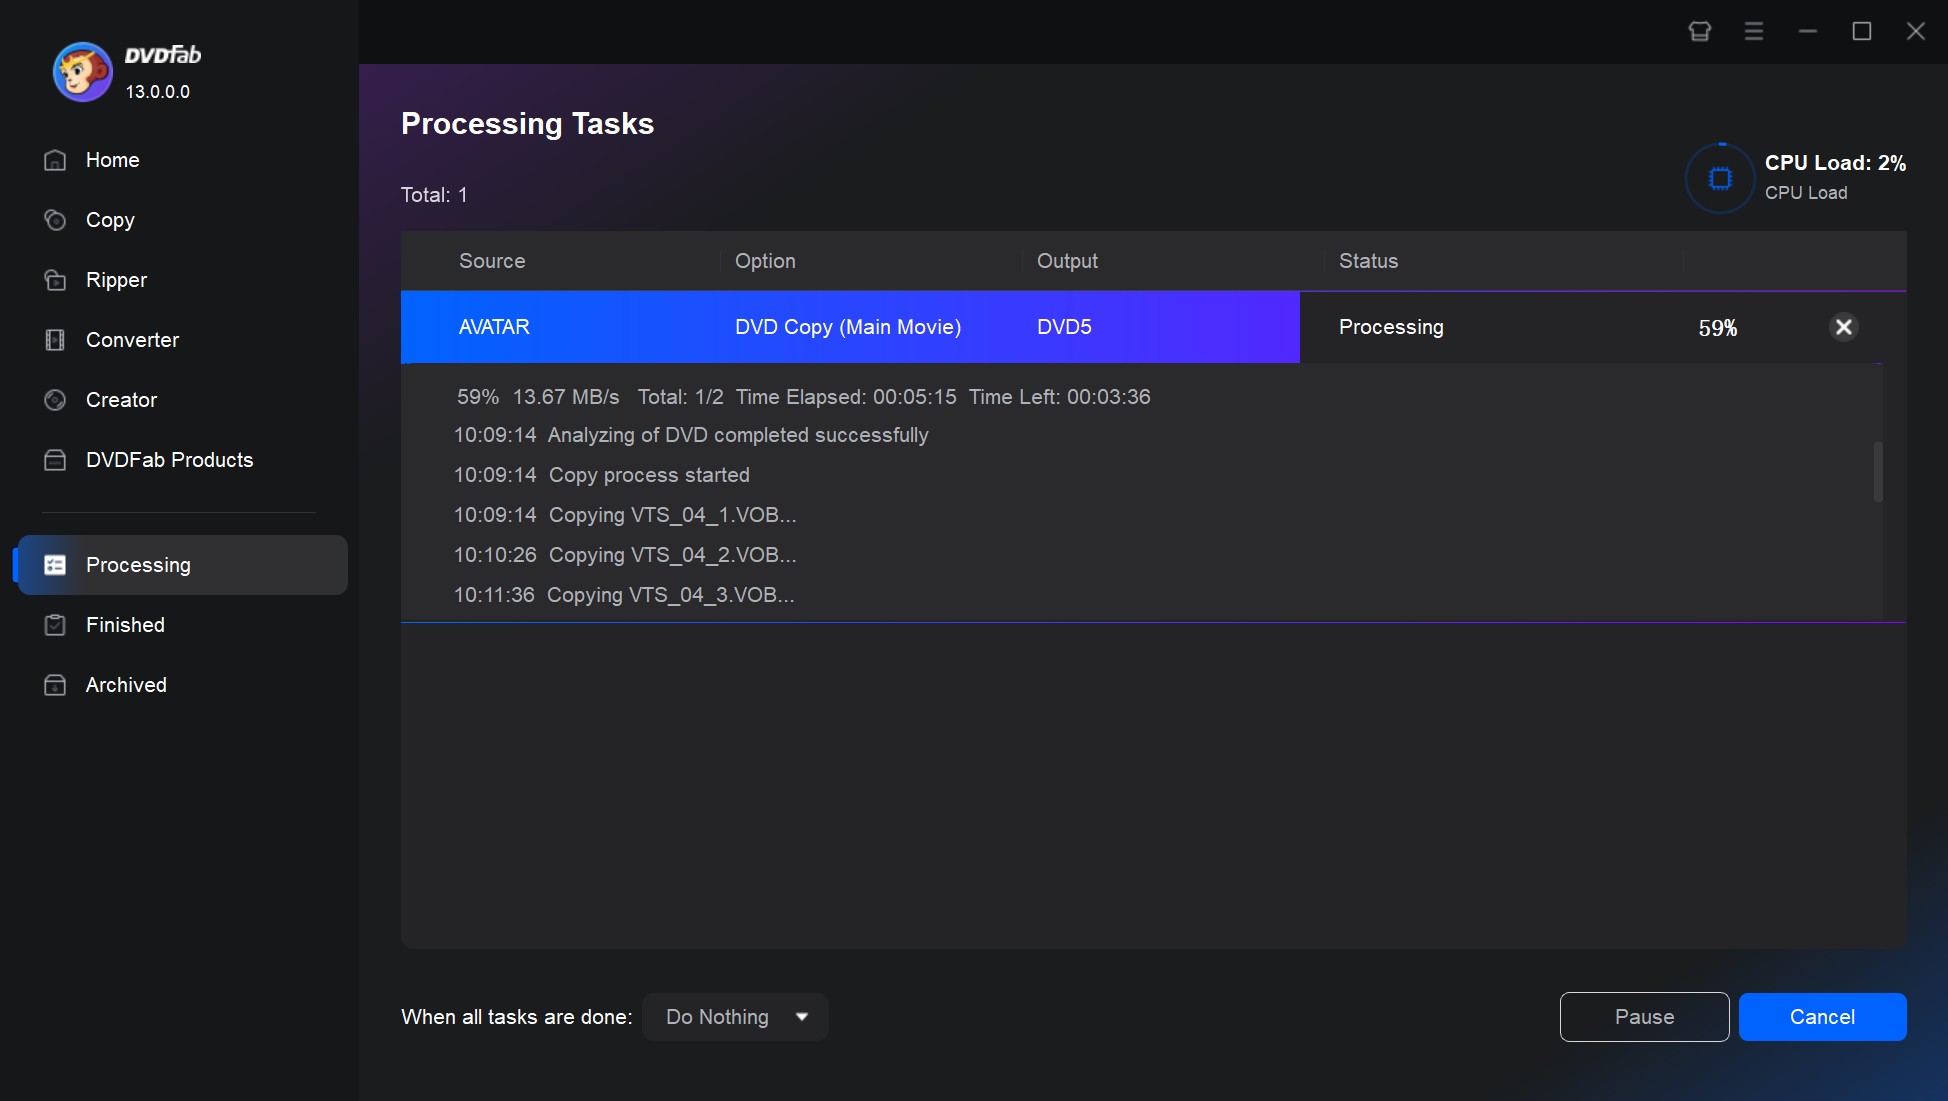
NOTE: DVDFab DVD Copy offers a 30-day trial for up to three DVDs. After the trial, DVDFab HD Decrypter remains available for supported basic tasks, but it is not equivalent to the paid DVD Copy module.
Key Features of DVDFab HD Decrypter for DVD Tasks:
- Available for supported basic copy tasks after the trial.
- Supports DVDs with older protection schemes; newer protections require the paid DVD Copy module.
- Creates ISO or folder backups in Full Disc or Main Movie mode.
- Accepts supported DVD discs, ISO files, and folders as copy sources.
- Adds multiple tasks to the queue and generates media information.
- Included in the same DVDFab package.
How to Rip DVD to ISO on Windows Using ImgBurn
💻Working System: Windows, Linux and other x86-based Unixes through Wine
ImgBurn is a lightweight and free tool that can convert a DVD to ISO or burn ISO images back to physical discs. It supports multiple image formats including BIN, IMG, CDI, and PDI, and offers five functional modes—Read, Build, Write, Verify, and Discovery. ImgBurn 2.5.8.0 was released on June 16, 2013, and is best presented as a legacy option for unprotected, readable discs.
I tested ImgBurn 2.5.8.0 on Windows 11 to create an ISO from a personal home-recorded DVD. The program completed the process in about 30 minutes and produced a clean ISO that mounted instantly in Windows. The interface felt dated but responsive, and the copy was accurate.
- Offers five core functions for reading, building, writing, and verifying images.
- Read a disc to an image file or write an image file to a disc.
- Supports numerous image formats beyond ISO.
- Completely free to use, no license required.
- No longer updated since 2013, potential compatibility risks.
- Cannot rip copy-protected DVDs to ISO.
- Installer may contain adware if downloaded from unofficial sources.
- Cannot compress DVD-9 to DVD-5.
Step 1: Download and Install ImgBurn
ImgBurn is a legacy tool, so the installer source and included offers require extra attention.
To reduce the risk of installing unwanted software:
- Download the setup file from the official ImgBurn website and scan it with Windows Security before opening it.
- Select "Custom Installation" if that option appears, then decline browser toolbars or other additional software before clicking "Next".
Step 2: Open ImgBurn and Choose the Read Mode
Launch the program and click "Create image file from disc" on the main menu. This mode allows you to extract data from your DVD and save it as an ISO image.
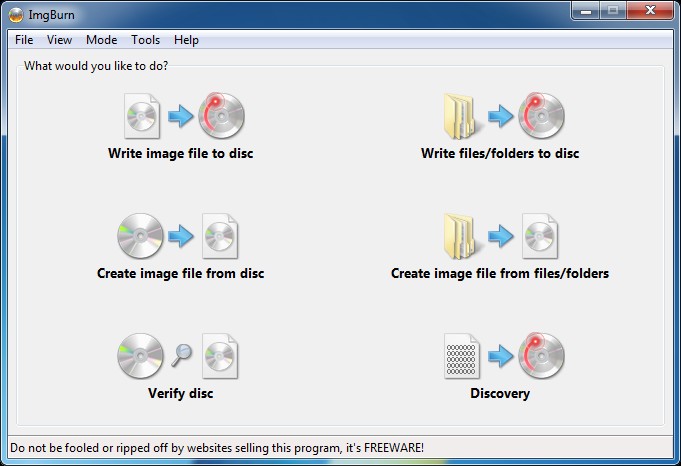
Step 3: Choose Source and Destination
Under Source, select your DVD drive. Then click the folder icon next to Destination and choose where you want to save the resulting ISO file. Rename the file for easy identification, such as MyDVDBackup.iso.
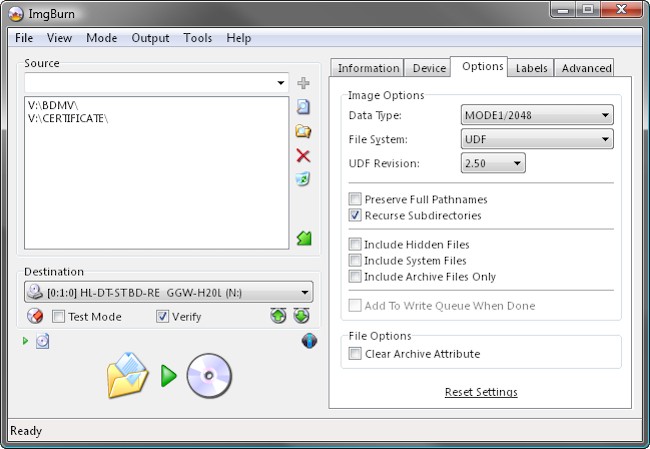
Step 4: Start the DVD to ISO Process
Click the large disc-to-file icon at the bottom to begin copying. ImgBurn will display progress details like read speed and estimated time. A completed copy should be mounted, inspected for the expected folders or files, and tested for playback or file access before it is treated as a usable backup. For a video DVD, confirm that the VIDEO_TS folder is present; repeated playback errors, missing files, or mount failures can indicate an incomplete image. You can also record a SHA-256 hash for later integrity checks.
How to Rip DVD to ISO on Mac Free with Disk Utility
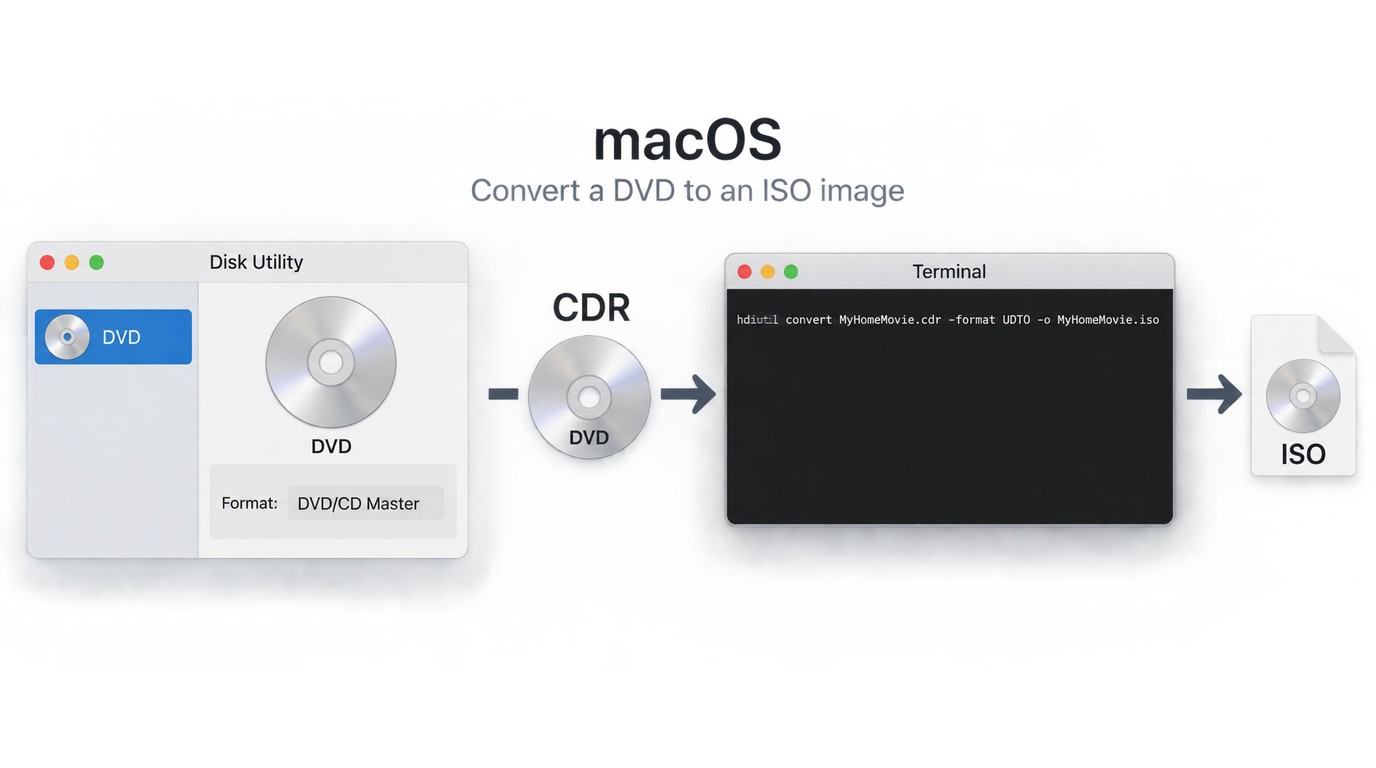
Unlike Windows, macOS offers a built-in way to rip DVD to ISO without third-party software. Disk Utility is built into every Mac and lets you manage storage devices, including hard drives, SSDs, USB drives, CDs, and DVDs. By selecting the "DVD/CD Master" format, you can create a sector-by-sector image of a DVD and then convert that image to a standard ISO for cross-platform use.
I tested this on macOS 14.4 (Sonoma) with an external USB DVD-ROM drive and a home-made wedding DVD containing data and video files. I selected DVD/CD Master format and saved a 4.7 GB image in about 26 minutes, then used hdiutil in Terminal to convert it to a .iso file. No additional software was needed. When I tried a commercial movie DVD, the operation failed. Disk Utility is intended for readable, unprotected discs, so it may not create a usable image from a protected commercial movie DVD.
- Create disk images of CDs, DVDs, or other disks
- Mount and unmount disks and disk images
- Restore previously created disk images to a disk
- No additional installation required
- Lack customization options
- Best for data discs; movie DVDs may copy incompletely
- Limited controls for read errors or bad sectors
Step 1: Launch Disk Utility and Prepare the Disc
Press Command+Space to open the Spotlight search box. Type "Disk Utility", and then press Enter.
Insert your DVD into the external optical drive. Once mounted, it will appear in Disk Utility's sidebar under External > [DVD Name]. Click the disc once to highlight it before creating the image.
Step 2: Create a New Disc Image from the DVD
From the menu bar, choose File → New Image → Image from [Device Name].
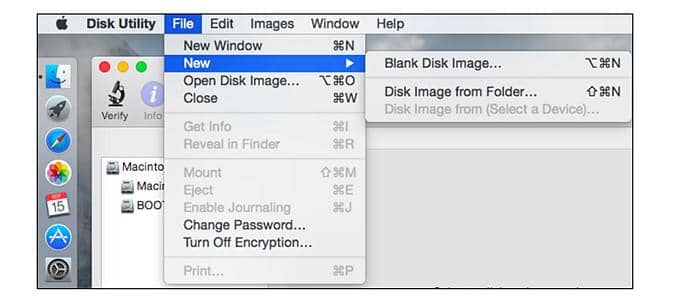
When the save dialog appears, select a destination folder (for example, Desktop) and enter a clear file name such as MyHomeMovie.cdr.
Select the DVD/CD master as the format and leave encryption disabled. As a result, the Disk Utility will create a .cdr file from the disc which is practically as good as an ISO file.
Step 3: Convert the .CDR File to ISO
After Disk Utility finishes, locate the generated .cdr file. To convert it for cross-platform use, open Terminal (Applications → Utilities → Terminal) and run the following command:

Press Enter to start conversion. Mac will create an .iso on your Desktop, which is identical in content to the .cdr.
Step 4: Verify and Store the ISO
Double-click the .iso file to confirm that it mounts correctly, then inspect the image for the expected VIDEO_TS folder or data files. Open the files or test DVD playback rather than relying on the completion message alone. For a long-term archive, you can also record a SHA-256 hash and compare it later. If the image does not mount, files are missing, or playback stops unexpectedly, recreate the ISO before deleting the intermediate .cdr file. If the image works, you can delete the intermediate .cdr file to save space or copy the ISO to an external drive for backup.
More Options to Rip DVD to ISO on Windows 10/11 and Mac
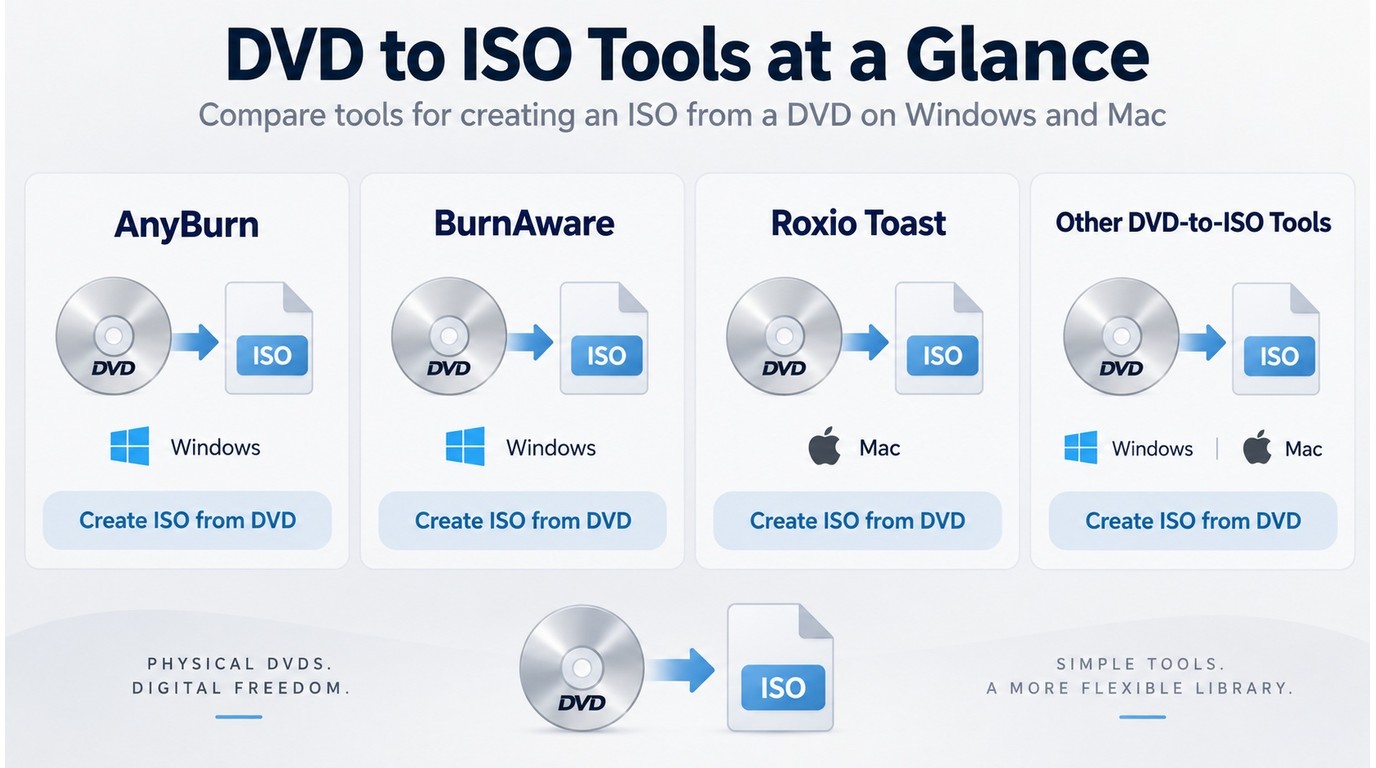
AnyBurn
💻Working System: Windows 7/8/8.1/10/11
AnyBurn is a free and lightweight DVD to ISO ripper specialized in burning and copying CD, DVD and Blu-ray discs, as well as creating image files and converting between various disc image formats. It not only supports creating audio CDs from various digital audio formats, but also can rip audio CDs to WMA, MP3, and WAV.
- Create image files from CD/DVD/BD or HDD
- Make a bootable USB device for Linux or Windows
- Create audio CD that can be played on standard CD player
- Only be available for Windows systems
- Lack video DVD authoring capabilities
- Occasional compatibility issues
How to Clone DVD to ISO on Windows 11 with AnyBurn
Step 1: Download AnyBurn from the official website and install it on your Windows PC.
Step 2: After inserting the DVD you want to convert into your computer's optical drive, launch AnyBurn. On the main screen, select "Create image file from disc".
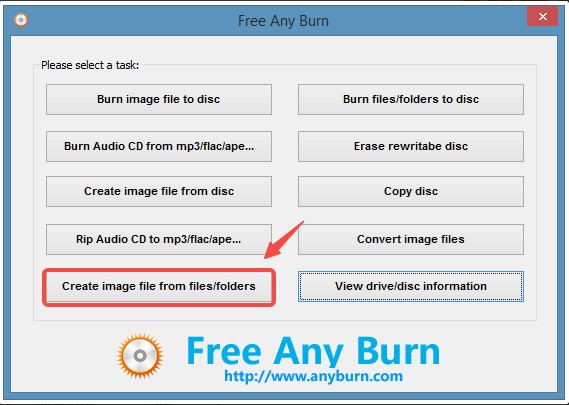
Step 3: In the "Source Drive" drop-down menu, select your DVD drive.
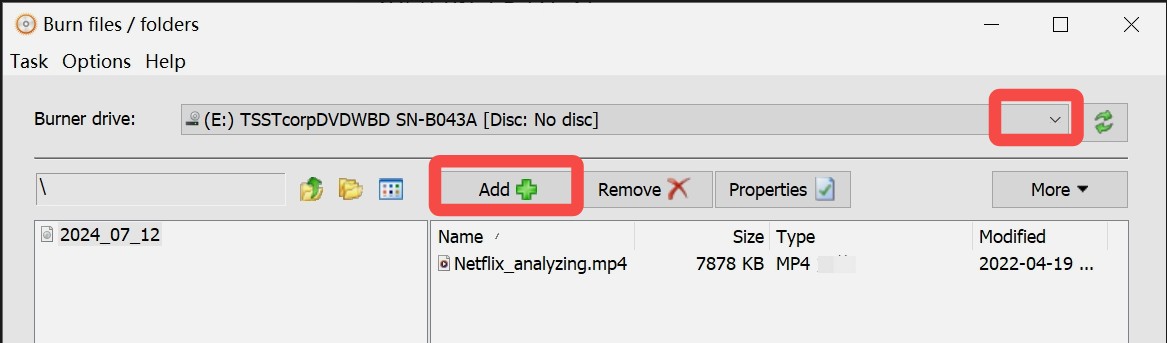
For the Destination Image File, click the folder icon, choose where you want to save the ISO, and enter a file name.
Step 4: Click "Create Now" to start the process. Wait for it to finish; the progress bar will indicate completion.
BurnAware
💻Working System: Windows XP, Vista, 7, 8, 8.1, 10, 11, both 32 and 64 bit
BurnAware is a full-featured ISO file maker that can create ISO images from DVDs, CDs, and BD discs. Users can benefit from BurnAware's advanced options, including control of boot settings, ISO levels, and direct copying, etc,. With it you can create data, music, video, and bootable discs, as well as working with images.
- Offers a free edition for home use
- Supports a wide range of disc and image types
- Clean, intuitive interface suitable for beginners
- Covers all standard burning and imaging tasks
- No disc-to-disc direct copying
- No content menu integration
- Premium and Professional versions not free
How to Rip DVD to ISO with BurnAware
Step 1: Download and install BurnAware on your PC.
Step 2: Insert the DVD you want to back up into your computer's DVD drive. Make sure the disc is recognized in Windows Explorer.
Step 3: Launch BurnAware. In the main interface, navigate to the left sidebar and click on "ISO Images" to expand the options. Select "Make ISO" (Make ISO image from local files).
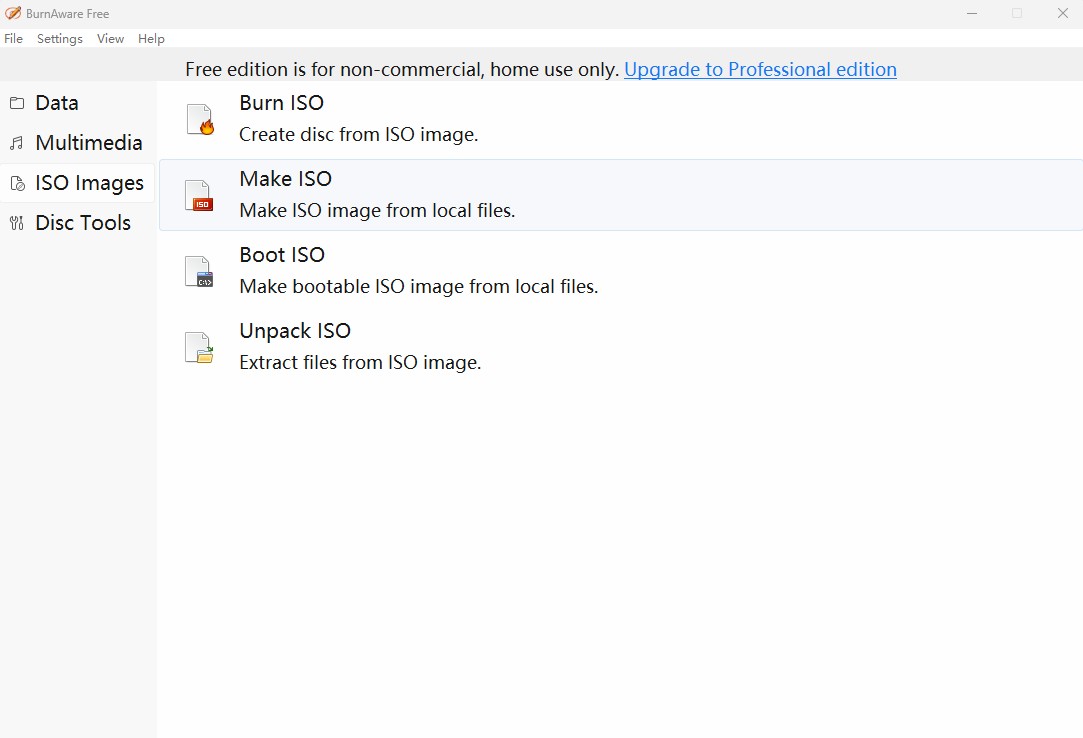
Step 4: In the window that opens, click the center area where it prompts you to add files or folders. Navigate to your DVD drive, select all files and folders from the DVD, and click "Add."
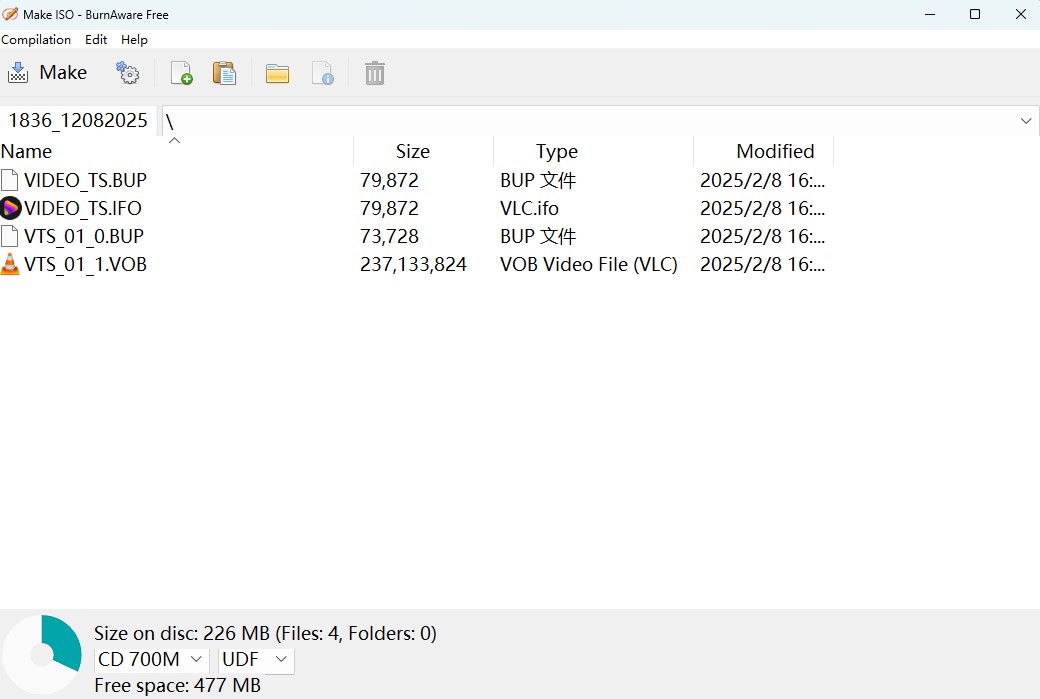
Step 5: After confirming your selection, click the "Make" button at the top left of the window.
Step 6: Choose the destination folder, enter a file name for your ISO image, and confirm to start the process.
PowerISO
💻Working System: Windows 7/8/8.1/10/11/XP
PowerISO is a powerful ISO maker that allows users to process ISO files and other image formats. It supports a wide range of functions such as creating, editing, burning, mounting, and converting disc images. For DVDs, PowerISO can convert physical discs into ISO files for backup or virtual drive use.
- Provide intuitive interface suitable for beginners
- Integrates with Windows Explorer for right-click mounting
- Handles ISO, BIN, NRG, CDI, and DAA files
- Doesn't require many system resources
- Can't process files larger than 300MB in the unregistered version
- Limited to Windows systems
- Limited features in free version
How to Rip DVD to ISO with PowerISO
Step 1: Download and install PowerISO from the official website, then launch the program after installation.
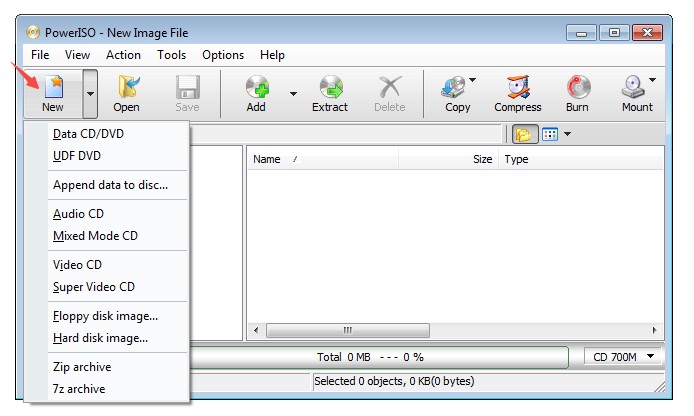
Step 2: Insert the DVD you want to convert into your computer's DVD drive. Make sure the disc is recognized by the system.
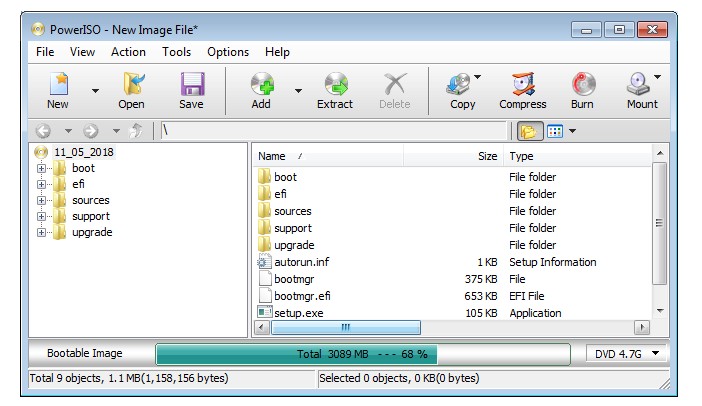
Step 3: In PowerISO, click the "Tools" menu in the top navigation, then select "Make CD/DVD/BD Image File..." from the dropdown list.
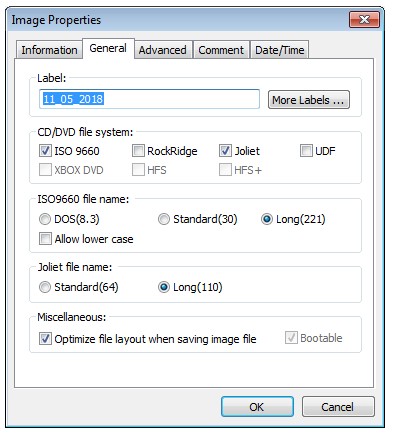
Step 4: In the pop-up window, select your DVD drive as the Source drive. Next, select the location for the output file and name your ISO image file.
Step 5: Click "OK" (or "Convert" if prompted) to start the ripping process. After completion, you can use the built-in PowerISO virtual drive to mount and verify your ISO file.
Roxio Toast
💻Working System: macOS
Roxio Toast is a Mac-exclusive disc authoring suite covering burning, ripping, format conversion, and basic video editing in one package. For DVD-to-ISO tasks, Toast can copy a readable, unprotected disc to an image file on a Mac.
- Support numerous formats & languages
- Convert DVDs to digital files
- Be able to recover damaged discs
- Burn music, photos, and data to DVD with drag and drop controls
- Limited to readable, unprotected discs for image creation
- Available only for macOS
How to Copy DVD to ISO with Roxio Toast
Step 1: Open Roxio Toast. Insert the DVD you want to create an ISO of. In the main window, click on "Copy" in the left-hand sidebar. Select "Image File" as the copy format.
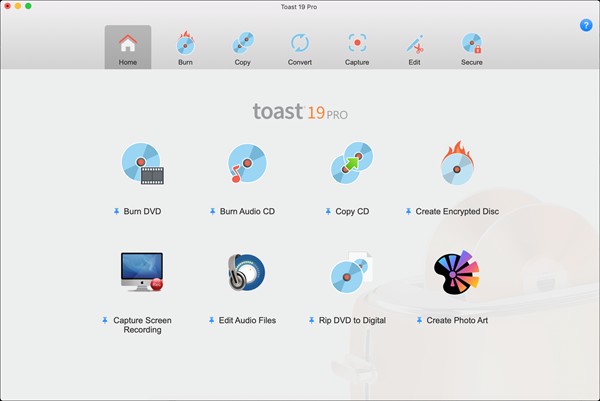
Step 2: Choose the DVD drive that contains the disc you want to copy. Select "DVD-Video" as the format if prompted. Choose a destination folder where you want to save the ISO file.
Step 3: Click the "Record" button to start the ISO creation process.
Choosing The Right DVD to ISO Converter: Features Compared
The table below compares current DVD to ISO options by operating system, suitable disc type, price model, and primary use.
| Software | OS Support | Maintenance Status | DVD Decryption | Batch Ripping | Compression | Highlights/Notes |
|---|---|---|---|---|---|---|
| DVDFab DVD Copy | Windows, macOS | Active | Yes, including CSS, RC, Sony ARccOS, etc | Yes | Yes | Cross-platform with custom modes |
| ImgBurn | Windows | Classic, no recent updates | No | No | No | Support a wide range of image formats |
| PowerISO | Windows | Active | No | No | No | Integrate with Windows Explorer |
| BurnAware | Windows | Active | No | No | Support audio CDs and bootable discs | |
| DVD to ISO | Windows | Unknown — No public changelog | No | No | No | Focused on converting DVD to ISO |
| AnyBurn | Windows | Active | No | No | No | Small footprint; create bootable drives |
| Roxio Toast | macOS | Active | Yes, but region-free only | Yes | Yes | Full-featured suite for media creation |
| Disk Utility | macOS | Active | No | No | No | Lack dedicated video DVD features |
Here's a quick guide to help you match the right software to your specific scenario:
2. ImgBurn - Ideal for creating ISO images from data or home-recorded DVDs
3. PowerISO - Great for those who want to mount, edit, or write ISO images to CD/DVD.
4. BurnAware - A free way to create and burn ISOs from various disc types.
5. DVD to ISO - Quick choice for converting unprotected DVDs to ISO files for simple backups.
6. AnyBurn - A lightweight solution for beginners handling basic disc and ISO operations.
7. Roxio Toast - Designed for Mac users who want to copy, and burn DVDs with menu customization.
8. Disk Utility - The built-in tool for Mac, perfect for generating ISO images from data discs.
For a personal backup of a DVD you are authorized to access, DVDFab DVD Copy is the stronger match when the disc uses supported native copy protection and you need Full Disc or Clone output. For a readable, unprotected disc, a free imaging utility may be sufficient.
FAQs About DVD to ISO
How to verify and mount the ISO on Windows and macOS?
Verifying the ISO confirms that the image was created correctly and can be read like a real disc.
On Windows 11/10:
- Locate the ISO in File Explorer. Right-click the file and choose Mount. If you do not see Mount, select Open with → File Explorer.
- A new DVD drive letter will appear. Open it and browse the files. For a video DVD you should see a VIDEO_TS folder.
- Optional integrity check: open Command Prompt and run: certutil -hashfile "C:\path\to\your.iso" SHA256
- Save the hash so you can re-check it later.
On macOS:
- Double-click the ISO in Finder. If it does not mount, choose Open With → DiskImageMounter, or run Terminal: hdiutil attach ~/path/to/your.iso
- The ISO mounts under /Volumes and appears in Finder. Open it and verify the expected folders and files.
- Optional integrity check in Terminal: shasum -a 256 ~/path/to/your.iso
- To unmount, eject the volume in Finder, or run hdiutil detach "/Volumes/Your ISO Name".
- After mounting the image, test playback or open several files. A mount failure, missing VIDEO_TS content, repeated read errors, or playback that stops unexpectedly can indicate an incomplete ISO.
Can HandBrake or MakeMKV create ISO files?
HandBrake transcodes DVD video to formats such as MP4 or MKV and does not create ISO images. MakeMKV's standard process also creates MKV files. Its Backup feature follows a separate full-disc backup process and should not be confused with ISO creation. To create an ISO, use a disc-imaging application that explicitly supports DVD input and ISO output, then mount and test the completed image.
Can you clone DVD to ISO on Linux?
Yes, you can convert DVD to ISO on Linux pretty easily because Linux has a built-in feature that allows you to rip DVD to ISO on Linux. Here is an example of how to use the 'dd' command in the terminal:
- Firstly, you must insert the DVD into the disk drive and mount it.
- After that, you can use the 'dd' command to rip the DVD. You can use the 'mount' command to check where your DVD is mounted.
The 'dd' command syntax will look something like this: "dd if=/dev/dvd of=~/my_dvd_backup.iso bs=2048"
Remember to replace '/dev/dvd' and '~/my_dvd_backup.iso' with your actual DVD drive path and the desired output file path, respectively. For a GUI based approach, you can use software like "Brasero" or "K3b". They are easy to use with lots of options and good for beginners.
Why choose ISO instead of MP4 or MKV?
ISO preserves the disc structure, menus, chapters, extras, and original streams; MP4 and MKV are file-oriented outputs better suited to broad playback or selective track storage.
- ISO: Retains the full DVD structure and is suited to complete disc preservation, mounting, and later restoration. It usually requires more storage and compatible playback software.
- MP4: Stores the selected movie or episode as a widely playable file, but it does not preserve the original DVD menu or full disc structure. Transcoding can reduce file size and makes editing easier.
- MKV: Can retain selected video, audio, subtitle, and chapter tracks in one file, but it generally does not reproduce the original DVD menu.
I would choose ISO when menus, extras, and future disc restoration matter. MP4 or MKV is more convenient when the goal is file-based playback, editing, or keeping only selected tracks.
Can Rufus create an ISO from a DVD?
No. Rufus writes an existing bootable image to a USB drive; it does not read a physical DVD and save it as an ISO. Use a disc-imaging application with DVD input and ISO output for this task.
Can I convert a DVD to ISO online?
A physical DVD must be read through a local optical drive to create a full-disc ISO. Browser-based converters cannot directly access the disc structure, and uploading an entire DVD image would add an unnecessary transfer step. Use desktop disc-imaging software instead.
What does “burn DVD to ISO” mean?
Creating a DVD ISO reads a physical disc into an image file. The reverse task is to burn an ISO to DVD, which writes an existing image back to compatible optical media. If your goal is a file on your computer, choose the option to create or read a disc image.
Conclusion
Current disc condition, operating-system support, and the tool's supported source type determine whether a DVD can be read into a usable ISO. A lightweight imaging utility may be sufficient for a readable, unprotected disc. For personal backups of DVDs you own or are authorized to access, DVDFab DVD Copy supports ISO output on Windows and macOS, with Full Disc, Main Movie, and Clone/Burn copy modes plus a task queue for multiple jobs. The limited trial lets you check source recognition, ISO creation, and playback before selecting a license.

 How to Copy DVD on Mac: 6 Tested DVD Copy Software for Mac in 2026By Wenny Yan - Oct 26, 2026
 11 Best ISO Creators to Create ISO File on Windows & Mac [2026 Updated]By Wenny Yan - Oct 9, 2026
 8 Best Free ISO Burners for Windows and Mac in 2026: Tested PicksBy Diana Smith - Sep 16, 2026
 How to Remove DVD Copy Protection: 6 Software Options [2026]By Diana Smith - Sep 10, 2026