How to Rip DVD to Facebook and Upload Videos Easily [2026 Guide]
Summary: Want to share your favorite DVD clips on Facebook? This guide shows you how to rip DVDs into Facebook-compatible formats using both free and paid tools, and how to upload the videos without losing quality. Please make sure to use it only for personal, legal purposes.
Table of Contents
A while ago, wanted to post a short scene from one of my favorite DVDs on Facebook, a funny family moment we had recorded years ago. But I quickly ran into a problem: the DVD file was too large and not in a format Facebook supported.
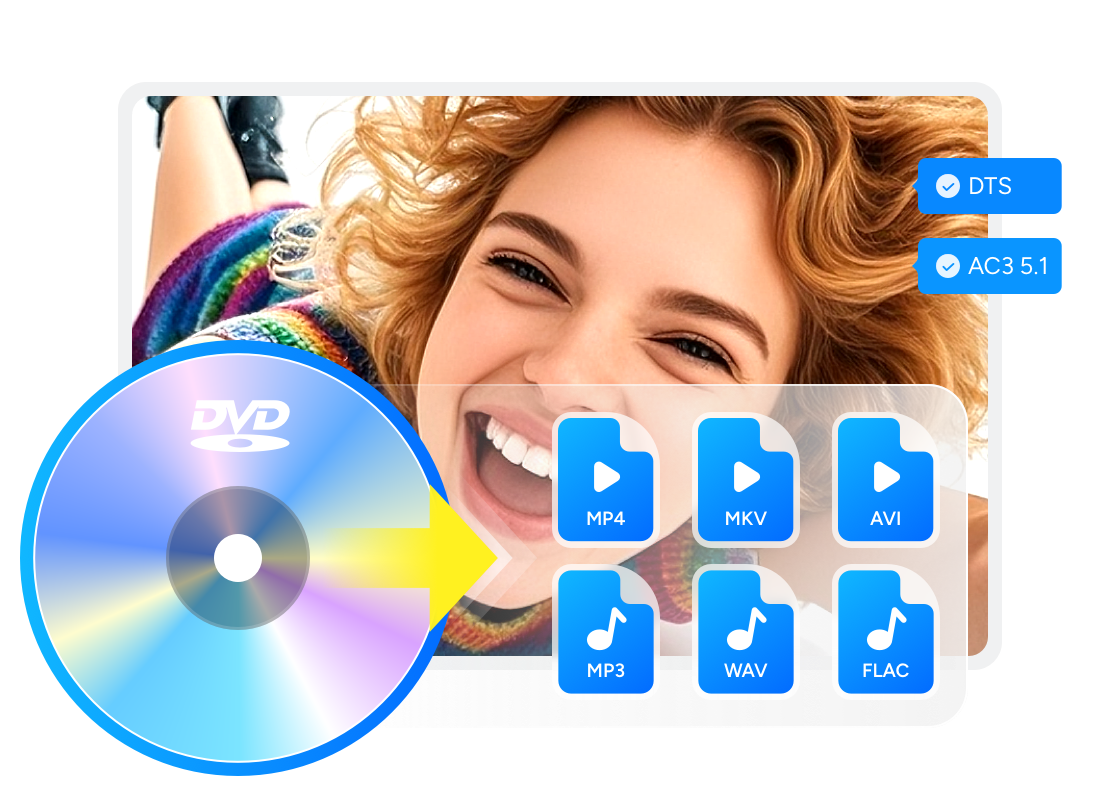
If you've ever tried to do the same thing, you already know the problem. DVD videos aren't made to go straight from disc to Facebook. The format is different, and you usually only want a small clip, not the whole two-hour movie or home video. However, you can rip DVD to a Facebook-friendly file, and cut out just the parts you want to share. In this article, I'll walk you through the best programs to rip DVDs to Facebook, so you can easily convert and share your favorite moments online.
Preparations for Ripping DVDs to Facebook
Before you turn a DVD into a Facebook-ready video, it's worth doing a couple of quick checks. They help you avoid wasted time, error messages, or uploads that look bad in the feed.

1. Check whether the DVD is protected
If you're working with a copy-protected DVD, such as commercial movies or concert recordings, regular tools may fail or produce errors. Make sure to use a DVD ripper that can bypass common protections.
2. Confirm that you have the right to share the video
If the DVD contains a family recording, a school event, your own footage, or another video you have permission to post, converting it for Facebook is usually straightforward. If it is a commercial movie, concert, TV show, or copyrighted bonus feature, do not upload the clip unless you have the legal right to share it. Ripping and posting copyrighted material can create copyright and platform policy issues, especially in the US market.
3. Use Facebook-friendly MP4 settings
For a normal Facebook post or Page upload, MP4 with H.264 video and AAC audio is the most practical target because it is widely supported by browsers, phones, and social platforms. A DVD source usually does not gain real detail from being forced to 1080p, so focus on a clean encode, correct aspect ratio, and a reasonable file size.
| Setting | Recommended choice | Why it matters |
| Container | MP4 | Easy to upload and play on Facebook |
| Video codec | H.264 | Broad compatibility across desktop and mobile devices |
| Audio codec | AAC | Helps avoid audio playback problems after upload |
| Resolution | Keep the DVD source size or export 720p when appropriate | Avoids fake upscaling that only increases file size |
| Clip length | Short, focused clips when possible | Shorter files upload faster and are easier to watch in the feed |
| Subtitles | Burn in subtitles if viewers must see them | Soft subtitle tracks may not display after upload |
How to Rip Copy-protected DVDs to Facebook
If you want a smoother and faster way to upload your DVD clips to Facebook, DVDFab DVD Ripper is a straightforward option to finish in one workflow. It can rip copy-protected DVDs, convert them to Facebook-compatible formats, and even enhance the video quality.
- Bypass various DVD protections including CSS, Region Code, and more
- Convert DVDs to all popular formats, including DVD to MP4, ideal for Facebook uploads
- Use hardware acceleration on supported GPUs to noticeably reduce conversion time
- Let you pick audio tracks and subtitles, trim or adjust advanced settings
- Available for both Windows and macOS, with an interface that supports multiple languages
- Input: DVD disc (2D/3D), ISO, folder
- Output: MP4, MKV, AVI, WMV, M2TS, TS, MP3, AAC, and more (including 3D & passthrough options)
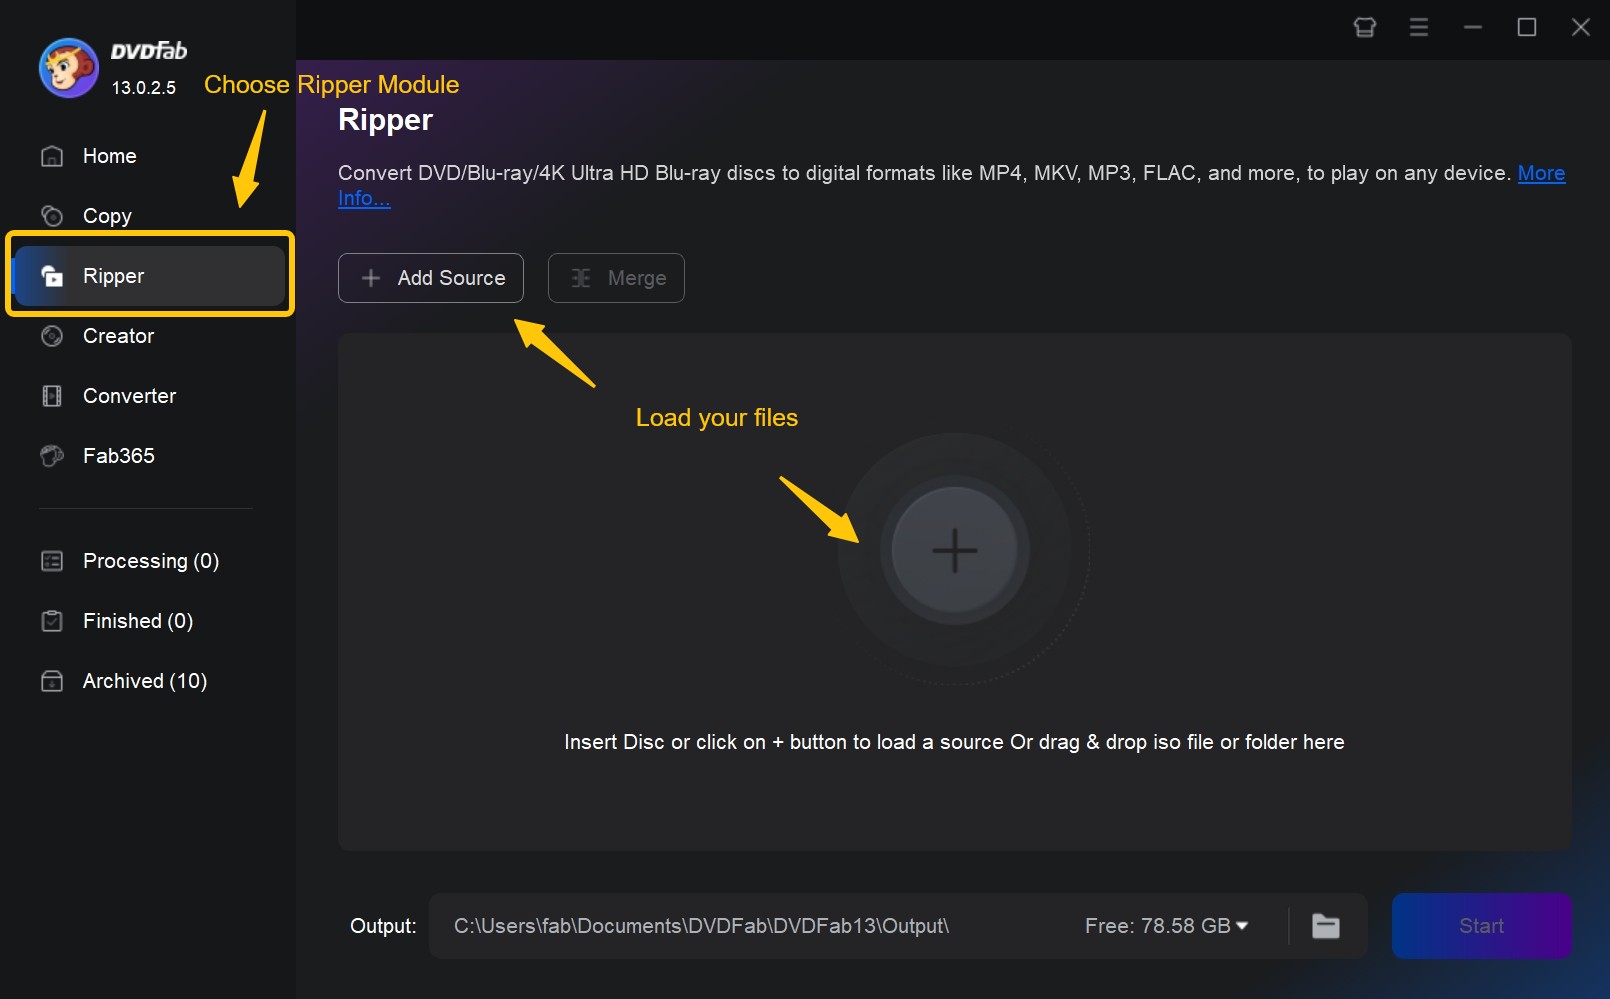
Step 1. Launch DVDFab and load the DVD source
Run DVDFab 13 and select the Ripper option. Insert your DVD disc into the optical drive or navigate to it via the Add button. If the source is an ISO file or a folder, simply drag and drop it onto the workspace.
Step 2. Choose a profile and Customize the Output
Click "Choose Other Profile" to select an output format. Options are available to select audio tracks and subtitles, set video and audio parameters, and more.
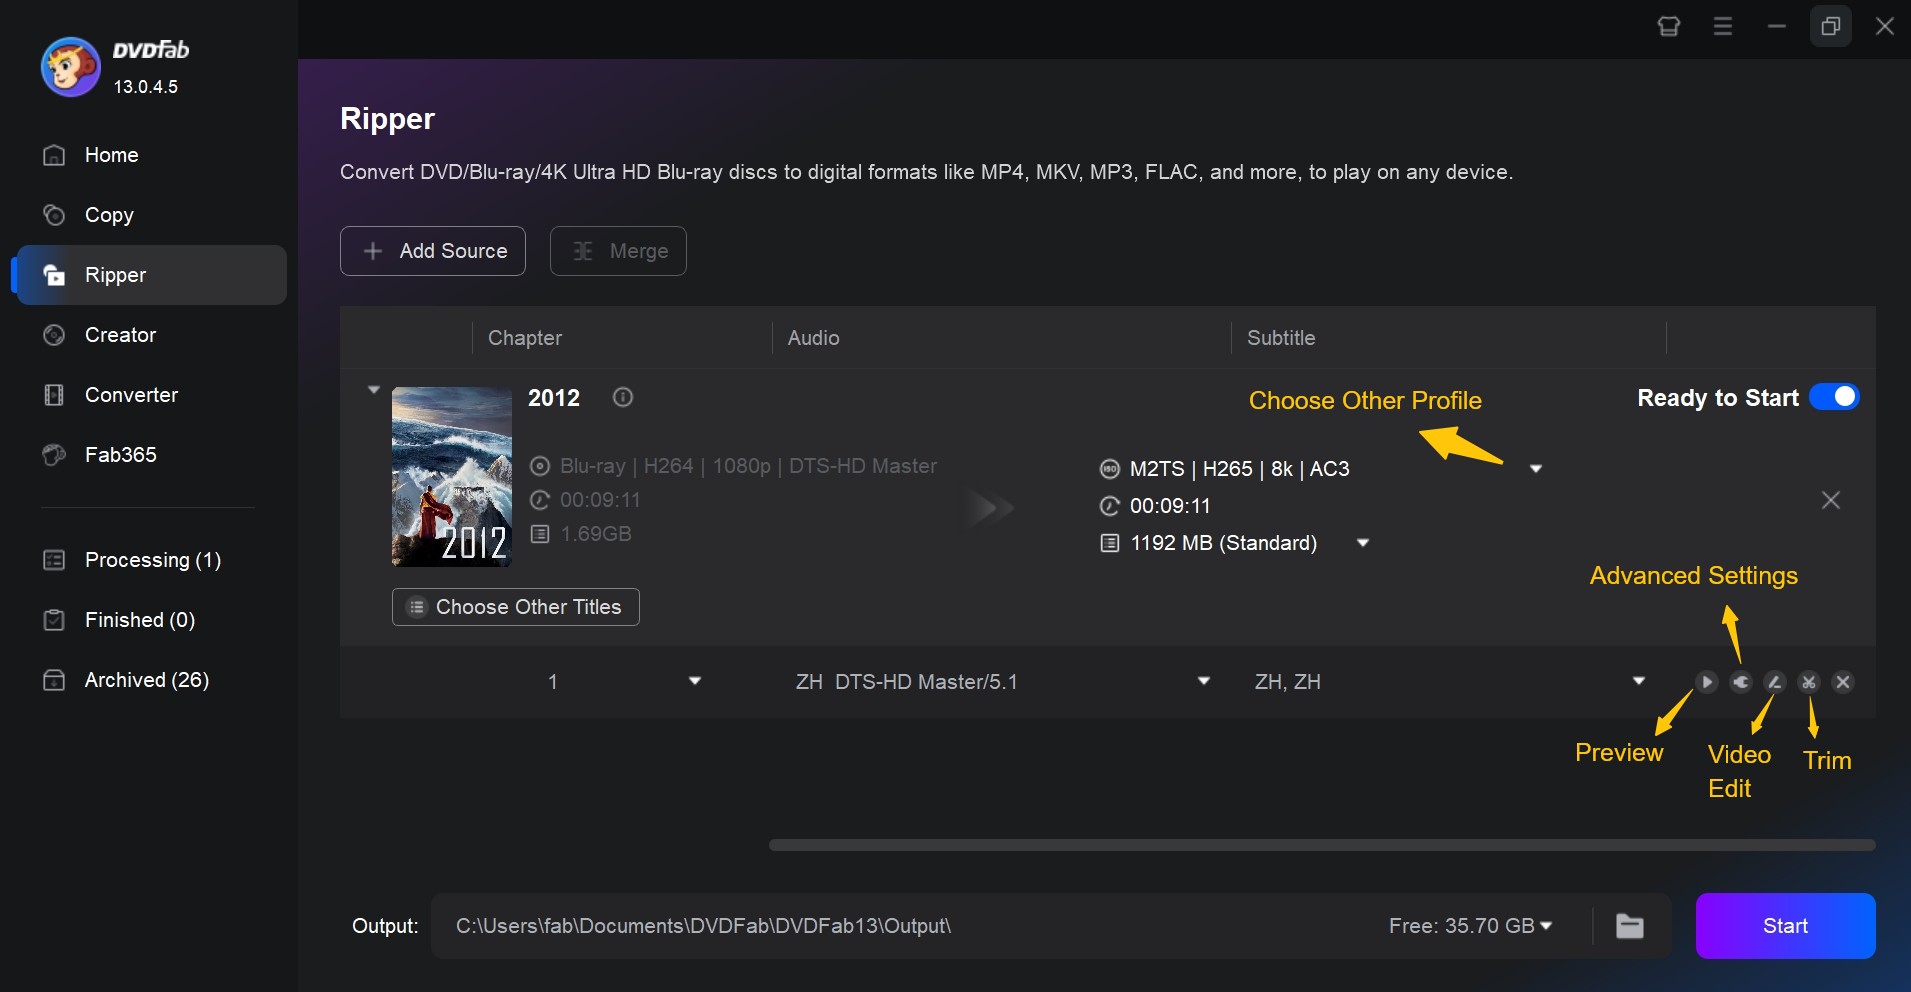
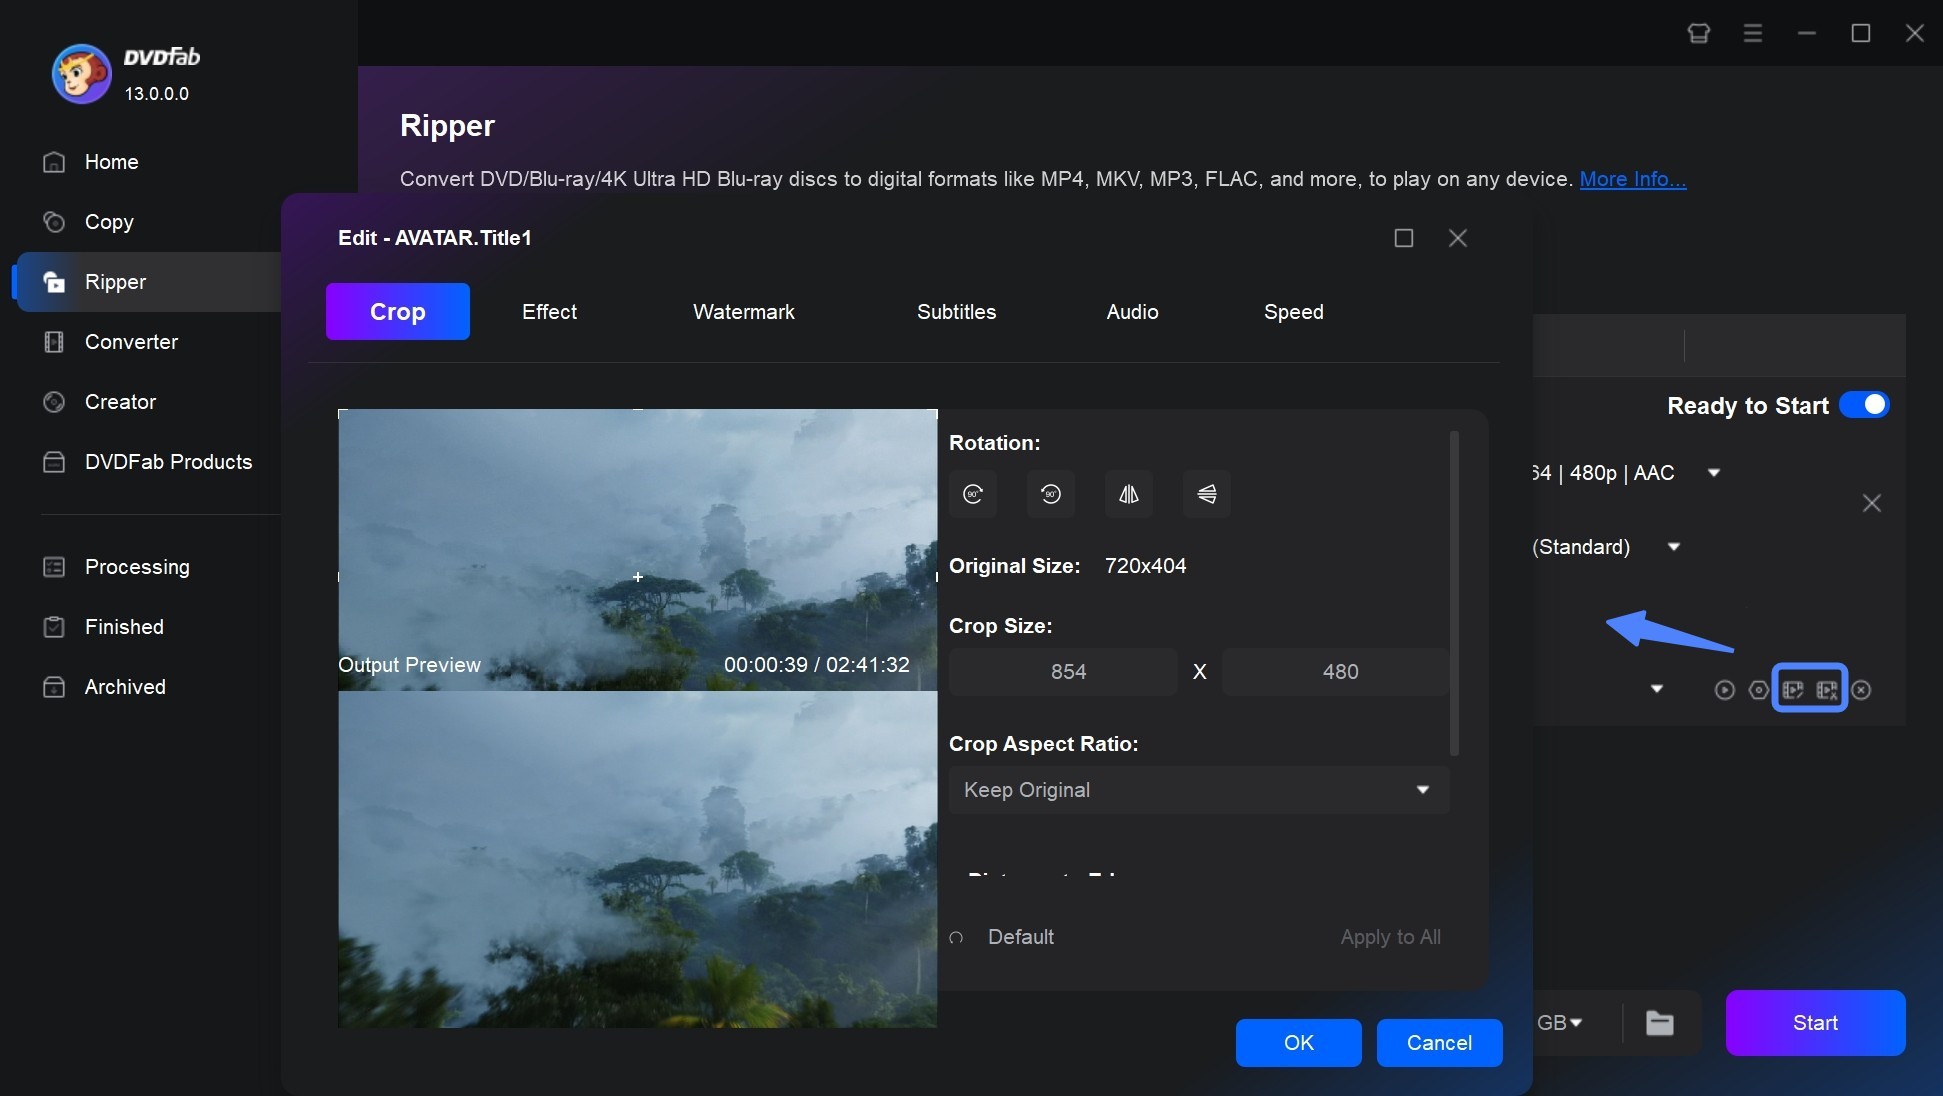
Before you start ripping, click the Video Edit or Trim icon. Here you can:
- Trim: Set start and end points to keep only the scenes you want to share.
- Crop: Remove black bars or unwanted frame areas.
- Add subtitles or text overlays if needed.
Step 3. Start Ripping
Save the video to your computer or an external drive/phone. Click the Start button, and the actual DVD ripping process will be clearly shown. This best DVD Ripper for Mac and Windows will convert your clip into a Facebook-ready file within minutes.
Rip DVDs to Facebook for Free with HandBrake
If you want a free way to rip DVDs for Facebook uploads, HandBrake is a solid option. It's open-source, runs on Windows, macOS, and Linux, and works well for converting homemade or unprotected DVDs into Facebook-friendly MP4 videos.
With a bit of extra setup, tech-savvy users can even pair HandBrake with third-party libraries to handle some copy-protected DVDs as well, though this process is more advanced and may not work for all protections.
- Converts DVDs to MP4 (H.264/H.265), ideal for Facebook uploads.
- Presets for common devices and quick format setup.
- It has no bundled software or as and is free and open-source.
- Integrated cropping and trimming tools for choosing clips before conversion.
- Technical setup and extra steps are needed when handling copy-protected DVDs.
- Transcoding DVDs is very slow, typically taking 3 to 5 hours.
- Fewer advanced editing options compared to DVDFab.
Step 1. Install and Activate HandBrake
Download HandBrake from the official website and install it on your computer. Then insert the DVD, or open the VIDEO_TS folder if you've already copied the disc to your PC.
Step 2. Select the DVD Source
Click "Open Source" and select your folder or DVD drive. All accessible titles will be scanned and displayed by HandBrake.

Step 3. Set the Output Format and Edit the Video
In the Summary tab:
- Make sure the Format/Container is set to MP4.
Under the Video tab:
- Set Video Codec to H.264 (x264).
- Use the Constant Quality slider; values around 20–22 are a good starting point for Facebook uploads.
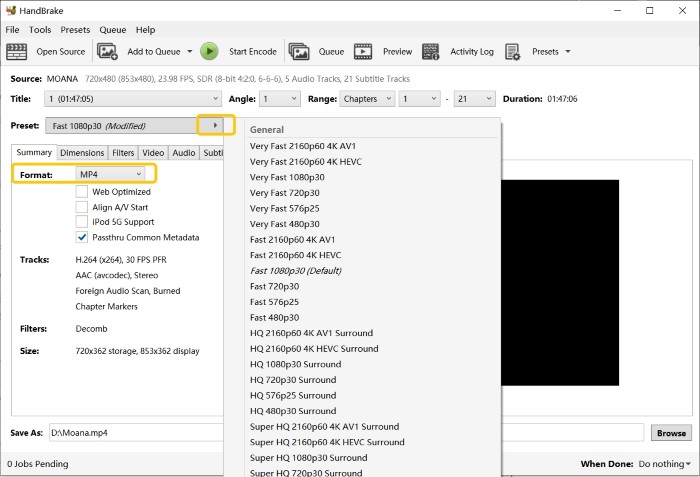
Optional modifications:
- Use the Range dropdown if you only want a specific chapter or time segment.
- Open the Dimensions tab to crop black bars or adjust the picture area. Cropping can reduce file size and keep the focus on the part you actually want to show in the Facebook post.
Step 4. Start Encoding
choose a Save As / Destination folder and filename for the MP4 file. Then click "Start Encode." When it finishes, you’ll have an MP4 file ready to upload to Facebook.
How to Upload Your Ripped DVD Videos to Facebook
Once you've turned your DVD into a Facebook-ready file with DVDFab or HandBrake, the last step is simply getting that video onto your timeline or page in a clean, watchable way. Here's how I usually go from a ripped DVD file to a finished Facebook post.
Step 1. Log in to Your Facebook Account
Open facebook.com in your browser, or launch the Facebook app on your phone. Then navigate to your profile, a page you manage, or a group where the video belongs.
Step 2. Prepare Your Video File
Facebook can host long videos (up to around 240 minutes and several gigabytes in size), but in practice shorter clips under about 10 minutes are easier to process and more likely to be watched to the end. If the file is very large, you can re-encode or compress it using DVDFab's settings.
Step 3. Upload Your Video
On desktop:
- In your feed, on your page, or inside a group, click Photo/Video in the post box.
- Browse to the folder where you saved the ripped DVD file and select it.
- Add a title, description, or tags to improve discoverability.
- Choose your audience: Public, Friends, Only Me, or a custom list.
Step 4. Optimize and Publish
After you upload, Facebook will start processing the video. Before you hit publish, select HD if available and enable captions or subtitles.
After confirming that everything appear correctly, click Post to share your clip. For multiple clips or series, it's better to organize them into a Facebook Album or Video Playlist for easier management.
FAQs
Can I upload a commercial DVD clip to Facebook?
Only upload a commercial DVD clip if you have the right to share it. Owning a DVD does not automatically give you permission to publish movie or TV footage on Facebook. For US users, this point is especially important because copyright claims can affect both the post and the account.
What is the best format for DVD to Facebook conversion?
MP4 with H.264 video and AAC audio is the safest general choice. It keeps the file compatible with Facebook, mobile devices, and desktop browsers. For most DVD sources, a clean 480p or 720p export is more practical than forcing the video into a large 1080p file.
How do I keep subtitles when uploading DVD video to Facebook?
If subtitles must appear for every viewer, burn them into the video during conversion. Soft subtitle tracks may work in local players but may not appear after the video is uploaded to Facebook.
Final Thought
When you want to take a clip from a DVD to Facebook, the right tool really depends on how you like to work. DVDFab DVD Ripper suits you if you prefer an all-in-one setup that can handle most copy-protected discs and gives you simple controls for format, quality, and subtitles in one place. If you only need to deal with unprotected or homemade DVDs and don't mind spending a bit more time with the settings, HandBrake is a solid free alternative.
Whichever route you choose, the basic flow is the same: pick the right part of the DVD, convert it to a Facebook-friendly MP4, check that it looks and sounds good, and then upload the clip.
 How to Convert DVD to Digital: 7 Free and Lossless MethodsBy Diana Smith - Jun 9, 2026
 How to Convert ISO to MKV: Lossless Remux vs H.265 Re-encodeBy Wenny Yan - Jun 3, 2026
 How to Compress ISO Files: 4 Methods for Storage, Playback, and ArchivesBy Diana Smith - Jun 2, 2026
![How to Convert DVD to AVI Free and Easily [2026 Updated]](https://r6.dvdfab.cn/upload/resource/en/dvd-to-avi-QL6y.jpg) How to Convert DVD to AVI Free and Easily [2026 Updated]By Diana Smith - Jun 2, 2026
How to Convert DVD to AVI Free and Easily [2026 Updated]By Diana Smith - Jun 2, 2026