
How to Copy DVD on Windows 10/11/8/7 Easily [DVD to DVD Copy]
Summary: Copying a DVD requires a disc drive and software that fits your goal. For a playable backup disc, DVDFab handles commercial encryption while ImgBurn works for free on unprotected content. For a digital archive without a burner, MakeMKV rips to lossless MKV in 10 to 15 minutes. The guide covers all five methods with tested step-by-step instructions.
My kids accidentally scratched our favorite Interstellar disc during a family movie night. This incident reminded me why we urgently need to copy DVD collections to prevent data loss. On Reddit's r/DataHoarder, many collectors report similar physical damage or sudden disc rot issues. I realized I needed a reliable backup method to preserve these physical keepsakes before they become unreadable.
To find the most effective solutions, I tested several tools on my Windows 11. In this guide, I will show you the exact steps and software for copying DVDs, giving you a plug-and-play digital or physical backup for your living room.
How I Choose the Best Way to Copy DVD to DVD
Before walking through each tool in detail, here is how I ran the tests and which tool I recommend for each use case.
I conducted these evaluations across a Lenovo Windows 11 laptop with an NVIDIA RTX 4060 Ti. My LG WH16NS60 external drive processed the 2026 US release of Captain America: Brave New World to verify decryption capability. The latest software versions underwent rigorous trials to measure performance speed and output quality. Every software breakdown below highlights new version features to ensure you receive the most current insights for your digitization tasks.
My Top Pick by use case
| What You Need | Best Pick |
| Copy any commercial movie disc to another disc | DVDFab DVD Copy |
| Copy a home-made DVD to another disc for free | ImgBurn |
| File-level data backup only, no disc playback needed | Windows File Explorer |
| Compress a DVD-9 to fit on a DVD-5 disc for free | DVD Shrink |
| Create a lossless digital archive without a burner | MakeMKV |
| Apart from copying a DVD to another DVD, you can also make digital copies with DVDFab DVD Ripper. For more information, check our guide on how to copy DVD to computer. | |
How to Copy a DVD with DVDFab DVD Copy
Best for: copying any encrypted DVD movie (1:1 or compressed)
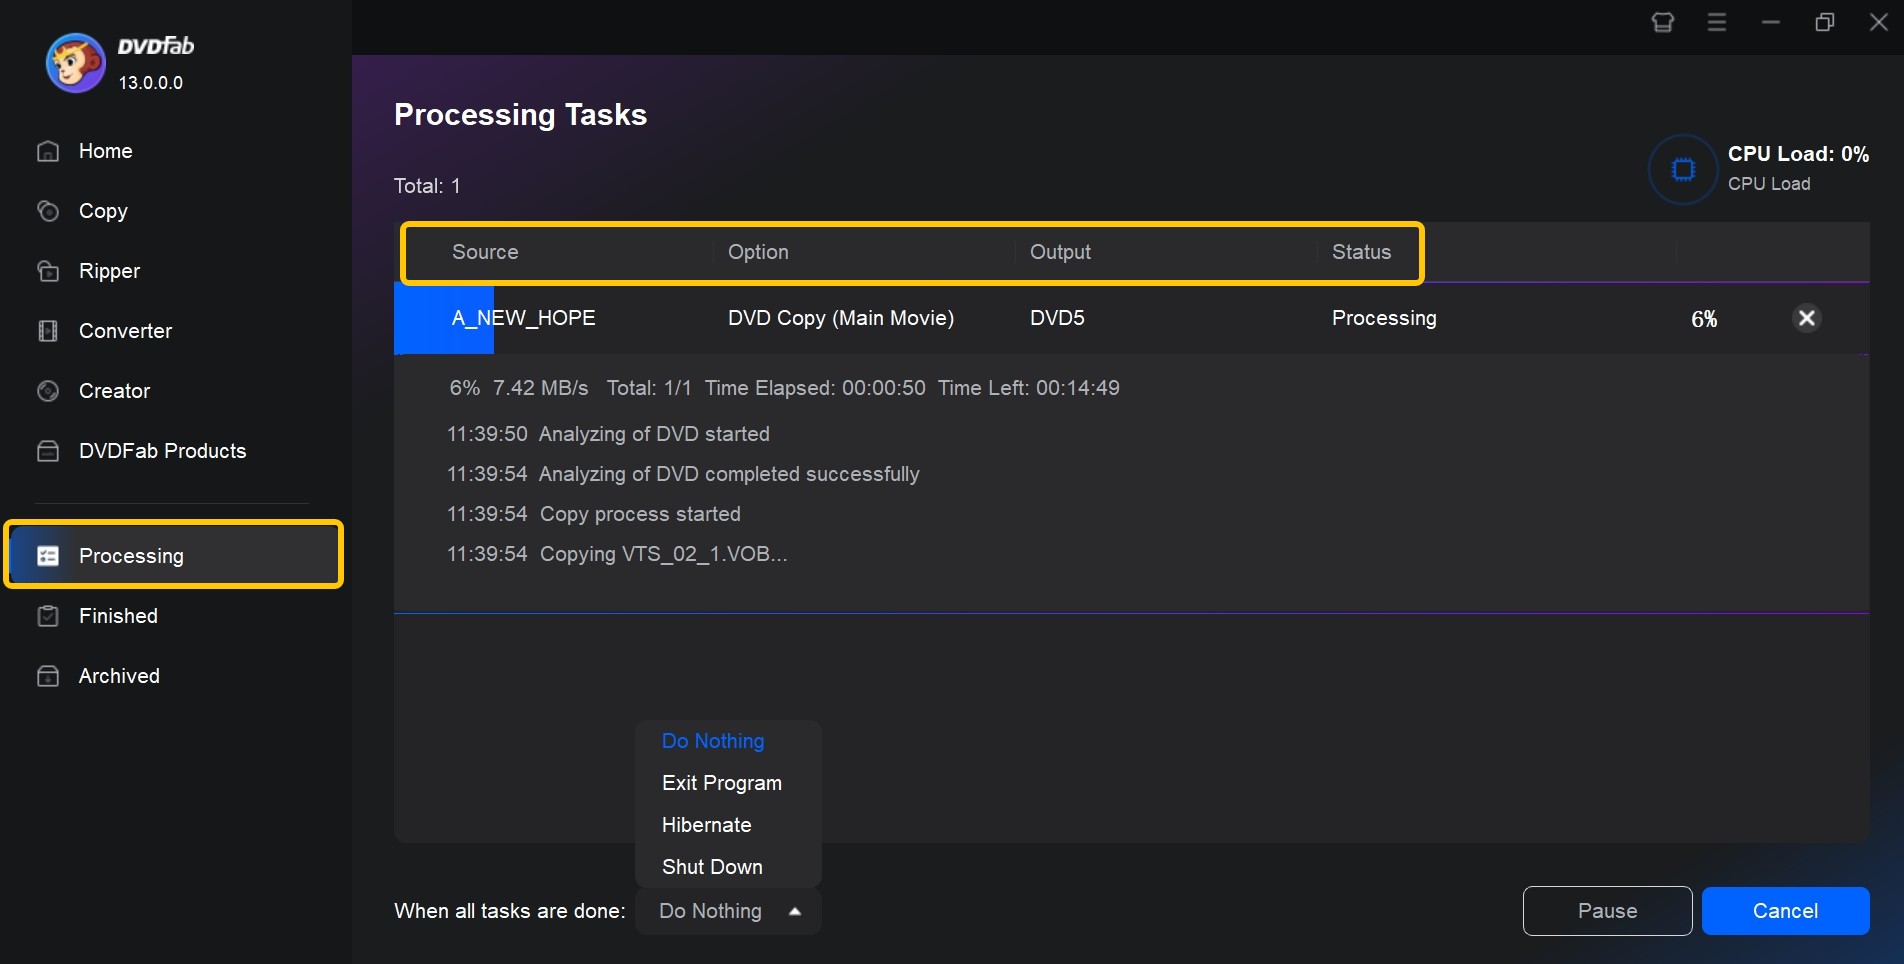
DVDFab DVD Copy is professional software to copy a DVD to another DVD, even for newly released, protected movie discs. I use DVDFab DVD Copy to duplicate DVD discs when I need a true 1:1 backup that keeps menus, chapters, and structure. It offers six modes: Full Disc, Main Movie, Clone/Burn, Split, Merge, and Customize. The copy can be saved to a DVD-9 or DVD-5 disc, an ISO image, or a VIDEO_TS folder.
DVDFab features exclusive PathPlayer and Cloud Decryption Service technologies, allowing you to back up all discs.
From my own experience, it worked very well with my newly purchased DVD, Captain America: Brave New World. It scanned the disc in 7 seconds without any interruptions, and the entire copy took only 5 minutes and 17 seconds.
- Copy ISO/folder/DVD to ISO image file or DVD folder for easy storage on hard disc
- Handle and copy decrypted discs (CSS/APS/RC/RCE, Sony DADC-type)
- Six copy modes: Full Disc, Main Movie, Clone/Burn, Split, Merge, Customize
- Compress DVD-9 discs (8.5GB) into DVD-5 discs (4.7GB) without quality loss
Below is the guide on using DVDFab to copy a DVD to another DVD.
Step 1: Download and Launch DVDFab
To copy a DVD to another DVD, download and launch DVDFab 13 on your Windows or Mac.
Step 2: Select Copy Mode
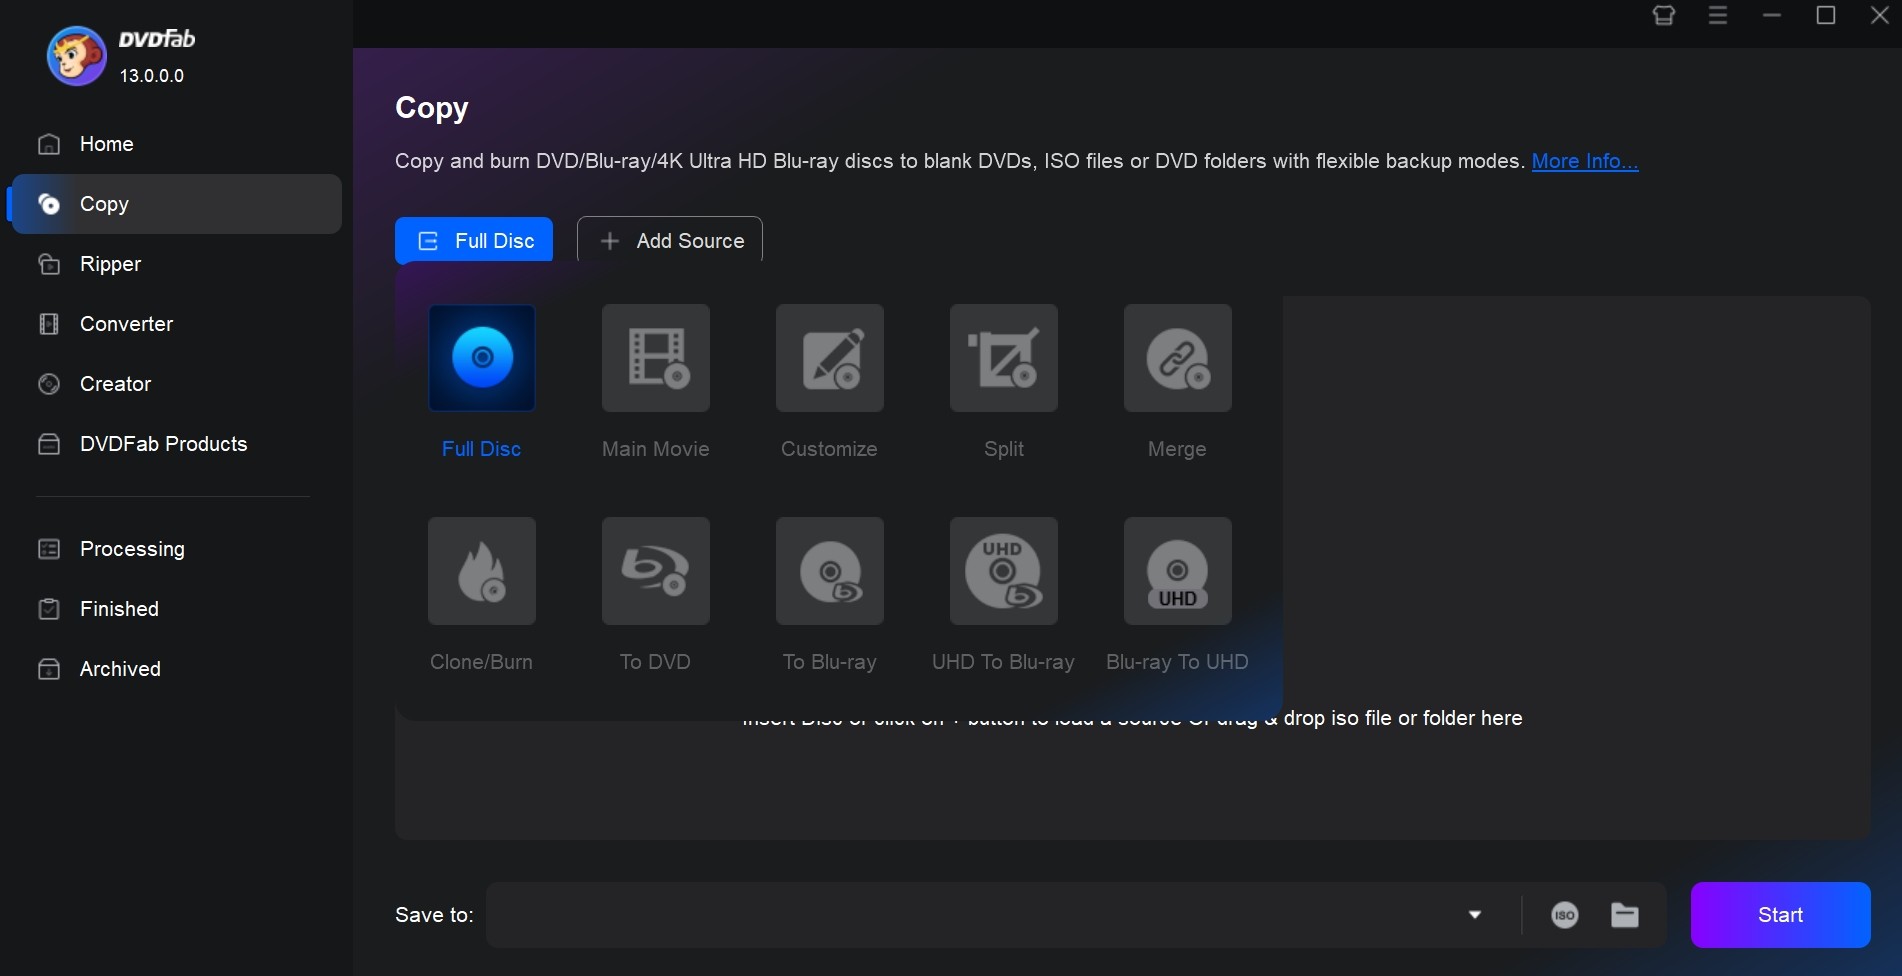
Select the Copy module on the left sidebar of the main interface and open Copy Mode. Select any of the available copy modes according to your needs before creating DVD to DVD copies. If you don't know which mode to pick, see the detailed explanations of each mode below.
- Full Disc: Copy the entire disc, including menus and extras; optional compression to fit DVD-5.
- Main Movie: Copy only the feature title with chosen audio/subs for a cleaner, smaller disc.
- Clone/Burn: Make a 1:1 DVD copy or ISO with original quality.
- Split: Copy a DVD-9 across two DVD-5 discs to avoid compression and preserve quality.
- Merge: Combine multiple sources (discs/ISOs/folders) into a single disc for convenient playback.
- Customize: Pick specific titles, audio, and subtitles; keep or drop menus as needed.
In DVDFab, the DVD Copy module offers a DVD to Blu-ray converter feature, but it requires an additional license.
Step 3: Load Your DVD and Adjust Settings
After you pick the copy mode, you can upload the source DVD you want to copy. Add a disc to your computer's DVD drive and DVDFab will automatically load it. DVDFab DVD Copy also accepts sources as an ISO image or a VIDEO_TS folder. If your source file is a folder or ISO, simply drag and drop it onto the main UI, or click Add Source to browse.
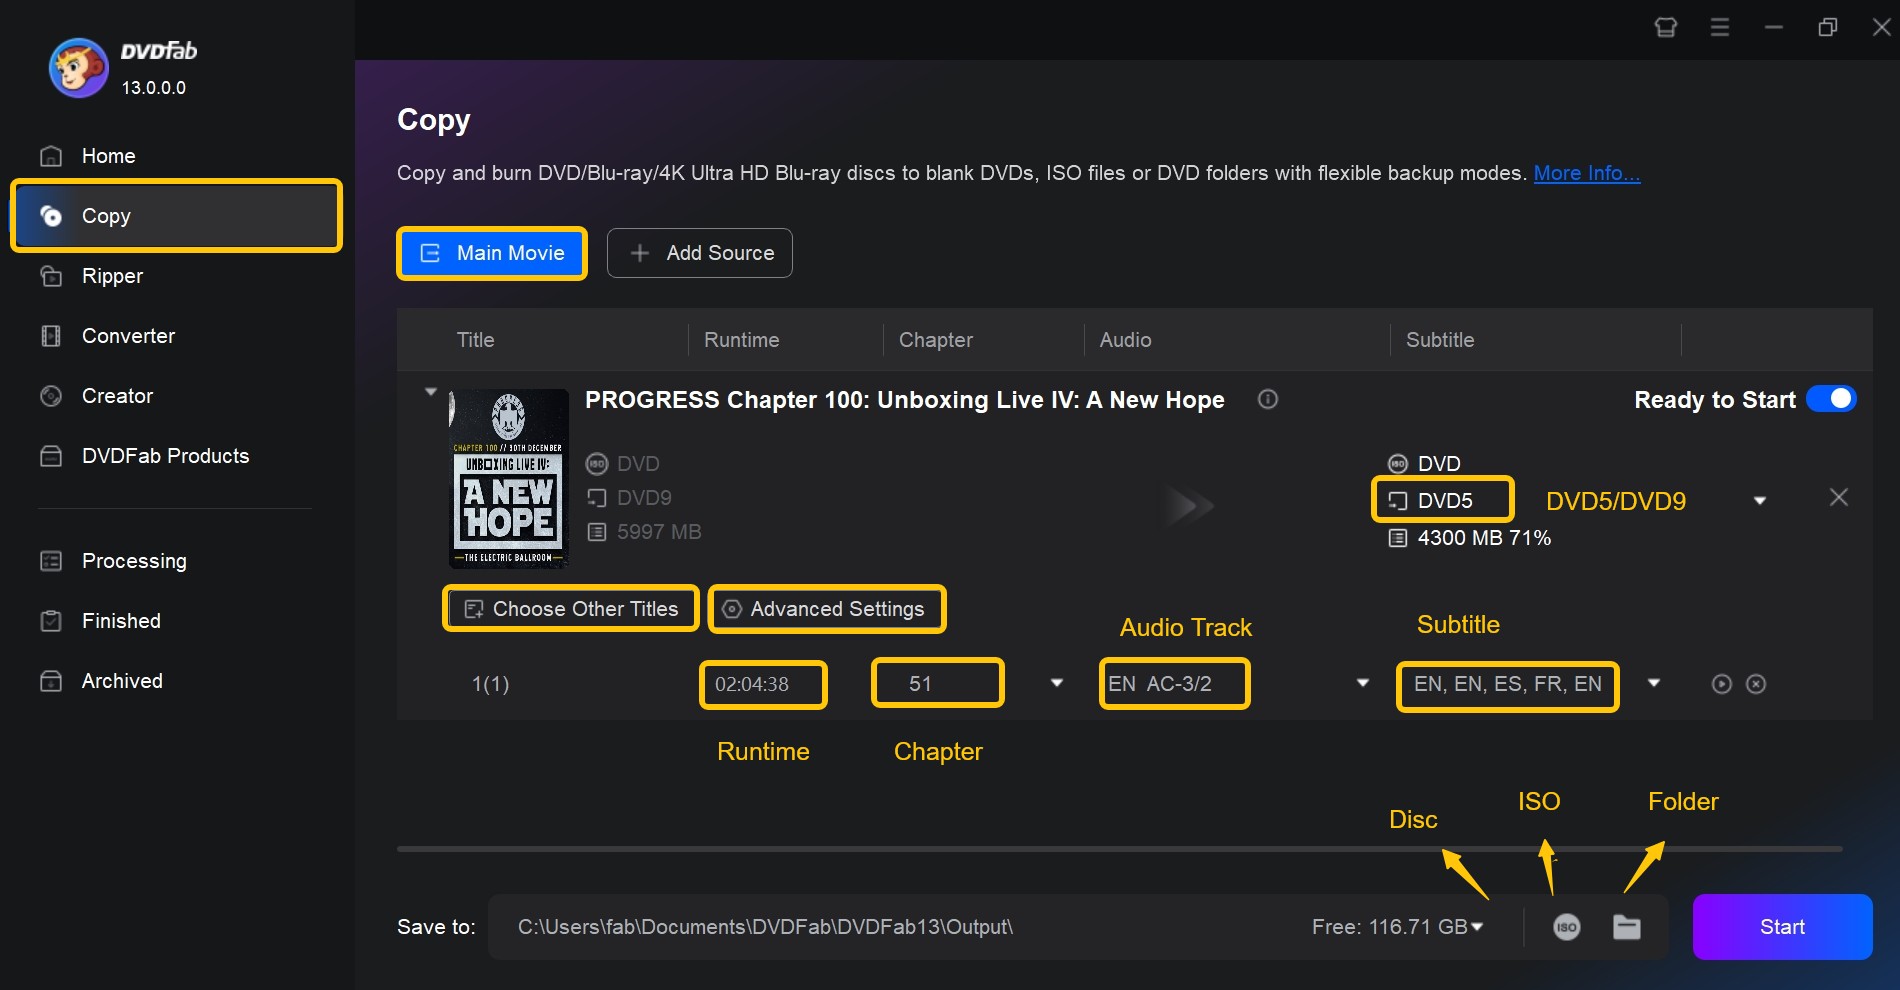
👉Main Movie: Because you selected Main Movie, once the source is loaded, the main feature is chosen by default. Here you can select the subtitles, audio tracks, and chapters you want to copy, and adjust Advanced Settings as needed. In Advanced Settings, set Output Size to DVD-9 or DVD-5. If your original DVD is DVD-9, choose DVD-9 to keep the original size/quality, or choose DVD-5 to enable compression.
👉Full Disc: In this DVD copy mode you don't need to pick titles, chapters, subtitles, or audio, because the goal is to copy everything (menus and navigation included). You can still choose DVD-5 or DVD-9 as the target to control a 1:1 capacity clone versus a compressed copy.
👉Clone/Burn: This mode requires no extra settings and lets you create a 1:1, byte-for-byte clone with no quality loss; you can also save as an ISO by choosing a save path, then burn that ISO to a blank disc later. Clone preserves the original layer break and structure.
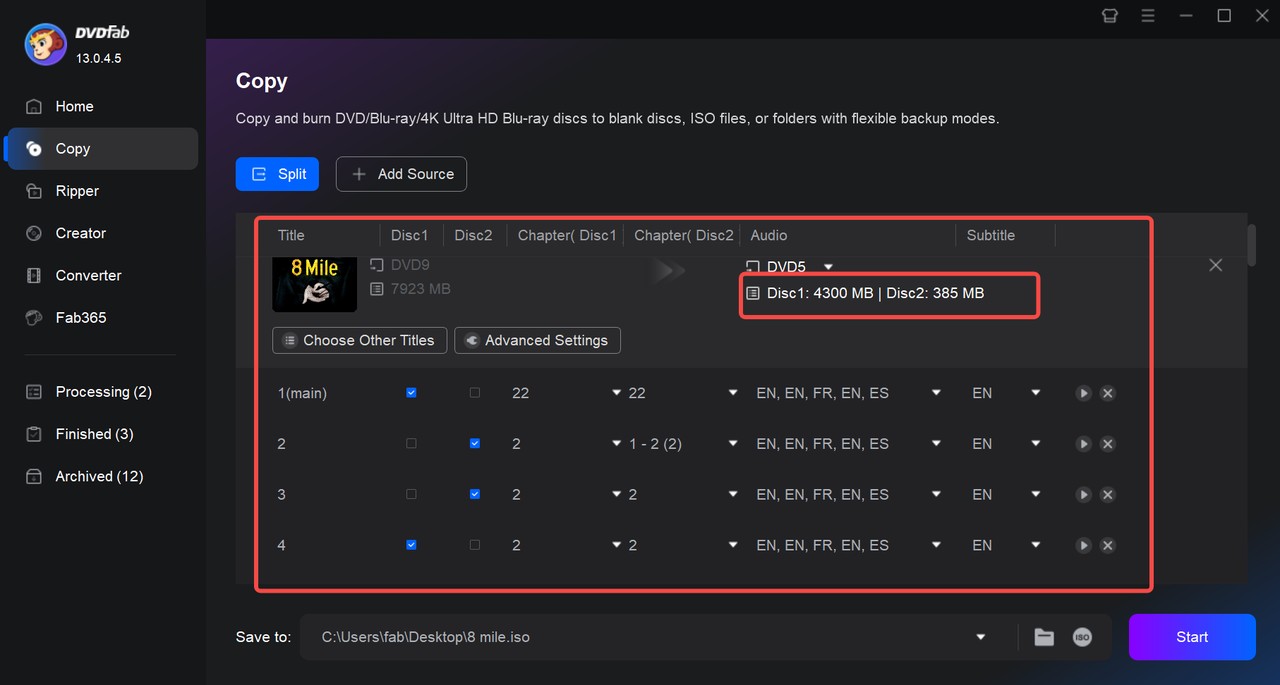
👉Split Mode: This mode can split a DVD-9 into two DVD-5 discs. After you upload the DVD-9, the software lists all titles; select which titles go on Disc 1 and which go on Disc 2. DVDFab shows the size of each disc as you choose, and you can also adjust audio and subtitles per title.
👉Merge Mode: Upload multiple disc sources (or ISO/folder). The program displays all titles; choose the audio and subtitle tracks to keep for each source, and build a single playable DVD.
👉Customize Mode: As the name implies, you can select the titles/chapters you want to copy, decide whether to keep menus, choose audio/subtitle tracks, and set the output target.
Step 4: Choose Output Format and Save Location
After you finish all adjustments, go to the bottom of the main UI and choose a directory to save the output file. You can also select your optical drive in the Save to drop-down to write the output directly to a blank disc. When everything is set, click Start to copy DVD to DVD.
Disclaimer: Copy-protection removal for commercial purposes is restricted in the United States under the Digital Millennium Copyright Act (DMCA). However, fair use, such as making personal backups of discs you own to some extent, can be permitted. We recommend checking the laws of your regions before copying DVDs.
- One tool for all your needs to copy DVDs
- Keeps menus and chapters
- Offers a free version: DVDFab HD Decrypter
- Only Full Disc and Main Movie modes are available in Free version
Copy a DVD to Another DVD with ImgBurn
Best for: copying home-made DVD videos to make playable backup
For non-protected discs, ImgBurn covers the two tasks I need: extracting an ISO from a DVD and burning that ISO to a blank disc. Unlike DVDFab DVD Copy, it does not offer one-click disc-to-disc copying. The workflow is manual: read the source disc to an ISO file first, then switch modes and burn the ISO to a blank disc. That two-pass approach typically takes 20 to 40 minutes for a standard DVD-5. ImgBurn does not handle commercially encrypted discs, so it works only for home-made recordings or content you have already decrypted separately.
For safety: the current and only legitimate version is 2.5.8.0. Download it from the official site at imgburn.com or from the mirrored archive at mirrorservice.org. Third-party download sites frequently bundle adware or repackaged installers alongside it. Although ImgBurn has not been updated since 2013, it runs reliably on 64-bit Windows 11.
💡ImgBurn is Windows-only and is not an option for Mac users who want to copy DVD on Mac.
Step 1: Insert the DVD and choose "Read" mode
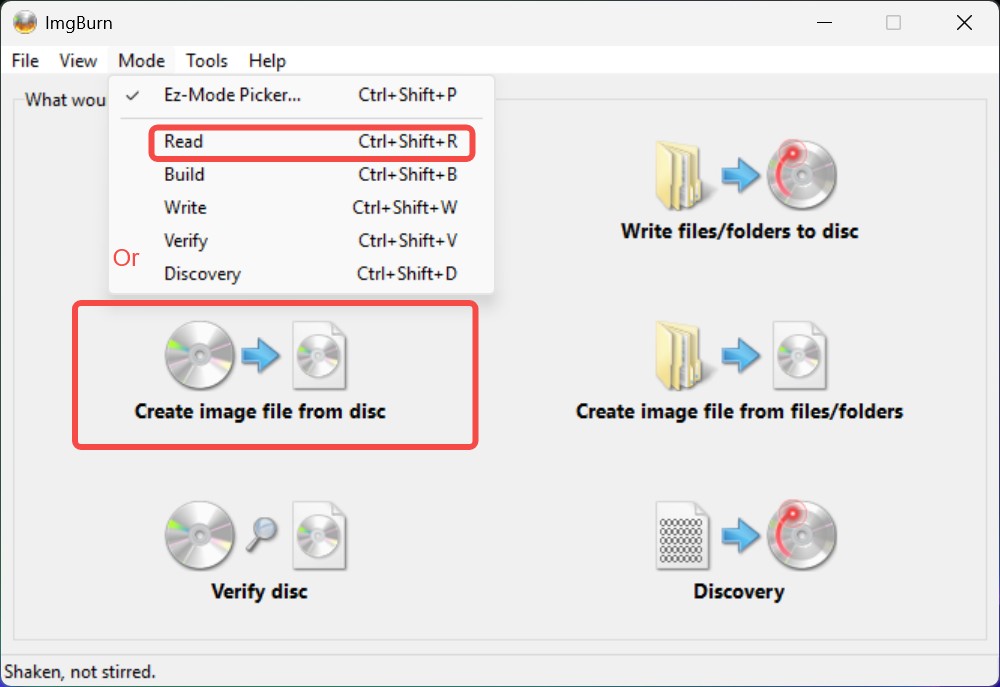
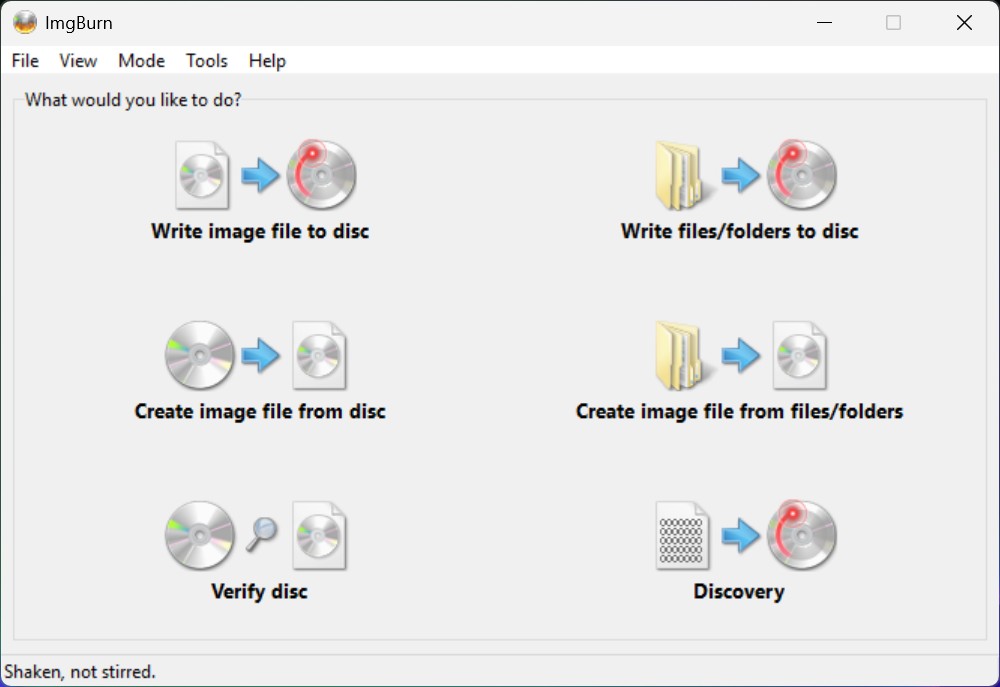
Insert the DVD you want to copy into the drive. Install and open ImgBurn. Then, on the startup screen, select "Create image file from disc." You can also go to the top menu, choose "Mode," then "Read" to enter this module, or press the shortcut Ctrl+Alt+R.
Step 2: Extract an image file from the DVD

After entering Read mode, ImgBurn will automatically detect the optical drive you are using. If it doesn't, click the blue drop-down arrow to manually select the drive that holds your disc. Click the yellow folder button ("Browse for a file") to choose where to save the image file. Leave the other settings at their defaults. Then click the convert icon in the lower left ("Read") to start extracting the DVD image. When extraction is complete, eject the disc. The image file format may be ISO, CUE or MDS.
Step 3: Switch to "Write" mode and insert a blank DVD
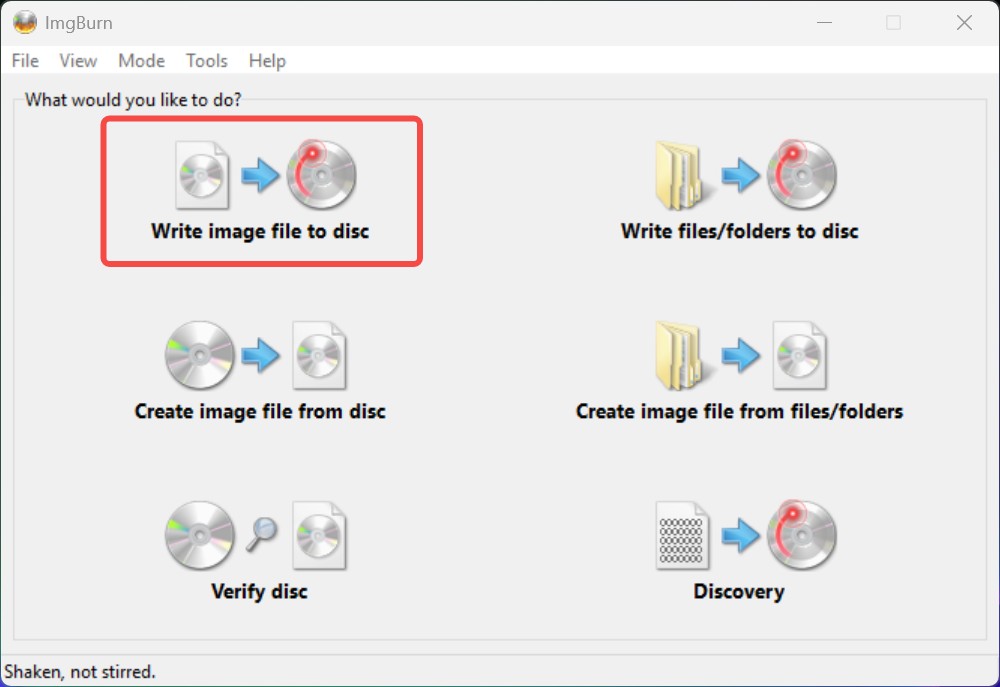
You can restart ImgBurn and choose "Write image file to disc" on the main screen, or simply go to the top menu bar and select "Mode > Write" without exiting. The shortcut Ctrl+Alt+W also opens this module. Then insert your blank DVD to prepare for burning
Step 4: Select the image file and start burning
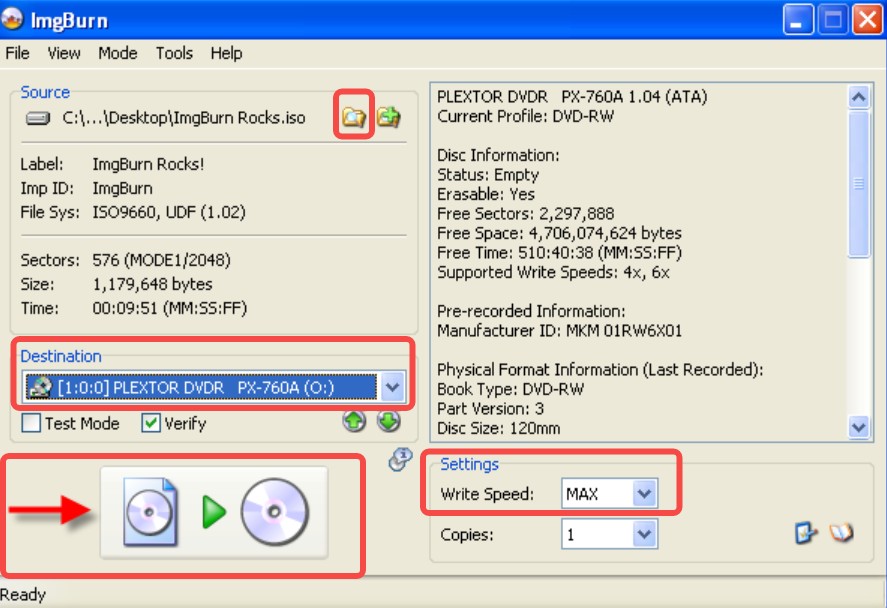
Click the yellow folder button ("Browse for a file") to select the image file you just created, then confirm that "Destination" shows the drive with your blank disc. You can set the write speed in the lower-right corner; a medium speed is recommended for stable burning and a higher success rate. Finally, click the convert icon in the lower left to burn ISO to DVD.
- Burn DVDs, CDs, and BDs from ISO images or disc sources
- Verify that the burned data matches the source to catch errors early
- Extract ISO images from DVD, files, and folders
- No updates in years
- Cannot handle any form of disc copy protection
- Requires two separate steps (read then burn) rather than a single operation
Copy and Compress DVD with DVD Shrink (Free)
Best for: compressing DVD-9 to DVD-5 on non-protected or lightly encrypted older discs
DVD Shrink is a free compression and backup tool that has remained widely used despite no updates since 2004. Its main strength is fitting a dual-layer DVD-9 (8.5 GB) onto a single-layer DVD-5 (4.7 GB) by selectively compressing video and letting you drop extras or menus you don't need. The output is a VIDEO_TS folder or ISO, which you then burn to a disc with ImgBurn.
There are two important limitations. First, protection coverage is narrow: DVD Shrink handles CSS and UOP region codes from older discs, but fails on modern schemes including Sony ARccOS and Disney X-Project. Second, Windows 11 compatibility is inconsistent. The final release (from 2004) generally runs on Windows 11 for older content, but analysis failures on newer disc formats are common even when those discs carry no modern protection.
Step 1: Download DVD Shrink from the official site
Go to dvdshrink.org and download version 3.2.0.15. Avoid third-party download sites that host renamed or repackaged versions.
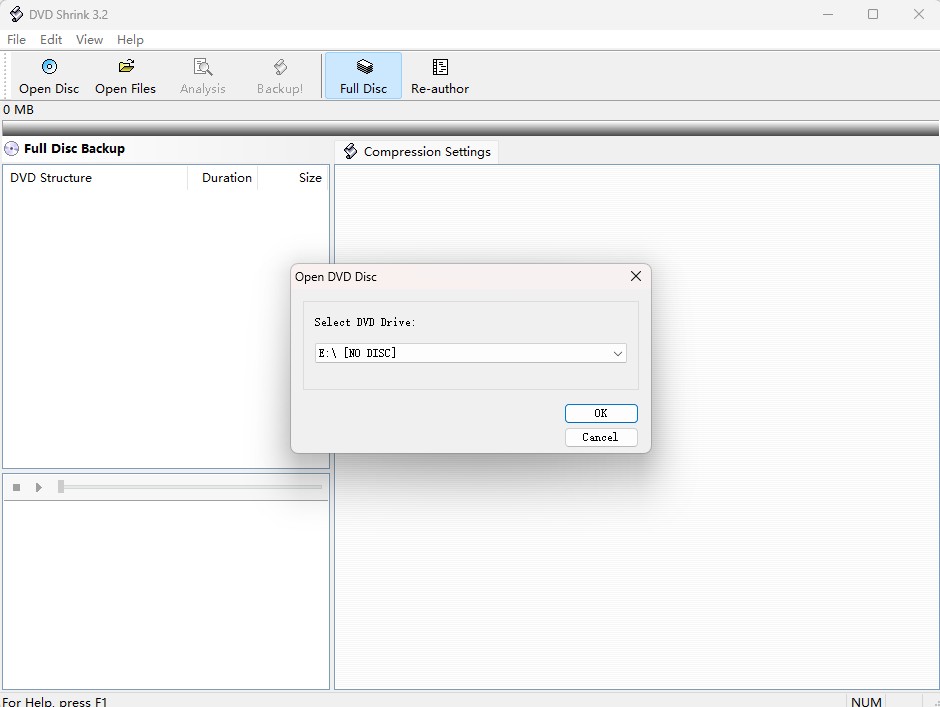
Step 2: Open your disc
Insert the DVD into your drive. Launch DVD Shrink and click "Open Disc." The software analyzes the disc structure and displays all components: menus, the main movie title, and any extras.
Step 3: Set compression and select content
DVD Shrink defaults to "Automatic" compression, which scales the disc to fit on a DVD-5. To reduce file size further, select individual titles in the structure panel and switch their video setting to "No Video" to drop extras or secondary titles. The bar on the right updates in real time to show the projected output size.
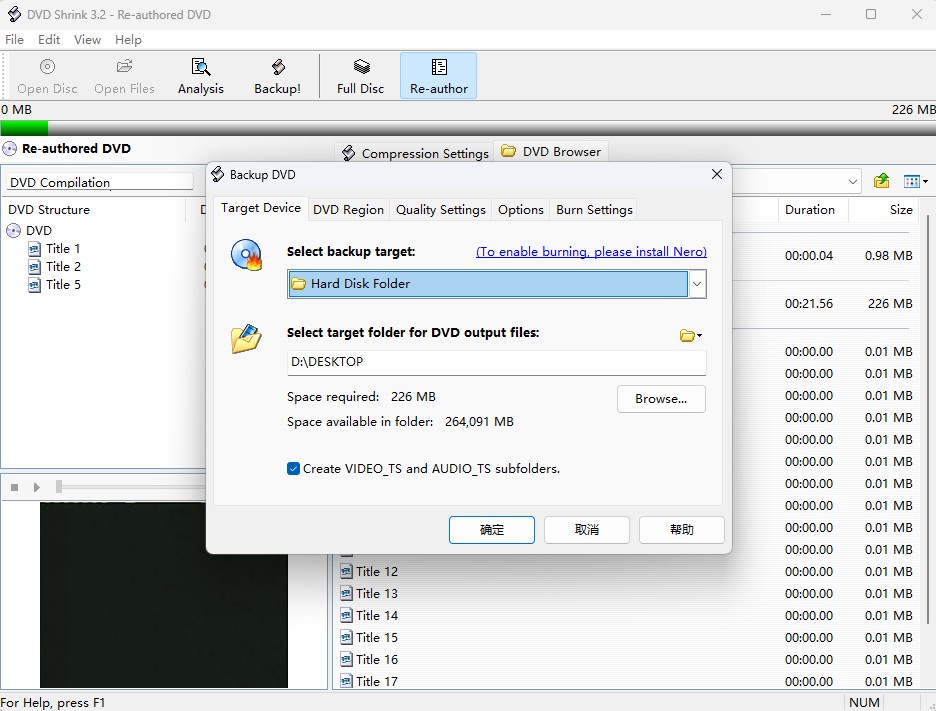
Step 4: Start the backup and then burn
Click "Backup!" at the top. Choose a destination folder for the VIDEO_TS output, or select "ISO Image File" to create an ISO directly. Processing takes 20 to 45 minutes depending on disc size, compression ratio, and CPU speed. When done, burn the VIDEO_TS folder or ISO to a blank DVD-5 using ImgBurn.
- Side-by-side compression controls make it easy to drop unwanted extras
- Compress DVD-9 to fit on DVD-5 with adjustable quality settings
- Output as ISO image or VIDEO\_TS folder for burning with ImgBurn
- Cannot handle modern protections
- Windows 11 compatibility is limited and unpredictable on newer disc formats
- Requires ImgBurn as a separate second step to produce a physical disc
Copy DVD to Your Computer with MakeMKV (Free Digital Backup)
Best for: lossless digital archive of a DVD when you do not own a disc burner
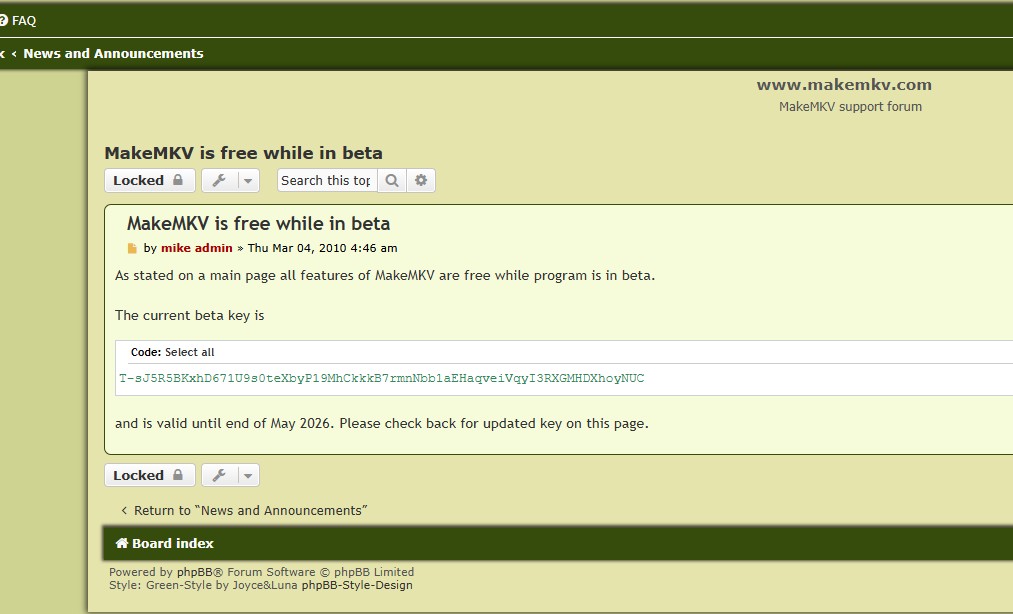
MakeMKV takes a different approach to copying a DVD: instead of writing to another disc, it converts the DVD content into an MKV file that preserves every video, audio, and subtitle track in lossless quality. I use it when I want a permanent archive copy on a hard drive without dealing with blank discs or burner hardware. The software is free for DVD ripping while in its long-running beta phase. To use it, you enter a registration key from the official MakeMKV forum that remains valid for one to two months before requiring renewal.
It does not produce a DVD disc or folder. If your goal is a physical backup disc that plays in a set-top player, use DVDFab DVD Copy or ImgBurn instead. MakeMKV is the right choice when a digital file on your hard drive is the endpoint.
Step 1: Download and enter the beta key
Download MakeMKV from makemkv.com. After installation, go to Help > Register Software. Copy the current beta key from the official announcement thread at forum.makemkv.com/forum/viewtopic.php?t=1053 and paste it into the registration field. Each key is valid for one to two months and must be renewed when the thread posts a replacement.
Step 2: Insert your DVD
Insert the disc into your drive. MakeMKV detects it automatically and displays a disc icon on the main screen. Click the icon to begin analysis.
Step 3: Select titles and tracks
MakeMKV lists all titles on the disc. The main feature is generally the longest entry. Expand it to choose which audio languages and subtitle tracks to include. Deselecting tracks you don't need keeps the output file to a manageable size.
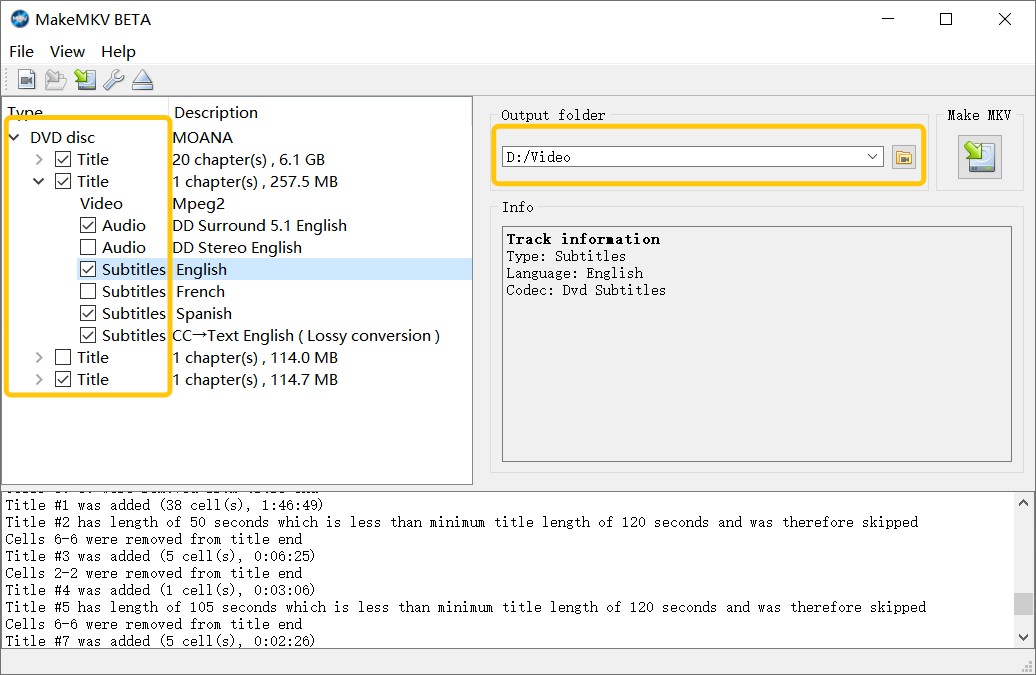
Step 4: Set the output folder and start
Choose a destination folder on your hard drive, then click "Make MKV." A feature-length movie typically completes in 10 to 15 minutes. The resulting MKV file plays in VLC, Plex, Kodi, or any major media player.
- Lossless output preserves the full original quality with all audio and subtitle tracks intact
- Cross-platform: runs on Windows, Mac, and Linux
- Handles CSS and most modern protections
- Cannot produce a playable DVD disc or a burnable ISO
- Beta key expires every one to two months
- Blu-ray ripping requires either the 30-day trial or the $60 paid lifetime license
Copy DVDs to DVDs with Windows File Explorer
Best for: copy non-protected DVDs for data backup
If you only want to copy DVD to DVD for file backup, and don't care about playback on a set-top player, you can use Windows' built-in program File Explorer. Note that this method works only for non-protected discs and does not guarantee playback in a DVD player; it's for data backup only. Here's the simplest tutorial on how to copy a DVD on Windows 10 with File Explorer.
Step 1: Insert the DVD into the CD\DVD drive. Open computer, click on DVD drive, and select the files you want to copy. Copy and paste selected files to the location where you want to save those files. After copying DVD, eject it.
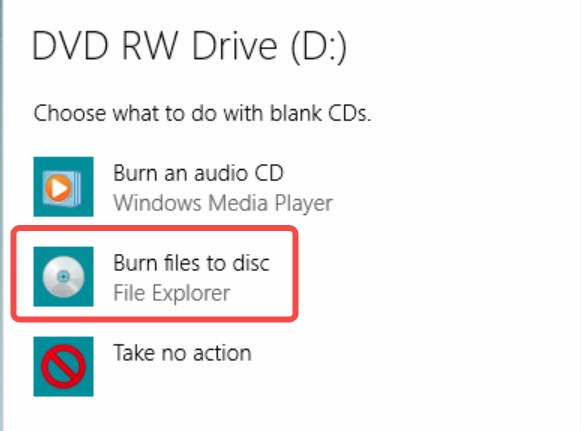
Step 2: Insert a blank DVD and wait a few seconds for Windows to detect it. In the AutoPlay prompt, choose "Burn files to disc." If AutoPlay is disabled, open File Explorer and double-click your optical drive.
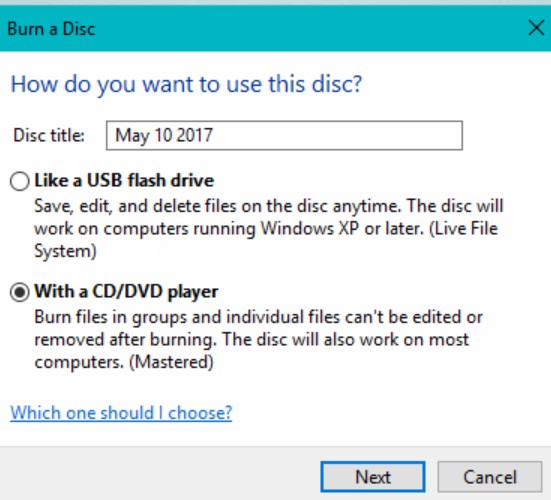
Step 3: Then a "Burn a Disc" dialog appears asking "How do you want to use this disc?" Choose "With a CD/DVD player." This uses the Mastered format, which finalizes the disc for broad compatibility.
Step 4: Drag the DVD items you want to copy into the disc window in File Explorer (it's best to place the entire VIDEO_TS folder at the root of the disc). You'll see a notice that the files are "waiting to be burned to disc," which means they're queued.
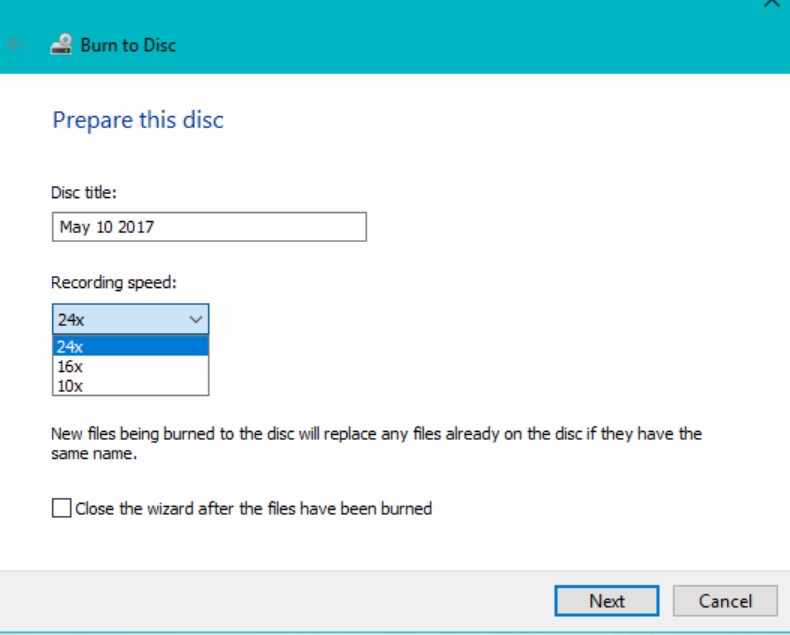
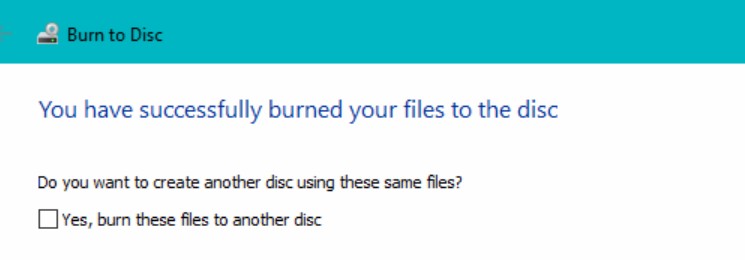
Step 5: Once you're done copying everything you want to write to the disc, Select "Drive Tools" in the toolbar menu of the File Explorer window, then select "Finish Burning." After that, you will see a "Burn to Disc" window pop up. Input a disc name, set a write speed, and confirm to start burning.
When DVD burning task is done, Windows provides a notice stating "You have successfully burned your files to the disc."
Note: Even if you pick "With a CD/DVD player" here, the cloned disc will still be detected as a data disc by DVD players and will not play. If you require a playable disc, I suggest using DVDFab DVD Copy, which's the easiest option to copy DVD to DVD.
- Built into every Windows 11/10/8/7 installation with no download required
- Reliable for creating a file-level backup of non-protected disc content
- Produces a data disc only; the copy will not play in a set-top DVD player
- No support for any form of copy protection
Tips for Copying DVDs
1. Match the disk type and capacity to the task.
Choose DVD-5 (4.7 GB) for shorter content or data, and DVD-9 (8.5 GB) when you want to avoid compression. As a reference from testing: DVDFab finishes a feature-length disc in roughly 5 minutes, MakeMKV in 10 to 15 minutes, ImgBurn in 20 to 40 minutes across two passes, and DVD Shrink in 20 to 45 minutes before the burn step. Drive speed, CPU, and compression settings all affect these figures.
2. Burn with the appropriate layout for your goal.
For a playable DVD-Video disc, use a tool that writes the proper DVD-Video structure (DVDFab or ImgBurn). For data backup, File Explorer's "With a CD/DVD player" mode finalizes the disc for broad read compatibility, but the result will not play as video in a set-top player.
3. Use moderate speeds to verify.
Avoid burning at maximum speeds; instead, choose a middle speed that your media supports and verify the disc after writing to detect marginal burns early.
4. Select trustworthy blank media.
Brands with consistently strong results across burners and players include Verbatim and Taiyo Yuden. Cheap no-name discs increase the risk of read errors, particularly on older set-top players.
FAQs
Can I copy a DVD I own?
Copying DVDs for commercial use is always illegal. This article does not encourage any activity that violates copyright law. Copying DVDs for personal "fair use", such as watching them on the phone, is permitted in some countries and regions, but the details vary. Please check the laws in your area before copying protected DVDs.
How to Copy DVD with HandBrake?
HandBrake does not support DVD to DVD Copy, but it can copy DVDs to digital files (e.g., MP4/MKV). If you want to know how to make a digital copy, read our detailed guide on how to rip DVD with HandBrake.
What if my copied DVD won't play on my DVD player?
The most common cause is a disc format mismatch. Windows File Explorer creates a data disc rather than a DVD-Video disc, so set-top players cannot read it as video. ImgBurn and DVDFab DVD Copy both produce proper DVD-Video output that plays correctly in consumer players. If the disc was made with the right tool but still won't play, try burning at a lower speed or switching to a different brand of blank disc. High burn speeds and cheap media are the two most frequent causes of playback failure on consumer players.
Conclusion
Copying a DVD comes down to two questions: is the disc protected, and what format do you need the copy in? For commercial releases with modern encryption, DVDFab DVD Copy handles the full range of protections and writes directly to a disc, while MakeMKV produces a lossless digital file when a physical disc is not the goal. For non-protected home-made recordings, ImgBurn makes a proper DVD-Video disc at no cost, DVD Shrink compresses DVD-9 content to fit on DVD-5 media, and File Explorer covers simple file-level backup.
![How to Rip DVD to ISO on Windows 11/10/8/7 and Mac? [2026 Update]](https://r3.dvdfab.cn/upload/resource/dvd-to-iso-ei38.jpeg) How to Rip DVD to ISO on Windows 11/10/8/7 and Mac? [2026 Update]By Wenny Yan - Jun 17, 2026
How to Rip DVD to ISO on Windows 11/10/8/7 and Mac? [2026 Update]By Wenny Yan - Jun 17, 2026![Top 11 ISO Creators to Create ISO File on Windows & Mac [2026 Updated]](https://r3.dvdfab.cn/upload/resource/create-iso-file-ytTu.jpeg) Top 11 ISO Creators to Create ISO File on Windows & Mac [2026 Updated]By Wenny Yan - Jun 16, 2026
Top 11 ISO Creators to Create ISO File on Windows & Mac [2026 Updated]By Wenny Yan - Jun 16, 2026![How to Copy DVD to DVD or Computer on Windows 10/11/8/7 [Tested Ways]](https://r1.dvdfab.cn/upload/resource/how-to-copy-dvd-windows-10-hO78.jpeg) How to Copy DVD to DVD or Computer on Windows 10/11/8/7 [Tested Ways]By Wenny Yan - Jun 16, 2026
How to Copy DVD to DVD or Computer on Windows 10/11/8/7 [Tested Ways]By Wenny Yan - Jun 16, 2026 9 Best Free DVD Copy Software in 2026: Tested & ReviewedBy Wenny Yan - Jun 11, 2026