How to Burn DVD on Mac Free and Easily: 5 Ways with Detailed Guide
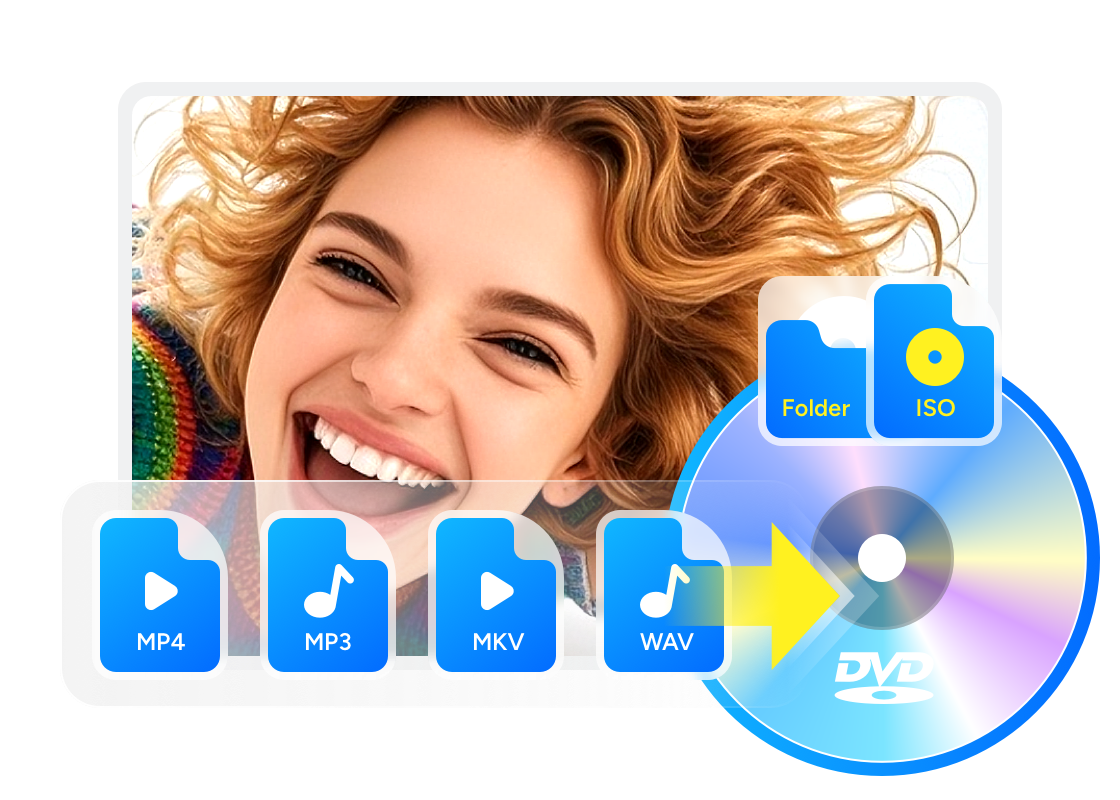
Summary: This blog introduces 5 ways to burn DVD on Mac and provides detailed tutorials: using DVDFab DVD Creator for professional video DVDs, utilizing Finder for free data disc burning, and employing Disk Utility to burn disk images, along with methods for slideshows and audio CDs.
Burning a DVD on Mac might seem simple, but it often involves specific challenges. For example, you may need to preserve precious family memories, back up important files, or even create a slideshow of your travels. No matter the reason, the right tools and methods can make the process much easier and more efficient. As macOS evolves, finding a reliable way to burn DVDs on newer versions can become more complicated. In this guide, I'll walk you through the best options and software for burning DVDs on Mac, helping you complete your project smoothly.
Types of DVDs You Can Burn on Mac
To find the most suitable burning tools and methods, it is important to first clarify what type of DVD you want to burn. Based on the latest usage data from Mac users, DVD burning needs can generally be divided into the following five types:
| Burn Playable DVD | This is the most common scenario. It converts video files (such as .mp4, .mov, etc.) into a standard DVD-Video format, so the disc can be played on home DVD players or most computer optical drives. It is a very typical way to share and back up video content. |
| Burn Data DVD | This simply stores various files (documents, photos, backup files, and so on) onto a DVD as data, similar to using a high-capacity USB drive. It is mainly used for file backup and transfer. |
| Burn Disk Image to DVD | This burns a complete disk image file (such as a .dmg or .iso file) onto a DVD, typically for creating a bootable installation disc or a full system copy. |
| Burn Slideshow to DVD | This takes a series of photos and image files, adds music and transition effects, converts them into a video slideshow, and then burns it as a video DVD that can be viewed on DVD players. |
| Burn Music to DVD | This burns audio files onto a disc that can be played on standard CD/DVD players. It can be in standard audio CD format, or as a data DVD containing MP3/AAC files. |
Now that you know the different types of DVDs you can burn. Whatever type you're aiming for, the following tutorial will guide you through the process.
How to Burn a Playable DVD on Mac
Whenever I want to burn a family movie or an important event video to DVD, and I want it to look professional with custom menus, I turn to DVDFab DVD Creator. I like to use it to burn my iPhone videos to DVD, creating physical backups of those warm memories.

- Burn DVDs from MOV, MP4, MKV, AVI, and over 200+ video formats
- Offer built-in, premium-designed DVD menu templates for a professional look
- Full customization: edit menu text, background, buttons, and music
- Support both DVD-9 (8.5 GB) and DVD-5 (4.7 GB) formats
- GPU acceleration ensures fast burning without compromising quality
- Output standard DVDs playable on any DVD player or media software
- Not only a Windows DVD maker but also a Mac DVD creator
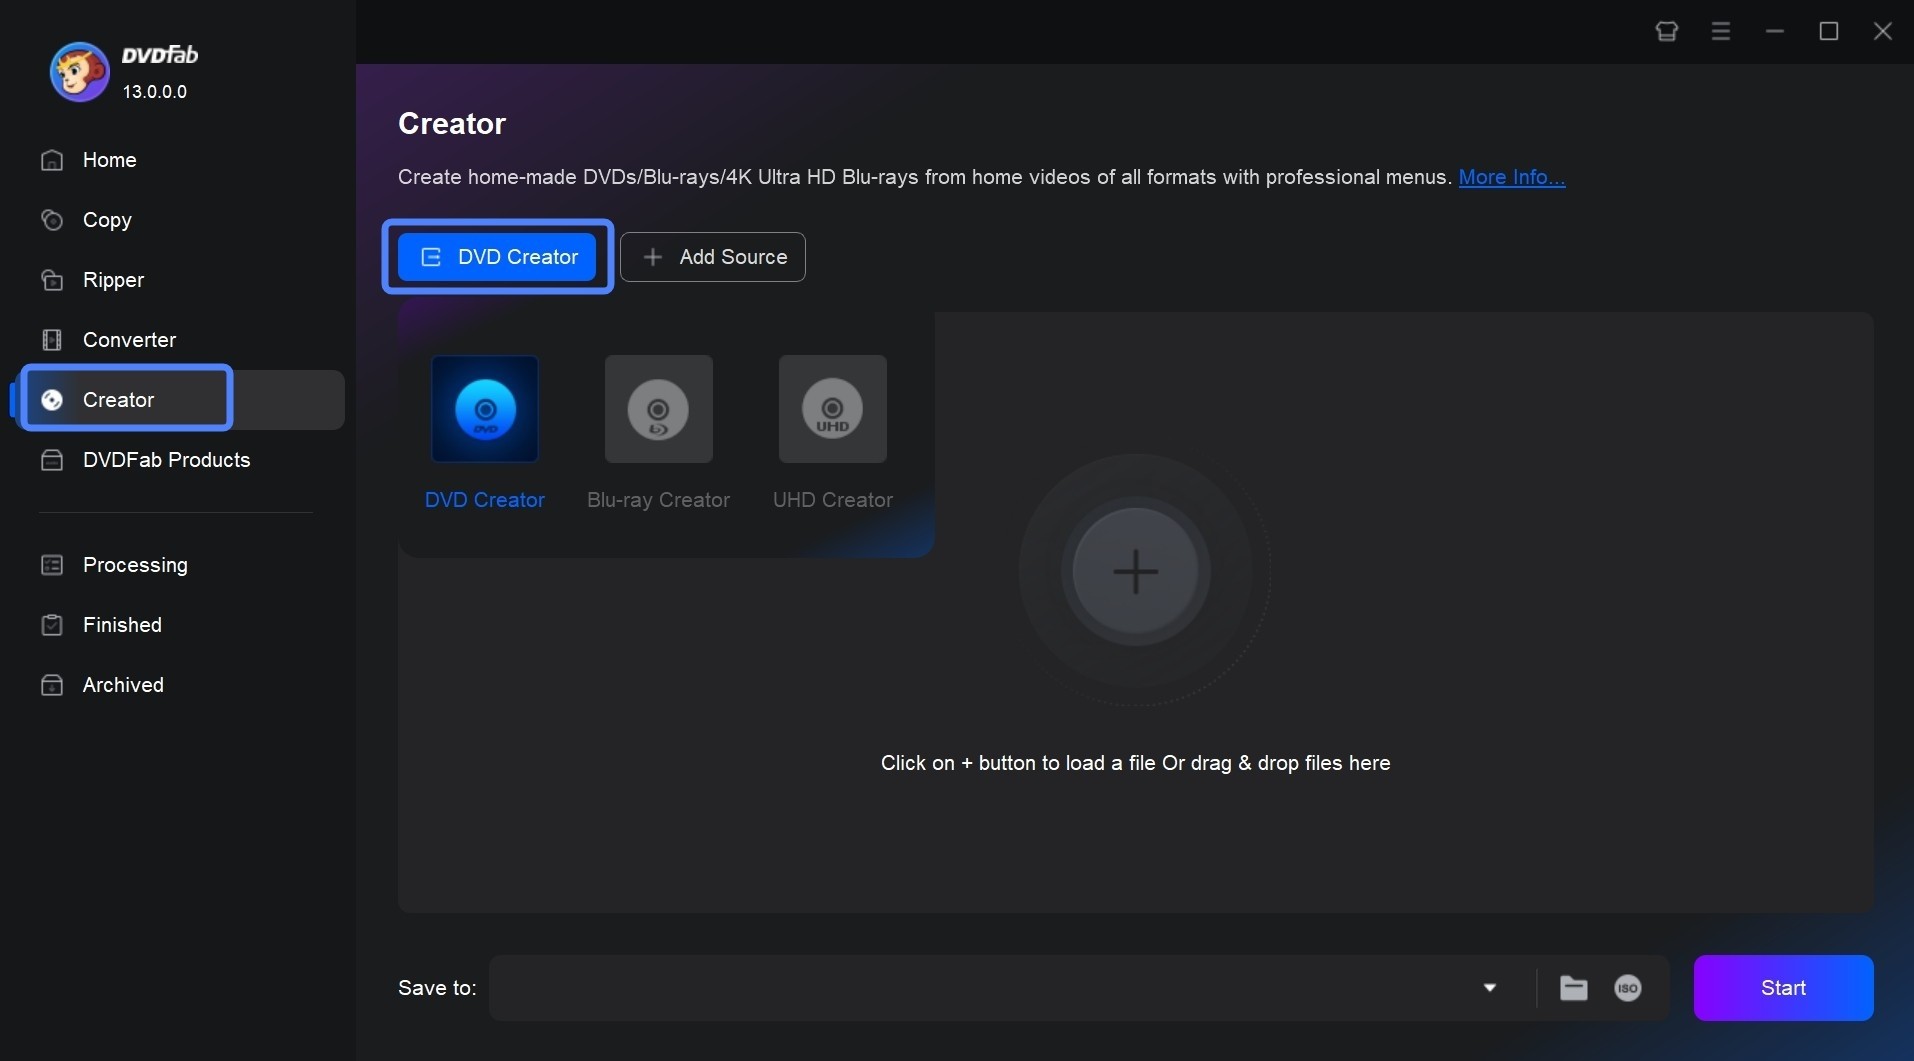
Step 1: Launch DVDFab and Load Video Source
After downloading and installing DVDFab DVD Creator on my Mac, I opened the program and switched to Creator Mode. Importing my video files was a breeze—I just dragged and dropped them into the workspace. The software recognized all my MP4 and MOV files with no issues, which was a relief since I've had compatibility problems with other tools in the past.
Step 2: Customize DVD Settings and Menu
I was impressed by how clear and well-organized the settings interface was. I selected DVD-5 for my blank discs, set the aspect ratio, and picked NTSC for compatibility with our player.
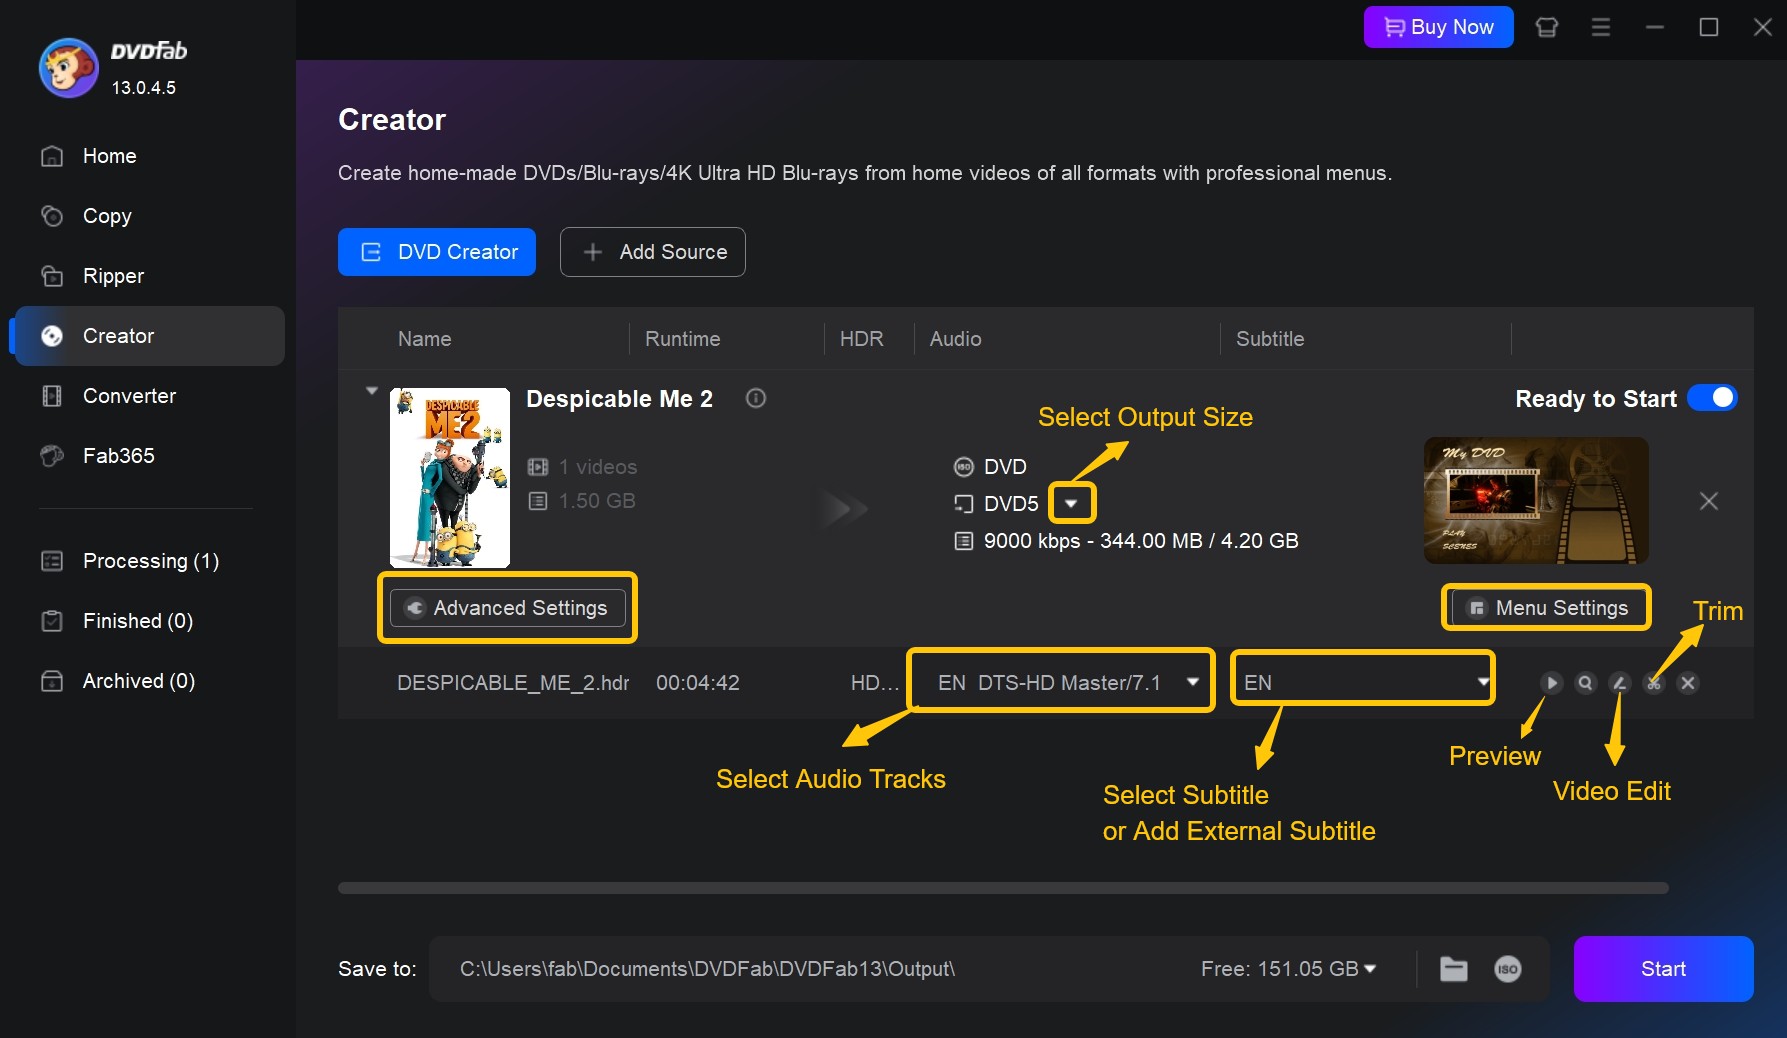
What stood out most for me was the menu customization: I could easily pick from professionally designed templates, upload a custom background image, and personalize the menu text and button style. Being able to add and sync external subtitles was a big bonus, especially for some travel videos we wanted to share with relatives.
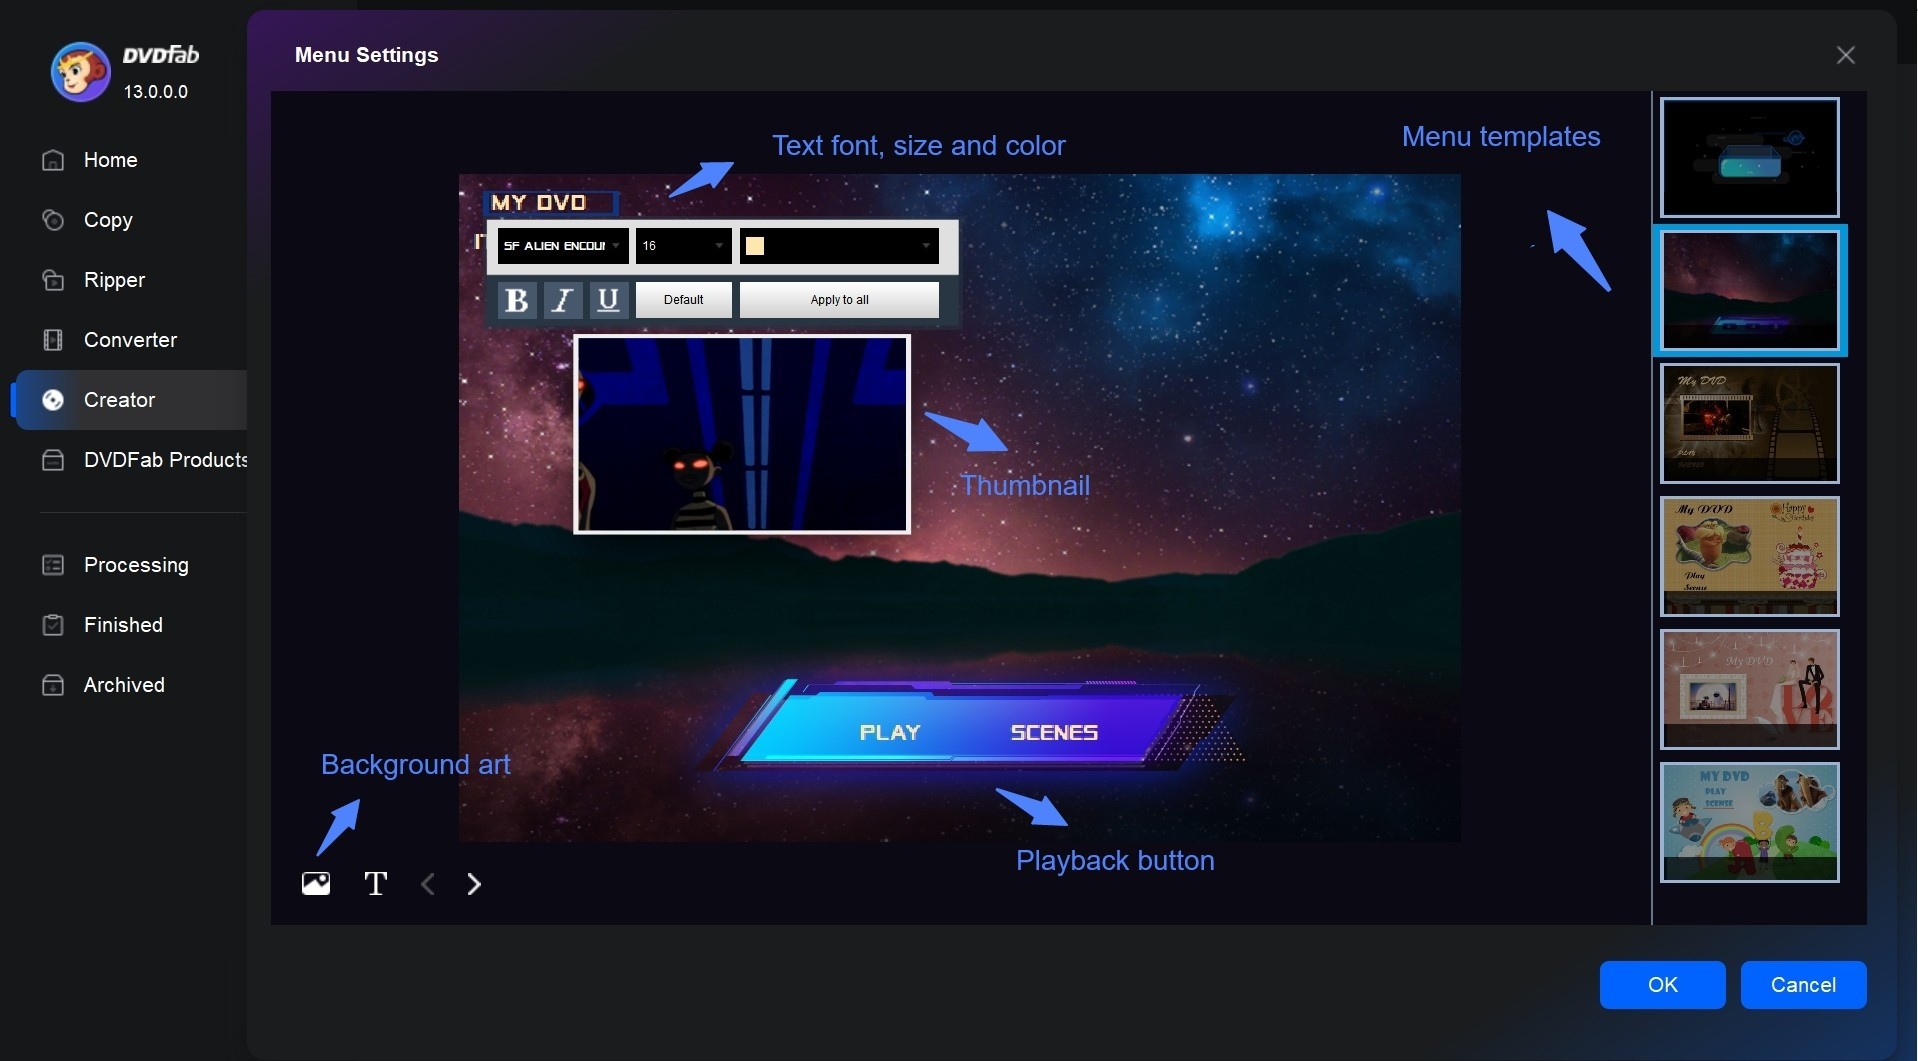
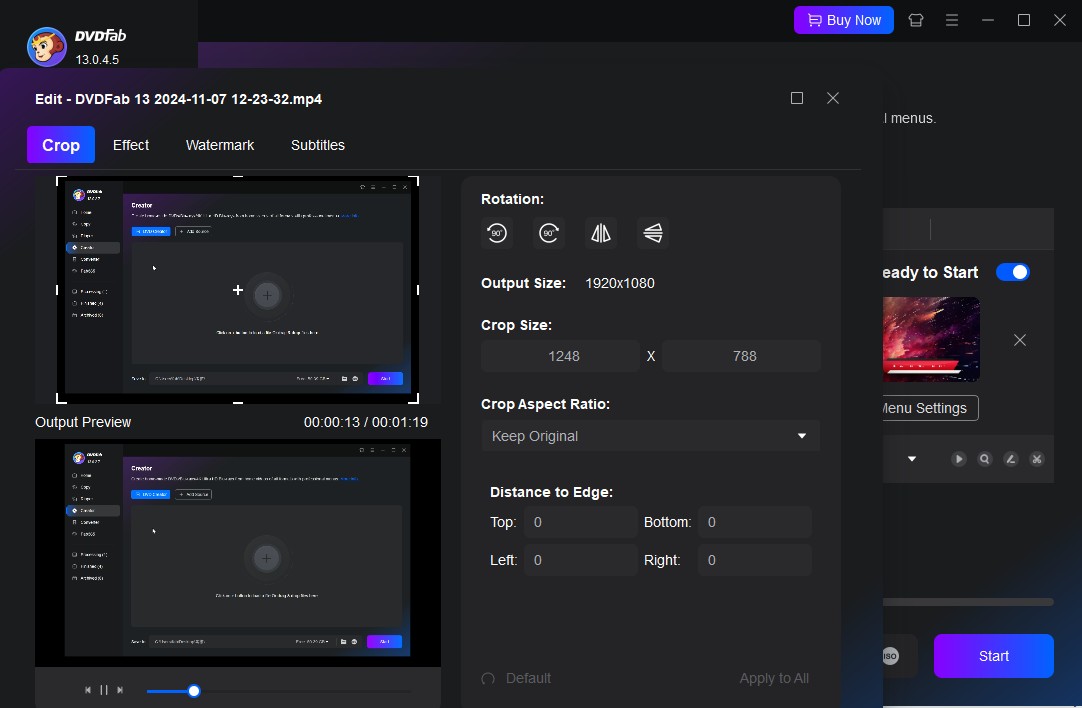
Furthermore, DVDFab DVD Creator provides a full suite of video editing tools right within the program—allowing me to trim scenes, enhance visuals, insert watermarks, and tailor subtitles, all in one place without relying on third-party editors.
Step 3: Start Burning DVD on Mac
After double-checking the menu preview and making some last-minute tweaks, I inserted a blank DVD and hit "Start". The burning process was faster than I expected—thanks to the program's GPU acceleration—and DVDFab kept me updated with a clear progress bar along the way. I liked that I could also save the project as an ISO, making future copies even easier.
How to Burn Data DVD on Mac For Free
Sometimes, I just need to quickly back up photos, documents, or project videos onto a DVD for storage or to share files with colleagues. In these cases, using the free built-in Finder or Disk Utility on my Mac gets the job done fast, even though I know these discs won't play on a standard DVD player.
As we know, Finder is the default file manager on macOS designed to launch other apps and manages files, disks and network volumes. It also supports basic DVD burning. However, please note: DVDs burned via Finder or Disk Utility are data discs, suitable for storage or transfer, but not playable on standard DVD players.
Step 1: Insert a blank DVD and choose how to handle it
Insert the blank DVD into the optical drive.
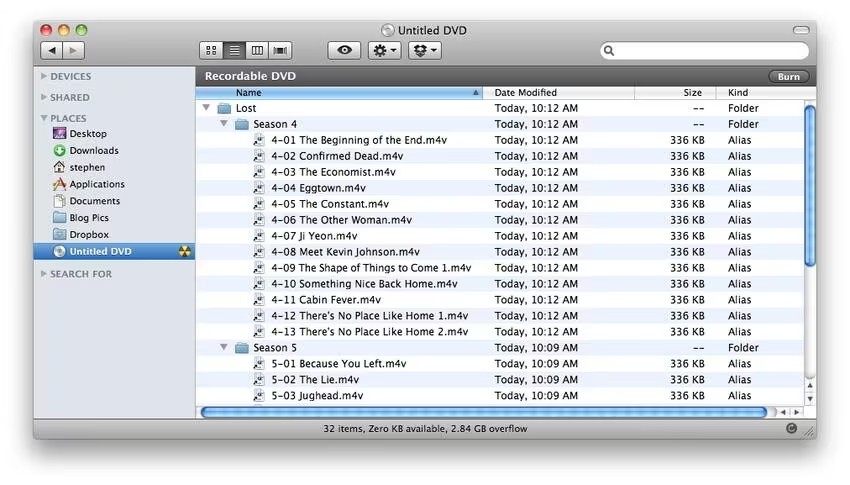
On most systems, macOS will show an Untitled DVD icon on the desktop, and show the same disc in the Finder sidebar under Locations.
If a dialog pops up asking what to do with the blank disc, choose Open in Finder.
Step 2: Add data files to the disc
Open a Finder window and locate the Untitled DVD in the sidebar.
In another Finder window or tab, browse to the files and folders that need to be backed up.
Drag the desired items into the Untitled DVD window.
Step 3: Burn the Data to DVD in Finder
Open the disc in Finder. In the upper right corner of the window, click the Burn button, or choose File > Burn "Untitled DVD" to Disc from the menu.
In the burn dialog, enter a disc name and set the burn speed.
Click Burn to start writing data to the DVD. Finder will show a progress bar while it writes the files to the disc.
How to Burn a DVD on Mac from a Disk Image
.dmg is a disk image format specific to macOS, commonly used for distributing Mac software installers or backing up the complete contents of a partition or disk. If I need to create a bootable system installation disc or a full software backup disc, I first create a .dmg image file and then burn it to a DVD. This can be done using macOS's built-in Disk Utility.
Stes to Burn a .dmg to DVD with Mac Disk Utility
Step 1: Open Disk Utility
Go to Applications > Utilities and find Disk Utility, or use Spotlight to search for "Disk Utility" and open it.
Step 2: Load the .dmg file in Disk Utility
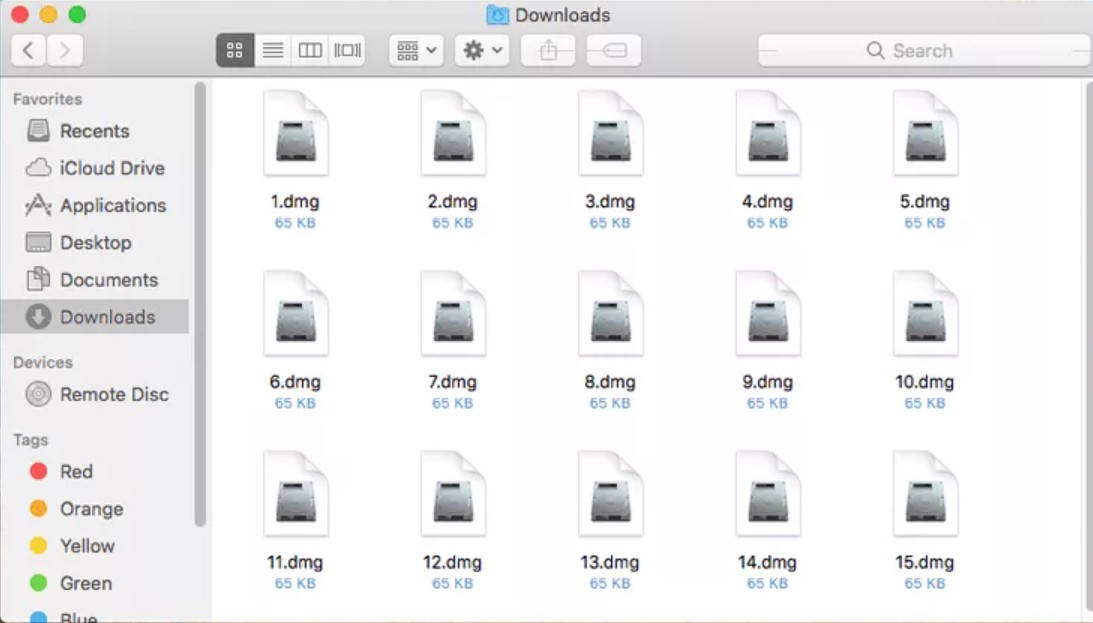
From the menu bar, choose File > Open Disk Image…, locate the .dmg file you want to burn, and open it. After that, the DMG will appear in the left sidebar under Images.
Step 3: Insert a blank DVD
Insert a blank DVD into your external optical drive and wait for macOS to recognize it. It should then show up as a blank disc in the left-hand list in Disk Utility.
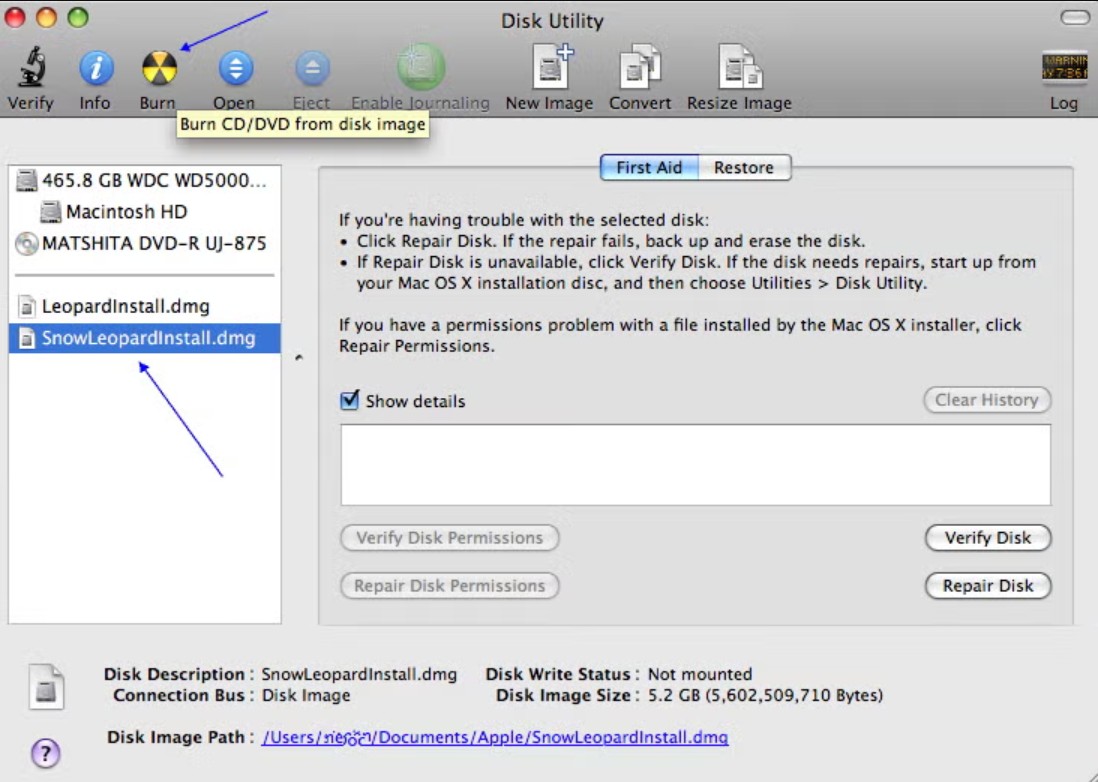
Step 4: Select the .dmg image to burn
In the left device list, click to select the .dmg image entry itself (the top-level image), not the mounted volume that appears underneath it.
Step 5: Start burning DVD on macOS
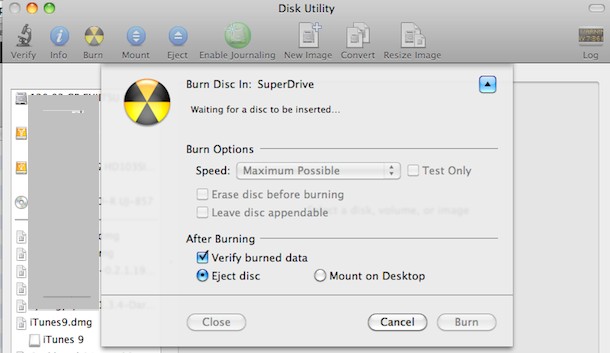
In the toolbar at the top of the Disk Utility window, click the Burn button. In the burn settings window that pops up, make sure the target device is the DVD burner you just inserted the disc into.
Click Burn, then wait for the progress bar to complete. When it's done, the drive will either eject the disc automatically or the newly burned disc will appear on your desktop.
Note: The burning process for .iso files is almost identical to .dmg images in Disk Utility. The main difference is that ISO is a more universal disc image format, often used for DVD-Video discs or system installation media that need to work across different platforms (Windows, Linux, etc.).
How to Burn Slideshow to DVD on Mac For Free
If I have a set of music tracks or photos I want to compile quickly onto a DVD—or need a free, open-source burning tool for basic projects—I use SimplyBurns, even though it may be less reliable on the latest macOS.
SimplyBurns is an open-source and free DVD Maker for Mac that enables users to burn media files such as music, photos or data into a CD or DVD. Meanwhile, it can store data on a disk or rip disk on the hard disk of Mac store. Inside this tool, audio and data project, backup mode, burning image mode, disc ripping mode are available to burn slideshow to DVD on Mac or rip DVD disc to hard drive.
💡SimplyBurns has not been updated in several years, which may result in compatibility issues with newer Mac operating systems and devices.
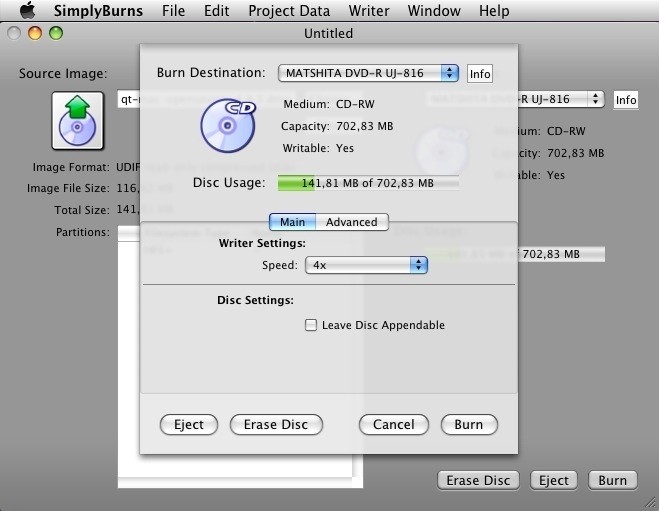
Steps to Burn an Album DVD on Mac with SimplyBurns
How to Burn Music to DVD on Mac (For Audio CDs)
When I want to burn a playlist for car rides or share my favorite mixes with friends in classic audio CD format, I find iTunes to be a fast and familiar way to create music discs directly from my library.
iTunes is one of the most widely used applications developed by Apple, which collects and catalogs thousands of songs, TV shows, podcasts, and movies. However, not all users are familiar with its free and quick CD/DVD burning features.
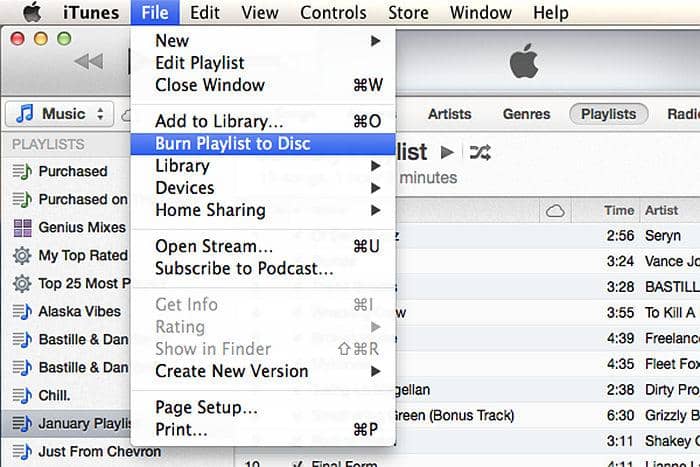
Steps to Burn Music to DVD on macOS via iTunes
FAQs
iMovie allows users to edit and create high-quality videos easily on Mac and iOS devices. However, iMovie does not offer a built-in feature to directly burn DVDs.
To burn an iMovie project to DVD, you first need to export the edited video from iMovie as an MOV or MP4 file, and then use a specialized DVD burning program such as DVDFab DVD Creator to create a playable DVD.
Can I Burn CD on Mac and Windows?
Yes, you can burn CD on Windows 10, 11 and Mac, but the methods differ slightly.
On Windows: You can use the built-in File Explorer to burn data discs or Windows Media Player to create audio CDs. Just insert a blank CD-R or CD-RW, drag files into the disc window, and follow the prompts to finalize the disc.
On Mac: If your Mac has an internal SuperDrive or you connect an external CD/DVD burner, you can use Finder to burn data discs or the Music app (formerly iTunes) to create audio CDs. Simply insert a blank disc, select your files or playlist, and choose "Burn".
As demonstrated above, the title of best Mac DVD burning program shall be given to DVDFab DVD Creator since it supports burning videos from all formats (MP4, MOV, MKV, AVI, etc.) into standard DVD discs, ISO files, or folders with professional menu templates. Thanks to hardware acceleration, DVDFab delivers fast burning speed, high output quality, and full customization. Above all, you can make DVD menu of your own style.
To ensure the best quality when burning a DVD on your Mac, using the right settings and tools is key. If you're using DVDFab DVD Creator, here are important parameters to adjust:
- Choose the correct DVD type (DVD-5 or DVD-9) based on your source file size.
- Select a professional menu template in DVDFab DVD Creator. You can also customize the menu to match your movie style.
- Although faster speeds are available, burning at a slower speed (e.g., 4x) ensures more reliable results.
Final Thought
By now, you should have a clear understanding of how to burn a DVD on a Mac, whether it's a playable DVD or a data DVD. When it comes to burning DVD on Mac with desirable results, DVDFab DVD Creator remains the top recommendation, offering a perfect balance of speed, quality, and customization.
![How to Burn M4V to DVD on Windows & macOS? [2026 Update]](https://r1.dvdfab.cn/upload/resource/en/burn-m4v-to-dvd-r9Vk.jpg) How to Burn M4V to DVD on Windows & macOS? [2026 Update]By Diana Smith - Apr 30, 2026
How to Burn M4V to DVD on Windows & macOS? [2026 Update]By Diana Smith - Apr 30, 2026 How to Convert MP4 to ISO: 6 Proven Methods for High Quality OutputBy Diana Smith - Apr 23, 2026
 How to Make DVDs on Mac and Windows with Easy Steps?By Wenny Yan - Apr 10, 2026
 How to Burn MP4 to DVD on Windows 10 and 11: 5 Best Ways in 2026By Diana Smith - Mar 23, 2026