Burn Video to DVD on Windows & Mac: 5 Methods Compared

Summary: Burning video to DVD is useful when you need a physical copy for family videos, school projects, event recordings, or work presentations. If you want a playable DVD for a regular DVD player, use DVDFab DVD Creator because it can convert video files into a DVD-Video disc with menus and chapters. If you only want to back up or transfer video files, burn a data DVD instead with Windows Media Player on Windows or Finder on Mac. The key difference is simple: a playable DVD is made for watching on a DVD player, while a data DVD is mainly for storing files.
Table of Contents
When I burn video to DVD, the problem I watch for is simple: a disc can play on a computer yet fail in a regular DVD player. That usually means the files were copied as data instead of being converted through DVD-Video authoring into a playable DVD with the structure a set-top player expects.
The conclusion is straightforward: use DVD authoring for a menu-based movie disc, and use a data DVD only for file storage. Below, I compare the main options for Windows and Mac, explain the settings that affect living-room playback, and show how to burn a DVD from local video files.
Burn HD Video to DVD: Quality and Setup
DVD-Video vs. Data DVD
A DVD-Video disc converts supported video files into the structure a regular DVD player can read, including VIDEO_TS files. A VIDEO_TS structure is different from simply copying an MP4 or MKV onto a disc. Standard NTSC DVD-Video is standard definition, so 1080p and 4K sources are downconverted for regular DVD-player playback. Keep the original file on a data DVD, or choose Blu-ray, when preserving HD resolution matters.
For broad living-room compatibility, I would choose DVD-Video authoring over a data disc whenever the recipient expects a menu-based movie disc. Before I start burning a video, like MKV to DVD, I check three things first: a writable DVD drive, a blank disc, and the right kind of burning software.
Disc, Drive, and Capacity
US Playback Compatibility Checklist
- Author the disc as DVD-Video instead of copying a raw video file.
- Select NTSC settings for playback in the United States.
- Use compatible writable media and finalize the disc after burning.
- Test the menu and every title in the intended DVD player.
- If an older player rejects the disc, try a conservative write speed.
A successful computer test does not prove that a set-top DVD player will accept the disc. Check the authored menu and titles on the player that matters before making additional copies.
Choose the Right Tool to Burn Video to DVD
A video to DVD converter needs to do more than write files to a disc. The key differences are whether it authors a playable DVD with menus and whether its editing tools match the project
| Tool | Operating system | Playable DVD and menus | Best fit and limitation |
| DVDFab DVD Creator | Windows and Mac | Yes | Menus, chapters and video editing; unnecessary for data-only discs |
| MAGIX Video deluxe | Windows | Yes | Timeline editing; more than a quick burn needs |
| AVS Video Converter | Windows | Yes | Conversion-led projects; not for Mac users |
| Windows Media Player or Finder | Windows or Mac | No, data discs only | File backup; no DVD-Video menu authoring |
How to Burn Video to DVD with DVDFab DVD Creator
- Available on: Win 11/10/8.1/8/7 & macOS 10.13 - 15.x
DVDFab DVD Creator is a professional video to DVD converter that enables you to create a playable DVD, ISO file, or DVD folder from any video format with remarkable speed and high-quality output. The program produces discs compatible with all major DVD standards, including DVD+R/RW, DVD-R/RW, and dual-layer discs.
I also tested DVDFab DVD Creator 13.0.6.5 on my Windows computer with a 1080p MP4 video that was about 2 hours long. In my test, the whole DVD burning process took about 14 minutes, which felt quite fast for a project of this length. For a standard DVD output, the picture looked clear, and the colors stayed very close to the original video. I also liked the menu and chapter editing features because they made the final disc easier to browse instead of turning it into one long video file.
Features:
- Burn videos to DVD, ISO, or folder from popular formats
- Edit source videos with the integrated video editor
- Merge multiple clips onto one disc and set playback order freely
- Create and customize menus using stylish templates and background music
- Convert MP4 to DVD with supported hardware acceleration
- Automatically retain metadata from original videos for organized playback
Step 1: Launch DVDFab and Load Video Source
Free Download Windows 11/10/8.1/8/7
Free Download macOS 10.13 - 15.x
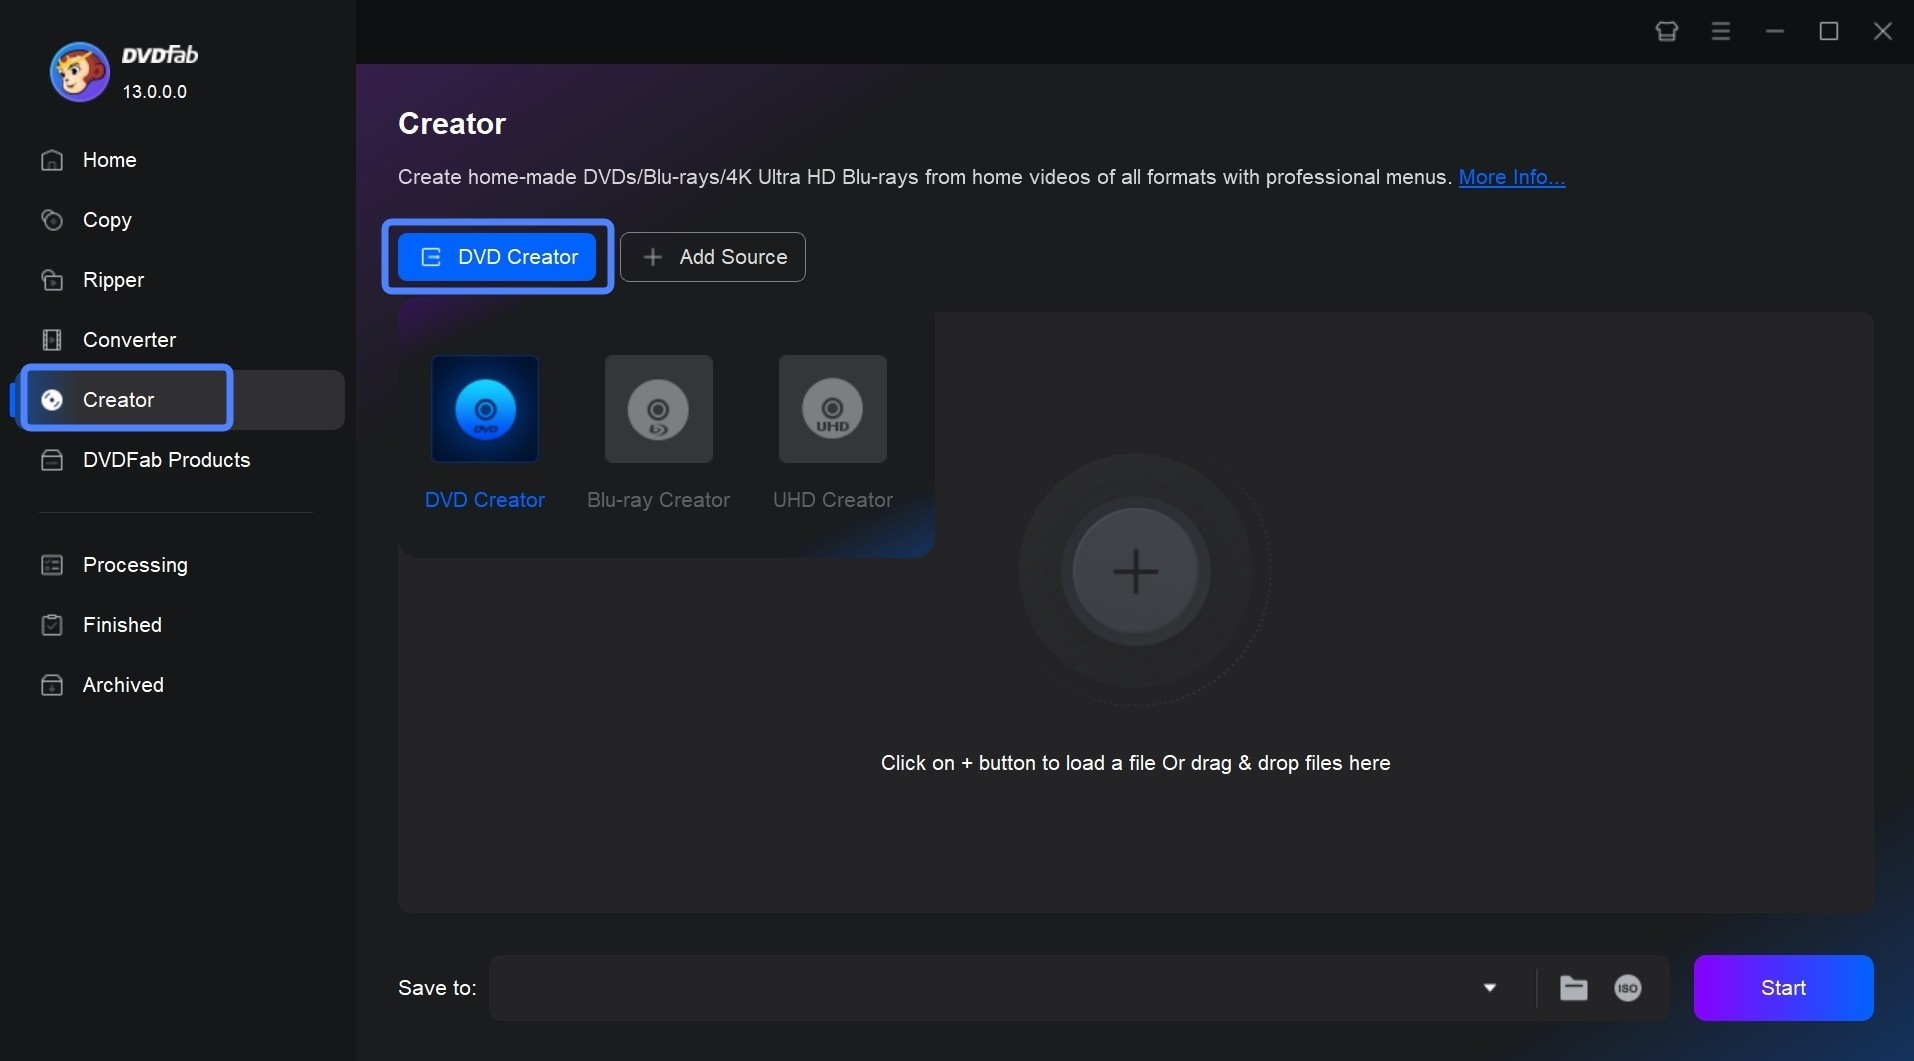
Open DVDFab and choose DVD Creator from the start-up module list. Drag and drop your video files into the main interface, or click Add to import them from your computer. Once the files are displayed, they are ready for authoring.
Step 2: Adjust Output Settings and Customize the DVD Menu
Open Advanced Settings to define your disc specifications. Select the DVD size (DVD-9 or DVD-5), choose the TV standard (NTSC or PAL), and set the aspect ratio (16:9 or 4:3). You can also adjust playback behavior to start from the menu or play all titles sequentially.
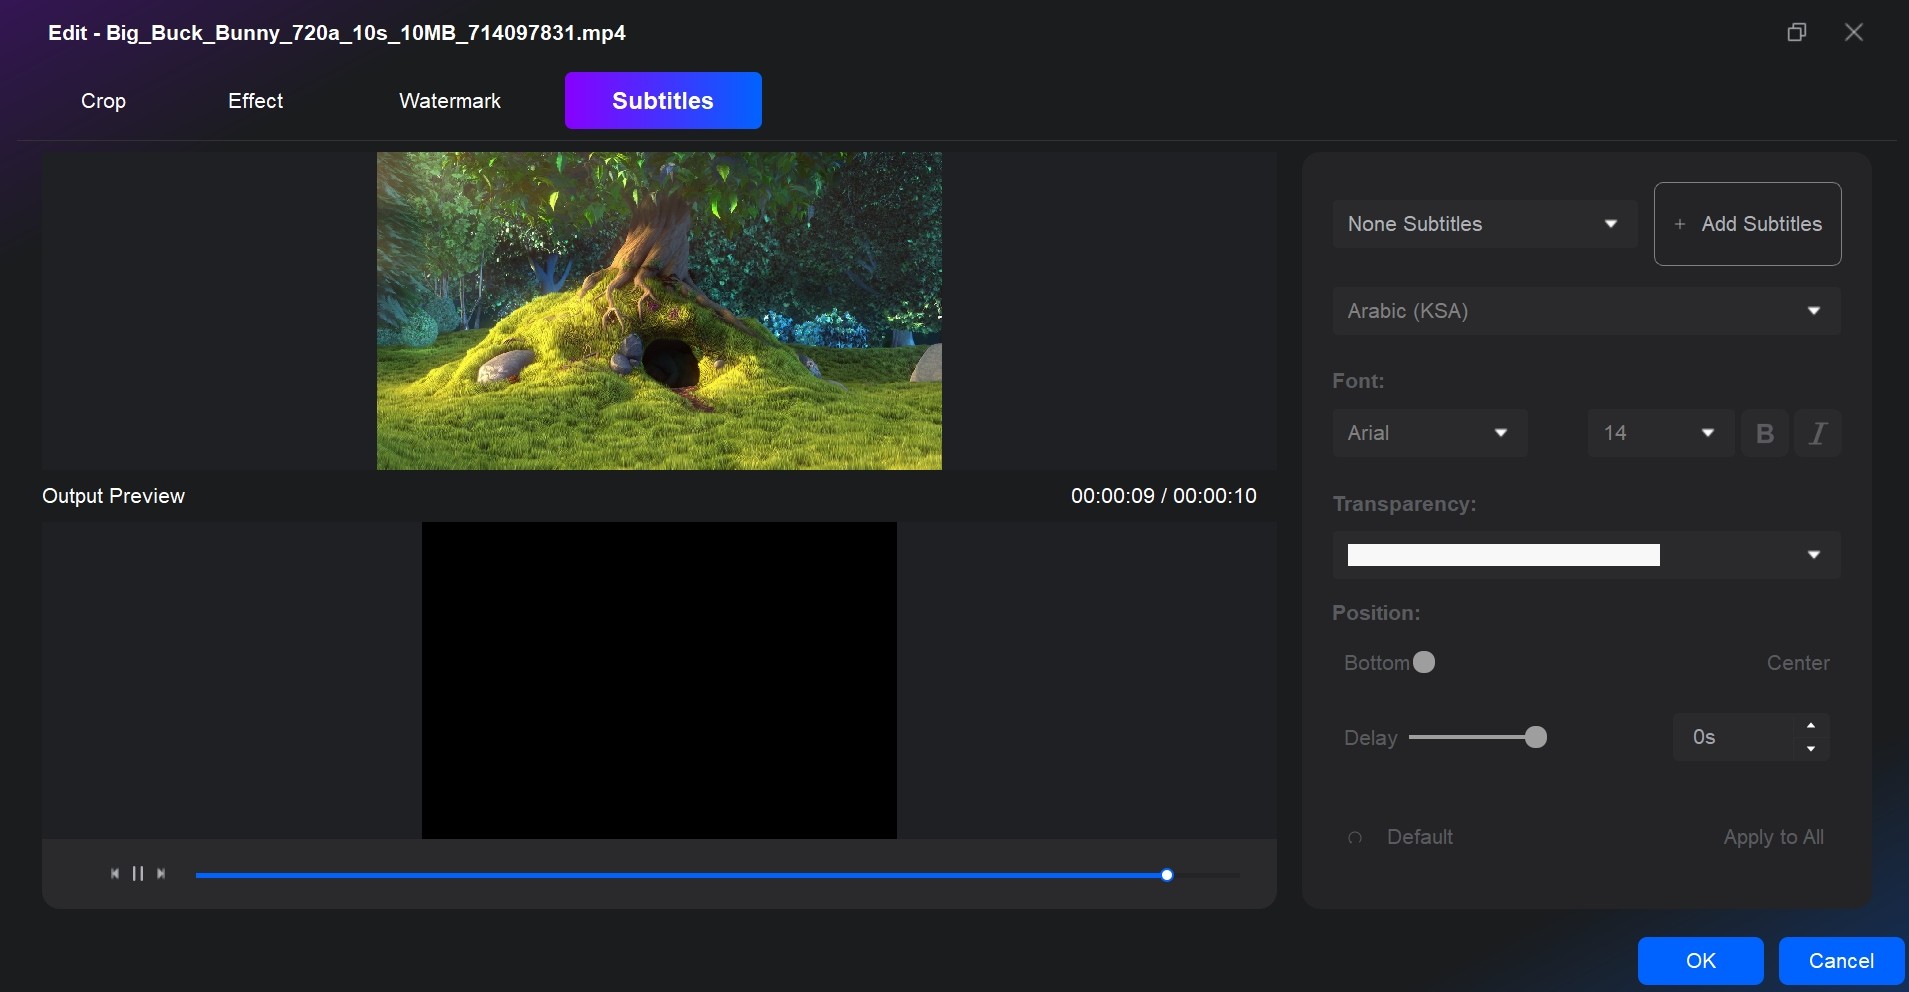
Optional: Add external subtitles or switch audio tracks for individual videos.
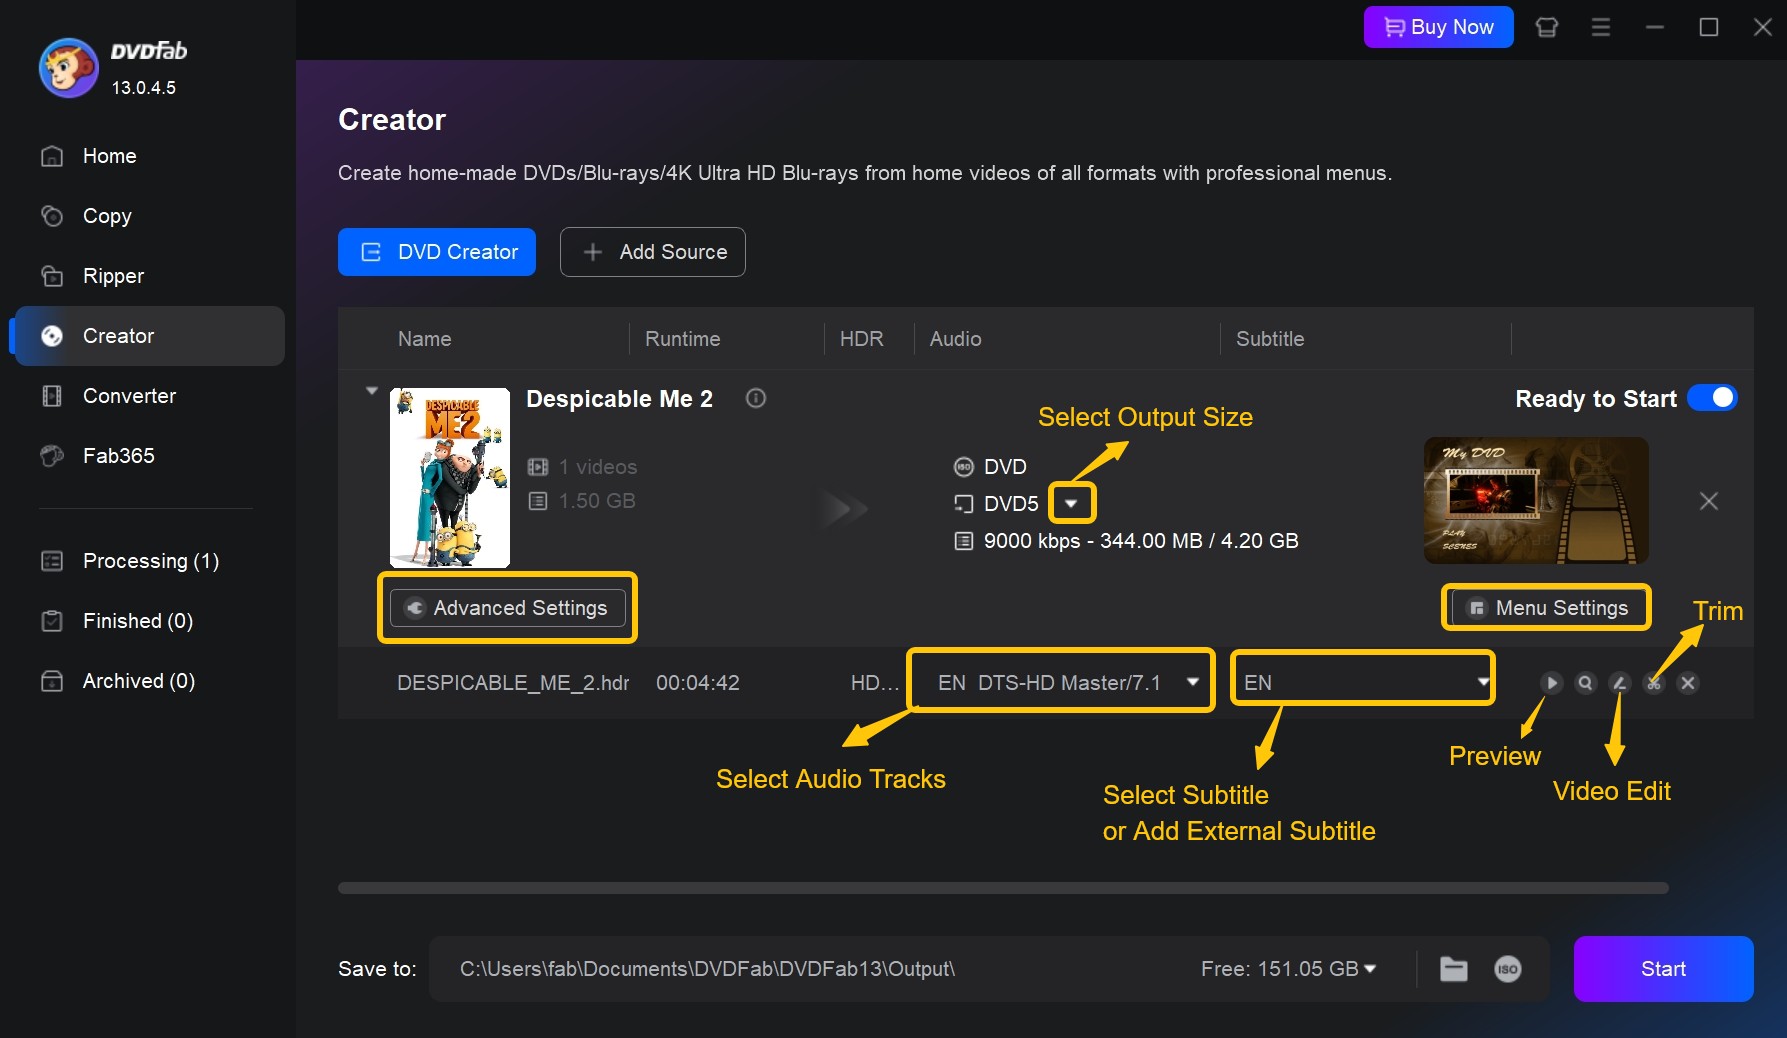
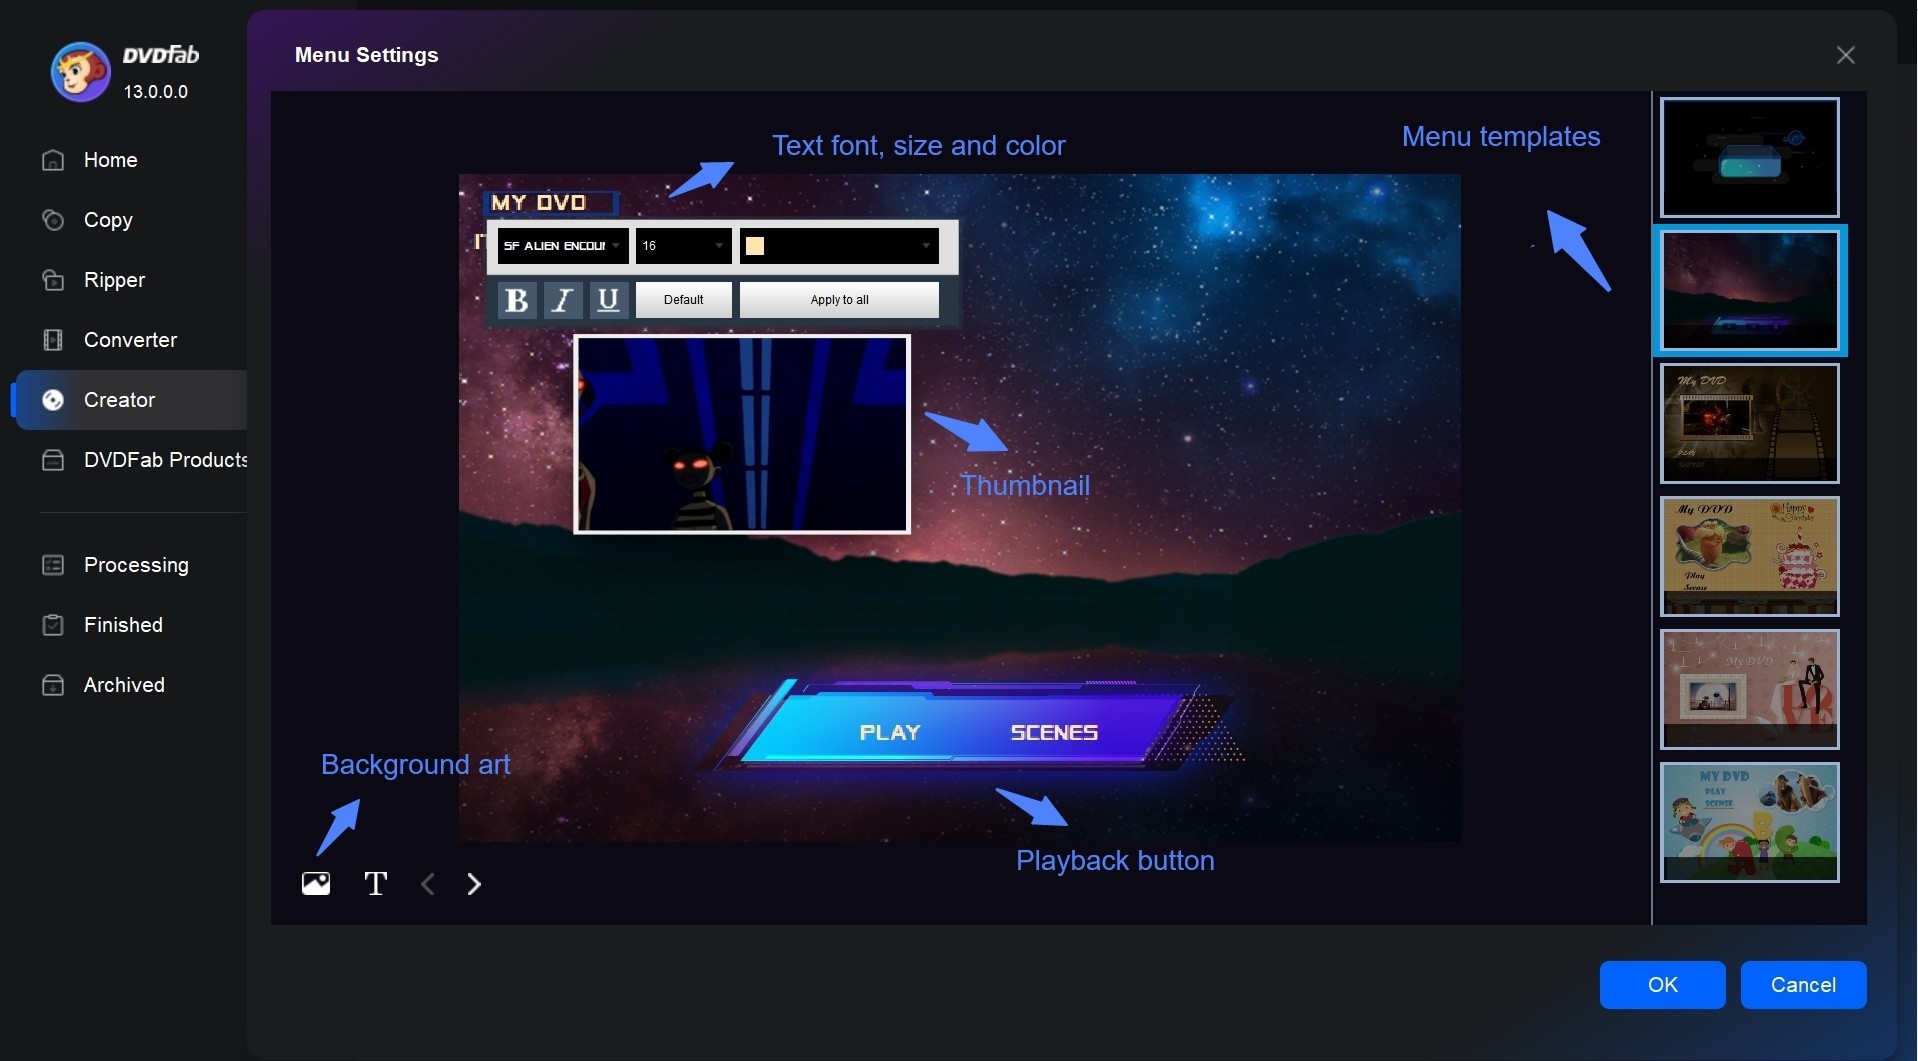
Then open Menu Settings to create DVD menu for better playback control. You can select a menu template, replace the background image, edit titles, adjust button style, or add background music. All main and chapter menus can be customized to match your preferred design.
Optional: Edit Video to DVD Before Burning
Use the Video Editor module to enhance your videos. For example, trim unwanted segments, crop the frame, rotate footage, adjust brightness and contrast, or add subtitles and watermarks. All edits will be reflected in the preview window before burning.
Step 3: Start to Burn Video to DVD
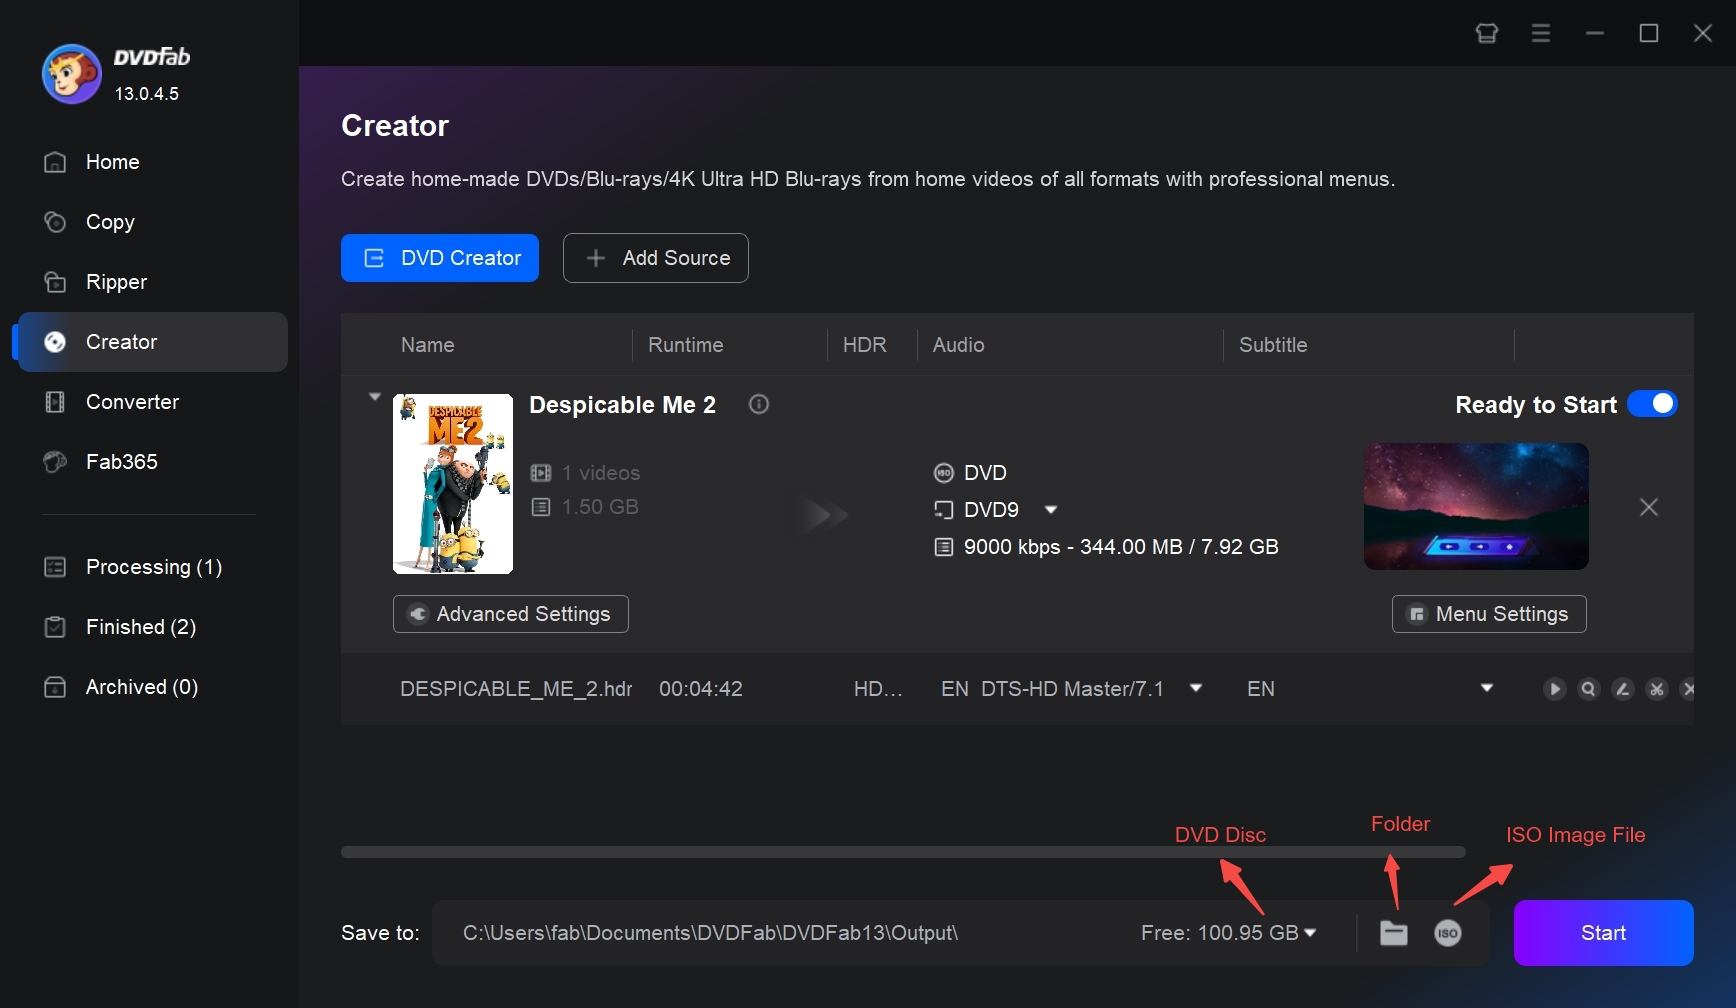
Insert a blank DVD into the optical drive of your computer. If you plan to create a digital backup, set the output destination as an ISO file or DVD folder. Once done, hit the Start button to burn your video to DVD.
How to Burn Video to DVD with MAGIX Video deluxe
- Available on: Windows 10/11
MAGIX Video deluxe provides an all-in-one workspace for creating professional DVDs from video on Windows. It integrates video editing, menu design, and DVD authoring tools within a single interface. Users can import clips from a wide range of formats, refine footage with precise timeline controls, and compile complete movie collections ready. The software also supports GPU-accelerated rendering to maintain smooth performance when working with long projects. Although its feature set is extensive, beginners may find the layered workspace slightly complex at first.
Features:
- Import and edit videos in major formats, including MP4, MOV, AVI, MPEG-2, and HEVC
- Design custom DVD menus using built-in templates, and background music
- Combine multiple clips or movies into a single DVD with structured chapter menus
- Apply transitions, text overlays, and color-correction before burning
Step 1: Import and Arrange Your Videos
Launch MAGIX Video deluxe and create a new project. In the Media Pool, locate your video files and drag them onto the timeline. Reorder clips as needed so the playback sequence matches your plan.
Optional: To include several films on one disc, right-click the title tab above Track 1, choose New movie, and import additional footage into the new timeline.
Step 2: Edit and Refine Your Footage
Open the timeline editor to polish your content before burning. Split or merge clips, and use ripple editing to keep transitions smooth. Adjust brightness, and color balance to correct exposure or style the look. Insert titles, rolling credits, and animated transitions to enhance flow, then add subtitles or overlays for narration. The preview window updates instantly, letting you evaluate changes in real time.
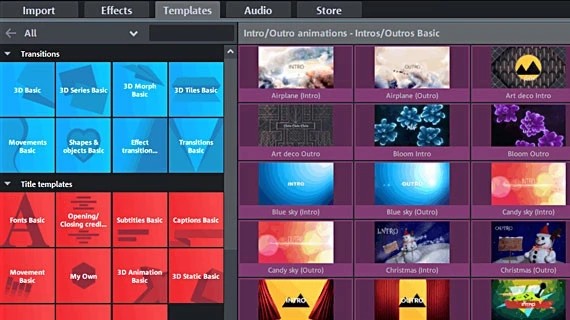
Step 3: Create a Professional DVD Menu
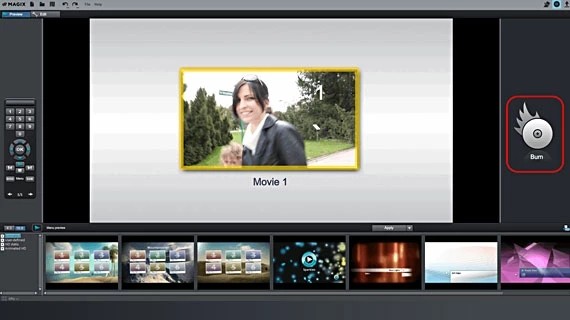
Switch to the Burn tab and select DVD as the disc type. Choose a menu template that suits your theme, then personalize backgrounds, button text, and navigation structure. Add background music or motion thumbnails for a more cinematic interface.
Step 4: Burn or Export the Project
Insert a blank DVD into the drive. In the Burn interface, confirm Burn to Disc to author directly or Create ISO Image to save a digital copy. Verify your settings and click Start Burning. MAGIX Video deluxe will encode, render, and finalize a playable video-to-DVD disc or ISO file compatible with standard DVD players.
How to Burn a Video to a DVD with AVS Video Converter
- Available on: Windows 11, 10, 8.1, 8, 7, Vista, XP
AVS Video Converter is a Windows-based application for video conversion, basic editing, and video-to-DVD burning. It supports projects built from MP4, MOV, and WMV to DVD files with custom menus and chapter navigation. It is a reasonable choice for Windows conversion-led projects, while Mac users and readers who want the simplest menu-first authoring screen may prefer another option.
Features:
- Convert common video formats for DVD projects
- Burn converted videos to DVD or Blu-ray with customizable menus
- Use hardware acceleration for faster encoding and preview
- Edit footage before conversion: trim, merge, split, or adjust aspect ratio
- Export videos optimized for YouTube, Facebook, mobile devices, and consoles
Step 1: Import Your Video Files
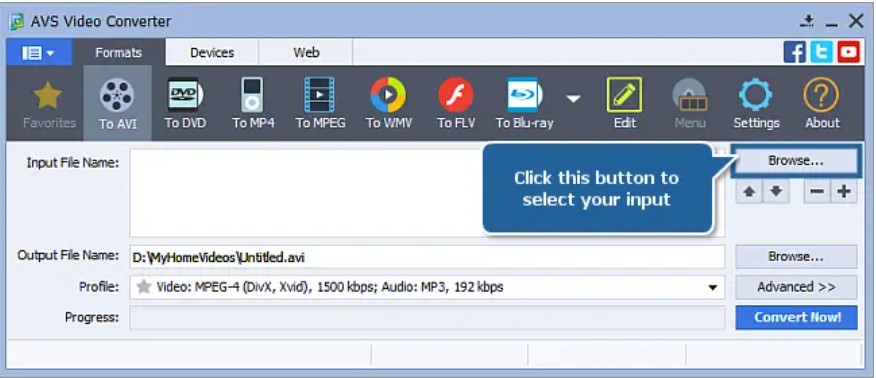
Launch AVS Video Converter and click Browse to select the video files you want to burn. Load multiple videos if you plan to create a compilation, then arrange their order in the file list before proceeding.
Step 2: Set Output to DVD and Choose a Profile
Open the Formats tab and select To DVD as the output option. Pick a preset profile that matches your desired quality or region standard (NTSC or PAL). If needed, add or remove files and define the target folder for the converted project on your local drive.
Step 3: Edit and Design Your DVD Menu
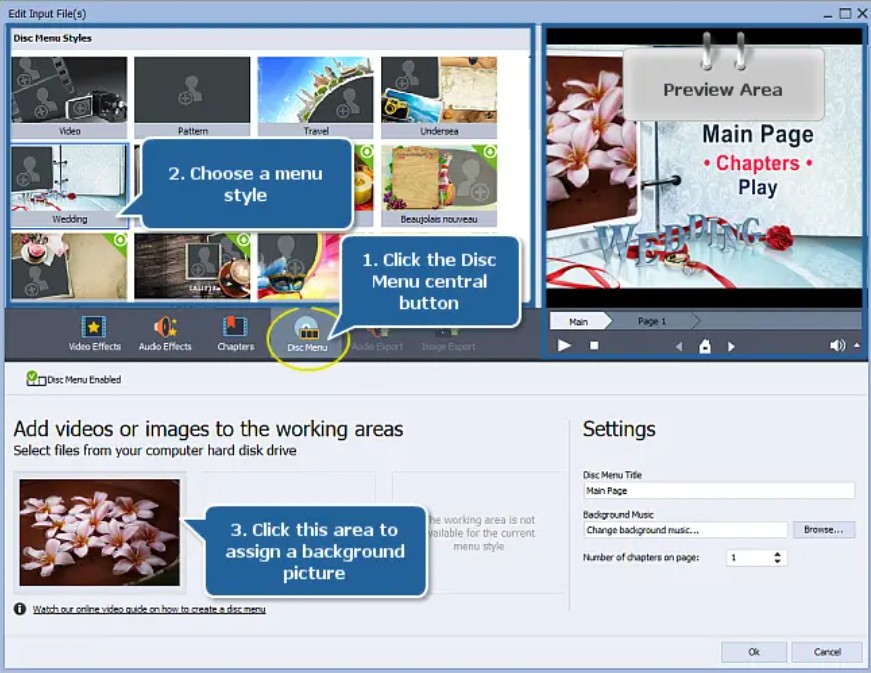
Before conversion, open the editing panel to refine your footage. Trim unwanted parts, merge clips, adjust color levels, and add titles or effects. Then enable Menu Creation to design the DVD layout, such as setting chapter points, selecting video loops, adding music, and editing menu titles for navigation.
Step 4: Burn Your Video to DVD
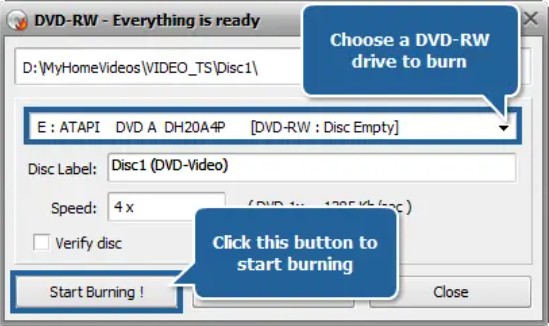
Click Convert Now! to start encoding your video project. After conversion, select Burn to Disc, insert a blank DVD, and click Start Burning. The program will author a playable disc with menus and chapters, or you can save the result as an ISO file.
How to Burn Video to a Data DVD (Backup Only)
Burn Video to Data DVD with Windows Media Player
- Available on: Windows 10/8/8.1/7/Vista/XP
Windows Media Player is a built-in Video to Data DVD software operated by Microsoft. It provides functionality for playing audio, video, and viewing images on computers running the Windows operating system. In addition, this versatile software allows you to burn your desired songs, pictures, or videos onto a CD or DVD, turning them into data discs for playback on appropriate systems. However, you cannot use Windows Media Player to create video DVDs that you could play on a regular DVD player.
Step 1: Open Windows Media Player and insert a blank DVD
Launch the program either from the shortcut on your desktop or from the programs list in the Start menu. Then place a blank DVD in your DVD writer drive. Ensure that the drive is either a DVD-R or DVD+R as these are typically the formats that are compatible with Windows Media Player.
Step 2: Switch to burn list and add files
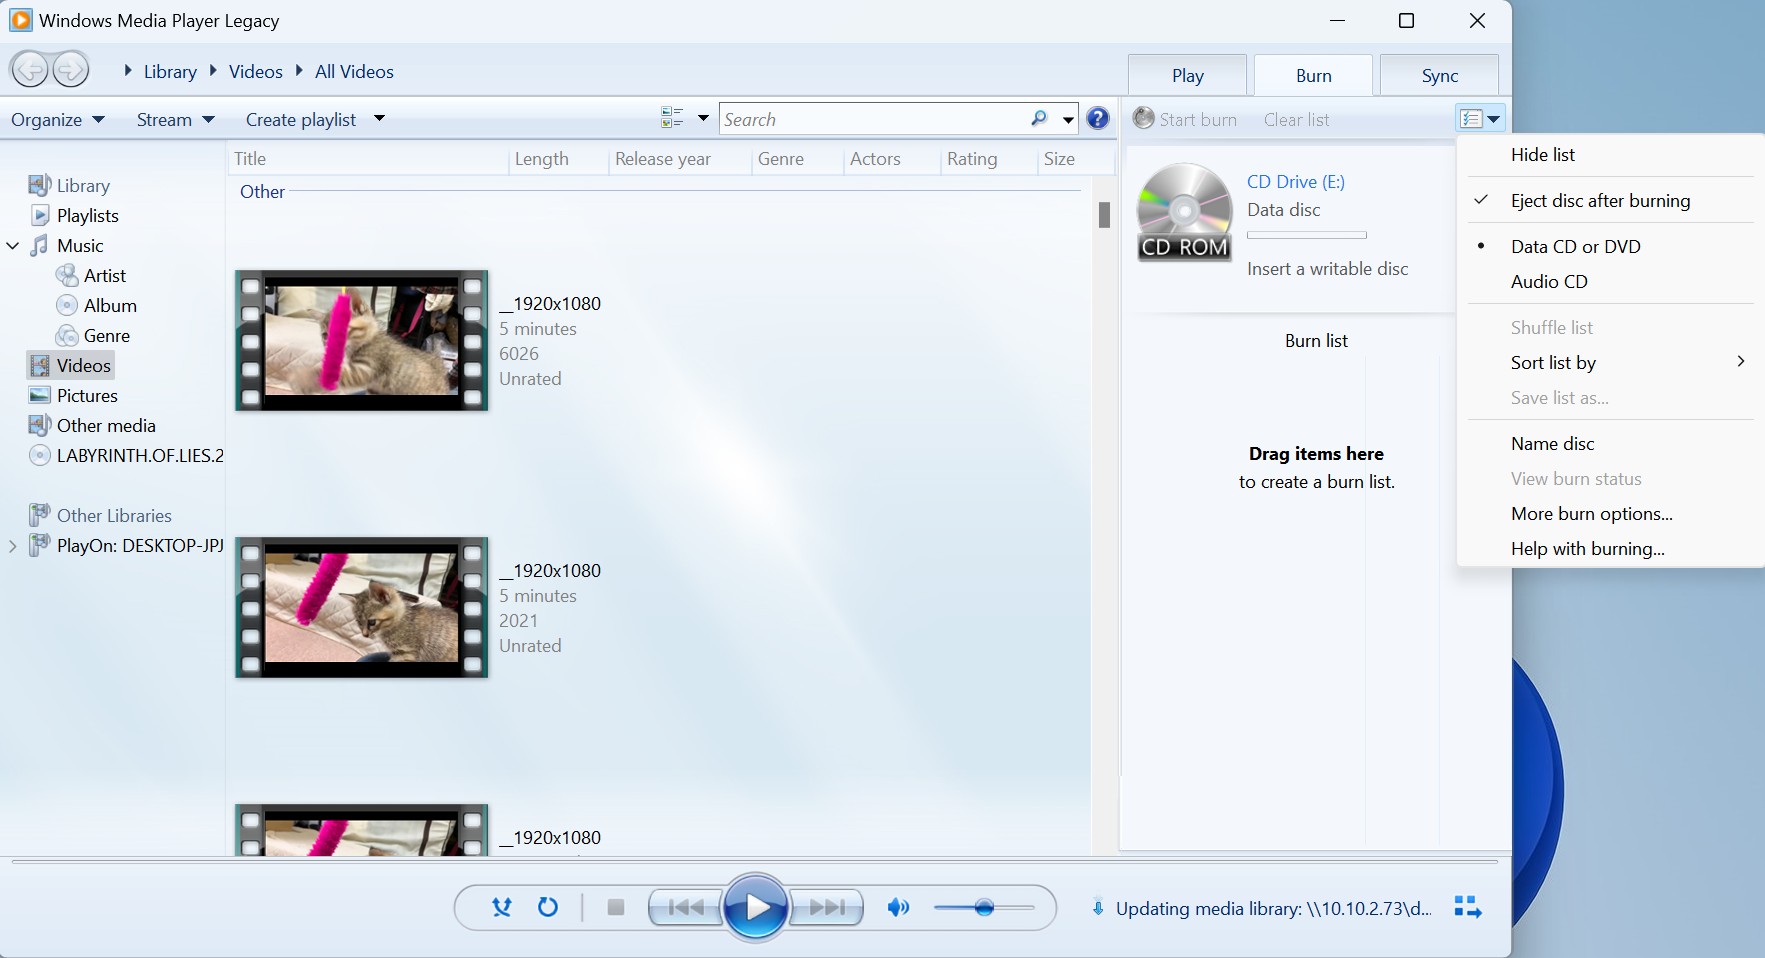
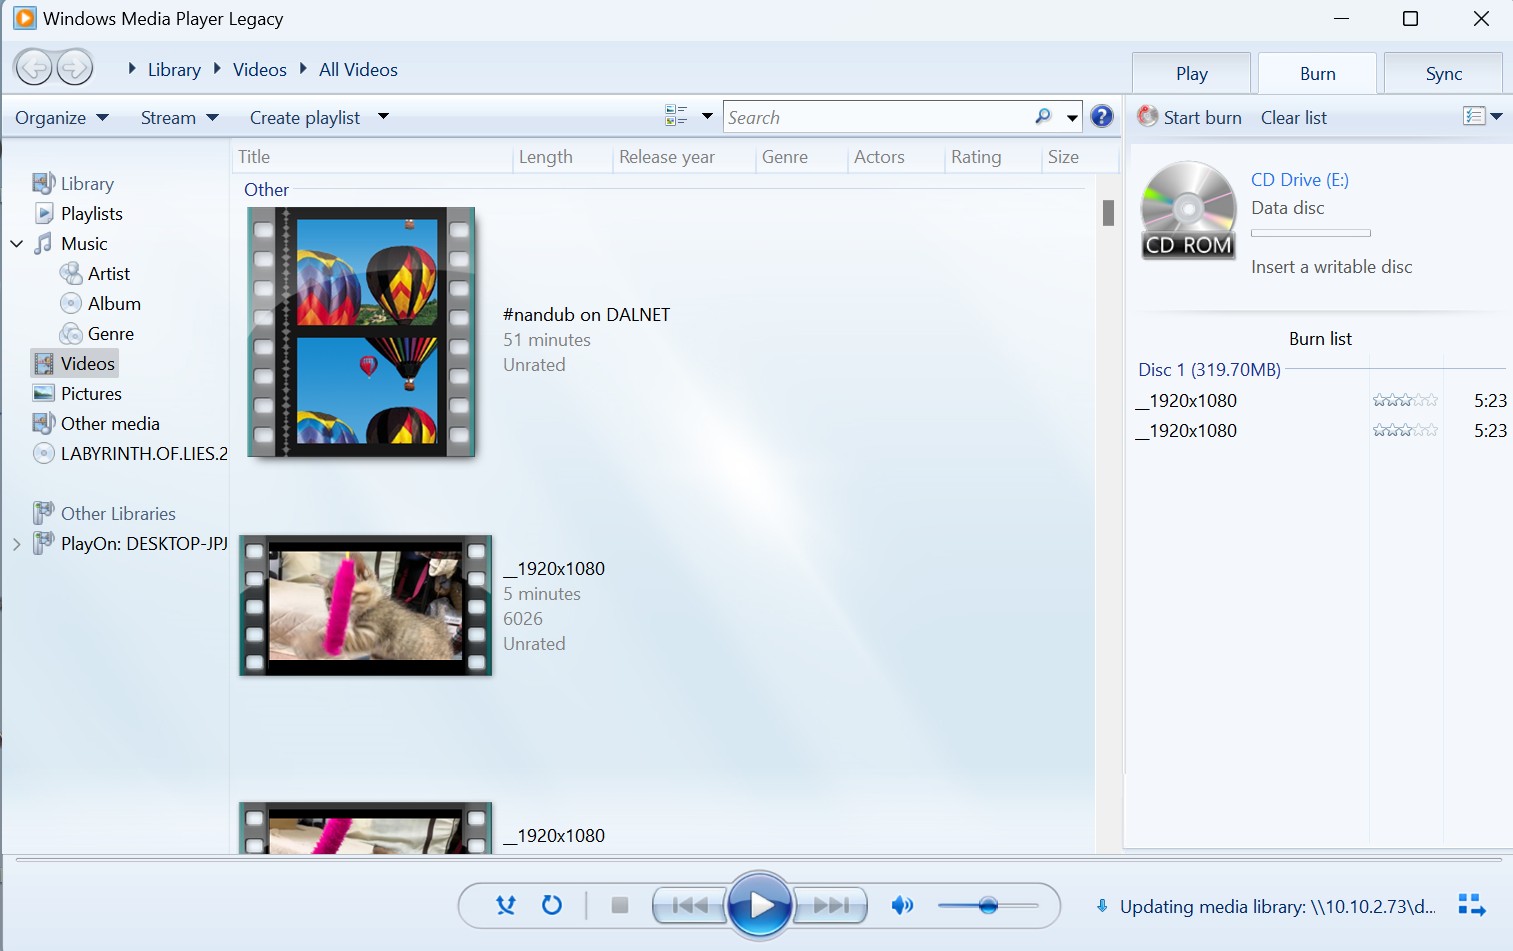
At the top right of the player, switch from the 'Play' tab to the 'Burn' tab. Navigate through your folders and find the video files you want to burn. Drag them to the burn list in the right pane of the Windows Media Player.
Step 3: Choose the right burning option and start burning video to data DVD
Click on the 'Burn options' drop-down menu and choose 'Data DVD'. Once you're satisfied with your burn list, click on 'Start Burn'. This feature allows Windows Media Player to start writing the video files onto your DVD.
Burn Video to a Data DVD with Finder
- Available when: A writable optical drive is connected to your Mac
Finder can write video files to a data DVD when a writable optical drive is connected, but it does not create DVD menus or author a playable DVD-Video disc. If you want to burn an iMovie to DVD on your Mac for a regular DVD player, use DVD authoring software that can create the required DVD-Video structure.
Step 1: Connect a writable external optical drive if your Mac does not have one, then insert a blank or rewritable disc. When the disc appears on the desktop, open it in Finder.
Step 2: Locate the video files that you wish to burn onto the DVD. You can do this by using Finder's search bar or manually searching through your files. Drag the selected files into the open DVD folder.
Step 3: Once you've relocated all the files, click on "File" in the menu bar at the top of the screen.
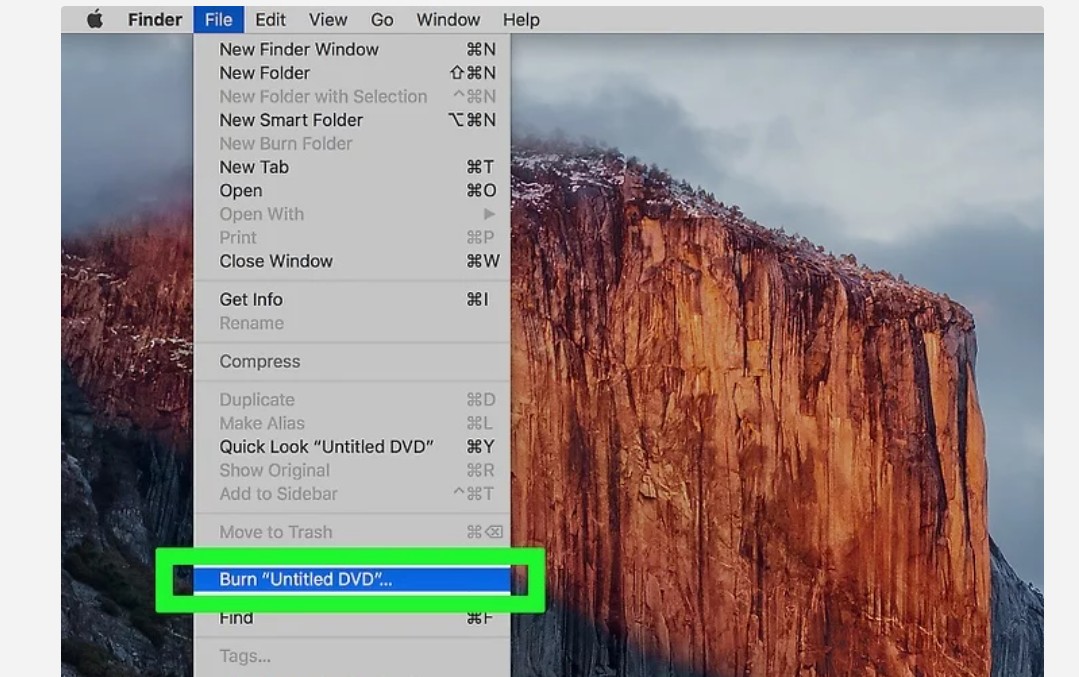
Step 4: Choose the 'Burn [disc]' option to start the burning process. A pop-up window will appear asking you to confirm the action. Click 'Burn'.
FAQs
What recordable DVD works best with older players?
Start with write-once DVD-R or DVD+R media and finalize the disc after authoring. Rewritable discs are useful for menu tests, but older standalone players may be less consistent with them. Playback also depends on the player, disc condition, DVD-Video structure, and write speed, so test the finished disc in the intended player.
Why can an authored DVD be larger than the source video?
DVD-Video authoring converts the source into DVD-compatible video and adds navigation assets such as menus and chapter information. The original file size is not a reliable estimate of the finished disc size, especially when a small, highly compressed video is converted for DVD playback.
When is a mail-in DVD service worth using?
A mail-in service can make sense if you do not own a writable drive or prefer to have a disc produced and delivered for you. It also avoids installing authoring software. Consider the privacy of uploading personal videos and the extra turnaround time before choosing this option.
Which online videos can I legally put on DVD?
Use local video files you created, own, or are authorized to use. Public-domain material and files offered with explicit download and reuse permission may also be appropriate. Authorization to watch a video online does not automatically include permission to copy, distribute, or put it on a disc.
Can subscription-app downloads be burned as DVD-Video?
Offline downloads inside subscription apps are not ordinary local video files for DVD-Video authoring. The steps in this article apply to video files you created, own, or are authorized to use, then import into DVD authoring software.
Conclusion
For a menu-based disc that needs to play in a regular DVD player, use DVD authoring software and create a DVD-Video disc. Use built-in tools when you only need a data DVD for file backup, and choose an editing-heavy option when the project genuinely needs timeline work before authoring. Before making additional copies, test one finished disc in the player where it will be used.

![How to Burn a DVD on Windows 10: 4 Ways for Video & Data DVDs [2026]](https://images.dvdfab.cn/media/how_to_burn_a_dvd_on_windows_10_m9kvvp.png/public) How to Burn a DVD on Windows 10: 4 Ways for Video & Data DVDs [2026]By Diana Smith - Aug 18, 2026
How to Burn a DVD on Windows 10: 4 Ways for Video & Data DVDs [2026]By Diana Smith - Aug 18, 2026 How to Copy DivX/Xvid to DVD: Playable DVD-Video or Data DiscBy Wenny Yan - Aug 17, 2026
![YouTube to DVD Converter: 4 Ways to Burn a Playable Disc [2026]](https://images.dvdfab.cn/media/burn_youtube_video_to_dvd_j8vz5l.png/public) YouTube to DVD Converter: 4 Ways to Burn a Playable Disc [2026]By Wenny Yan - Aug 17, 2026
YouTube to DVD Converter: 4 Ways to Burn a Playable Disc [2026]By Wenny Yan - Aug 17, 2026 12 Best Free DVD Authoring Software for Mac & Windows in 2026: TestedBy Diana Smith - Aug 12, 2026