How to Rip and Burn Music CD and DVD
Summary: To rip and burn music cds, using Windows Media Player simplifies the process for personal use. This guide provides step-by-step instructions to convert discs into digital formats like MP3 and burn playlists onto recordable media. It also covers extracting audio from video discs and explains technical differences between formats, helping you preserve your collections across modern and legacy devices effectively.
Table of Contents
My shelves are still lined with rows of jewel case - a mix of 90s rock CDs and rare concert DVDs that streaming services simply don't carry. While I love the convenience of my phone, there's a certain "soul" in physical media that I'm just not ready to give up. I realized recently that if I didn't copy music CD soon, those tracks might be stuck on plastic forever.
I spent time figuring out the best ways to copy audio CD onto my modern devices and even how to burn fresh custom CDs for my car's legacy player. Along the way, I discovered that the technical differences between a CD and a DVD change everything from sound quality to storage capacity. In this guide, I'm sharing the exact steps I use to manage my music CD collection effectively, so you can keep your library alive and portable.
How to Rip and Burn a CD via Windows Media Player?
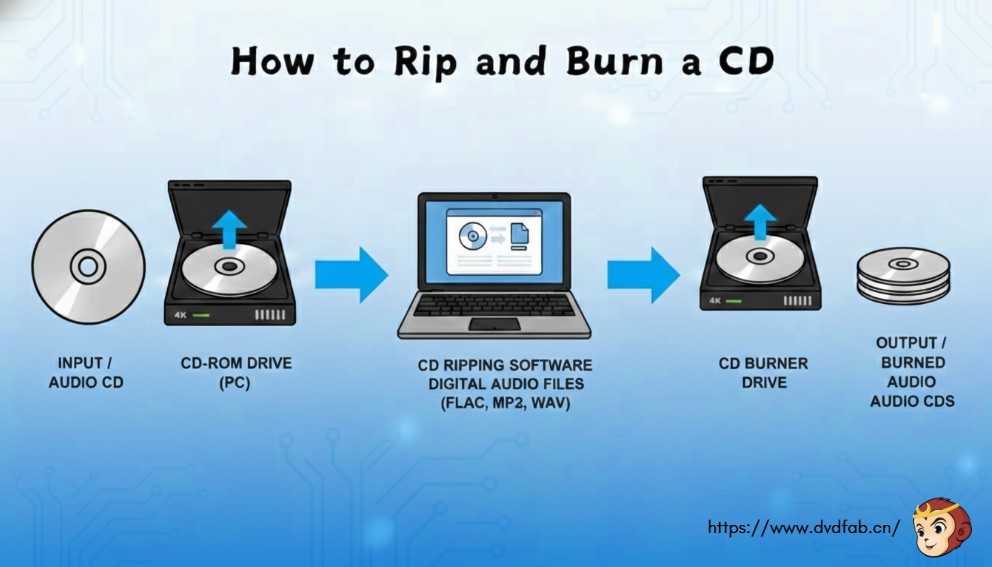
As music CDs fade from use, you may want to copy their content to your computer. Software like Exact Audio Copy and dBpoweramp can rip CDs, but if you prefer not to install anything, Windows Media Player can also handle the task.
Windows Media Player is a multimedia software developed by Microsoft. It is primarily used for playing audio, video and viewing images on computers running the Microsoft Windows operating system, as well as on Pocket PC and Windows Mobile-based devices.
The media player has features such as the ability to rip music from and copy music like MP3 to DVD or CD, burn recordable discs in Audio CD format or as data discs with playlists, synchronize content with a digital audio player or other mobile devices, and enable users to purchase or rent music from online stores.
Steps to Rip and Copy Music from CD to Computer with Windows Media Player
Step 1: Insert the CD you want to rip into your computer's CD/DVD drive. Open Windows Media Player. You can do this via the Start menu of your system by searching for 'Windows Media Player'.
Step 2: On Windows Media Player interface, you should see the CD listed in the left-hand panel. If you click on the CD, it'll bring up all songs available on it. By default, all songs should be selected, but you can choose which ones you want to rip by checking or unchecking the boxes.
Step 3: Before you begin ripping, you might want to adjust the audio quality. You can do this by going to 'Organize' > 'Options' > 'Rip Music'. Here you can select a specific format (like MP3 or WAV) and audio quality (the higher the quality, the larger the file size).
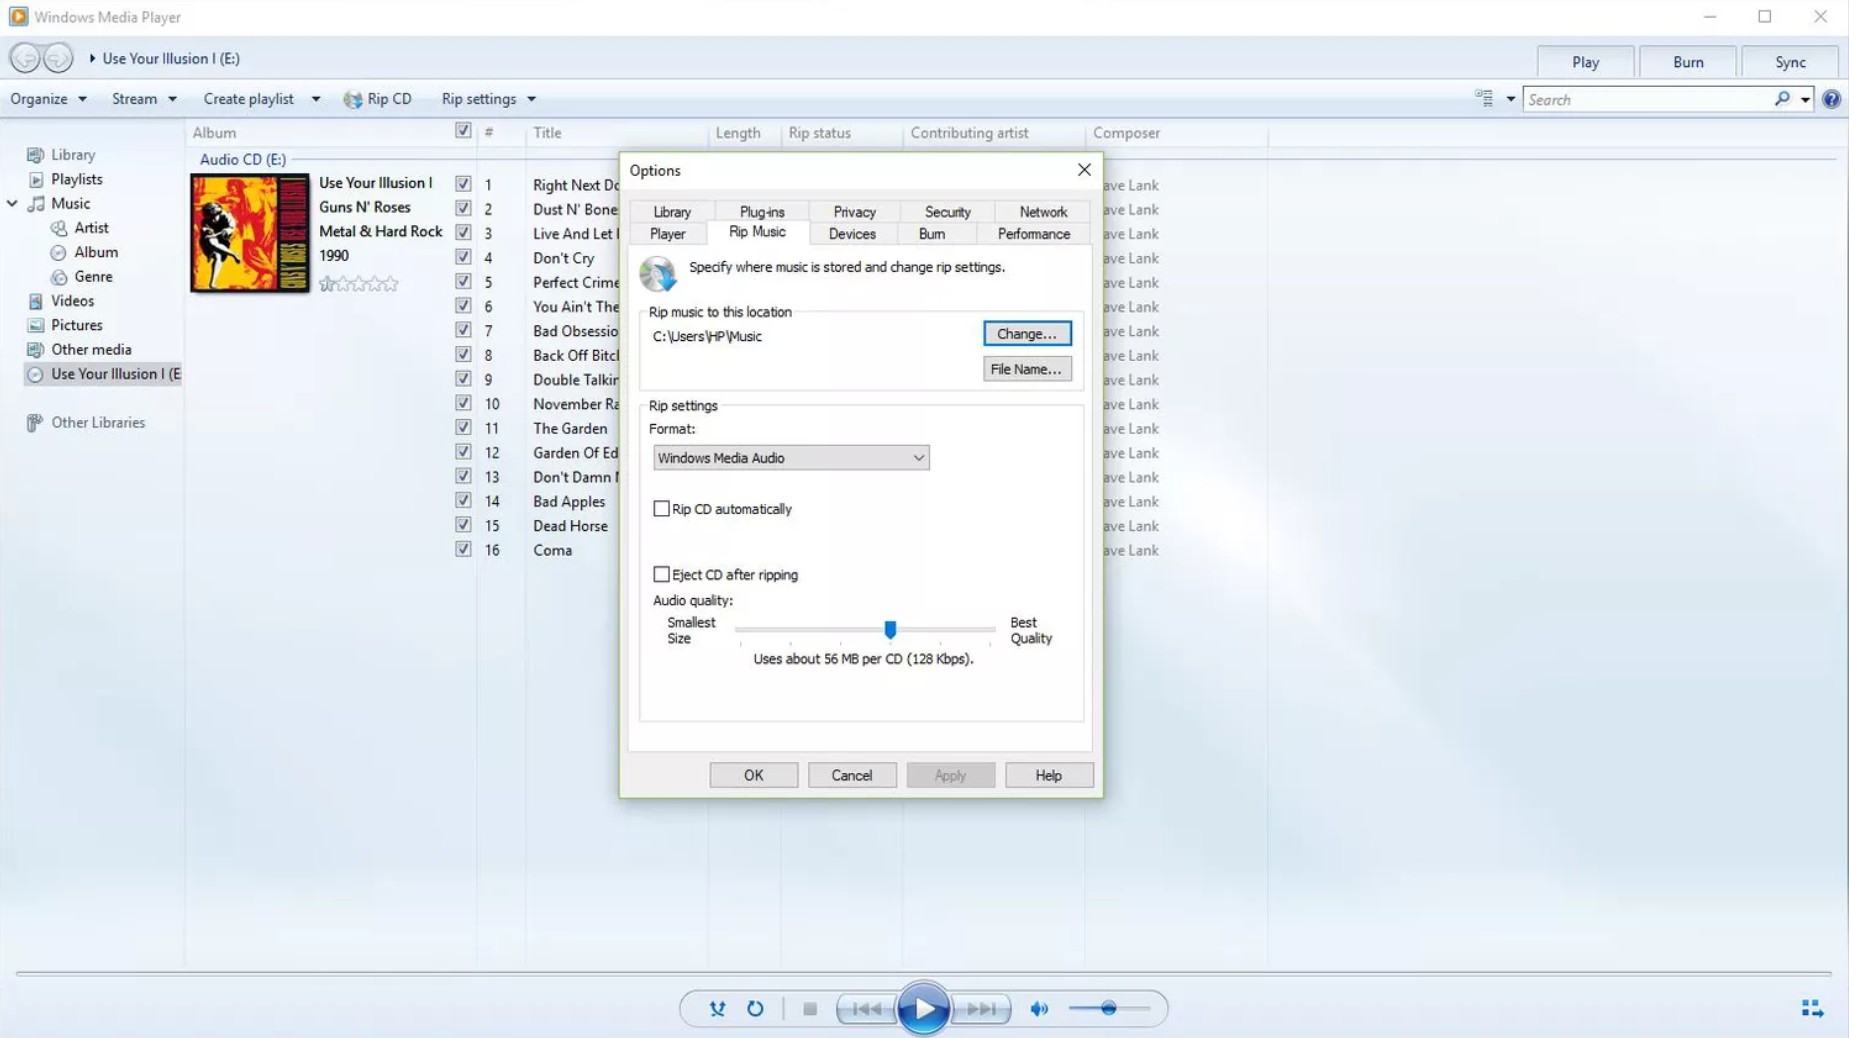
Step 4: Also, you may want to choose an output folder here by changing the 'Rip music to this location' setting. By default, it'll be your Music library but you can select a specific folder if you prefer.
Step 5: Once you're happy with the settings, click 'Apply' then 'OK' to go back to the main screen. Now, click the 'Rip CD' button at the top and Windows Media Player should start converting your songs into digital files, saving them in the location you specified. After all songs are ripped, you can find them in the output folder you set prior to ripping.
Nowadays, CDs are disappearing gradually. With so many streaming songs on various platforms, would you like to burn music to CD with a free CD maker? Continue to read and find the best answer.
Steps to Burn Music to a CD via Windows Media Player
Step 1: Insert a blank CD into the CD-ROM drive of your computer. Ensure it's a writable CD. Open Windows Media Player on your PC. You can find it in the Start Menu or by searching for it in the search bar.
Step 2: Once you've opened Windows Media Player, go to the Burn tab which is usually located at the top-right corner of the interface.
Step 3: Create a "Burn List" by dragging and dropping the audio files or songs from the library on the right-hand panel to the Burn panel on the right. You can add or remove songs, or adjust the order of songs in the Burn list according to your preference.
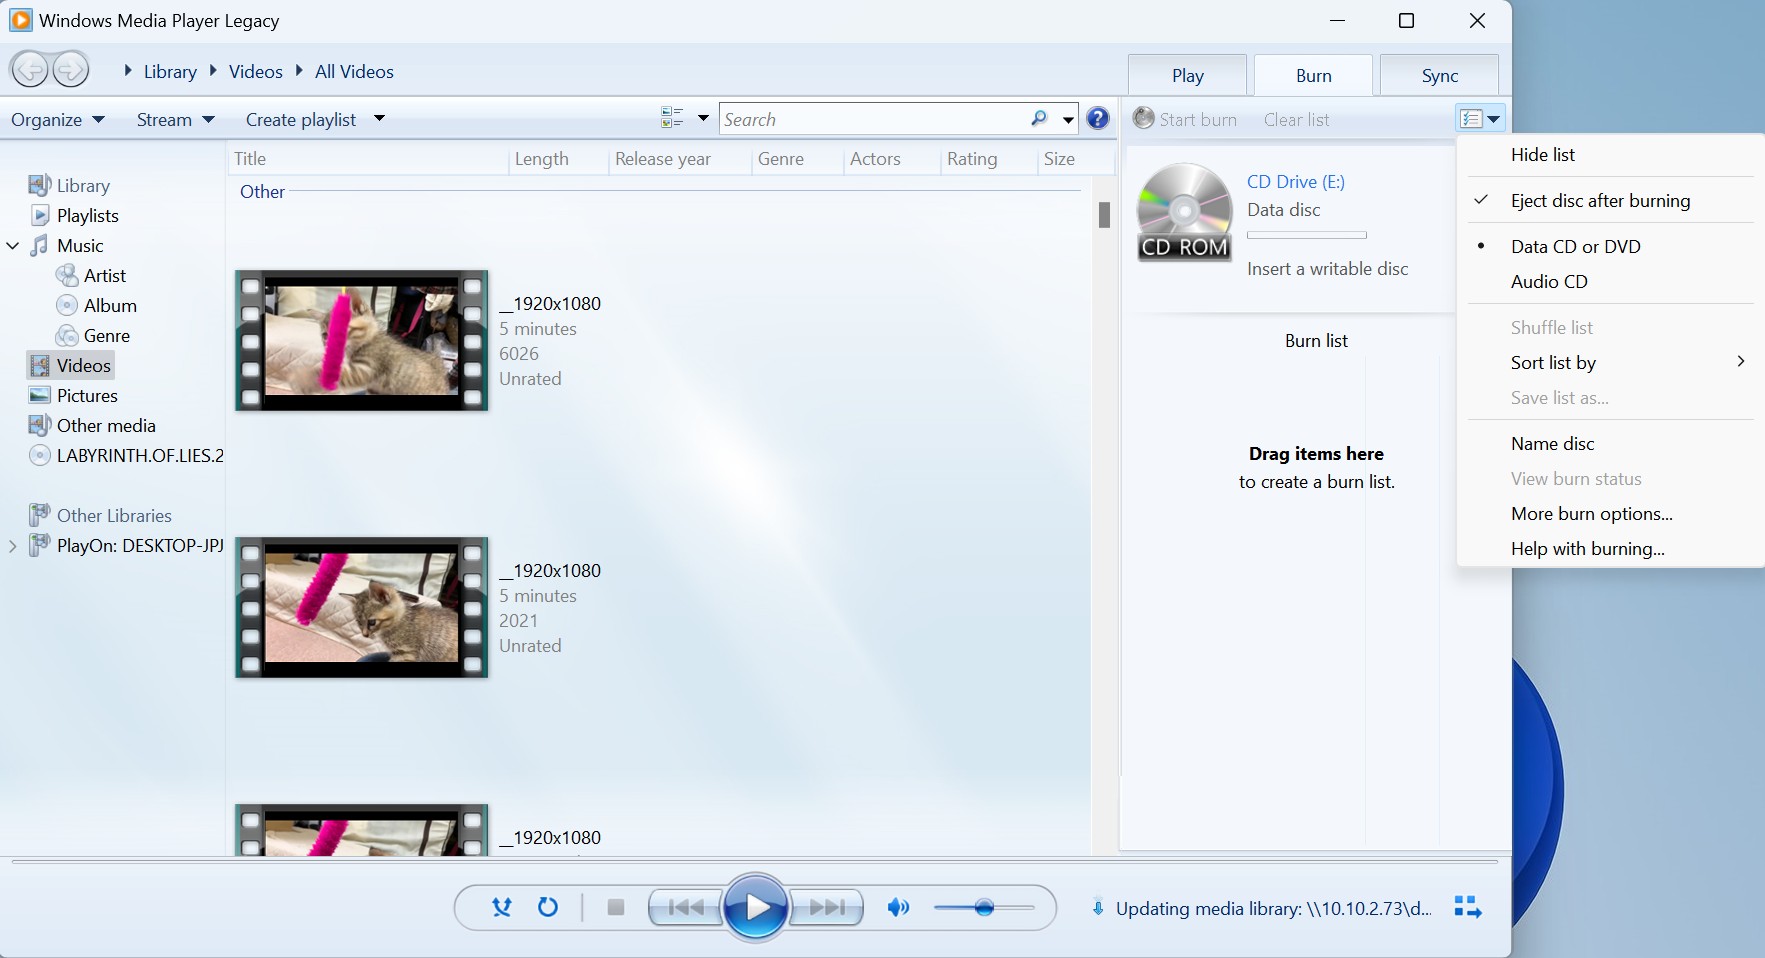
Step 4: Once you're satisfied with your Burn list, click on the "Start Burn" button. This is usually located at the top or bottom of the Burn list. The burning process will begin and the progress of each song burned will be shown.
Once all the songs have been burned to the CD, the CD will automatically eject. Check to see if the Burn process has completed successfully. If Windows Media Player gives a confirmation message, it's usually a sign that the burning process was a success.
How to Burn Music Videos to DVD?
Burning music videos to a DVD lets you watch your favorite songs on a TV or home theater. While apps like Windows Media Player or iTunes work for audio, they often struggle with video menus and playback quality on standard DVD players. Using a dedicated tool ensures the video and audio stay in sync and the disc works correctly.
DVDFab DVD Creator helps you make these discs easily. It supports many video types like MP4 and MKV, so you do not need to change file formats before you start. You can choose different menu styles to make the disc easy to use. The software uses your computer's hardware to finish the burning process quickly while keeping the picture and sound clear. It works with both DVD-5 and DVD-9 discs to fit your entire collection.
Key Features:
- Make DVD from more than 200 video formats, like AVI, MP4, MKV, etc.
- Support all sorts of disc formats including DVD-5, DVD-9, DVD+R, etc.
- Offers highly intuitive, flexible, and customizable menu templates.
- Burn DVD fast thanks to the latest GPU acceleration technologies.
- Output high-quality video for better viewing experience.
- Offer a built-in video and chapter editor for customization
Steps to Burn Music Video to DVD with DVDFab DVD Creator
Step 1: Start the DVDFab 13 software, go to the Creator and choose DVD Creator module. Add your video using the "Add" tab on the main screen, or drag-and-drop the file directly.
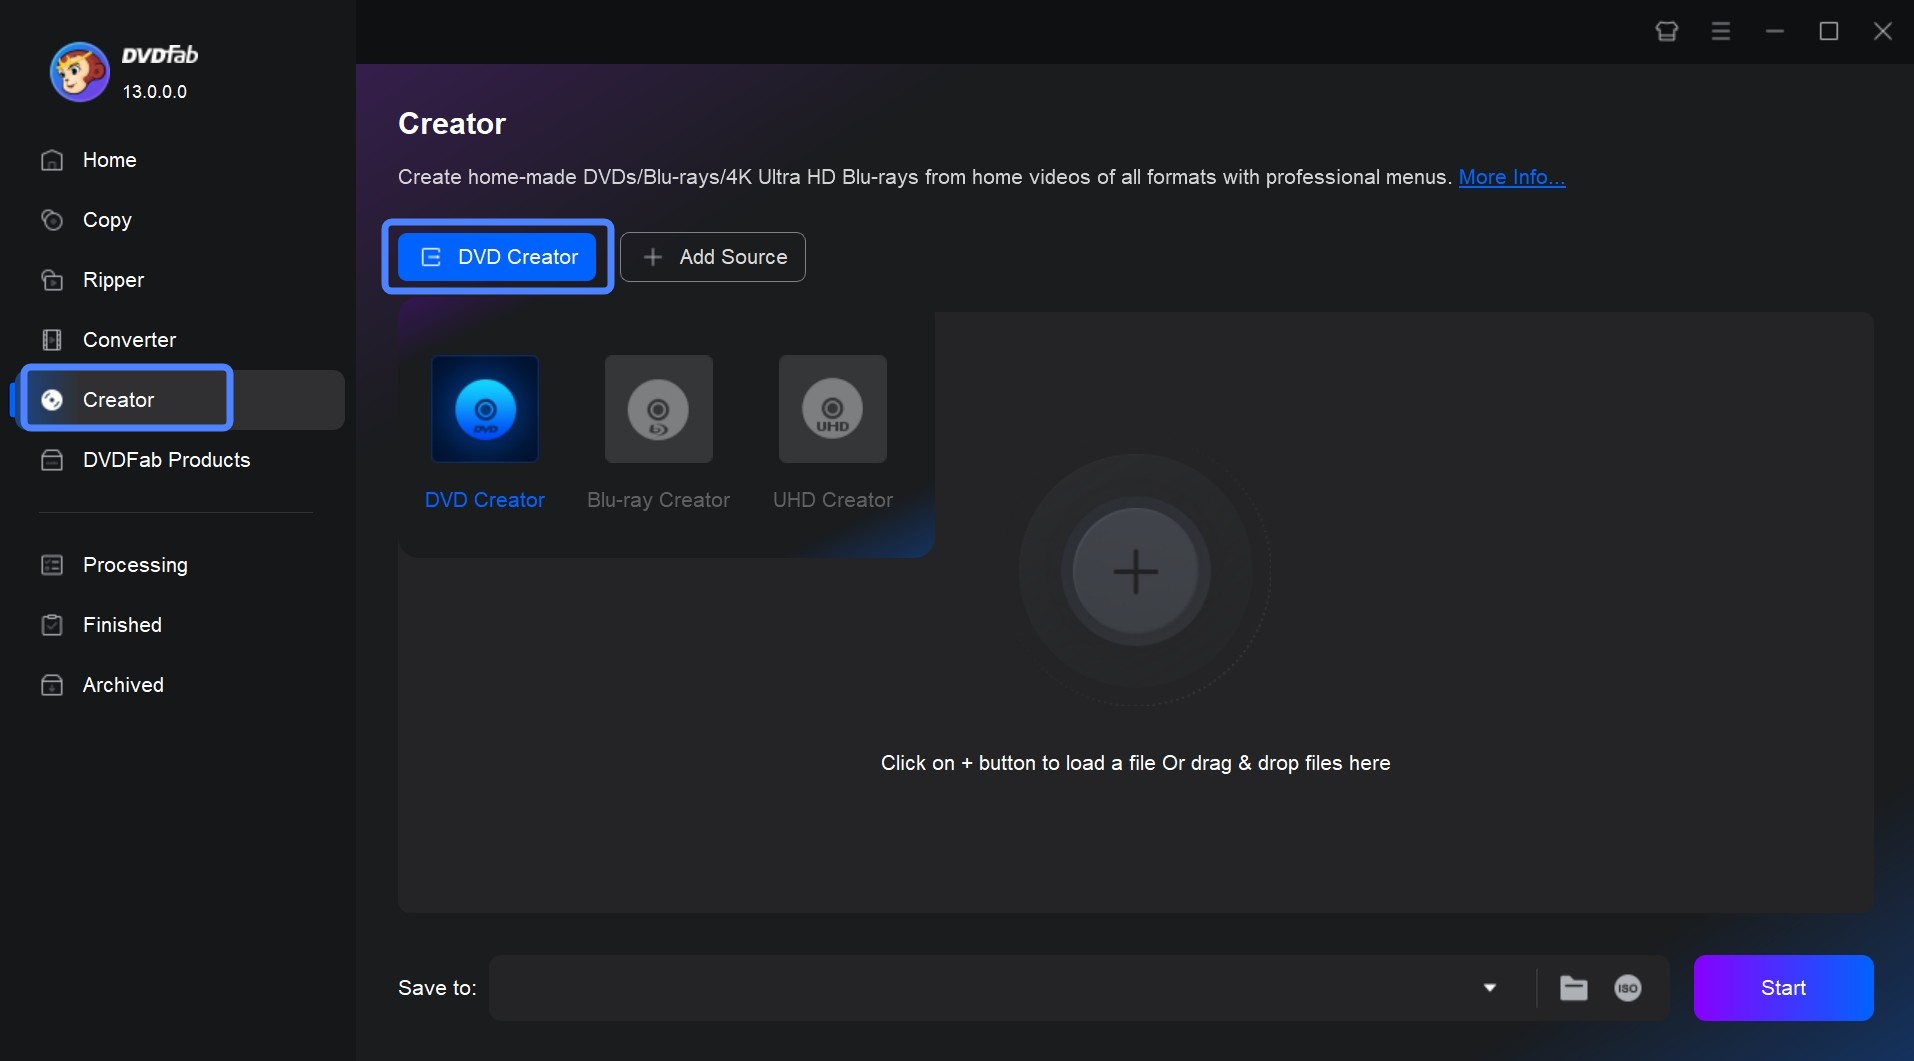
Step 2: After uploading your music video, select "Advanced Settings" to determine the output size and quality. Then, click on "Menu Settings" to choose and customize your desired menu.
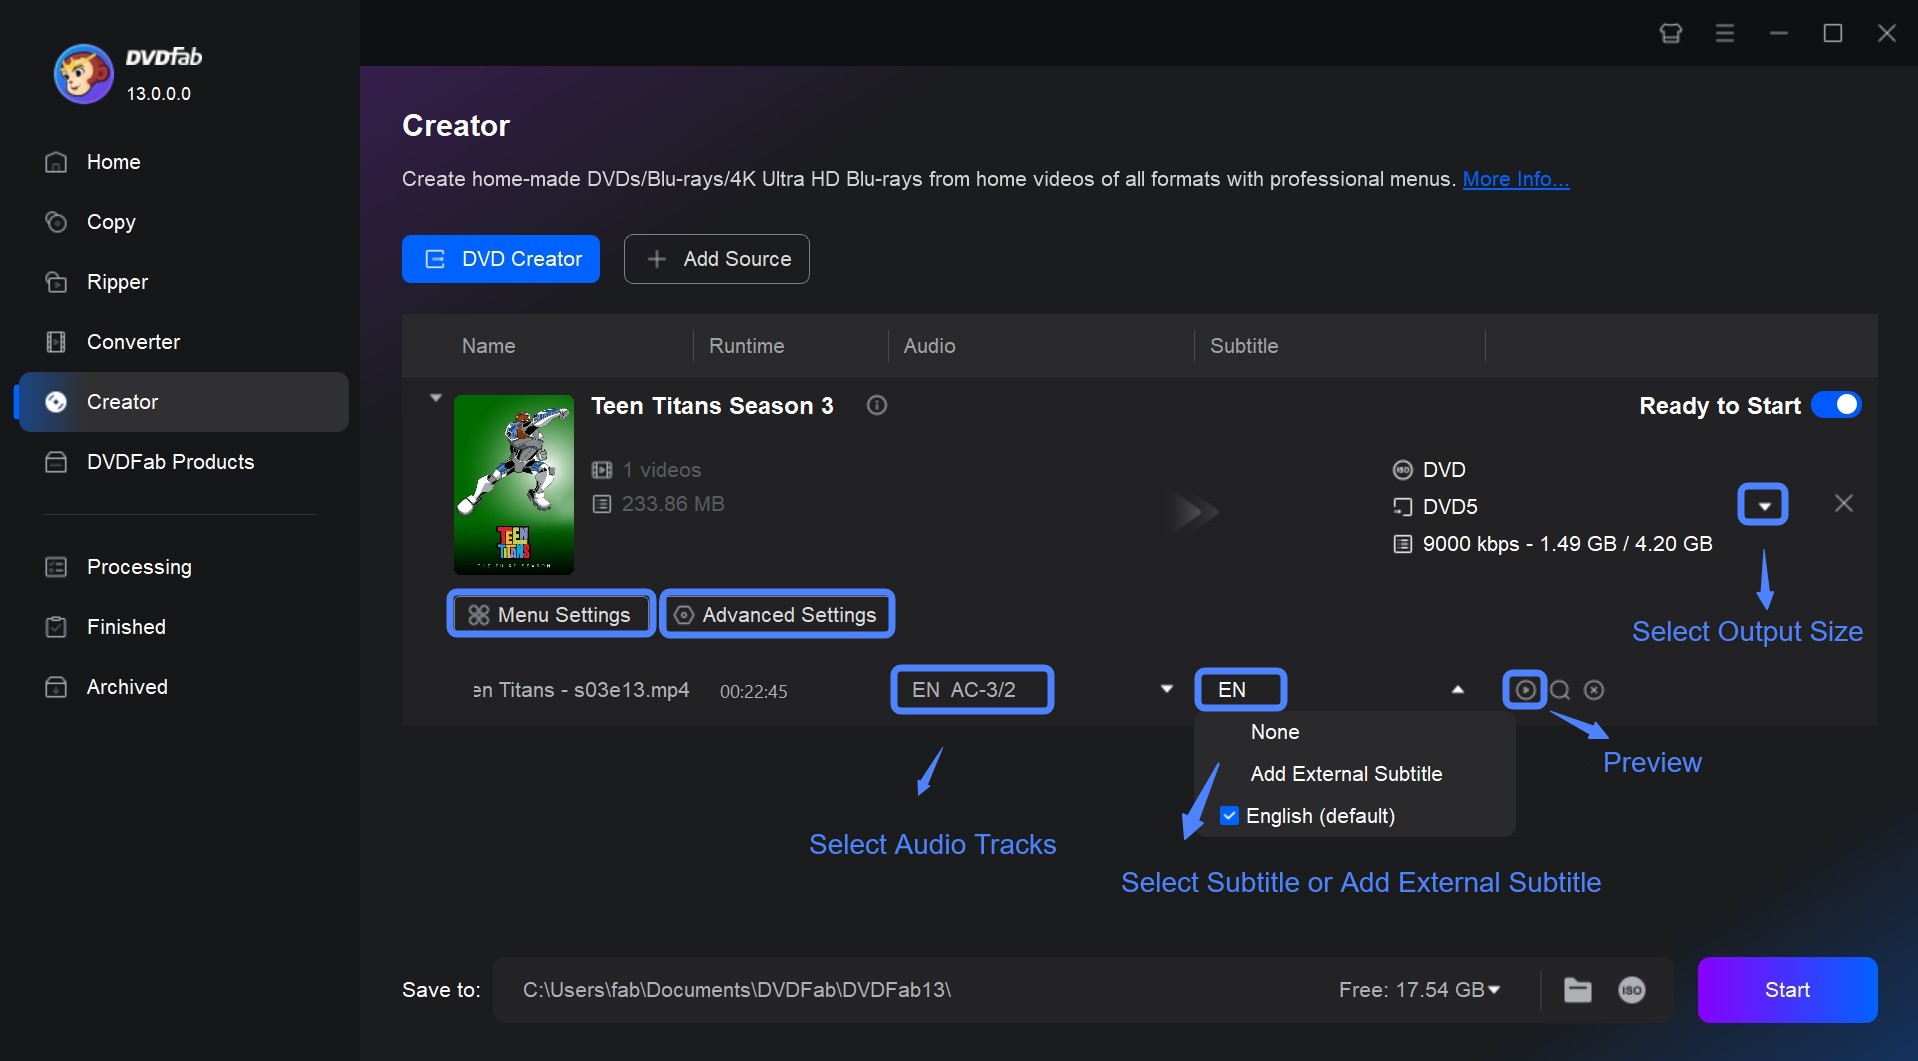
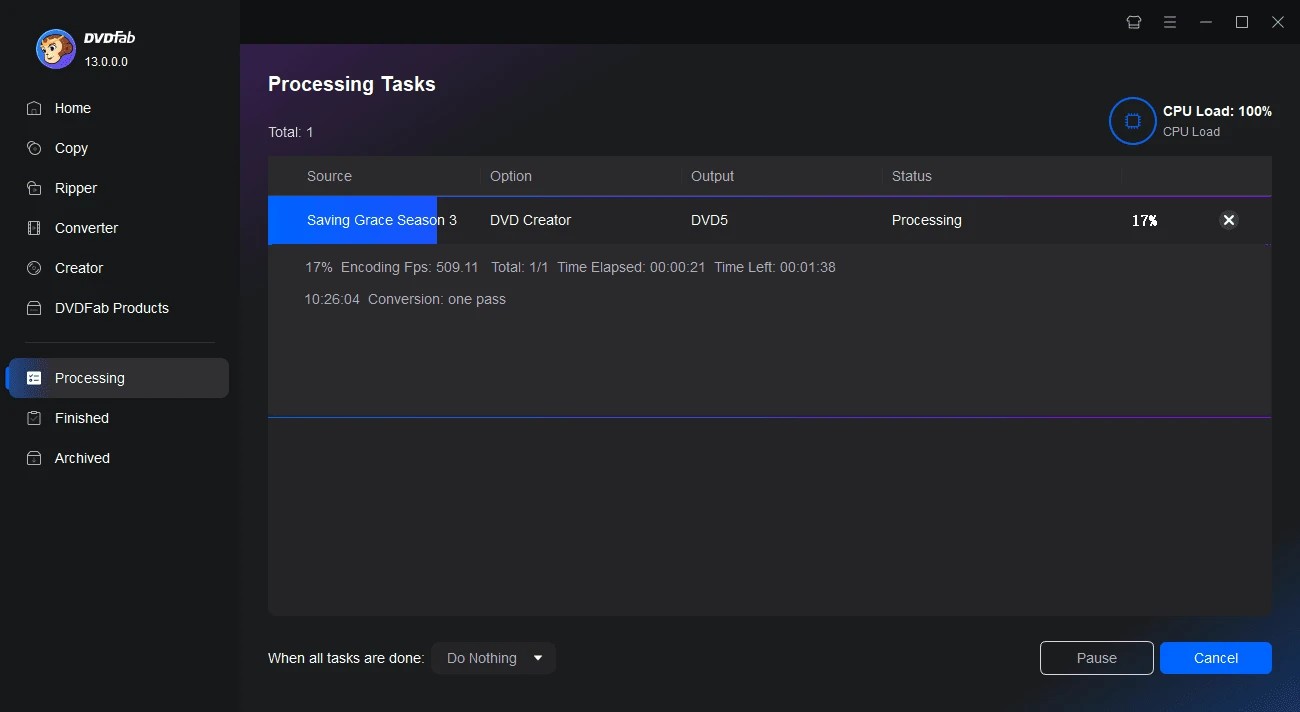
Step 3: Choose the output directory in "Save to" part, click the "Start" button to start making your DVD. During the process, the DVD Creator will provide step-by-step progress updates.
How to Rip Music from DVD?
Taking music out of a DVD lets you listen to it on your phone or laptop. This is a helpful way to save concert audio or rare tracks that you cannot find on streaming sites. This process is also useful when you want to rip and burn cd sets into digital files. Converting these tracks makes your music collection easy to carry and play on any modern device.
DVDFab DVD Ripper can turn DVD audio into digital files like MP3, FLAC, or WAV. It is built to handle different types of discs for personal backups. The software automatically picks the best settings for your specific device, so the music sounds just as good as the original. It works fast by using your computer’s processor efficiently, allowing you to move your DVD library to your digital playlist without a long wait.
Key Features:
- The ONLY tool that supports any old or newly released encrypted DVDs.
- Rip music formats from DVD, such as MP3, MP4, M4A, WMA/WMA10, WAV, AAC.
- Rip Hi-fi audio from DVDs, including like Flac Multi-channel, Flac Stereo, Way Multi-channel, and Way Stereo.
- Rip DVD to 1000+ video formats and 260+ preset output devices.
- Powerful video editor can crop, trim, merge video, add watermarks and subtitles, and even adjust video color as you like.
- Support batch music to DVD conversion at GPU hardware accelerated speed.
- Synchronize meta info and generate .no file friendly to media server.
Steps to Rip Music from DVD with DVDFab DVD Ripper
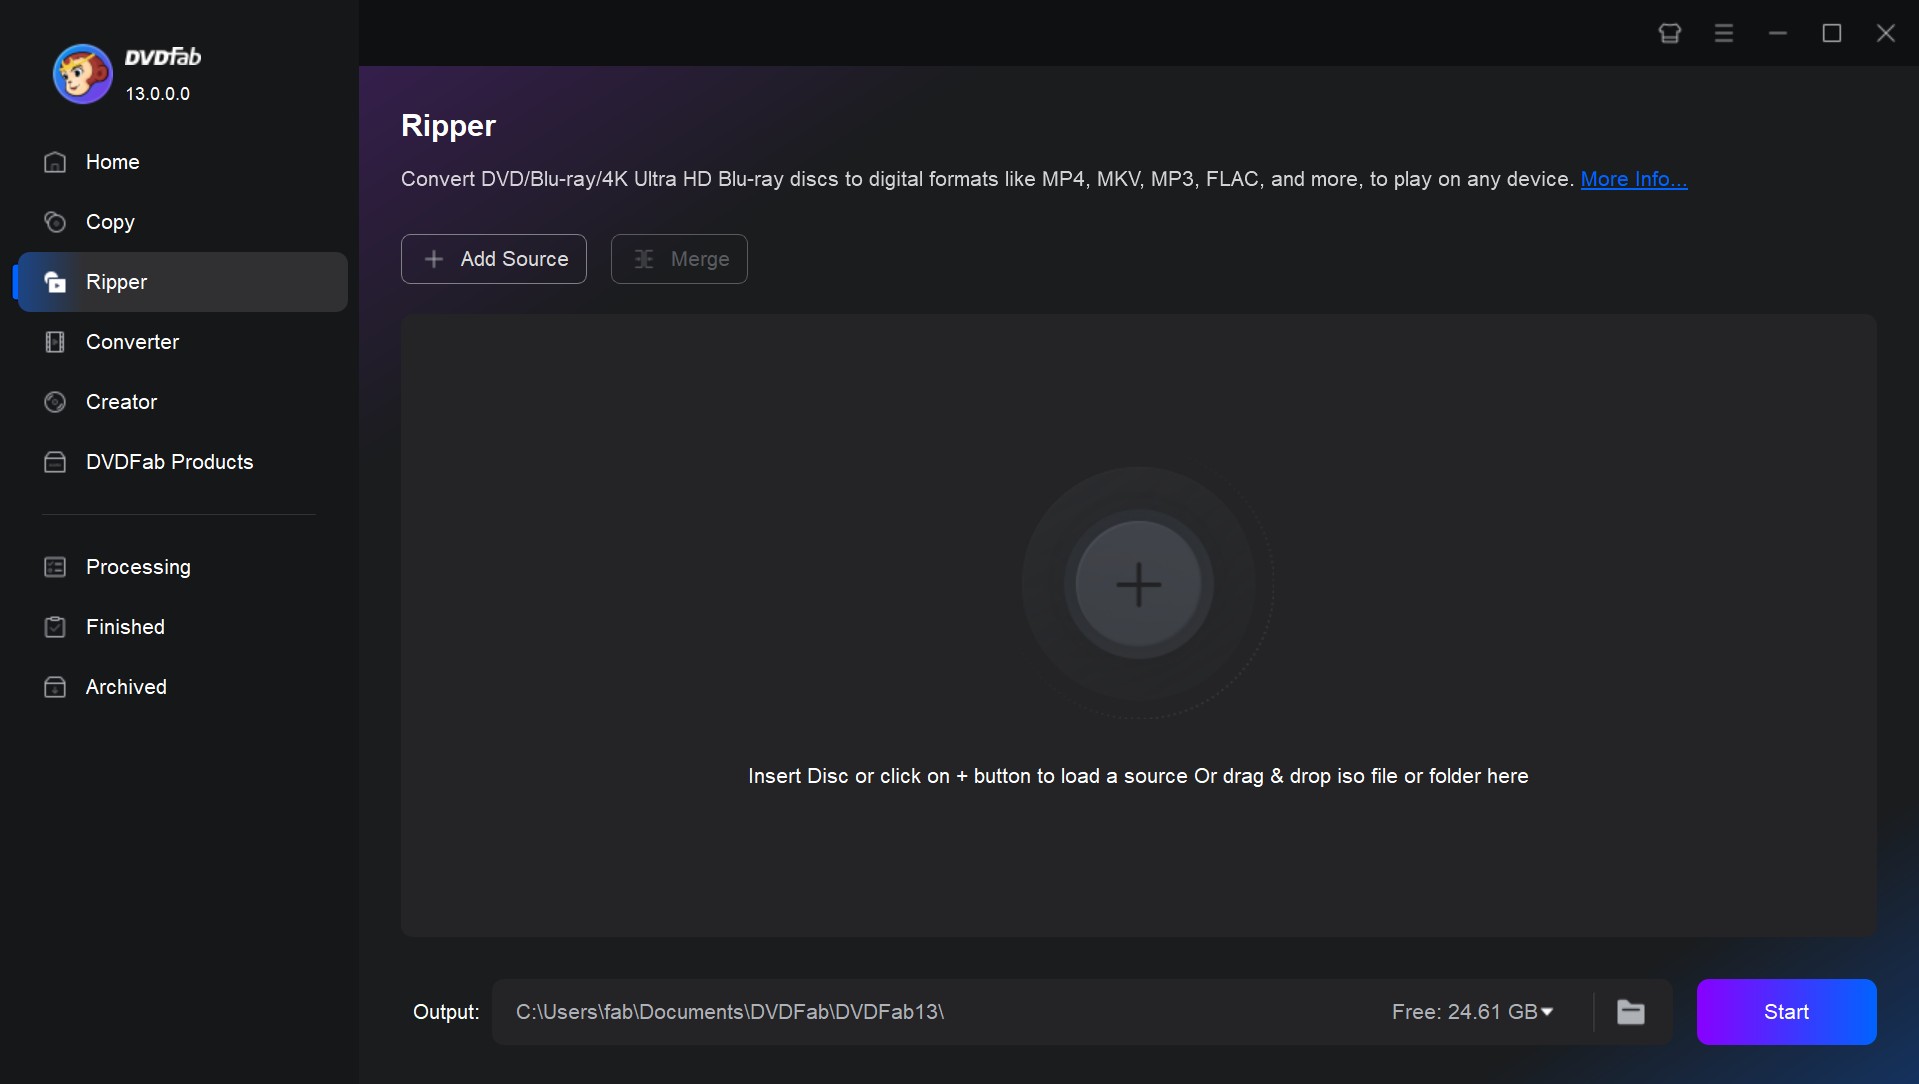
Step 1: Open DVDFab 13 and choose the Ripper option. Insert your DVD into your computer or use the Add button to locate it. Alternatively, drag and drop an ISO file or a folder onto the workspace.
Step 2: Click on "Choose Other Profile" to pick an output music format. You can choose to rip your DVD to MP3, AAC, WAV, OGG, and many other audio formats
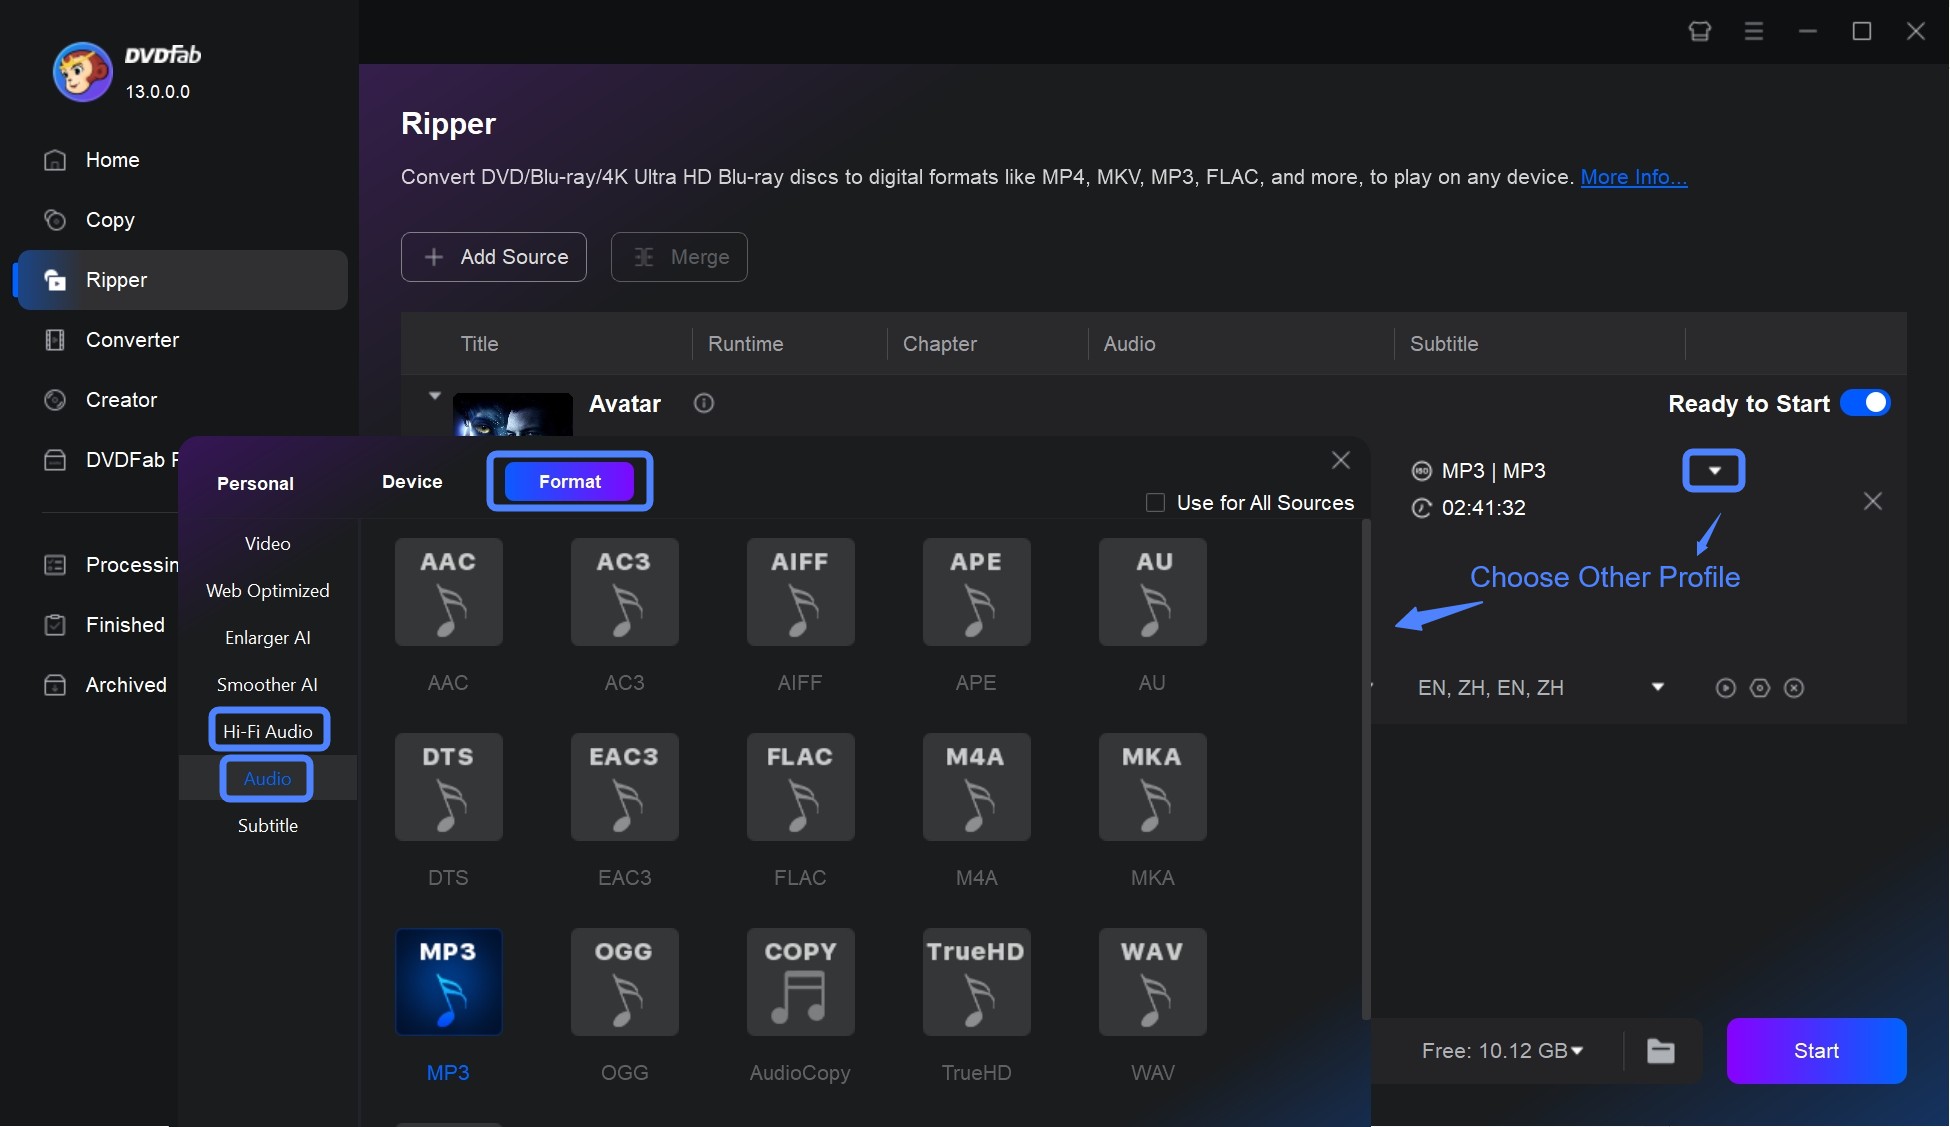
You also have the option to select audio tracks and subtitles, and to adjust audio settings.
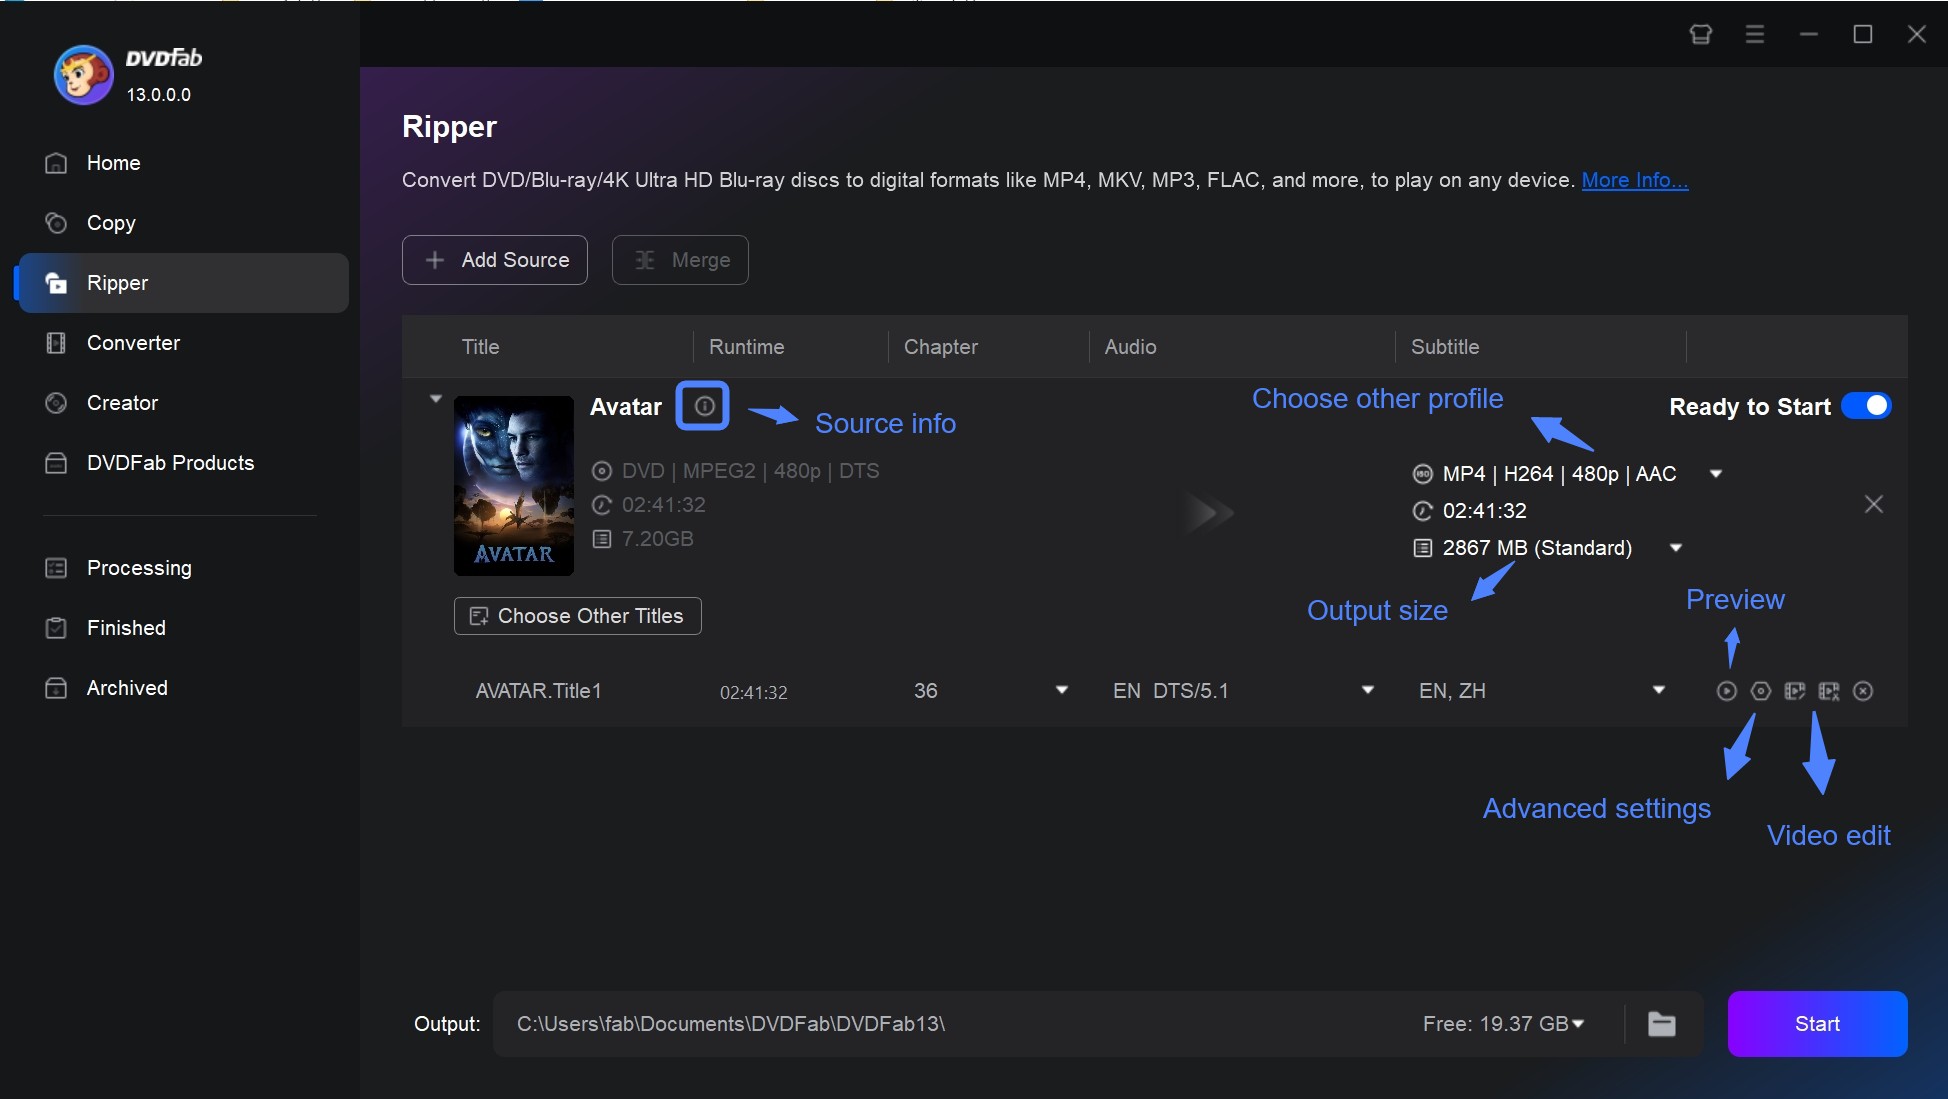
Step 3: Save your music on your hard drive or mobile device. Click the Start button to begin ripping music from your DVD, the progress of which will be displayed.
FAQs
What is a CD?
CD stands for Compact Disk. CD is an optical storage device used in computers for the permanent storage of data and information. It is an external storage device as it can be separated from the computer without using any tool. CD is also categorized as a secondary memory device because it is used to store those parts of data on which the CPU is not currently working.
What is a DVD?
DVD stands for Digital Versatile Disk. It is also an optical storage device that is used as the secondary storage media in computers. The construction and operation of DVDs are almost similar to that of CDs. The major difference is that a typical DVD can acquire about 7 times more amount of data as compared to a CD.
What are the Differences between CD and DVD?
| Parameter | CD | DVD |
| Definition | CD stands for Compact Disk. | DVD stands for Digital Versatile Disk. |
| Size | CD size is 700 MB. | DVD size ranges from 4.7 GB to 17 GB. |
| Recording Layer | Recording layer or metal layer is close to top of the disk. | Recording layer or metal layer is close to middle of the disk. |
| Pits | CD have single layer of pits. | DVD have double layers of pits. |
| Space between loops | Space between spiral loops is 1.6 micrometer in CD. | Space between spiral loops is 0.74 micrometer in DVD. |
| Space between pits | Space between pits is 0.834 micrometer in CD. | Space between pits is 0.40 micrometer in DVD. |
| Correction code | CIRC and EFMP are used as error correction code. | RS-PC and EFMPlus are used as error correction code. |
| Data Transfer Rate | Data Transfer Rate is 1.4 to 1.6 Mb/Sec. | Data Transfer Rate is 11 Mb/Sec. |
| Channel Bit Length | Channel Bit Length in CD is 300 nanometer. | Channel Bit Length in CD is 113 nanometer. |
| Numeric Aperture | Numeric Aperture of CD is 0.45. | Numeric Aperture of DVD is 0.6. |
| Thickness | CD thickness is 1.2 mm. | DVD thickness is 0.6 mm. |
Conclusion
If there is a need to copy, rip or burn a CD or DVD, do you know how to do that easily? In conclusion, Windows Media Player can copy music from CD to computer or USB. Windows 10 DVD burner helps you burn music to CD. DVDFab DVD Creator allows you to burn music to DVD, and DVDFab DVD ripper assists you to rip music from DVD.
 7 Best & Free DVD Menu Creators in 2026: How to Make a DVD Menu on Windows & MacBy Diana Smith - Jul 16, 2026
 How to Make DVDs on Mac and Windows with Easy Steps?By Wenny Yan - Jul 13, 2026
 How to Burn MP3 to DVD: Best Audio DVD Creators Compared (2026)By Wenny Yan - Jul 10, 2026
 How to Burn Video_TS to DVD on Windows and Mac: 4 Methods That WorkBy Diana Smith - Jul 1, 2026