How to Rip a CD with Windows Media Player on Windows 10/11?

Summary: To rip a CD with Windows Media Player, insert the audio CD, open Media Player or Windows Media Player Legacy, choose the CD, set the rip format and audio quality, then click Rip CD. MP3 is the safest choice for everyday playback, while FLAC or WAV is better for higher-quality music archives.
Ripping a CD with Windows Media Player is still one of the simplest ways to copy songs from an audio CD to a Windows 10 or Windows 11 computer. You do not need extra software for basic CD ripping, as long as your PC has a working CD/DVD drive and Windows Media Player is available. In this guide, I will show you how to rip a CD with Windows Media Player, choose the right audio format and quality settings, and fix common problems when the Rip CD button does not appear or the disc cannot be read.

Before Ripping a CD with Windows Media Player
Windows Media Player can rip an audio CD to digital music files, but it cannot do the job without a readable audio CD and a working optical drive. Before starting, check the disc condition, insert it into an internal or external CD/DVD drive, and decide whether you want smaller MP3 files or larger lossless files.
Internet access may help Windows Media Player display album, artist, and track information. However, metadata lookup is not always reliable, especially on newer Windows systems, so ripped songs may appear as Track 01, Track 02, and so on. Check the file names before ripping a large CD collection.
What You Need
- An audio CD: Windows Media Player rips audio CDs, not video DVDs or data discs.
- A Windows 10 or Windows 11 PC: Use Windows Media Player Legacy on Windows 10, or Media Player / Windows Media Player Legacy on Windows 11.
- An optical drive: Many newer laptops do not include a built-in drive, so an external USB CD/DVD drive may be needed.
- Enough storage space: MP3 files are small, while FLAC, WAV, and ALAC files need more space.
- A chosen save location: Windows Media Player often saves ripped music in the Music library unless you change the path.
How to Rip a CD with Windows Media Player on Windows 10/11
Follow these steps after you insert the audio CD into your computer's optical drive.
Step 1. Insert the Audio CD
Put the music CD into your CD/DVD drive. Wait a few seconds for Windows to read the disc. If nothing appears, open the player manually from the Start menu.
Step 2. Open Windows Media Player or Media Player
Open Start, search for Windows Media Player, Windows Media Player Legacy, or Media Player, then open the app that shows your audio CD.
In some Windows 11 systems, the newer Media Player opens by default. In others, Windows Media Player Legacy is still the easier path for CD ripping.
Step 3. Select the Audio CD
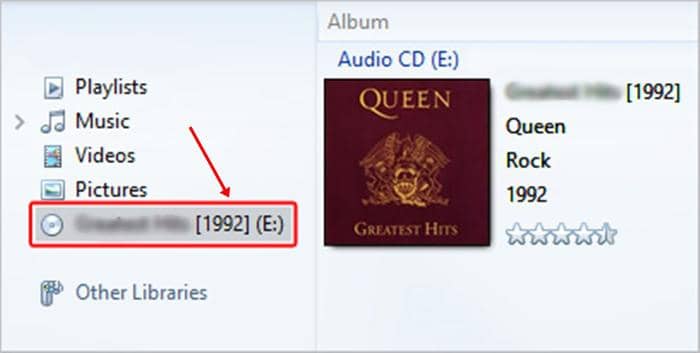
Look for the CD in the left sidebar, library view, or Audio CD section. Select it to show the tracks on the disc. You can leave all tracks selected or uncheck the songs you do not want to rip.
Step 4. Open Rip Settings
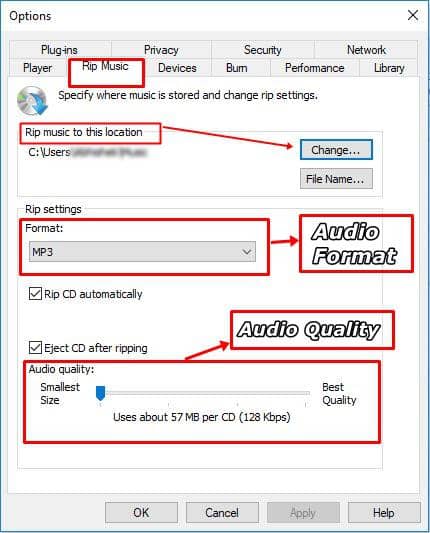
Before ripping, open Rip settings or the settings menu. In Windows Media Player Legacy, you can also use:
Tools > Options > Rip Music
From there, choose the output format, audio quality, and save location.
Step 5. Choose Format and Audio Quality
Choose MP3 for common playback. Choose FLAC or WAV if you want to keep more audio detail and do not mind larger files. Choose ALAC if you mainly use Apple Music, iPhone, iPad, or other Apple devices.
For MP3, 192 Kbps is usually enough for casual listening, while 320 Kbps keeps more detail with a larger file size.
Step 6. Click Rip CD
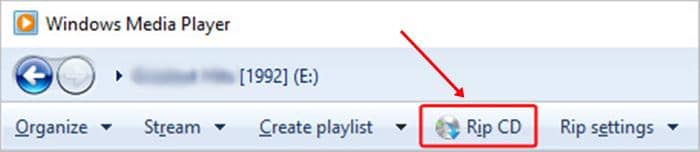
Click Rip CD and wait for the process to finish. Do not remove the disc until the ripping status is complete. After that, open the save folder and play one or two tracks to confirm the files were created correctly.
Best CD Rip Settings for MP3, FLAC, WAV, and ALAC
The right rip setting depends on where you plan to play the music and how much storage space you want to use.
| Format | Use it when | File size | Compatibility |
| MP3 | You want files for phones, cars, USB drives, and general playback | Small to medium | Very wide |
| FLAC | You want compressed lossless audio for archiving or higher-quality playback | Medium to large | Good, but not universal |
| WAV | You want uncompressed audio for editing or simple long-term storage | Large | Wide |
| ALAC | You use Apple Music, iTunes, iPhone, or iPad | Medium to large | Strong in Apple environments |
| WMA | You keep an older Windows music library | Small to medium | Less common outside Windows |
For most users, MP3 at 192 Kbps or 320 Kbps is the easiest choice. For a personal CD archive, FLAC is usually a better choice than MP3 because it keeps the audio data without lossy compression. WAV also keeps the audio data, but the files are much larger. ALAC is a practical choice when your library is mainly inside Apple apps or Apple devices.
Where Does Windows Media Player Save Ripped Music?
Windows Media Player usually saves ripped CD tracks in your Music folder or Music library. The exact folder can vary if you changed the rip location before.
To check or change the save location in Windows Media Player Legacy:
- Open Windows Media Player Legacy.
- Go to Tools > Options.
- Open the Rip Music tab.
- Check the folder under Rip music to this location.
- Click Change if you want to save future ripped files somewhere else.
After ripping, check folders named by artist or album. Windows Media Player may create subfolders automatically based on the CD information it has.
Why Is the Rip CD Button Missing or Not Working?
The Rip CD button may be missing or unavailable for several reasons.
| Problem | What to check |
| The disc is not an audio CD | Windows Media Player rips music CDs, not DVD movies or data discs |
| The drive did not read the disc | Reinsert the disc, clean it, or test another CD |
| You opened the wrong view | Select the audio CD from the sidebar or Audio CD section |
| The player does not show the CD | Close and reopen the app, then check whether Windows detects the optical drive |
| The CD is damaged | Try another disc to confirm whether the problem is the drive or the CD |
| Track names or album art are missing | Edit the track names manually if online album information is unavailable |
Album information may not always load automatically. Before ripping, connect your PC to the internet so Windows Media Player can try to retrieve song titles, artist names, album names, and cover art. If the information does not appear, go to your music library, right-click the album, and choose Find album info to search for the correct metadata.
These details are often called music tags or metadata. They help your ripped files appear correctly in music players, car systems, and media libraries. If Windows Media Player still cannot find the right album, you can edit the song titles, artist name, album name, genre, and cover art manually.
Can Windows Media Player Rip DVDs?
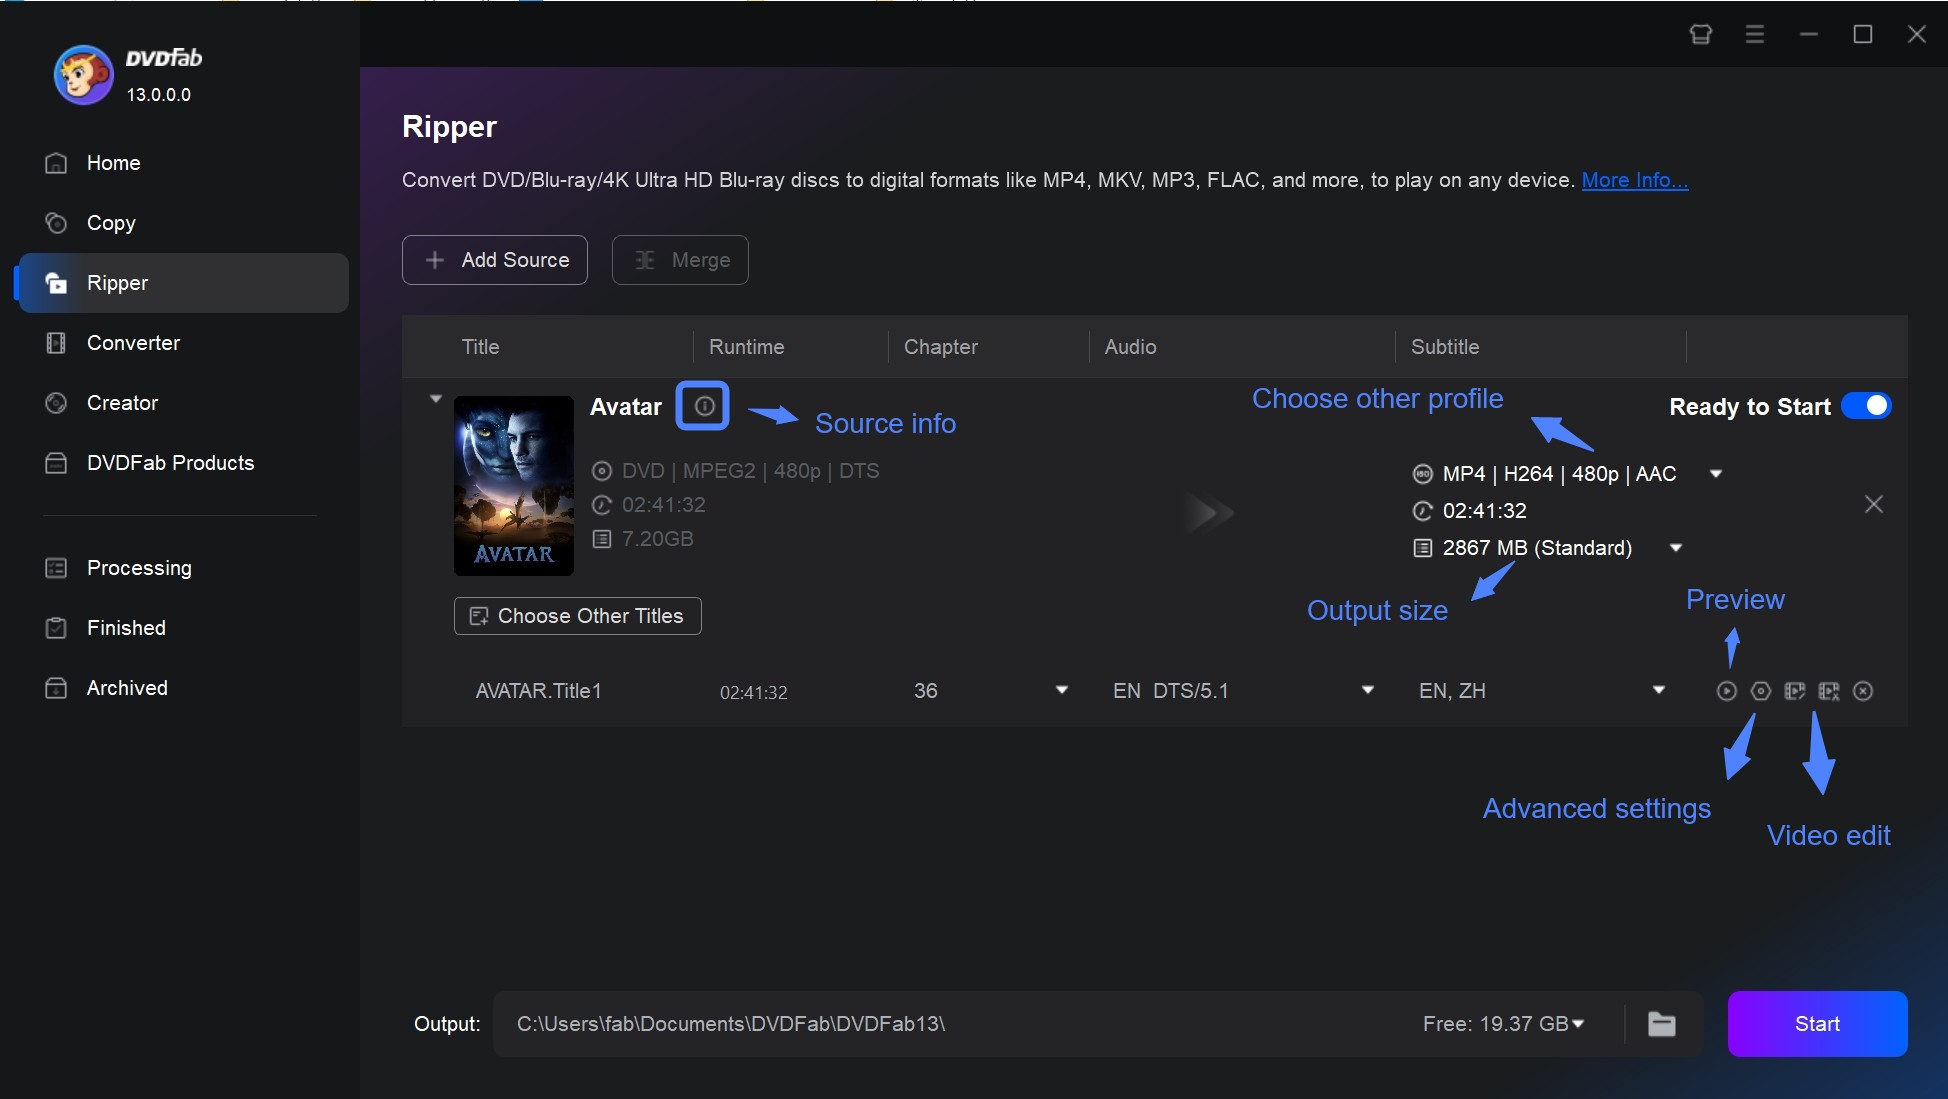
No. Windows Media Player can rip audio tracks from a music CD, but it cannot rip DVD movie discs to MP4, MKV, or other video files. Audio CD ripping and DVD ripping are different tasks. A music CD stores audio tracks, while a DVD movie contains video, audio tracks, subtitles, menus, chapters, and sometimes region or copy protection. If your goal is to convert a DVD movie to a digital video file, you need a DVD ripping tool instead. DVDFab DVD Ripper can help you convert homemade or protected DVDs to common video or audio formats such as MP4, MKV, MP3, AAC, and WAV.
- Keep updated to support newly released DVDs.
- Convert DVD movies to video formats such as MP4, MKV, AVI, WMV, M2TS, and TS.
- Extract DVD audio to formats such as MP3, AAC, WAV, WMA, and AC-3.
- Choose audio tracks, subtitles, chapters, and basic video/audio settings before conversion.
- Use preset profiles when you want files for phones, tablets, TVs, or media players.
- Edit the video with the built-in video editor.
How to rip a DVD with DVDFab DVD Ripper:
- Launch DVDFab and choose the Ripper module.
- Insert the DVD disc, or add a DVD ISO file or folder.
- Open the profile menu and choose an output format, such as MP4 or MKV.
- Select the audio track, subtitles, and other output settings if needed.
- Choose an output folder and click Start to convert the DVD.
Free Download Windows 11/10/8.1/8/7
Free Download macOS 10.13 - 15.x
FAQs
Does ripping a CD erase or change the original disc?
No. Ripping copies the audio tracks from the CD to your computer. It does not remove, edit, or damage the music on the original disc.
Do I need an internet connection to rip a CD?
No. Windows Media Player can rip audio tracks without an internet connection. However, connect your PC to the internet before ripping if you want it to retrieve song titles, artist names, album names, and cover art automatically.
Can I rip a CD with an external USB CD drive?
Yes, as long as Windows can detect the external CD/DVD drive and read the audio CD. If the CD does not appear in Windows Media Player, check whether the drive shows up in File Explorer first.
What should I do if Windows Media Player is not installed?
Search for Windows Media Player Legacy from the Start menu first. If it is not available, check Windows optional features or use the newer Media Player app if it supports CD ripping on your system.
Can I rip a CD to a USB drive?
Yes, but the simpler method is to rip the CD to your Music folder first and then copy the files to the USB drive. You can also change the rip location before ripping if you want the files saved somewhere else.
Conclusion
Windows Media Player is enough when you want to rip a standard audio CD to MP3, FLAC, WAV, ALAC, or another supported audio format. Set the format, quality, and save location before you click Rip CD, then check the output folder after the process finishes.
If you want to rip a DVD movie instead, Windows Media Player is not the right tool. Use DVD ripping software such as DVDFab DVD Ripper only with discs you own or have permission to copy, and follow the rules in your location.

 Free DVD Decoder for Windows XP and Windows 11: 3 Ways to Play DVDsBy Diana Smith - Sep 23, 2026
 How to Compress ISO Files: 4 Methods for Storage, Playback, and ArchivesBy Diana Smith - Sep 16, 2026
 How to Rip DVD to Facebook and Upload the Video in 2026By Diana Smith - Sep 15, 2026
![How to Rip DVDs for Plex: Guide to Formats, Tools, and Library Setup [2026]](https://images.dvdfab.cn/media/Screenshot_2026-09-08_at_18.53.34_j36v3l.png/public) How to Rip DVDs for Plex: Guide to Formats, Tools, and Library Setup [2026]By Diana Smith - Sep 8, 2026
How to Rip DVDs for Plex: Guide to Formats, Tools, and Library Setup [2026]By Diana Smith - Sep 8, 2026