
How to Copy DVD on Mac: 6 Tested DVD Copy Software for Mac in 2026
Summary: To copy a DVD on Mac, you first need an external DVD drive if your Mac has no built-in optical drive. Movie DVDs should be saved as MP4 or MKV with tools such as DVDFab DVD Ripper, HandBrake, or MakeMKV, while data or software DVDs can be backed up as CDR or ISO files with Disk Utility or Finder. Protected commercial DVDs usually need a dedicated DVD ripper or copy tool like DVDFab because Disk Utility and HandBrake have clear limits.
Table of Contents
Last weekend, I tried to copy a DVD on Mac after finding an old family movie and a software disc in the same storage box. My MacBook Air had no internal disc drive, the external DVD drive took several tries to mount the disc, and I quickly realized that a movie DVD, a data DVD, and a protected disc all need different tools.
To separate tool limits from disc problems, I tested how to copy DVD on my M4 MacBook Air running macOS Tahoe 26.2 with an external DVD drive. The sections below show which method saves DVD movies as MP4 or MKV, which method creates ISO or CDR backups, and what I checked when a DVD would not copy on your Mac.
6 Reliable Ways to Copy a DVD on MacBook Pro/Air, iMac, and Mac mini
Modern Macs usually need an external USB or USB-C DVD drive before they can read a physical disc. Once your Mac sees the DVD, the best method depends on the disc type, the output you want, and the software your macOS version can run.
Quick Answer
I used the latest available versions I could verify in June 2026. This table shows the route I would choose first.
| Goal | Best Method | Version Tested / Release Date | Mac System, Model, and Chip Fit | Output | Best For |
| Digitize commercial discs | DVDFab DVD Ripper | DVDFab 13 for Mac 13.0.5.8; DVD Ripper update: May 12, 2026 | macOS 10.13-15.x; supported on M-Series or Intel Chips) | MP4, MKV, AVI, FLV, MP3, device profiles | Bypassing CSS/region code cases quickly and saving playable MP4 or MKV files |
| Free video encoding | HandBrake + libdvdcss | HandBrake 1.11.2; released June 7, 2026 | macOS 10.13 and later; supported on Apple Silicon M1 and newer | MP4, MKV, WebM | Technical users who want custom encoding settings |
| Keep a DVD title with original tracks | MakeMKV | MakeMKV 1.18.3; released January 25, 2026 | x64 or ARM64 Mac OS X 10.7 or later | MKV | Preserving original video, audio, subtitles, and chapters in one file |
| Unprotected image backup | Disk Utility / Finder | Built into macOS; no separate app version | Intel or Apple Silicon Mac with a readable optical drive | CDR, ISO, blank disc | Archiving homemade family videos, software discs, or data discs |
| Protected structural backup | DVDFab DVD Copy | DVDFab 13 for Mac 13.0.5.8; DVD Copy update: May 12, 2026 | macOS 10.13-15.x; supported on M-Series or Intel Chips) | ISO, DVD folder, blank DVD | Cloning commercial discs with menus or preserving DVD structure |
| Simple data transfer | Direct copy and paste | Finder method; no separate version | Any Mac that mounts the DVD in Finder through an internal or external drive | Files or VIDEO_TS folder | Moving standard unprotected data files manually |
How I Tested These DVD Copy Methods on Mac
I evaluated extraction speed, output usability, disc reading behavior, and format control on my M4 MacBook Air running macOS Tahoe 26.2 (25C56). I used an external DVD drive and tested two common paths: saving a DVD movie as a digital file, and creating a backup image or folder from a disc.
I did not treat one speed result as a universal benchmark. DVD condition, optical drive speed, copy protection, subtitle choices, encoder settings, and hardware acceleration can all change the result. I focused on what each method does well, where it fails, and which output it creates.
That gave me a more useful answer than a single stopwatch number.
How to Copy a DVD to Mac as MP4 or MKV
A movie DVD needs a different path from a data DVD. You usually want a file that plays in Apple TV, QuickTime-compatible apps, Plex, VLC, or a media server. MP4 gives you the easiest playback path. MKV keeps more tracks together, but some Apple apps do not open it directly.
The three best DVD Copy Software below cover most movie DVD cases: DVDFab DVD Ripper for copying protected and complex discs on Mac, HandBrake for uprotected DVD sources, and MakeMKV for MKV copies.
Copy Any Protected DVDs to Mac with DVDFab DVD Ripper
DVDFab DVD Ripper is a reliable choice when you want to copy a DVD movie to your Mac as MP4, MKV, or another digital format. It integrates a DVD decryption module for protections such as CSS, APS, and region codes, so you do not need to install a separate library before copying encrypted DVDs. This tool fits protected commercial DVDs better than Disk Utility, HandBrake, or direct copy and paste.
The DVDFab for Mac 13.0.5.8 build also supports Apple Silicon hardware acceleration in my test environment. My test showed that a 90-minute movie finished conversion in just five minutes, which makes it my top choice for processing large disc collections efficiently. The software also maintained full 480p standard definition quality while reducing the final file size through compression settings.
The software also gives you practical controls after loading the disc. You can choose the main movie, select audio and subtitles, add external subtitles, crop the frame, trim clips, and save the result as a format that matches your playback device.
Best for: users who want to copy protected DVD movies to MP4, MKV, or device profiles on Mac.
Available on:
- The only tool that can decrypt the latest copy protection from discs.
- Input any protected DVD disc (2D & 3D), DVD folder, DVD ISO image file.
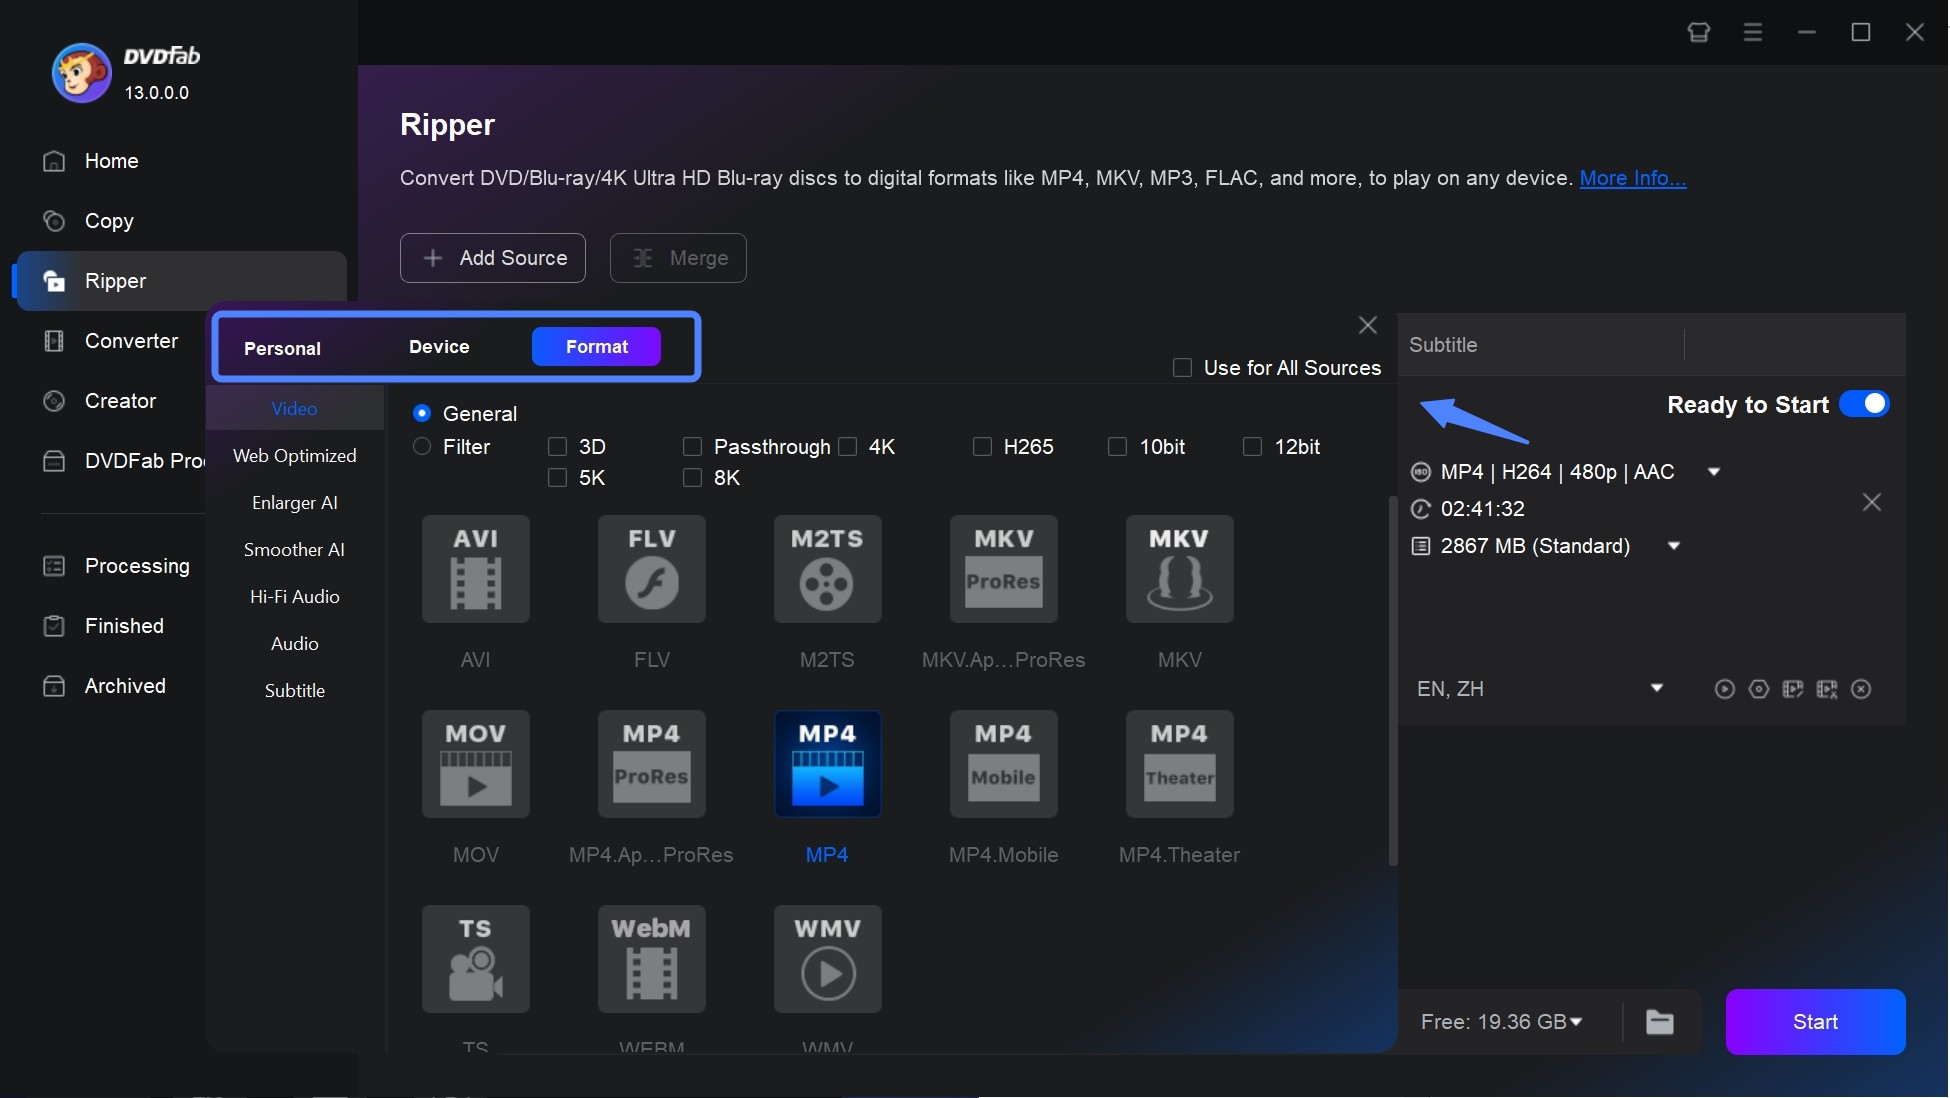
- Output 1000+ video/audio formats: MP4, MKV, AVI, MP3, TS, WebM, etc.
- Profile Filter: 3D, Passthrough, 4K/5K/8K, H265, 10/12 bit, etc.
- Export 260+ devices: iPhone, Android, Xbox One, USB, and other preset devices.
- Speed: 50x faster ripping speed with GPU acceleration & batch conversion.
- Video editing tools: trim, crop, watermark, subtitle, video effects, contrast, brightness, etc.
- The free version can only output MP4 and MKV formats.
How to Copy a DVD Movie on Mac with DVDFab DVD Ripper
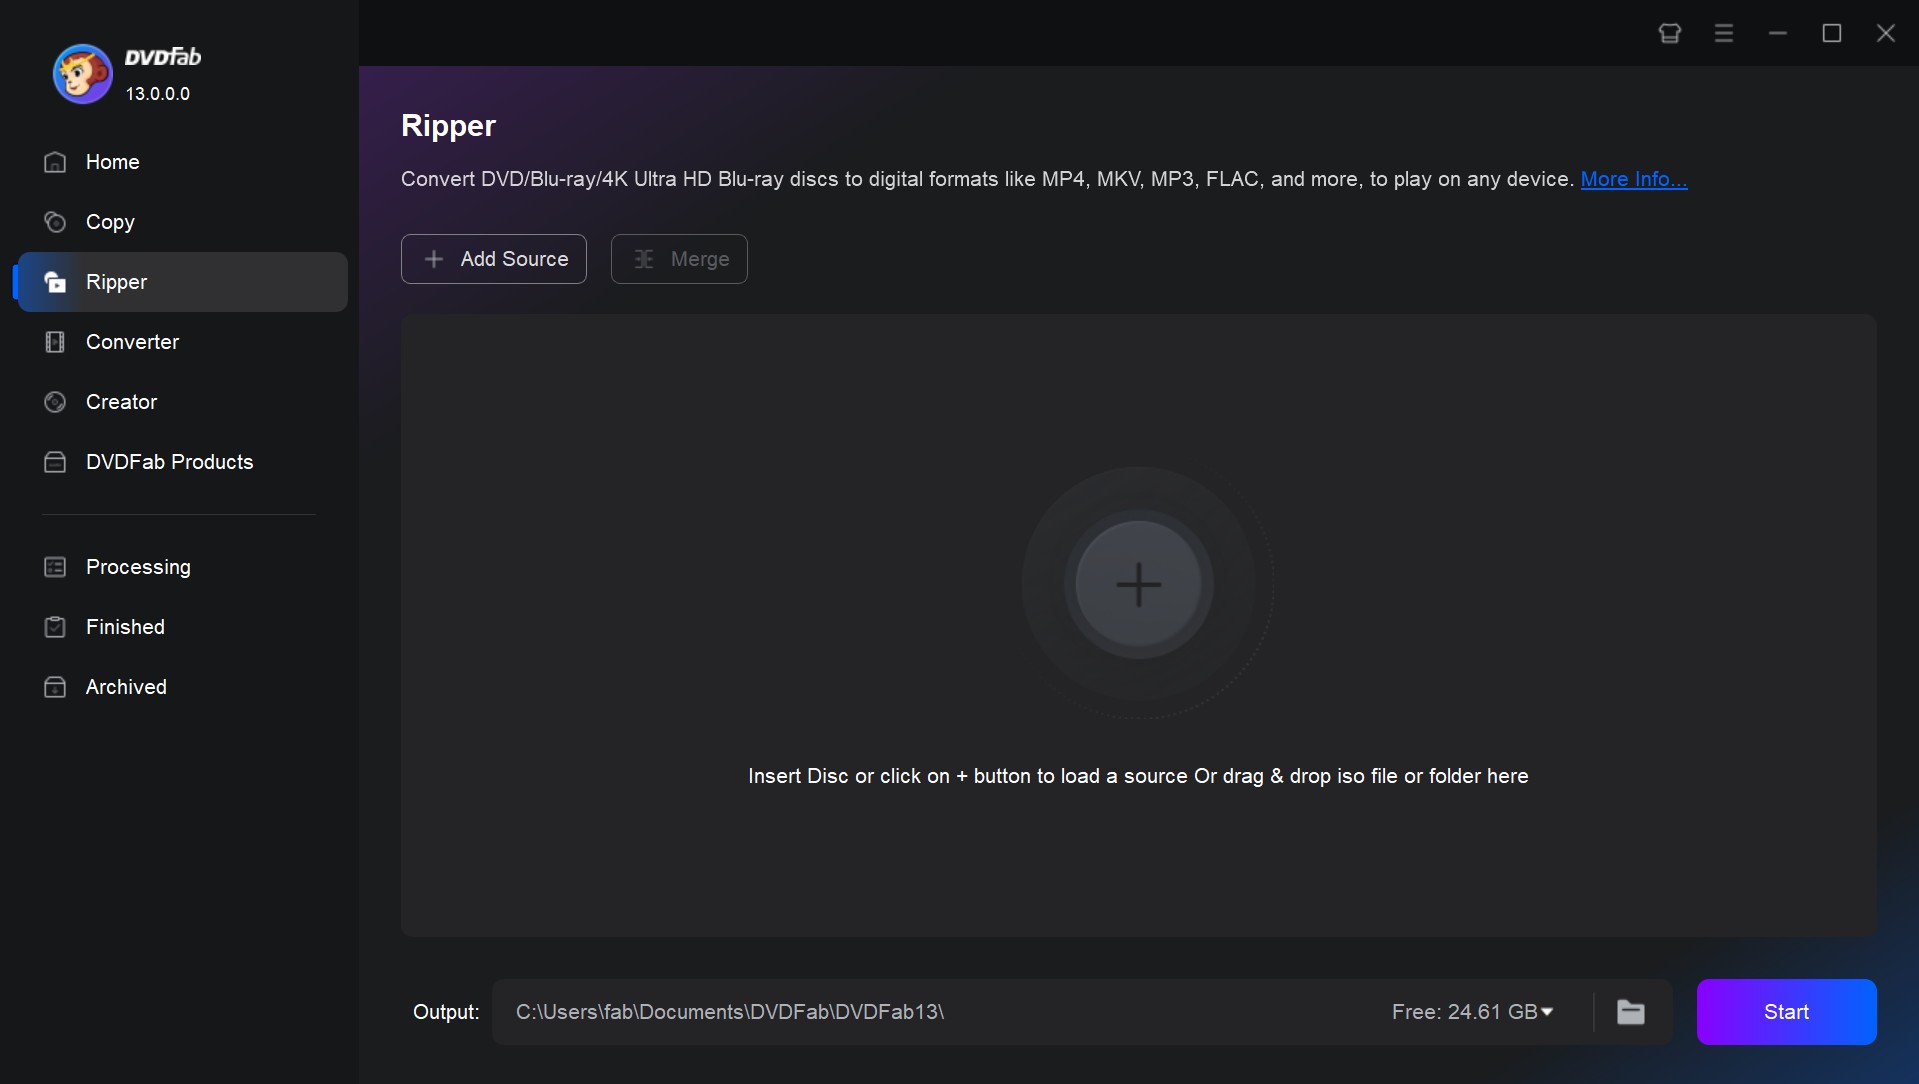
Step 1: Install and launch it on your Mac, and click the module "Ripper" first. Insert your disc into a DVD drive, and then this program will detect it quickly. If your source file is an ISO image or folder, you can also simply drag and drop it to the main interface.
Step 2: Click "Choose Other Titles" to select the whole or part of DVD titles you want to rip. You can also select chapters, audio tracks, subtitles or add external subtitles. Then use the options of Advanced Settings and Video Edit to edit your file based on your reference.
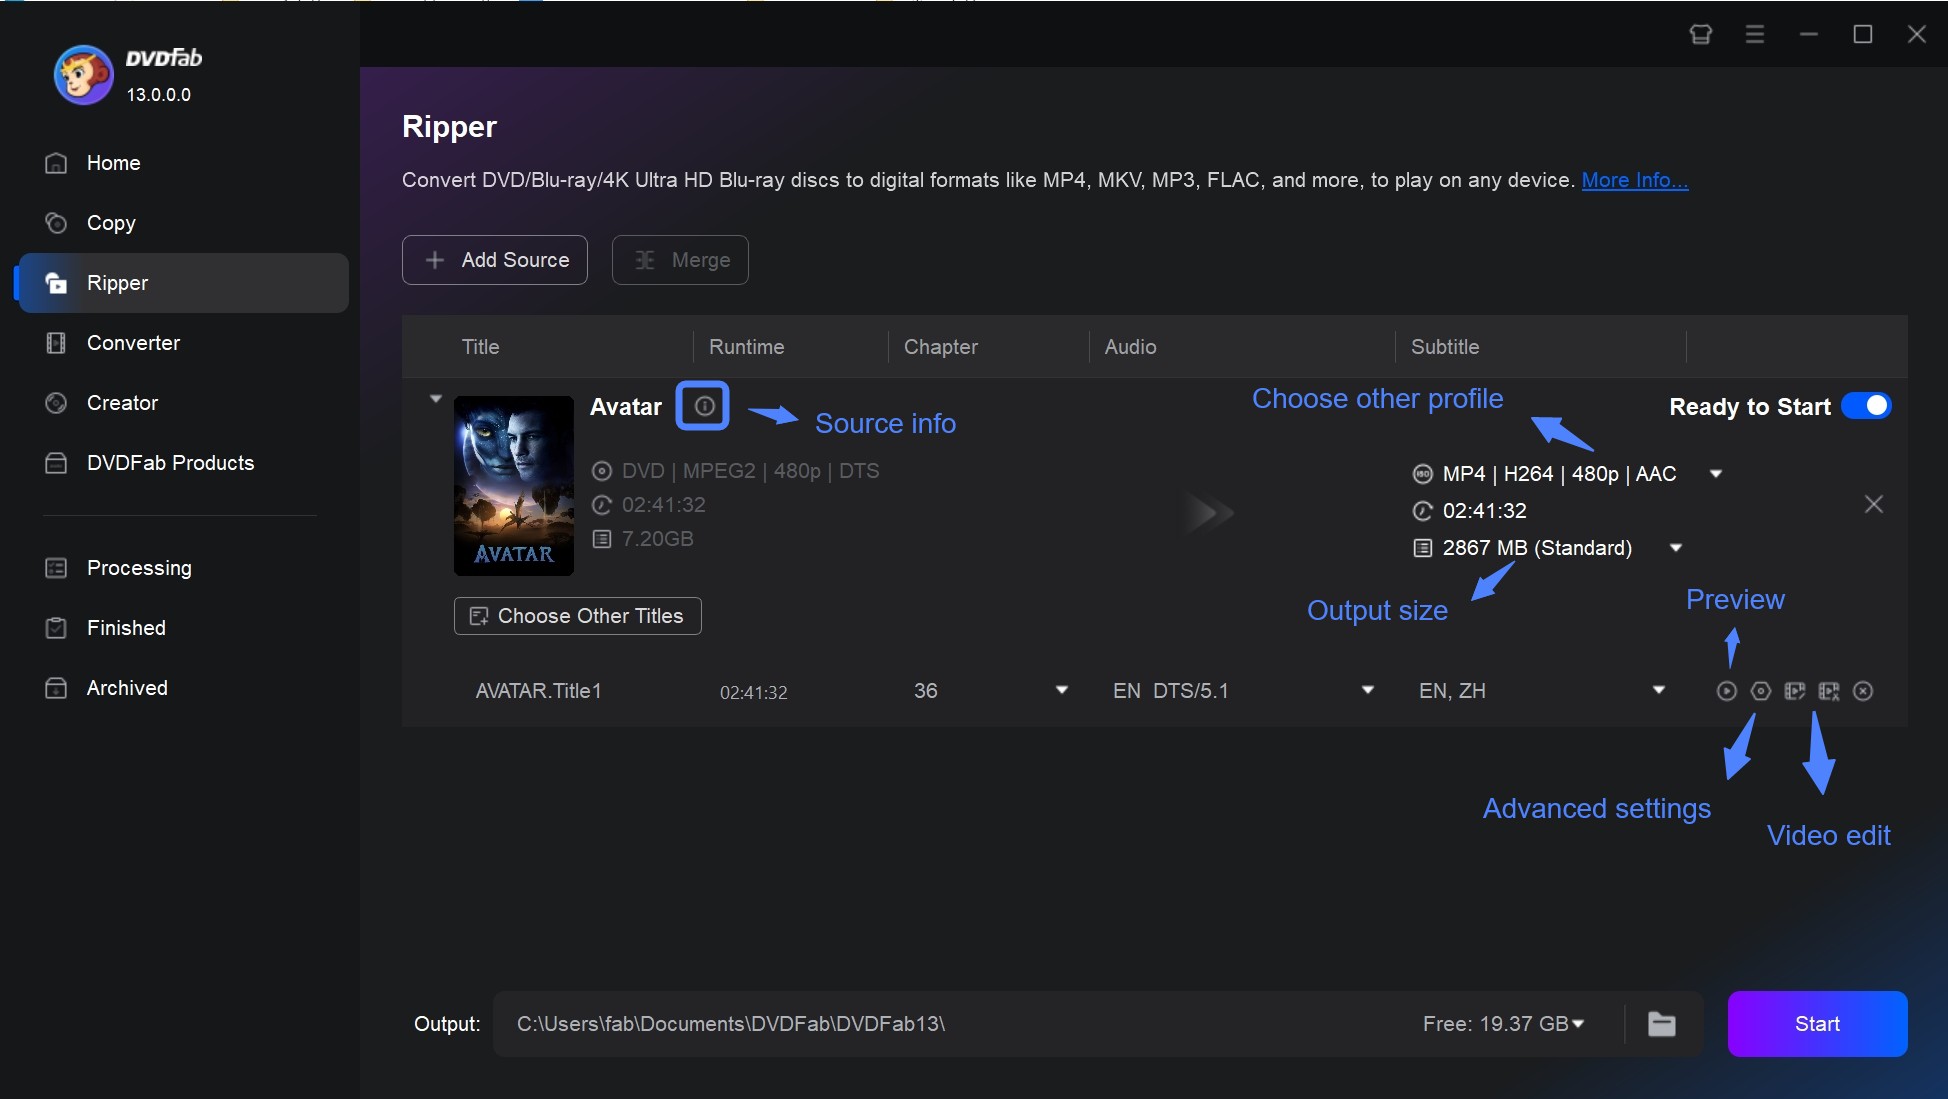
Then click "Choose Other Profile" to customize it by selecting the output video/audio formats and device category.
Step 3: Save the file and click the "Start" button to convert DVD to MP4 on Mac. You can check the real-time schedule and stop the process at any time.
Copy CSS-Protected DVD to Mac with HandBrake + libdvdcss
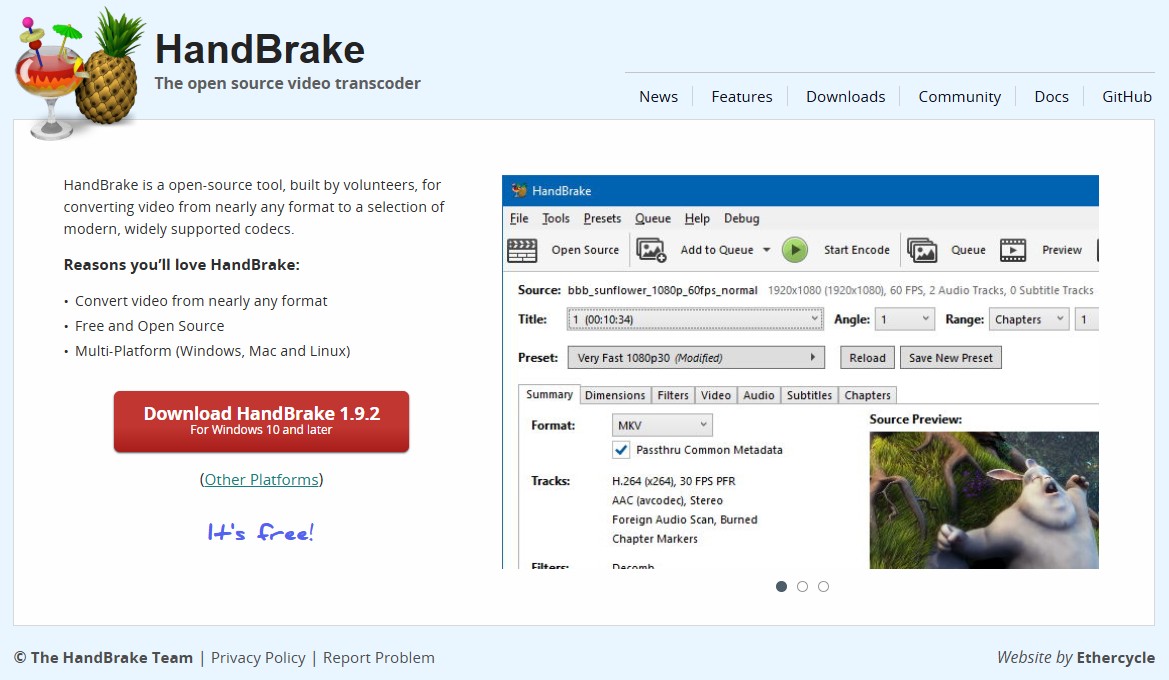
HandBrake is an open-source video transcoder for copying DVD on macOS, Windows, and Linux. It accepts standard video files and unprotected physical media, then encodes them into efficient H.264 or H.265 files inside MP4, MKV, or WebM containers. It gives you detailed control over video quality, presets, filters, audio tracks, and subtitles.
The core application lacks native commercial disc decryption. Users must install libdvdcss manually before HandBrake can read some CSS-protected DVDs. Even then, libdvdcss only helps with some CSS cases. It does not turn HandBrake into a full DVD decryption tool, and it does not solve fake titles, structural protection, region issues, or damaged sectors.
HandBrake 1.11.2 works well when the DVD source is readable and you want precise encoding control. The manual libdvdcss setup creates a higher learning curve for beginners. I prefer this software for copying older, unprotected homemade discs or lightly protected discs on Mac.
Best for: technical users who want precise encoding control over unprotected or lightly protected discs.
Available on: macOS 10.13 or later, Windows, and Linux.
- Converts standard DVDs to MP4, MKV, or WebM formats.
- Includes pre-configured settings optimized for Apple devices.
- Provides full control over codec, resolution, bitrate, subtitles, and audio tracks.
- Can queue multiple DVD titles or episodes for batch conversion.
- No cost or license required.
- Need third-party tools like libdvdcss installed on Mac to copy protected DVDs.
- Does not preserve DVD menus or extras—only converts selected titles.
- Conversion (transcoding) is lossy; file quality depends on chosen settings.
How to Copy DVD on Mac with HandBrake
Step 1: HandBrake is supported on recent versions of macOS such as Sonoma, Ventura, and Monterey. Go to the official website, and download the appropriate version and install it.
Step 2: If you need to copy encrypted DVDs, get libdvdcss from trusted websites like VideoLan and GitHub and install it to your Mac.
For macOS 10.10 or older OS: Simply download the libdvdcss.pkg from the VideoLan website and install it by double-clicking the file.
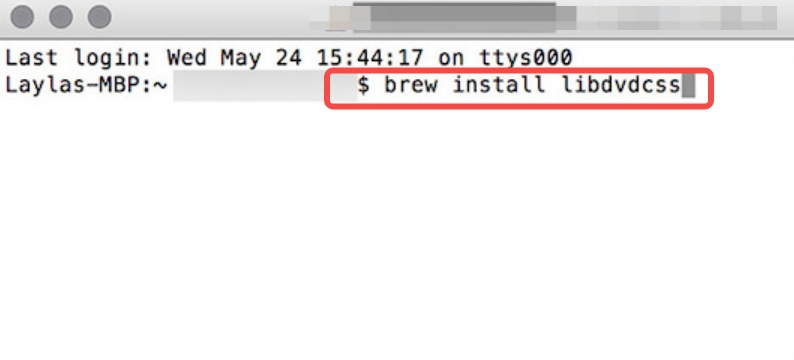
For macOS 10.11 (El Capitan) and newer versions: install Homebrew. Then, open Terminal and enter the command brew install libdvdcss. Then, Homebrew will place the libdvdcss.dylib library in the correct system path for HandBrake to detect automatically.
Step 3: Insert the DVD into your external optical drive and open HandBrake. Under Source Selection, you can choose the DVD drive from the list or select the ISO file or DVD folder if you're working with a digital source.
Step 4: Select the Format (usually MP4 or MKV), and a suitable preset such as Fast 1080p30 or HQ 720p30. You can also adjust settings for video quality, audio tracks, and subtitles in the corresponding section.
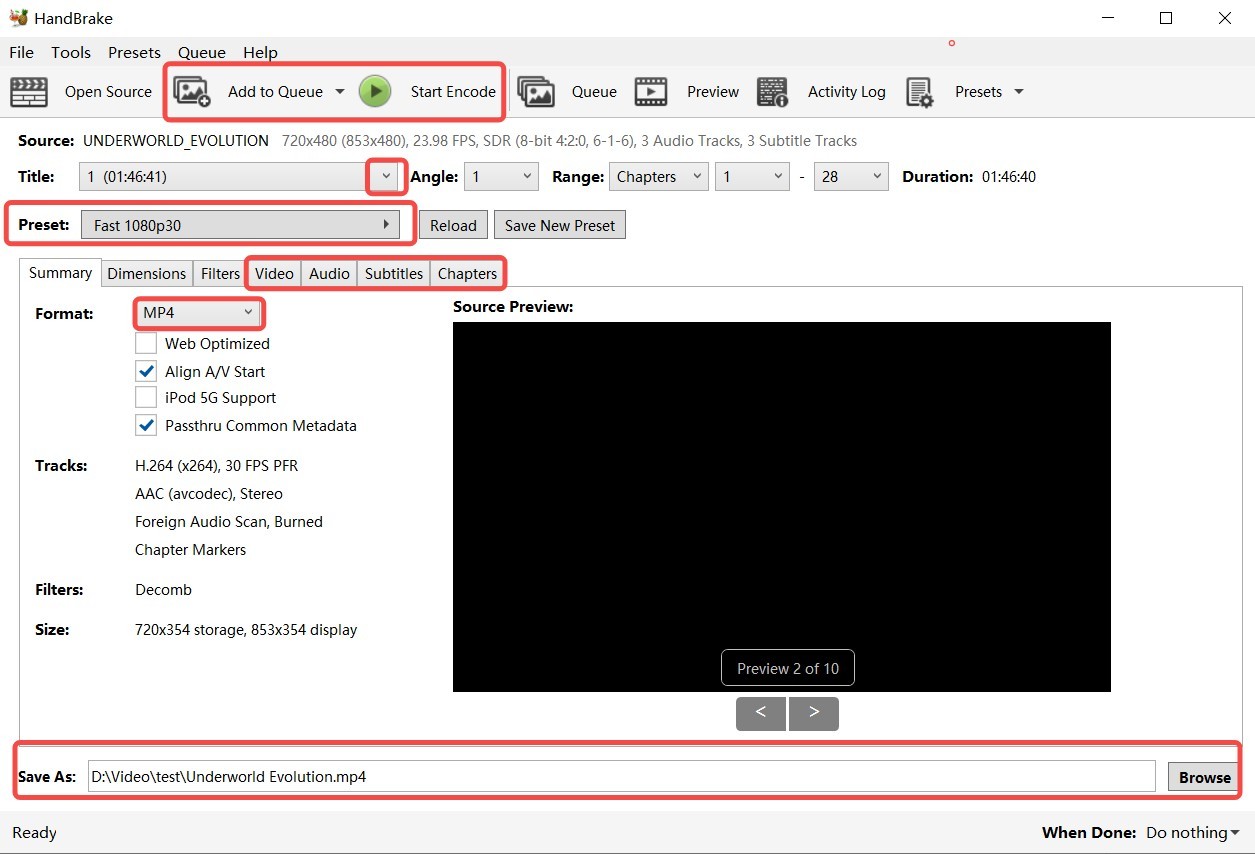
Step 5: In the Save As field, choose a destination folder and name for your output file. Close any unnecessary programs to free up CPU resources for HandBrake. Then, click "Start Encode" to begin copying the DVD.
Copy AACS-Protected DVD to Mac with MakeMKV
MakeMKV can help you copy a DVD on Mac as an MKV copy with its audio, subtitles, and chapter data. It does not create MP4 files, and it does not offer the same editing or compression controls as a ripper or converter. But it gives you a simple way to save DVD titles without re-encoding the video.
The main benefit is track preservation. The trade-off is file size. I keep MakeMKV for exact MKV copies when I want original audio, subtitles, and chapters together, but I do not use it when I need MP4 output, smaller files, or built-in editing controls. If you have the beta key, you may use MakeMKV to rip DVDs encrypted with region code or CSS. However, the MakeMKV purchase page is currently down.
A note is that macOS may ask you to adjust Gatekeeper settings because MakeMKV is not signed by Apple.
Best for: home theater users who prioritize original video and audio tracks over storage space.
Available on: x64 or ARM64 Mac OS X 10.7 or later, Windows, and Linux. I tested it on an M4 MacBook Air.
- Create MKV files without another video encode.
- Decrypt AACS and BD+ copy protections.
- Preserve original video, audio, subtitles, chapters, and metadata.
- Run at a speed mainly limited by the optical drive.
- Use a simple title selection process.
- Create large files.
- Output MKV only.
- Do not include video editing tools.
How to Copy DVD to Mac with MakeMKV
Step 1: Download MakeMKV from the official website and install it on your Mac.
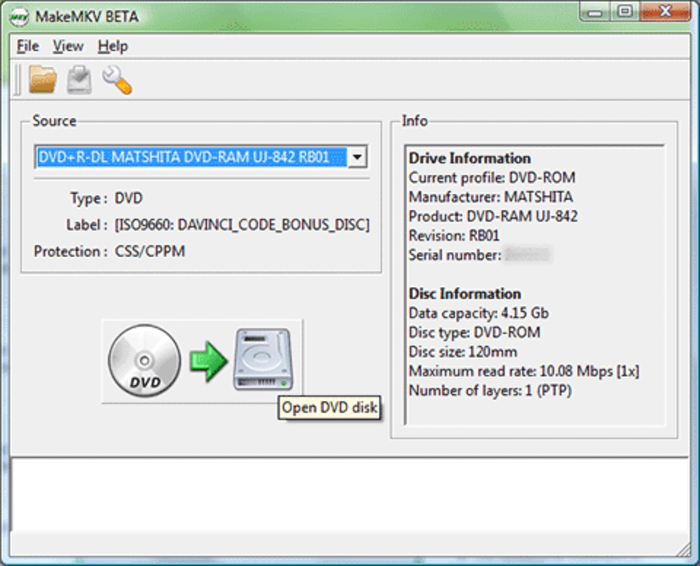
Step 2: Insert the disc into your optical drive and launch MakeMKV. Click "Open Disc" to scan the DVD and wait until all titles appear. If your source is an ISO or a DVD folder, click "Open Files" to load it.
Step 3: Select the main movie or any other titles you need. Choose the desired audio tracks and subtitles, and clear any extras you do not want.
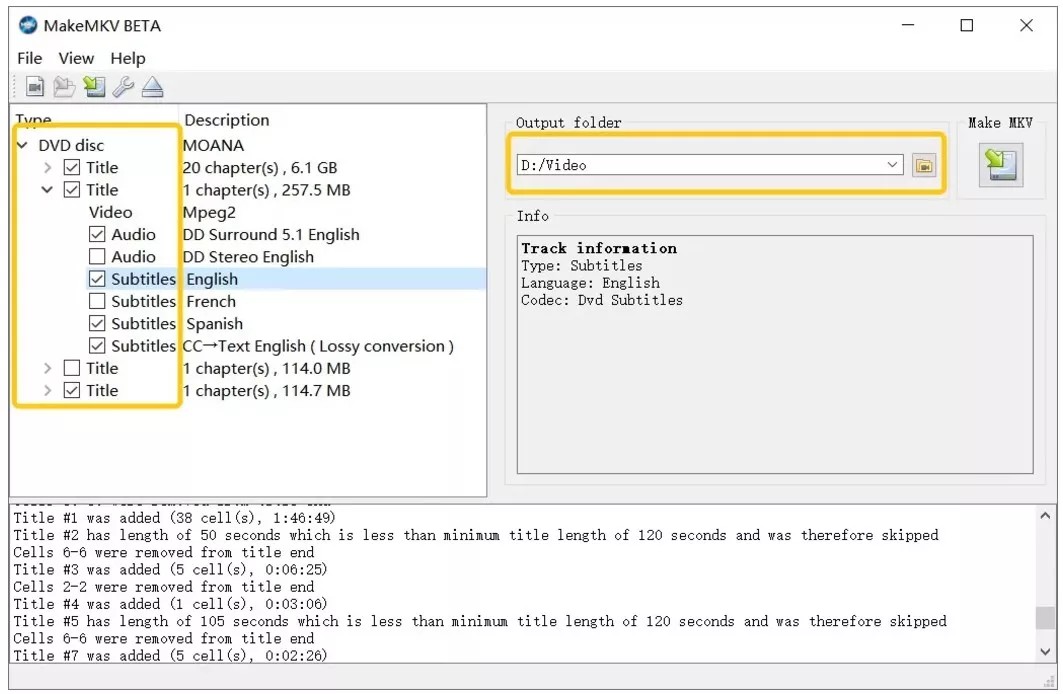
Step 4: From the Output folder dropdown, choose a destination on your Mac. Click "Make MKV". Wait for the process to finish, then find the .mkv file in your output folder.
How to Copy a DVD on Mac as an ISO, CDR, or Full Backup
A full backup keeps more of the DVD structure than a movie file. This route makes more sense when you want to archive a disc, burn another copy, keep menus, or save a DVD folder on your Mac hard drive.
Disk Utility and Finder cover unprotected discs. DVDFab DVD Copy covers the cases where the disc is protected or where you need full disc, main movie, clone, split, merge, or custom copy modes.
Copy an Unprotected DVD on Mac with Disk Utility or Finder
Apple includes Disk Utility as a built-in macOS app for managing internal drives, external storage devices, and disk images. For unprotected DVDs, Disk Utility can create a DVD/CD master image with the .cdr extension. On current macOS versions (on El Capitan 10.11 and later), Finder can burn that image back to a blank disc; older OS X versions (on OS X El Capitan 10.11 and earlier) may also offer a Burn option inside Disk Utility.
Disk Utility works best with unencrypted optical discs. Users can mount the generated image as a volume on Mac or burn it back onto blank media. This method gives you a native way to archive homemade family videos, software discs, and standard data DVDs.
macOS Sequoia and later versions still support this basic disk image workflow. Disk Utility reads the physical disc and saves the image file to your Mac. The process works reliably only when the source disc is readable and does not use commercial DVD copy protection.
- Built into macOS.
- Creates CDR image backups of unprotected physical media.
- Mounts created images in Finder.
- Handles homemade unencrypted video and data discs.
- Fails on encrypted discs.
- Creates limited output formats.
- Does not convert DVD movies to MP4 or MKV.
Conclusion: Disk Utility and Finder are best for backing up unencrypted homemade family video discs or standard data discs.
Create a Disk Image with Disk Utility
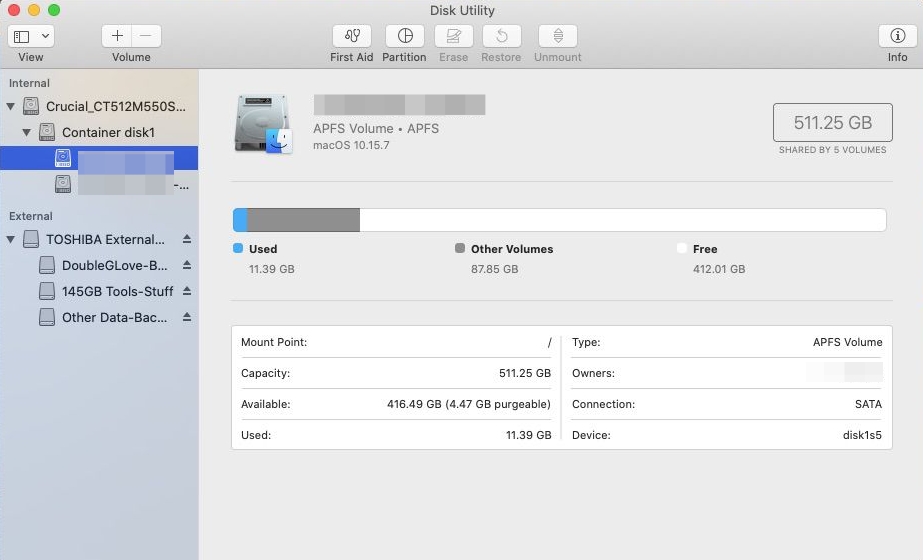
Step 1: Insert the DVD into your external DVD drive. Open Applications > Utilities > Disk Utility.
Step 2: Click View > Show All Devices so you can see the physical DVD device.
Step 3: Select the physical DVD device, not just the mounted volume.
Step 4: Choose File > New Image > Image from "[device name]".
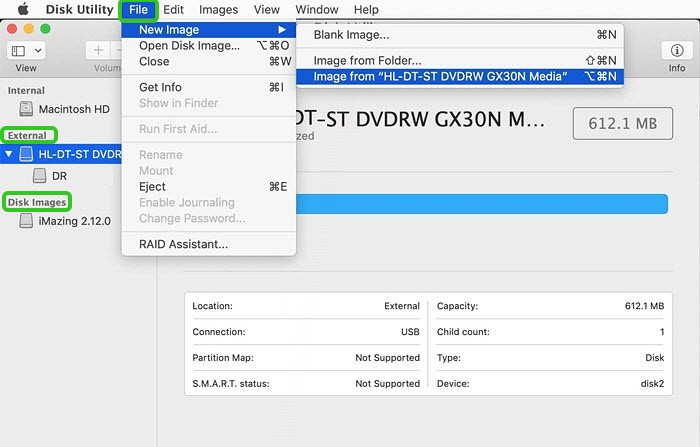
Step 5: In the save dialog, choose a name and a location with enough free space. Set Format to DVD/CD master and Encryption to None.
Step 6: Click Save to start. Once Disk Utility finishes, you will have a .cdr image of your disc on your Mac.

Need a real .iso? Convert with Terminal:
hdiutil convert /path/source.cdr -format UDTO -o /path/destination.iso
After converting to ISO image files, you can burn ISO to DVD with DVD burning tools.
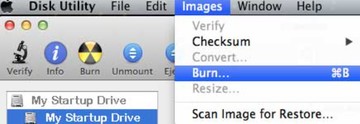
Burn the Image with Finder
Step 1: Eject the original DVD and insert a blank writable disc.
Step 2: In Finder, Control-click the .cdr or .iso image file, then choose Burn Disc Image to Disc.
Step 3: Select your optical drive and burn speed. Keep verification enabled when you want Finder to check the copied data.
Direct Copy and Paste for Simple Data Discs
Finder handles simple file transfer when the DVD contains normal files. I only use this method for document discs, photo discs, software discs, or other unprotected file discs.
Movie DVDs are different. You may see VIDEO_TS and AUDIO_TS folders, but dragging them to your desktop does not always preserve a reliable, playable DVD backup. This method also will not work for protected commercial DVDs.
Use the best DVD Copy Software formacOS - DVDFab DVD Copy
DVDFab DVD Copy is a dedicated software to copy DVD on mac with support for 6 copy modes. It allows you to copy DVDs with 1:1 quality or compress them to save storage space, copy only the main movie title, or duplicate any specific content you want from the source. In addition, you can split one DVD-9 into two DVD-5s or merge multiple DVDs into a single disc. Physical discs, ISO files, and DVD folders are supported as input and output.
Like DVDFab DVD Ripper, it also supports decryption of various encryption types, from basic to advanced, such as CSS, Region Code, APS, and more. That's why I often use both DVD copy software for Mac together — one for disc image backups and the other to rip DVDs into portable digital formats for viewing on my iPad.
Best for: collectors who need playable physical backups or exact ISO archives of encrypted commercial movies.
Available on:
- Copy homemade and commercial DVDs to Mac, including Disney X-project DRM, RCE, CSS, etc.
- Support to encrypted new discs by providing services like cloud decryption.
- Copying DVD for macOS in batch at lightning-fast speed.
- Customized settings for output size, audio and subtitle languages.
- 6 Copy modes: Full Disc, Main Movie, Clone/Burn, Merge, Split and Customize.
How to Clone DVD on Mac with DVDFab DVD Copy
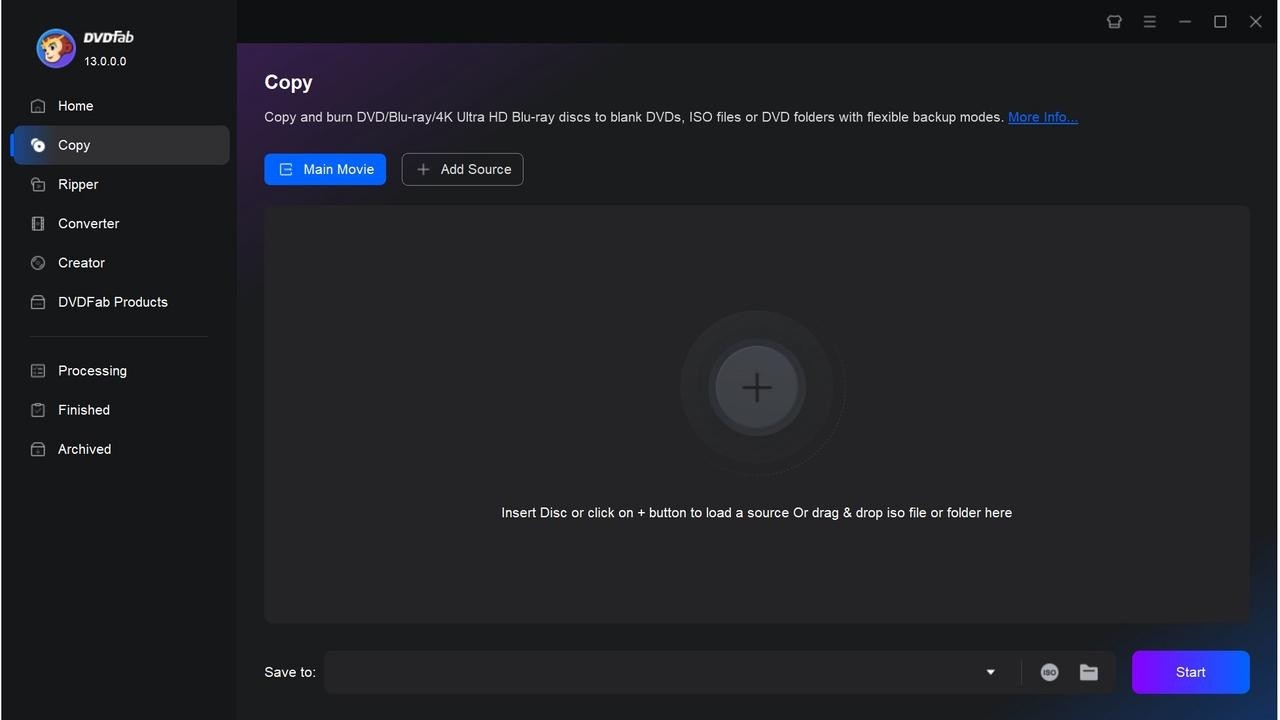
Step 1: Launch DVDFab and load the source.
Insert the DVD you want to back up into your optical drive. If you have a folder or ISO file instead, drag and drop it onto the software’s main page to begin copying.
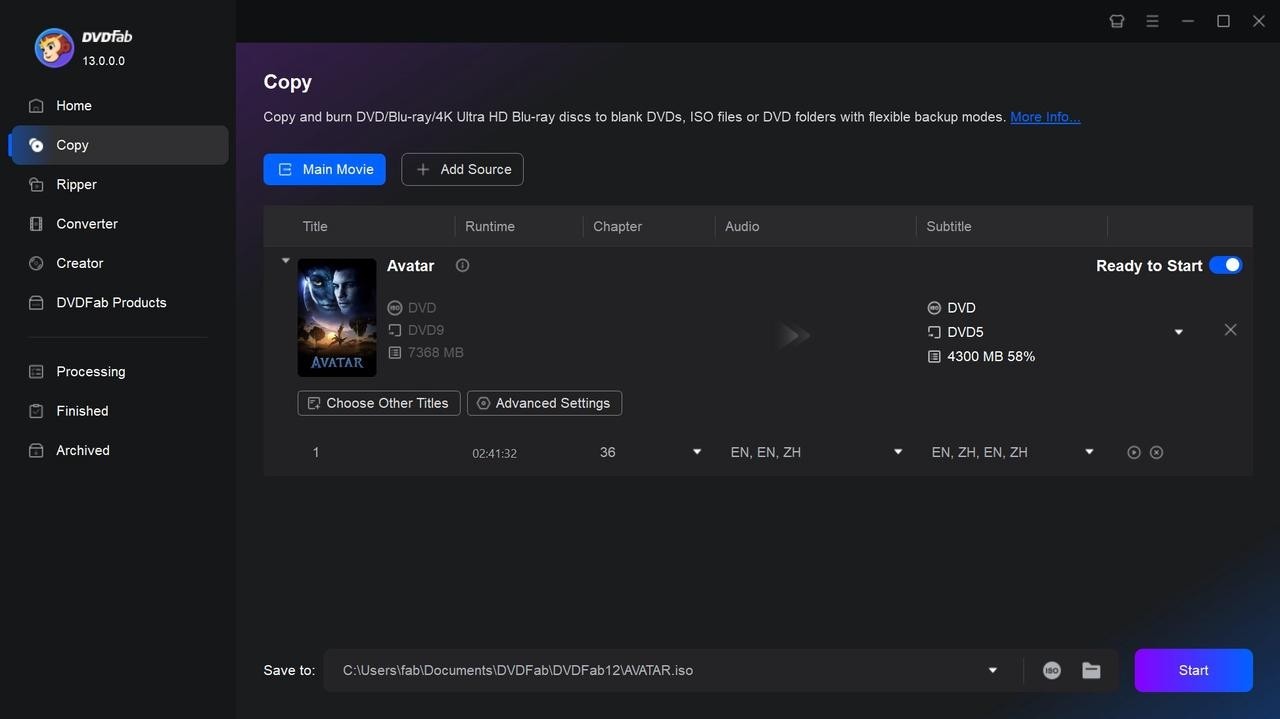
Step 2: Select Copy mode and customize the output DVD.
Choose a copy mode based on your needs. Then go to Advanced Settings to select DVD-5 or DVD-9. If you want to back up as an ISO file or folder on your hard drive, click the ISO or folder icon at the bottom of the main interface and choose a storage location.

Step 3: Start the DVD copy process on Mac.
Click Start to save DVD to computer. DVDFab will show the copy progress in the task window.
DVD Won't Copy on Mac? Check These Problems First
DVD copying often fails because the Mac cannot read the disc, not because you picked the wrong output format. Check the source, the drive, and the tool before repeating the same process.
| Problem | Likely Reason | Recommended Check |
| DVD does not show in Finder | Finder settings, bad cable, weak drive connection, or damaged disc | Show external discs in Finder, reconnect the drive, and test another disc. |
| External DVD drive is not recognized | USB-C hub, power issue, cable issue, or drive compatibility | Use another cable, connect the drive directly, or try a powered hub. |
| Disk Utility cannot create an image | The DVD is protected or has unreadable sectors | Use Disk Utility only for unprotected discs, then try a DVD ripper or DVD copy tool for commercial discs. |
| HandBrake cannot scan the DVD | Missing libdvdcss, stronger protection, fake titles, or damaged sectors | Install libdvdcss for basic CSS discs, then switch tools if HandBrake still fails. |
| MakeMKV shows no titles | Damaged disc, unsupported structure, or drive issue | Clean the disc, test another drive, or use another DVD tool. |
| Copied file will not open on iPhone or iPad | The file is ISO, CDR, VIDEO_TS, or MKV | Convert the movie to MP4 or MOV for Apple device playback. |
| Output has no subtitles | Wrong subtitle track or subtitle setting | Preview the title first, then choose the correct subtitle track. |
| DVD copy stops halfway | Bad sectors, scratches, or weak drive read speed | Clean the disc, reduce drive load, or try another external drive. |
When the disc fails before the app starts a real copy or encode, stop changing random settings. The source usually leaves the first clue.
FAQs About Copying DVDs on Mac
Is it legal to copy DVDs to Mac?
Local rules decide what you can copy and how you can use the copy. You should copy only discs you own or have permission to copy, and you should not share copied files without rights.
What format should you use when copy DVD on Mac?
Use CDR when Disk Utility creates an image from an unprotected disc. Use ISO or VIDEO_TS when you want a full backup. Use MP4 when you want easy playback on Mac, iPhone, iPad, Apple TV, or Plex. Use MKV when you want to keep multiple audio or subtitle tracks.
Can I copy a DVD on MacBook Air or MacBook Pro without a disc drive?
You need an external USB or USB-C DVD drive. After your Mac reads the disc, choose Disk Utility for unprotected backups, HandBrake or MakeMKV for some movie files, or DVDFab for protected DVDs and fuller copy options.
How do I copy a DVD to my Mac hard drive?
Use Disk Utility to save an unprotected DVD as a CDR or ISO image. Use a DVD ripper like DVDFab when you want to save a DVD movie as MP4 or MKV on your Mac hard drive.
Can I copy a DVD to Mac and watch it on iPhone or iPad?
Yes, but you should convert the movie to MP4 or MOV first. ISO, CDR, and VIDEO_TS work better for backup than mobile playback.
Why can't my copied DVD open on Mac?
Your Mac may not open the copied format with its default apps. QuickTime does not handle every DVD backup format, so you may need MP4 for direct playback or a media player that supports ISO, VIDEO_TS, or MKV.
Conclusion
Each DVD copy tool for Mac has its own balance of speed, quality, and ease of use. Some are built for 1:1 disc backups, while others focus on quick digital copies for portable viewing. Choose the one that matches how you manage and watch your collection, and you'll have your movies safely archived and ready whenever you need them.
![How to Rip DVD to ISO on Windows 11/10/8/7 and Mac? [2026 Update]](https://r3.dvdfab.cn/upload/resource/dvd-to-iso-ei38.jpeg) How to Rip DVD to ISO on Windows 11/10/8/7 and Mac? [2026 Update]By Wenny Yan - Jun 17, 2026
How to Rip DVD to ISO on Windows 11/10/8/7 and Mac? [2026 Update]By Wenny Yan - Jun 17, 2026![Top 11 ISO Creators to Create ISO File on Windows & Mac [2026 Updated]](https://r3.dvdfab.cn/upload/resource/create-iso-file-ytTu.jpeg) Top 11 ISO Creators to Create ISO File on Windows & Mac [2026 Updated]By Wenny Yan - Jun 16, 2026
Top 11 ISO Creators to Create ISO File on Windows & Mac [2026 Updated]By Wenny Yan - Jun 16, 2026![How to Copy DVD to DVD or Computer on Windows 10/11/8/7 [Tested Ways]](https://r1.dvdfab.cn/upload/resource/how-to-copy-dvd-windows-10-hO78.jpeg) How to Copy DVD to DVD or Computer on Windows 10/11/8/7 [Tested Ways]By Wenny Yan - Jun 16, 2026
How to Copy DVD to DVD or Computer on Windows 10/11/8/7 [Tested Ways]By Wenny Yan - Jun 16, 2026 9 Best Free DVD Copy Software in 2026: Tested & ReviewedBy Wenny Yan - Jun 11, 2026