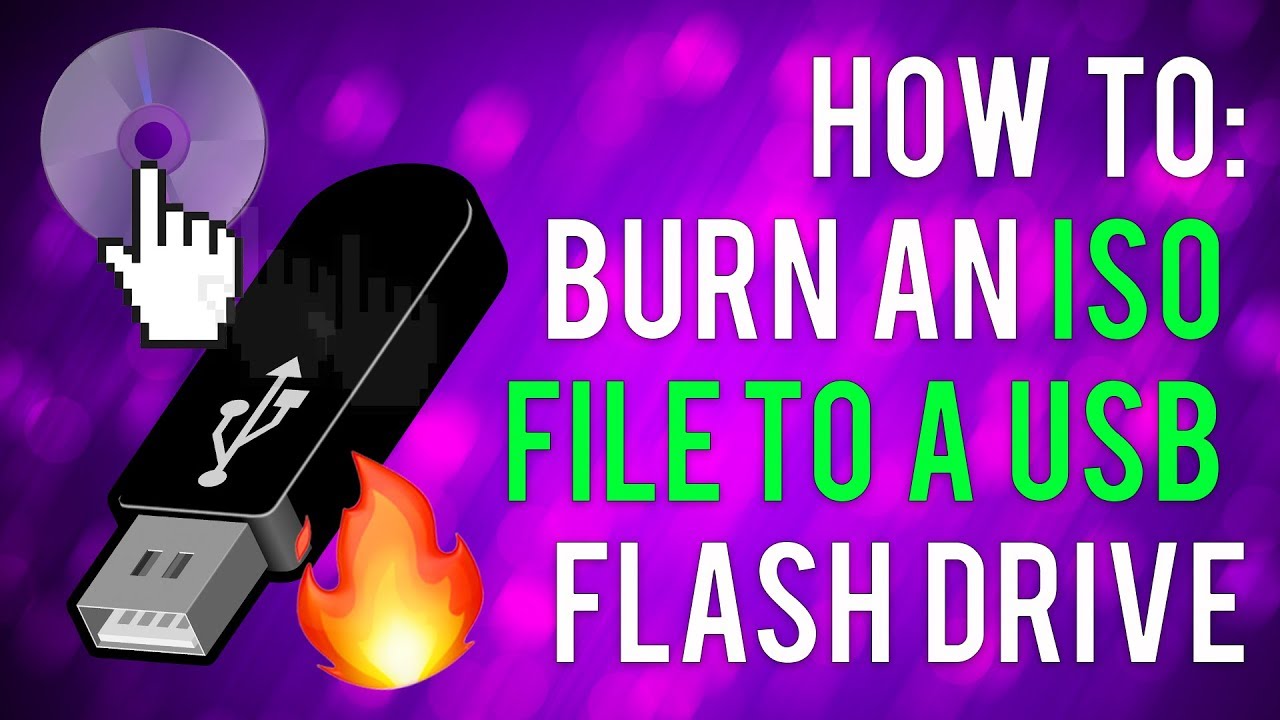
How to Burn ISO to USB for Safekeeping or Portability?
Summary: Looking to transfer an ISO file to a USB drive for safekeeping or portability? This guide has you covered! You will learn how to burning ISO file to a bootable USB drive, as well as how to burn a disc ISO file and transfer it to a USB drive for data storage purposes only.
Table of Contents
USB drives are storage devices that use a Universal Serial Bus (USB) interface, including flash drives and external hard drives. It is important to distinguish between flash drives and external hard drives, as they serve different purposes. Many users wonder whether they should burn an ISO file onto a bootable USB drive or store DVD contents on a USB drive for safekeeping using DVD to USB Converter.
Depending on your needs, you may choose different approaches. This guide will cover both methods, helping you securely store and manage your important data on a USB drive.
Way 1: Burn Disc ISO File to USB for Storage Only
Directly Transfer an ISO to USB
Let us know what you want to do: either burn an Disc ISO file on a USB hard drive or just copy an ISO file to a USB device. If you already have an ISO file and want to directly transfer it to a USB drive, all you need to do is follow the instructions below:
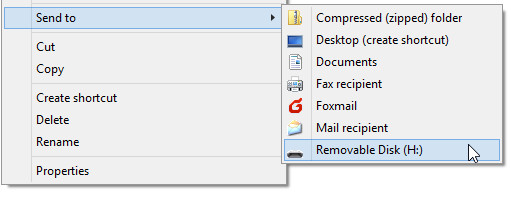
- Plugin the USB flash drive. The computer will identify and install the USB drive if it isn't already there. To save an ISO image file, you must have adequate capacity on your USB flash drive.
- Locate and right-click the source ISO image file, pick the "Send to" option and choose a detachable drive.
- Alternatively, you may copy the ISO disc image file and then directly paste it to your USB flash drive.
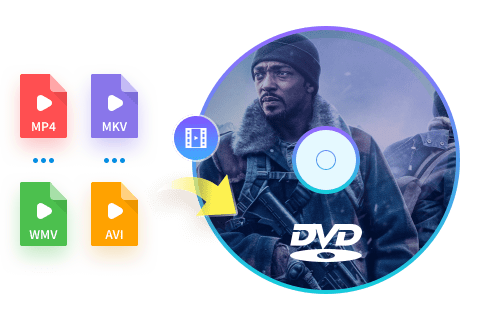
Burn an ISO File and Transfer it to USB with DVDFab DVD Creator
DVDFab DVD Creator is a software that allows you to create DVD discs, ISO files and folder from various video formats, including MP4, AVI, MKV, ISO video file and more. This type of video can originate from various sources like YouTube, an iPhone, or even a camcorder. So this tool enables you to burn your video files to disc ISO files saved on your computer, mobile device, or USB hard drive.
- Create a DVD, folder, or ISO file from 200+ popular video formats
- Choose from lots of built-in menu templates catering to various themes
- Multi-core CPU support for faster processing without sacrificing quality
- Choose from various audio and subtitle options and adjust settings for output quality
- It is rigorously tested for malware and viruses and regular updates
How to Burn ISO File to USB using DVDFab DVD Creator?
Step 1: Download and Install this free DVD burning software
Step 2: Make sure that you've chosen "Creator" > "DVD Creator."
DVDFab 13 has many modules, each with a unique set of capabilities. Remember to enable the 'Creator' option in this DVD burning program if you wish to burn ISO Windows or Mac.
Step 3: Add your videos to this ISO converter.
Then load the source video files you want to burn by clicking the "Add" button on the main page, or by simply dragging and dropping them into the main page. DVDFab DVD Creator allows you to input multiple video files to convert because it supports batch processing.
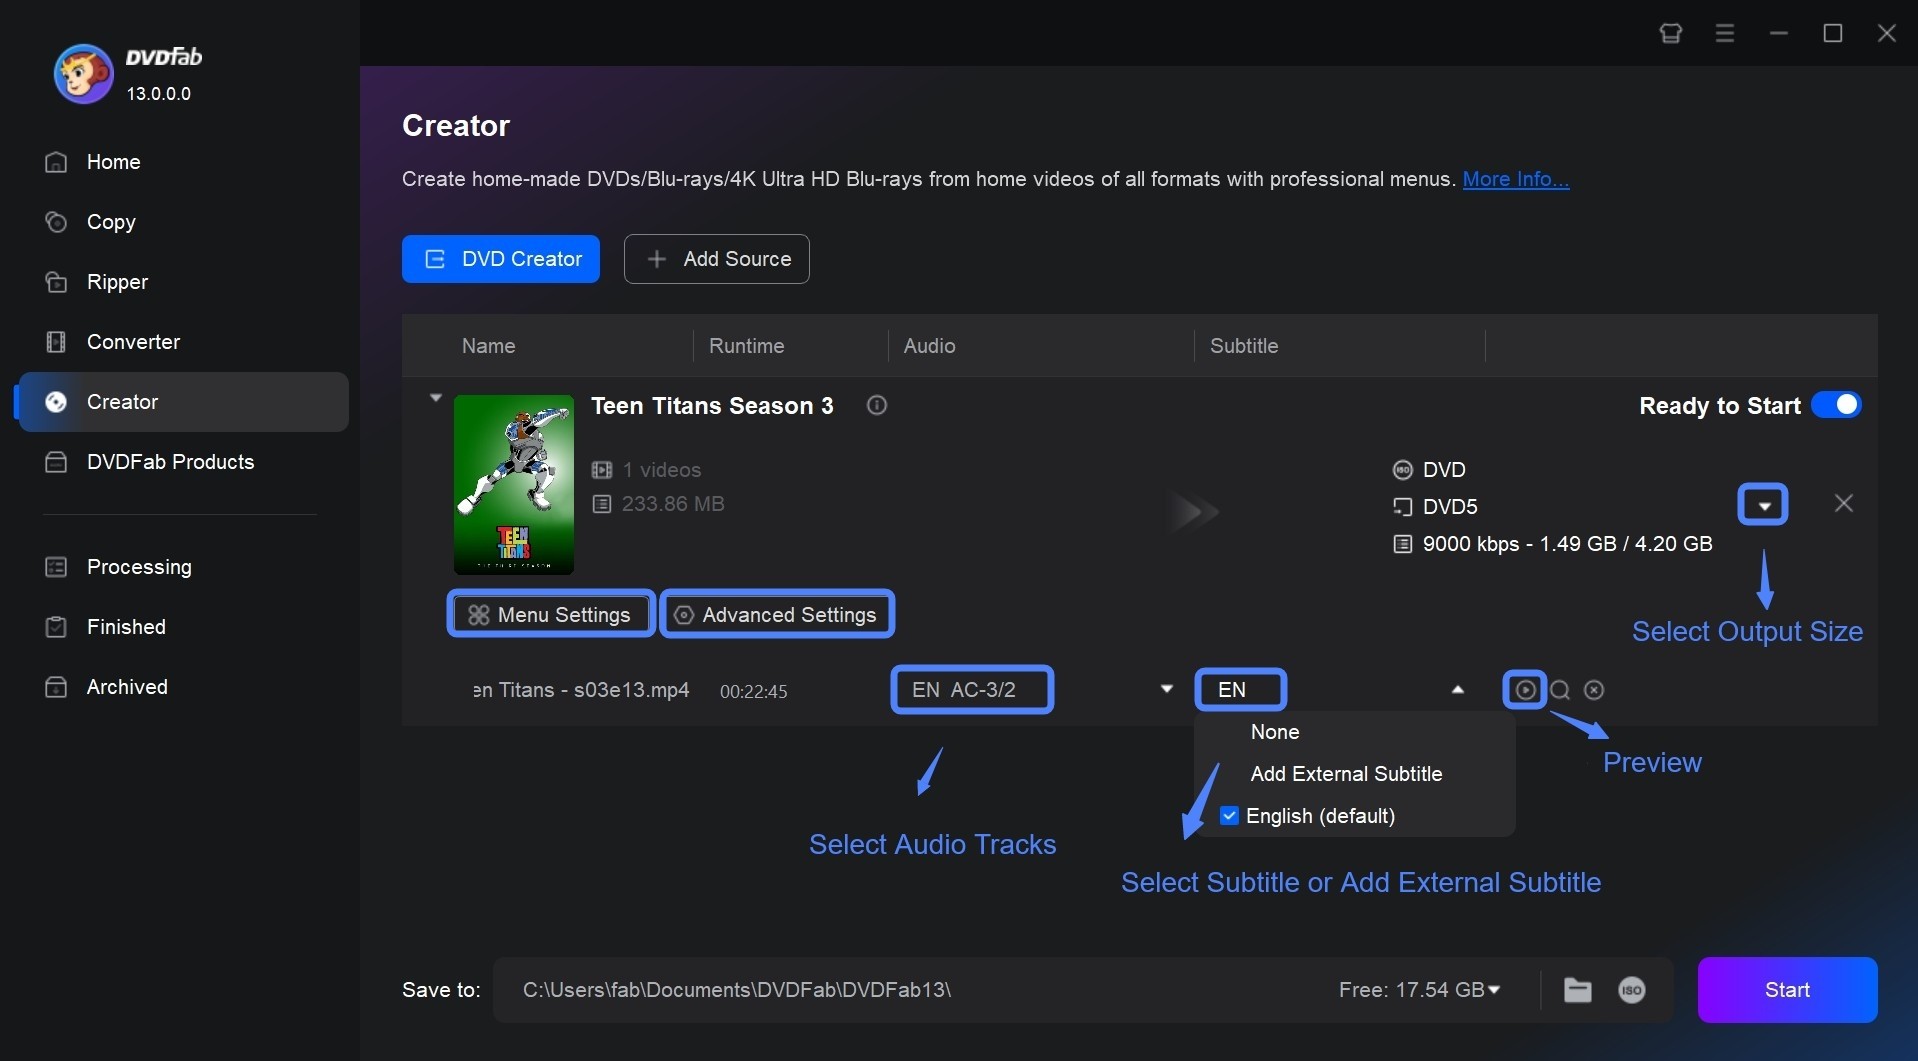
Step 4: To customize the output disc ISO file, go to 'Advanced Settings' and 'Menu Settings'.
Here you can make Advanced Settings, Menu Settings, choose audio tracks and subtitles. Click the Advanced Settings, you can set the volume label, output, and video quality. You can also choose Menu Properties and Playback Mode.
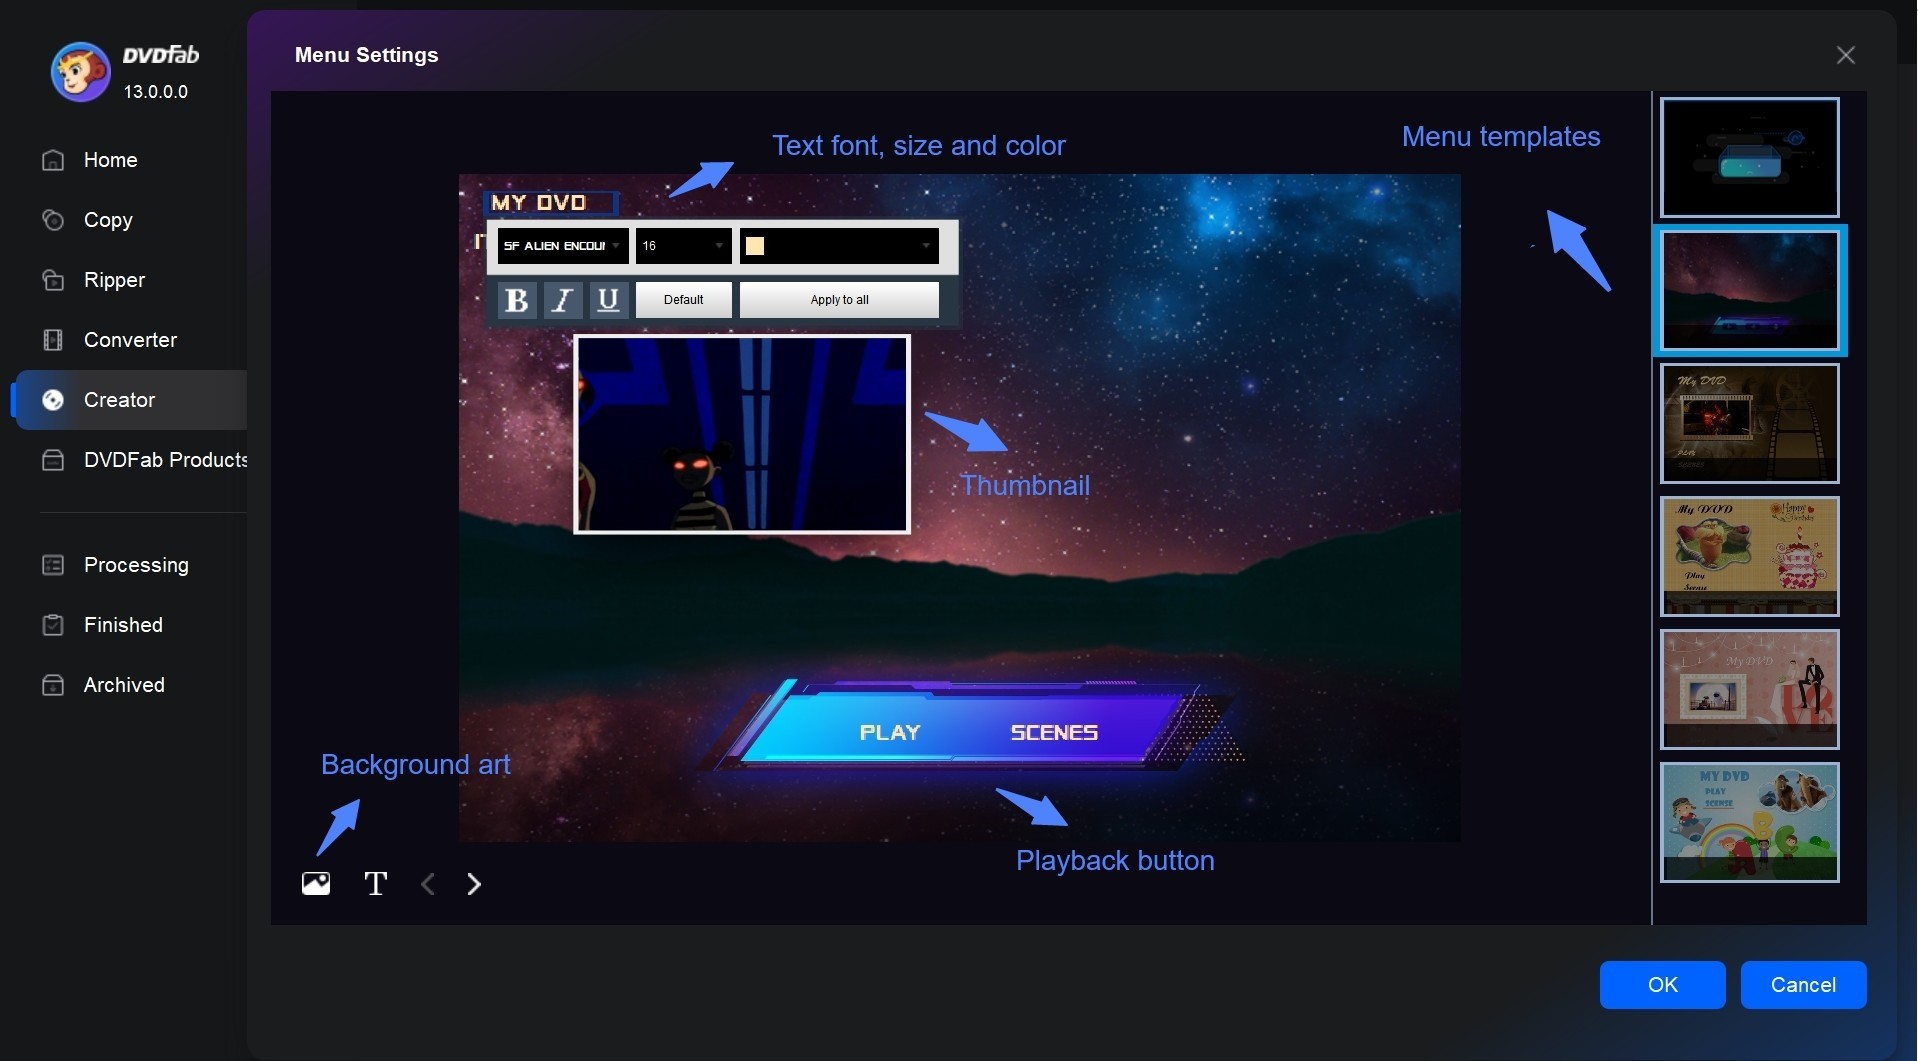
DVDFab also offers a built-in DVD menu creator that boasts menu designs on a wide range of subjects, like weddings, children, and balloons. Freely personalize all the elements and widgets inside the menu templates including background art, thumbnails, text font, color, and size, as well as playback buttons like Play/Pause and Previous/Next.
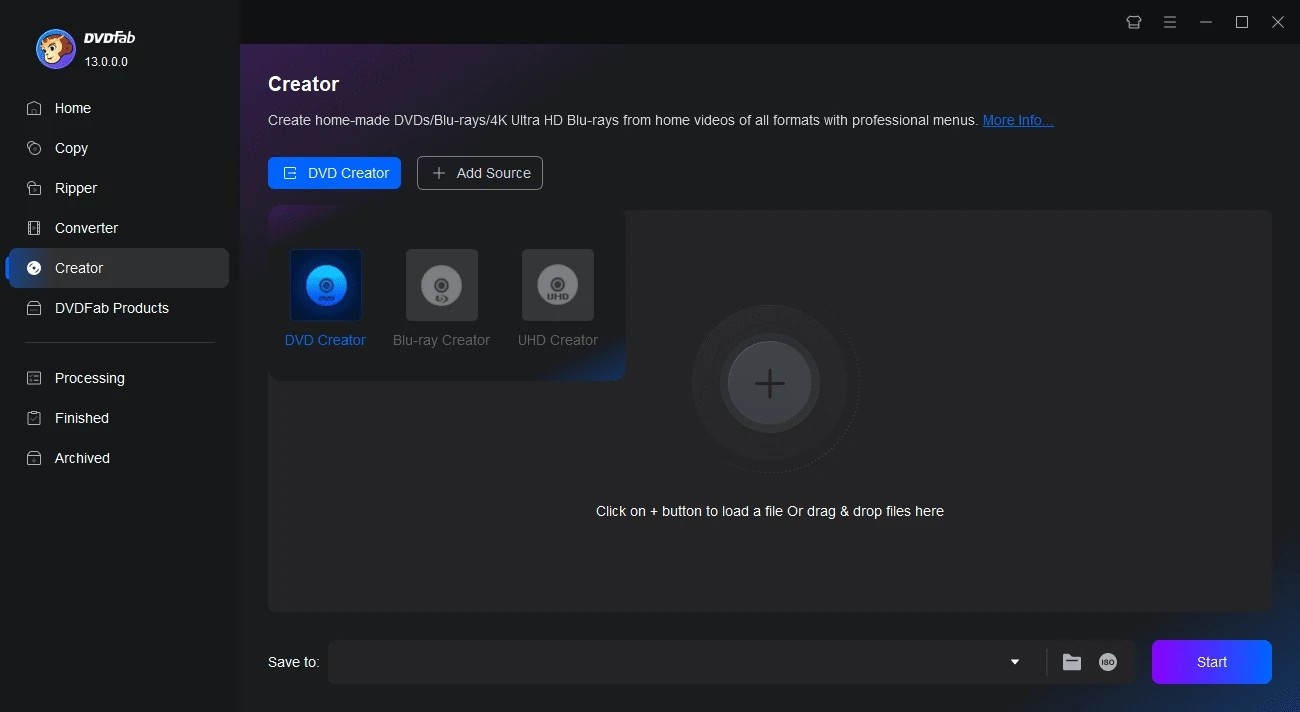
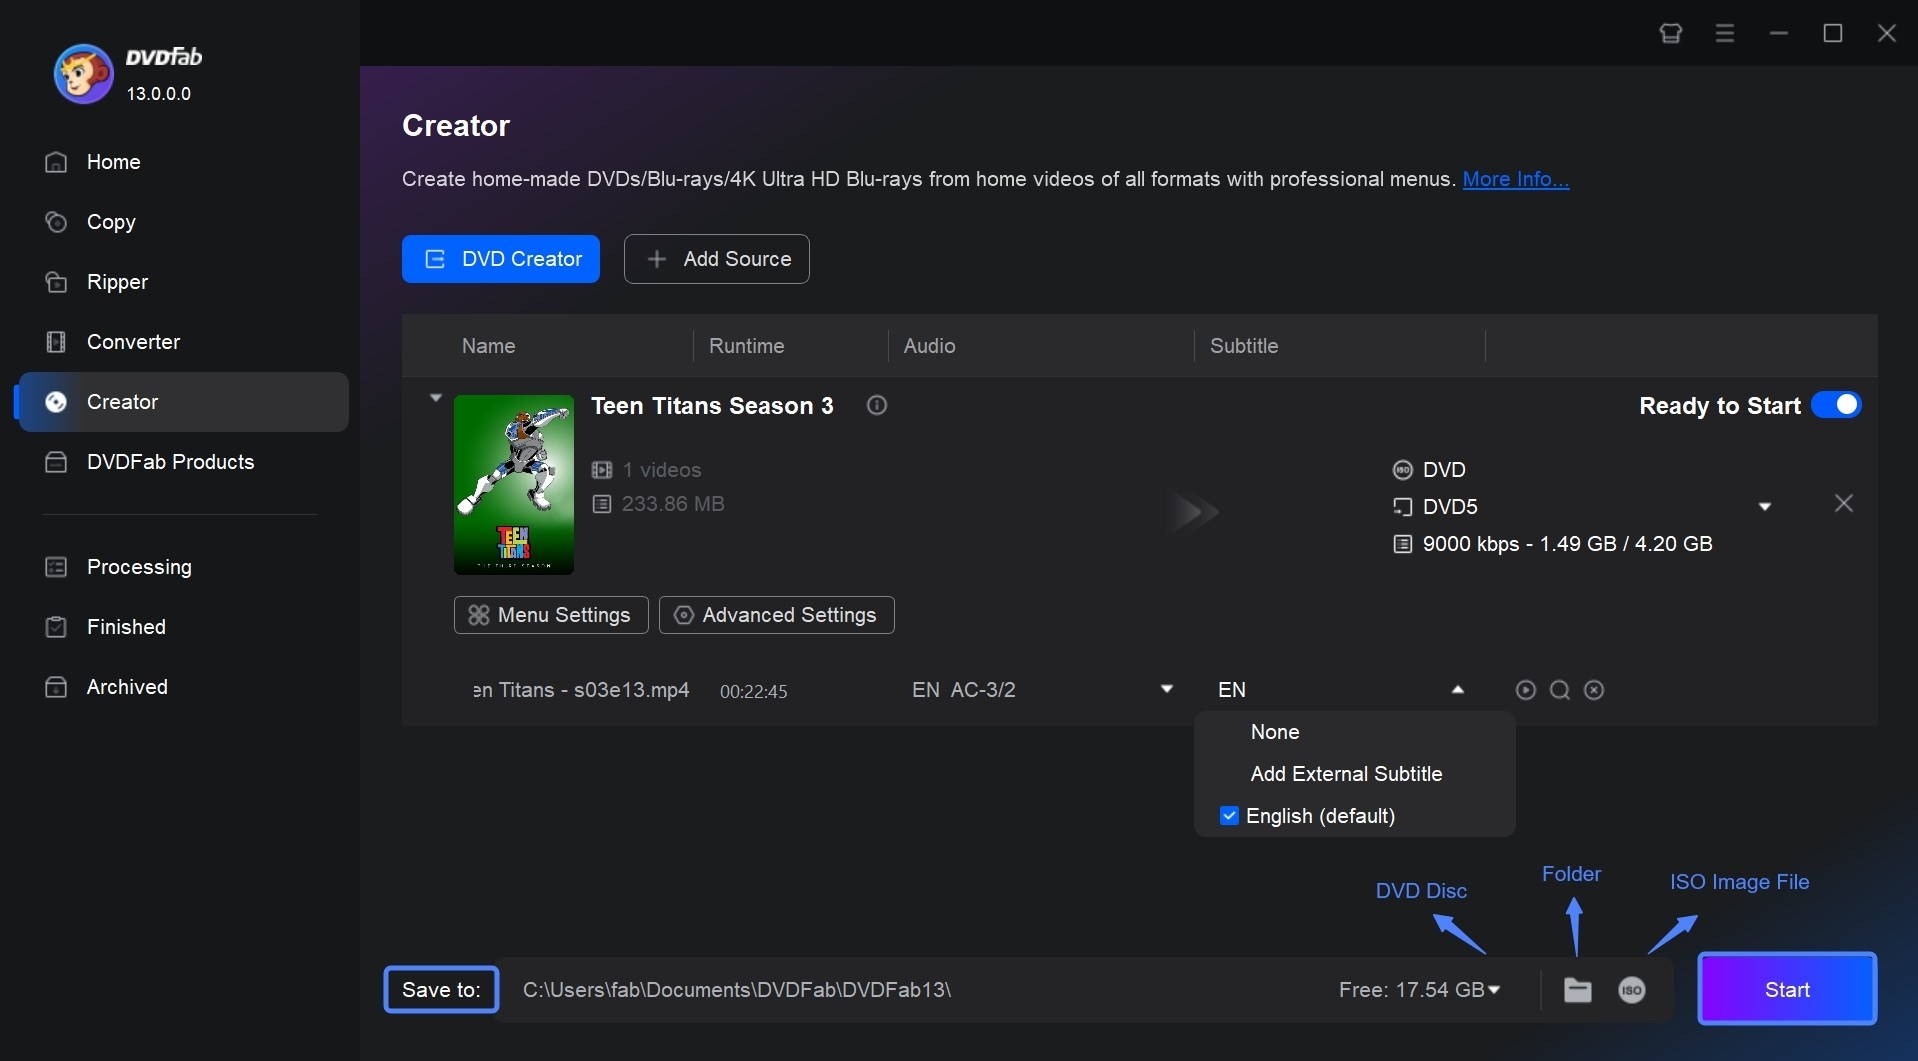
Step 5: Start to burn ISO files and transfer it to your USB
Since you are going to burn a disc ISO file, then you need to click the 'ISO' icon and choose your USB drive as the output location from the pop-up interface. Finally, click the 'Start' button to create a disc ISO image file for your desired USB flash drive.
Way 2: Burn ISO to USB Using Rufus on Windows
Rufus is a utility tool that helps to create bootable USB drives quickly and efficiently. It is particularly useful if you need to create USB installation media from bootable ISOs (Windows, Linux, etc), or you need to work on a system that doesn't have an OS installed, or you need to flash a BIOS or other firmware from DOS.
How to Create Bootable USB from ISO with Rufus
Step 1: Go to the Rufus official website and download the latest version of the software. Install it on your Windows machine.
Step 2: Insert your USB flash drive into your computer. Make sure that it has enough capacity to hold the ISO file that you want to burn.
Step 3: Open the Rufus program that you installed. It will automatically detect the USB flash drive that you inserted. Then, click on the 'Select' button and a window will pop-up prompting you to locate the ISO file that you want to burn. Navigate to the ISO file, select it, and then click on 'Open'.
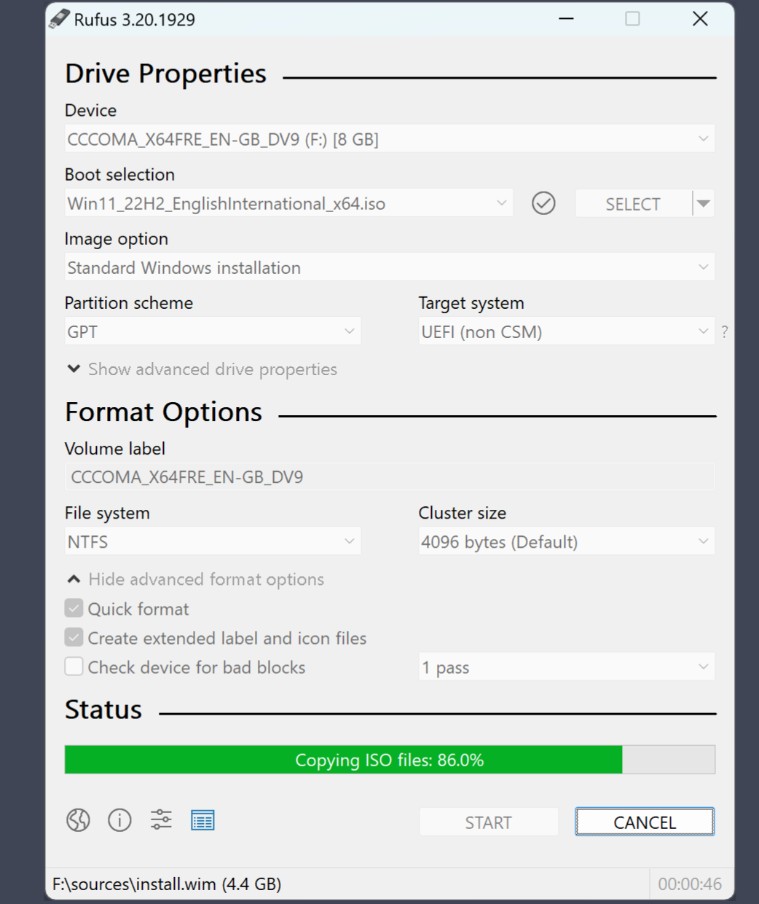
Step 4: Choose MBR or GPT partition scheme according to your system (legacy BIOS or UEFI). Also, select the target system type. Check the format options to ensure everything is correct. Typically, FAT32 would be the default option for the file system. Keep the default settings unless you have a specific reason to change them.
Step 5: Click 'Start' to begin the burning process. A warning will pop up, warning you that all data on the USB drive will be destroyed. Make sure you have backed up any important data before proceeding.
💡Rufus will format your USB and create a bootable device. This process may take a few minutes. Once completed, a message will pop up, indicating that the USB is ready to use.
Way 3: Burn ISO to USB with Terminal on Mac
Burning an ISO to a USB on Mac using Terminal is a process in which a bootable or playable copy of the data from the ISO file is made on a USB stick. This method can be quite technical and intimidating for novices, but it is a very fast and efficient ISO converter to burn an ISO file to a USB on a Mac.
How to Create Bootable USB from ISO with Terminal
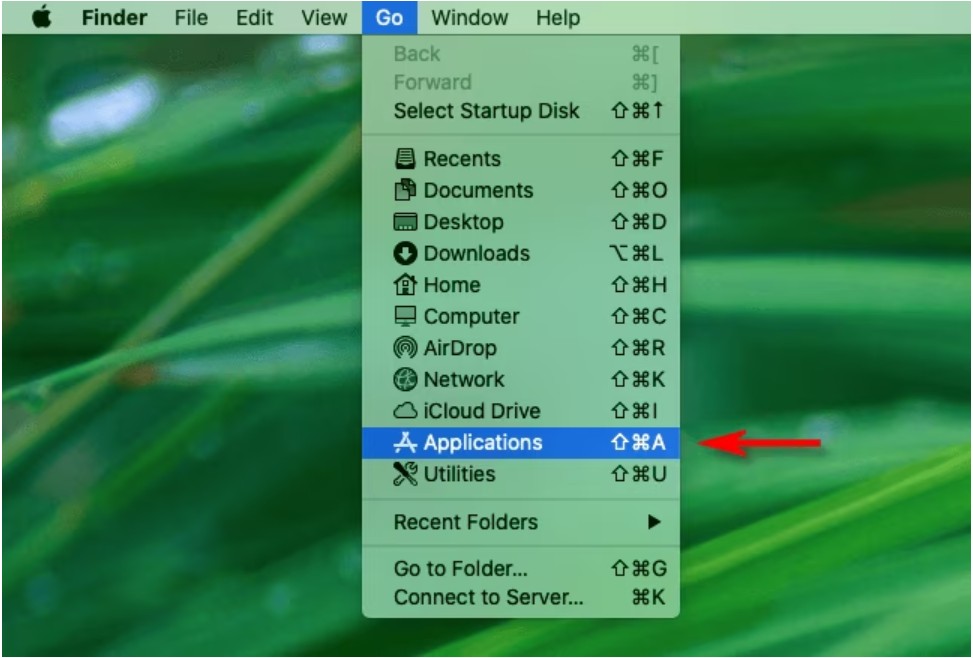
Step 1: Open Terminal. You can do this by going to Applications > Utilities > Terminal. Connect the USB device to your Mac computer.
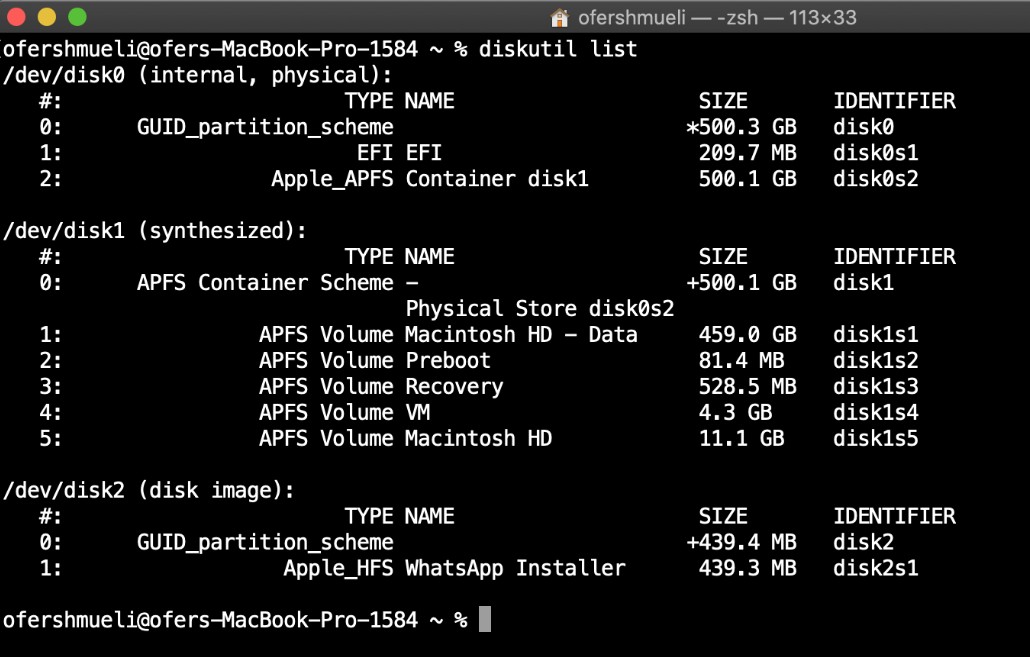
Step 2: In Terminal, type in the following command without hitting enter: 'diskutil list’. This command gives a list of all the disks currently connected to your MAC. Identify your USB stick, typically referred as /dev/disk and the number, like /dev/disk2.
Step 3: Input the following command into Terminal to unmount the USB stick: 'diskutil unmountDisk /dev/disk[n]’, where '[n]' is the number from the last step. For example, if your USB was /dev/disk2, the command will be 'diskutil unmountDisk /dev/disk2'.
Step 4: Now, you can write the ISO file to the USB stick. Use the following command: 'sudo dd if=path/to/isofile.iso of=/dev/rdisk[n] bs=1m', where '[n]' is the number identified in step 3 and 'path/to/isofile.iso' is the location of your ISO file.
Note: Be cautious while using 'dd' command, as misusing it could result in losing data.
Step 5: Release the ISO file from the system using this command: 'diskutil eject /dev/disk[n]' where '[n]' is the number from step 3.
💡Please note, this process requires significant care as any command executed in Terminal can overwrite any disk. Make sure you double-check every step to avoid data loss.
Way 4: Burn ISO to USB on Linux (Ubuntu)
Creating a bootable USB stick from ISO on Ubuntu involves a simple process where you will need to use Ubuntu's built-in Startup Disk Creator or you can use UNetbootin, a third-party tool. This process essentially accomplishes two tasks: format your USB drive and install ISO file on it. After this operation, your USB stick will be bootable and ready to install Ubuntu on any computer.
How to Create Bootable USB from ISO on Ubuntu
Step 1: First, you'll need to download the Ubuntu ISO file from the official Ubuntu website. Depending upon your requirements and current PC architecture, you can either choose Ubuntu desktop or Ubuntu Server.
Step 2: Now, plug in your USB stick into the computer, get it ready to configure it as a bootable Ubuntu USB stick.
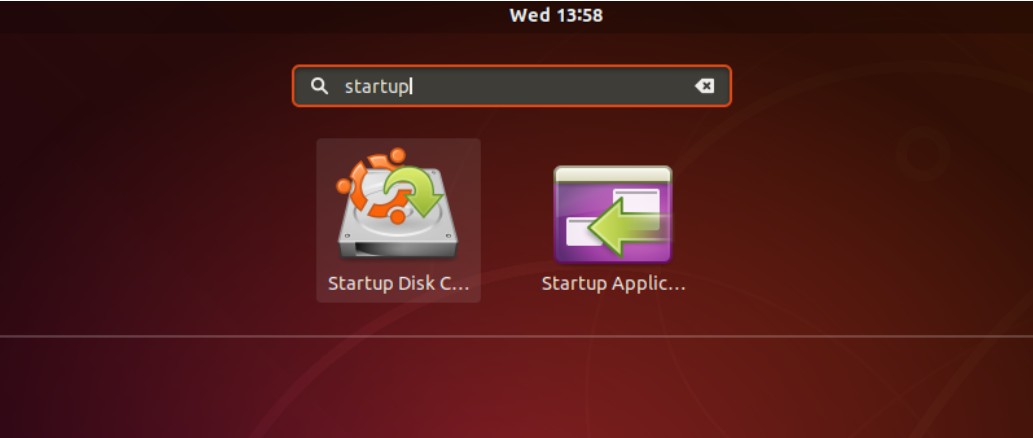
Step 3: In your applications, search for "Startup Disk Creator" and open it.
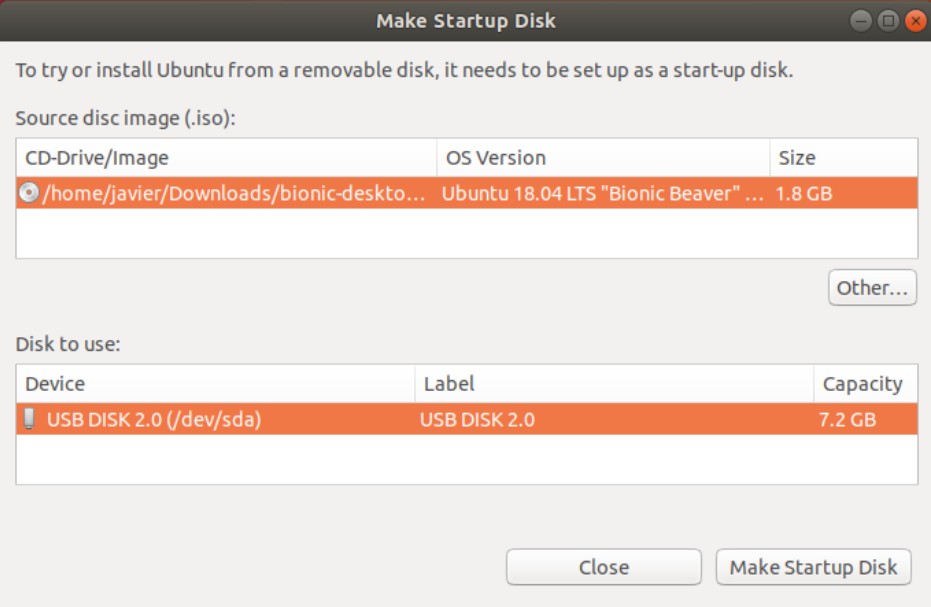
Step 4: In the Disk Creator window, select the " source disk image " and your " disk to use ". The source disk image will be your downloaded Ubuntu ISO file, and the disk to use will be your USB stick which you have already inserted.
Step 5: Before turning your USB into a bootable device, you'll need to erase all the previous data. Click on "Erase Disk". Be sure that you've backed up all your data on the USB Stick before using this function.
Step 6: Now, click on "Make Startup Disk". You'll be asked for your password, enter it. Now Startup Disk Creator will start creating a bootable USB stick.
Once the process completes, you can safely remove your USB stick from the computer. Now it is ready to use.
Way 5: Burn ISO to USB with Windows USB/DVD Download Tool
Windows USB/DVD Download utility is an excellent option for burning ISO/DVD to USB bootable for Windows OS installation. There are two ways to get Windows from the Microsoft Store: a compressed data archive or an ISO image. An ISO file is a single uncompressed file that contains all of the Windows’s installation files.
Using the Windows ISO to USB/DVD Download Tool, you may make a bootable file from an ISO image of Windows by copying the ISO image to your disc. After that, you can use your USB or DVD drive to put Windows on your machine.
How to Burn ISO to USB with Windows USB/DVD Download Tool
To use the Windows USB/DVD Download Tool to write ISO to USB, follow the procedures listed below:
Step 1: At first, you should download and install the Windows USB/DVD Download Tool on your PC.
Step 2: Click on the Windows USB/DVD Download Tool by hitting the Windows START button and selecting Windows USB/DVD download tool from the All-Programs list.
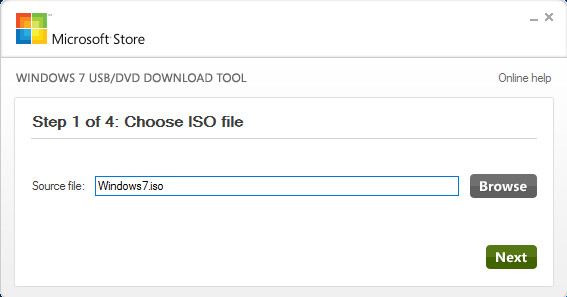
Step 3: Select your Windows ISO file in the SOURCE FILE box, or input the name and location of the file and click BROWSE. Select NEXT.
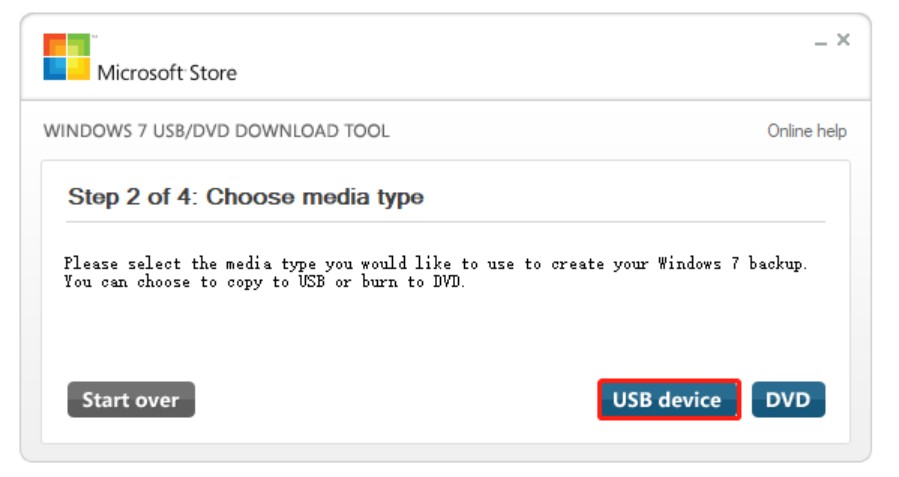
Step 4: Create a file duplicate by selecting USB DEVICE or DVD DEVICE from the drop-down menu.
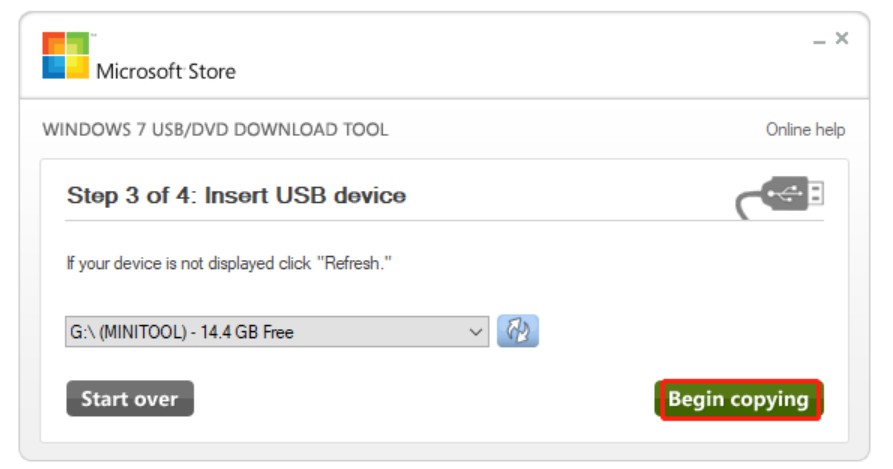
Step 5: To begin transferring the file to a USB flash drive, pick your USB device from the drop-down list and click the corresponding button. Click BEGIN COPYING if you want to burn the file to a DVD.
💡When your Windows ISO file has been copied to your DVD or USB device, double-click Setup.exe to begin the installation process; hopefully, these easiest steps to burn ISO to USB windows 10 will help you.
Conclusion
Transferring an ISO file to a USB drive is a useful way to keep your data safe and portable. This guide has provided step-by-step instructions on how to transfer an ISO file to a USB drive. Choose DVD Creator software if you wish to create an ISO image file from video files that can be stored on a USB stick. Try the Windows USB/DVD Download Tool to build a bootable system image file.
 Can Wii Play DVDs? Best Methods to Watch DVD on Your Wii!
Can Wii play DVDs? This is probably the most frequent question asked by Nintendo Wii lovers. And you might be disappointed to find out that the answer is No. But thanks to the advancement of technology, you can play DVDs on a Wii as long as you get the right method.
 How to Solve "No Valid Sources are Available for this Video" Error
If you are facing errors like No Valid sources are available for this video android or any similar errors, this means you are having trouble loading your videos. This article will give you all the information regarding the reason behind this error and the best ways to fix it.
 Explore the Most Popular Sites for MP4 Movies Download 2025
Feeling difficult to figure out the most suitable website or tool? This article teaches you how to achieve HD MP4 movie downloads and shows the top sites designed to download MP4 movies easily. Read on to know more.
 Can Blu-ray Players Play 4K Ultra HD?
Can I play 4K movies on my Blu-ray player? If you are wondering "Can Blu-ray plays 4K" and "Will 4K Blu-ray play on a regular Blu-ray player", you are on the right page! This post offers the optimal solution to watch your 4K movies on a standard Blu-ray player when you have no 4K Blu-ray player at hand. Read on for more details.