How to Burn a DVD on Windows & Mac: 2026 Tested Ways

Summary: How to burn a DVD for free depends on the type of disc you want to create. File Explorer on Windows or Finder on macOS can write a data DVD, but a DVD movie for a standard player requires authoring software, such as DVDFab DVD Creator, to create the VIDEO_TS structure. Use an ISO-burning or DVD-copying tool only when the source image already contains the complete disc structure. After burning, finalize the disc and test it in the target DVD player.
Table of Contents
Here's the short answer: dragging a video file onto a blank disc will not create a DVD that plays in a standard DVD player. A DVD-Video disc must be authored with a VIDEO_TS structure; a data disc simply stores files a computer can read. Pick the right one first, then the rest is straightforward.
I've burned enough discs (family footage, ISO backups, the occasional test disc that refused to play) to know where most people get stuck: they follow a data-disc tutorial expecting a movie disc, or they skip finalization and end up with a coaster. This guide walks through three paths — a playable movie DVD, a data DVD on Windows or Mac, and burning an ISO image — plus how to test the finished disc. Burn only content you own or are authorized to use, for personal, non-commercial purposes where permitted by applicable law.
Choose the Right DVD Burning Workflow
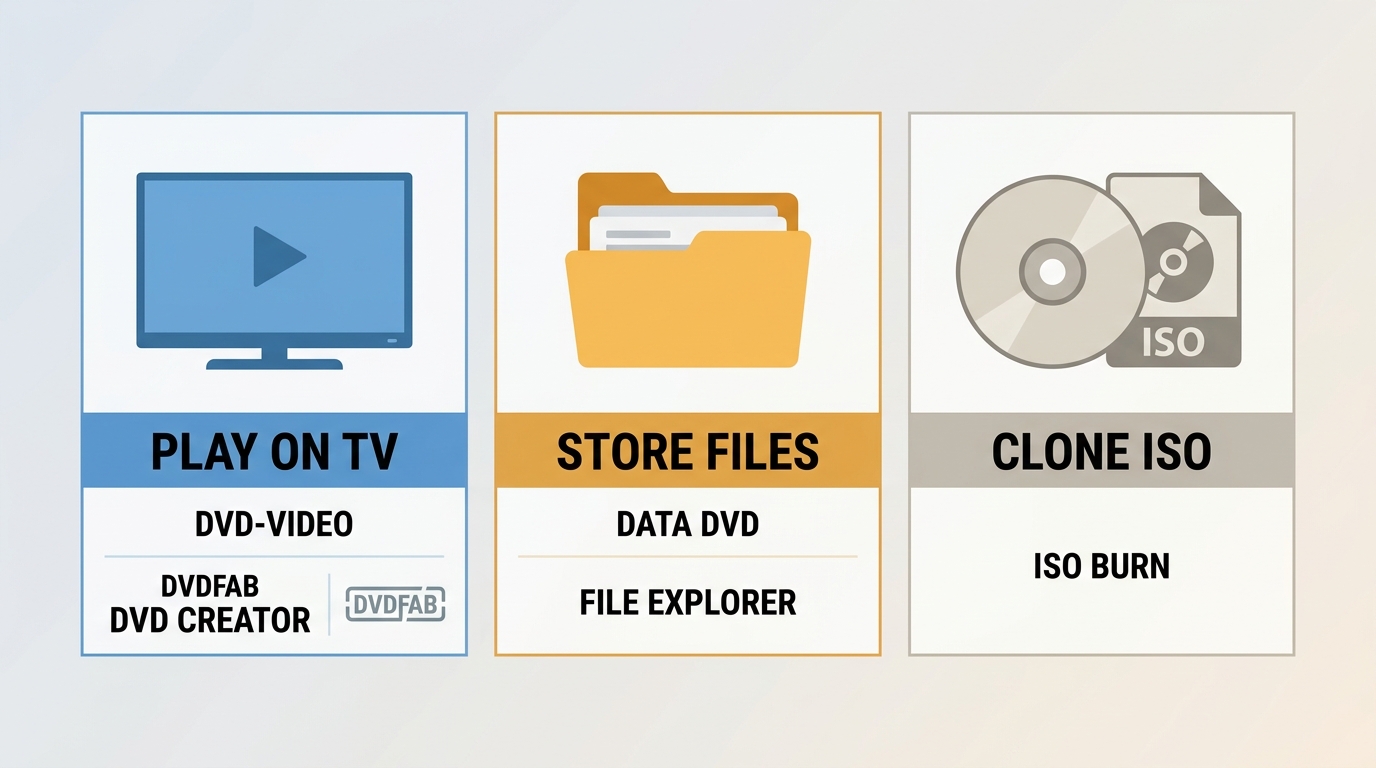
Before you insert a disc, decide which of the three outcomes you actually want — the workflow, the software, and the disc format all follow from that choice. Then confirm your hardware can actually write DVDs.
Computer with a DVD writer. Most current laptops ship without an internal optical drive, and even those that have one may only read discs. Check your drive's spec (in Windows Device Manager, or System Information on Mac) — the writer capability is labeled something like "DVD±RW." If your machine can only read discs, or has no drive at all, you'll need a compatible external USB DVD writer.
Blank DVD Discs. You clearly need blank media to write your files onto. Choosing the right disc type will save you time and effort, since you wouldn't want the burn to fail halfway because the disc is full. Here is how to choose based on capacity and reusability:
| Storage Capacity | Reusability | ||
| DVD-5 | 4.7GB around 120-133 minutes of video depending on compression | DVD±R | Single-write, non-erasable, best for permanent archiving and sharing. |
| DVD-9 | 8.5GB around 240 minutes of video depending on compression | DVD±RW | Re-writable, erasable, best for temporary archives or testing discs. |
A DVD Burner Drive. You might be asking, "How do I tell if my computer has a DVD burner?" Sadly, most modern computers no longer come with built-in DVD drives. You can purchase a compatible external or internal burner separately from retailers like Amazon or eBay. We suggest looking into models like the LG BP50NB40 for reliable performance.
DVD Burning Software. Windows and macOS include built-in tools for data discs, but neither can author a DVD-Video disc that plays on a standalone player. For that you need dedicated authoring software; for cloning an ISO you need a copy tool. The decision table below spells out which is which, and there are free DVD burners worth comparing if you want to survey your options first.
Burn a Data Disc, DVD-Video, or ISO?
The most common mistake I see is treating these three paths as interchangeable. They aren't — the output structure and the players that can read it are fundamentally different.
| Reader goal | Source files | Software type | Disc structure | Where it plays | Best fit |
|---|---|---|---|---|---|
| Data DVD | Any files (documents, photos, raw video) | Built-in (File Explorer / Finder) | Plain file system (UDF/ISO 9660) | Computers with an optical drive | File backup and transfer between computers |
| DVD-Video (playable movie) | MP4, MKV, MOV, AVI and similar video files | Dedicated authoring tool | VIDEO_TS folder with VOB, IFO, BUP files | Standalone DVD players and computers (compatibility varies) | Home videos, event discs, offline playback on a TV setup |
| ISO image burn | An existing .iso file or a complete VIDEO_TS folder | Disc copy / imaging tool | Whatever the image already contains | Depends on the source image | Cloning a disc you already own or restoring a backup image |
A properly authored DVD-Video disc is designed for standalone players, but real-world compatibility still depends on the player, disc media, video standard (NTSC in the US), and burn quality — no tool can promise it plays everywhere. If your want to burn vidoe to DVD for playback on a TV setup, use authoring software; if you just need to move files, the built-in tools are enough.
How to Burn a Playable Movie DVD
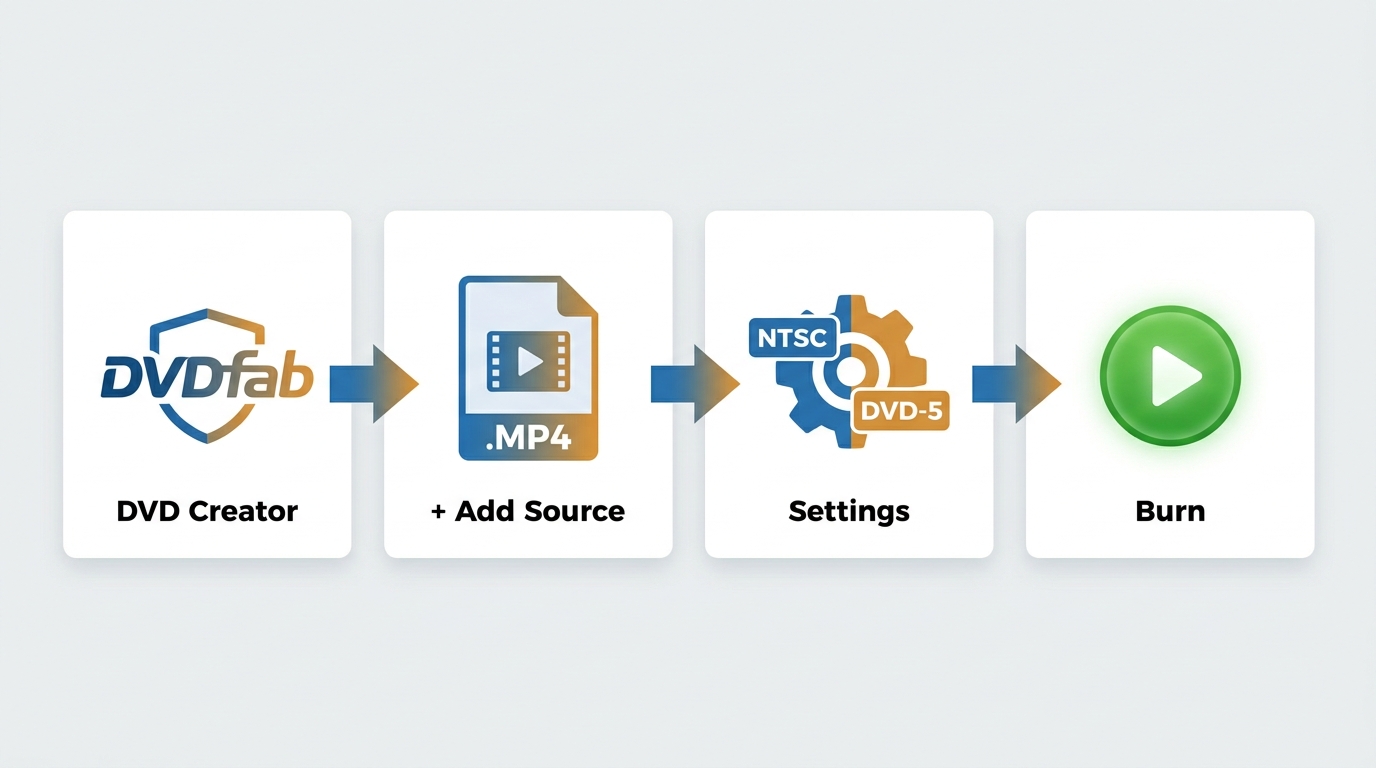
If your goal is a disc that plays in a set-top DVD player, this is the only path that gets you there — a video file, no matter the format, has to be re-encoded to MPEG-2 and packed into a VIDEO_TS structure. Built-in Windows and macOS tools cannot do this; you need a dedicated authoring app.
A few format decisions before you start: For US playback, author to NTSC unless the target player specifies otherwise. Pick DVD-5 (4.7 GB, roughly two hours at good quality) for shorter footage, or DVD-9 (8.5 GB) for longer runtimes where you don't want to squeeze the bitrate. My rule of thumb: pick compatibility over maximum compression — a slightly larger, cleaner encode is worth more than shaving a few hundred MB.
I use DVDFab DVD Creator for this because it handles DVD authoring, menu templates, and chapter creation in one program. It can burn multiple video files to a playable DVD or save the project as an ISO image or DVD folder. In my recent test on a Windows 11 computer, a 4.66 GB MP4 file was processed in about 14 minutes with GPU acceleration enabled. The menu created with the built-in Menu Creator also responded smoothly when I played the finished DVD on a standalone player.
Features:
- Burn MP4, MKV, AVI, MOV, FLV, and 200+ video formats to a playable DVD.
- Supports burning video files such as MP4 to ISO files, or folders, facilitating playback on both hardware and software players.
- Offers multiple themed, customizable menu templates for professional DVDs with navigation menus.
- Includes a video editor for cropping, trimming, watermarking, importing subtitles, adjusting brightness, and more.
- Supports custom chapter creation.
- GPU acceleration boosts burning speed while maintaining stability.
Supported OS:
Free Download Windows 11/10/8.1/8/7
Free Download macOS 10.13 - 15.x
Here's the workflow I use with DVDFab DVD Creator:
Step 1: Launch DVDFab and Enter the DVD Creator Module
1. Click the official secure download button above to download DVDFab 13 and follow the prompts to install it.
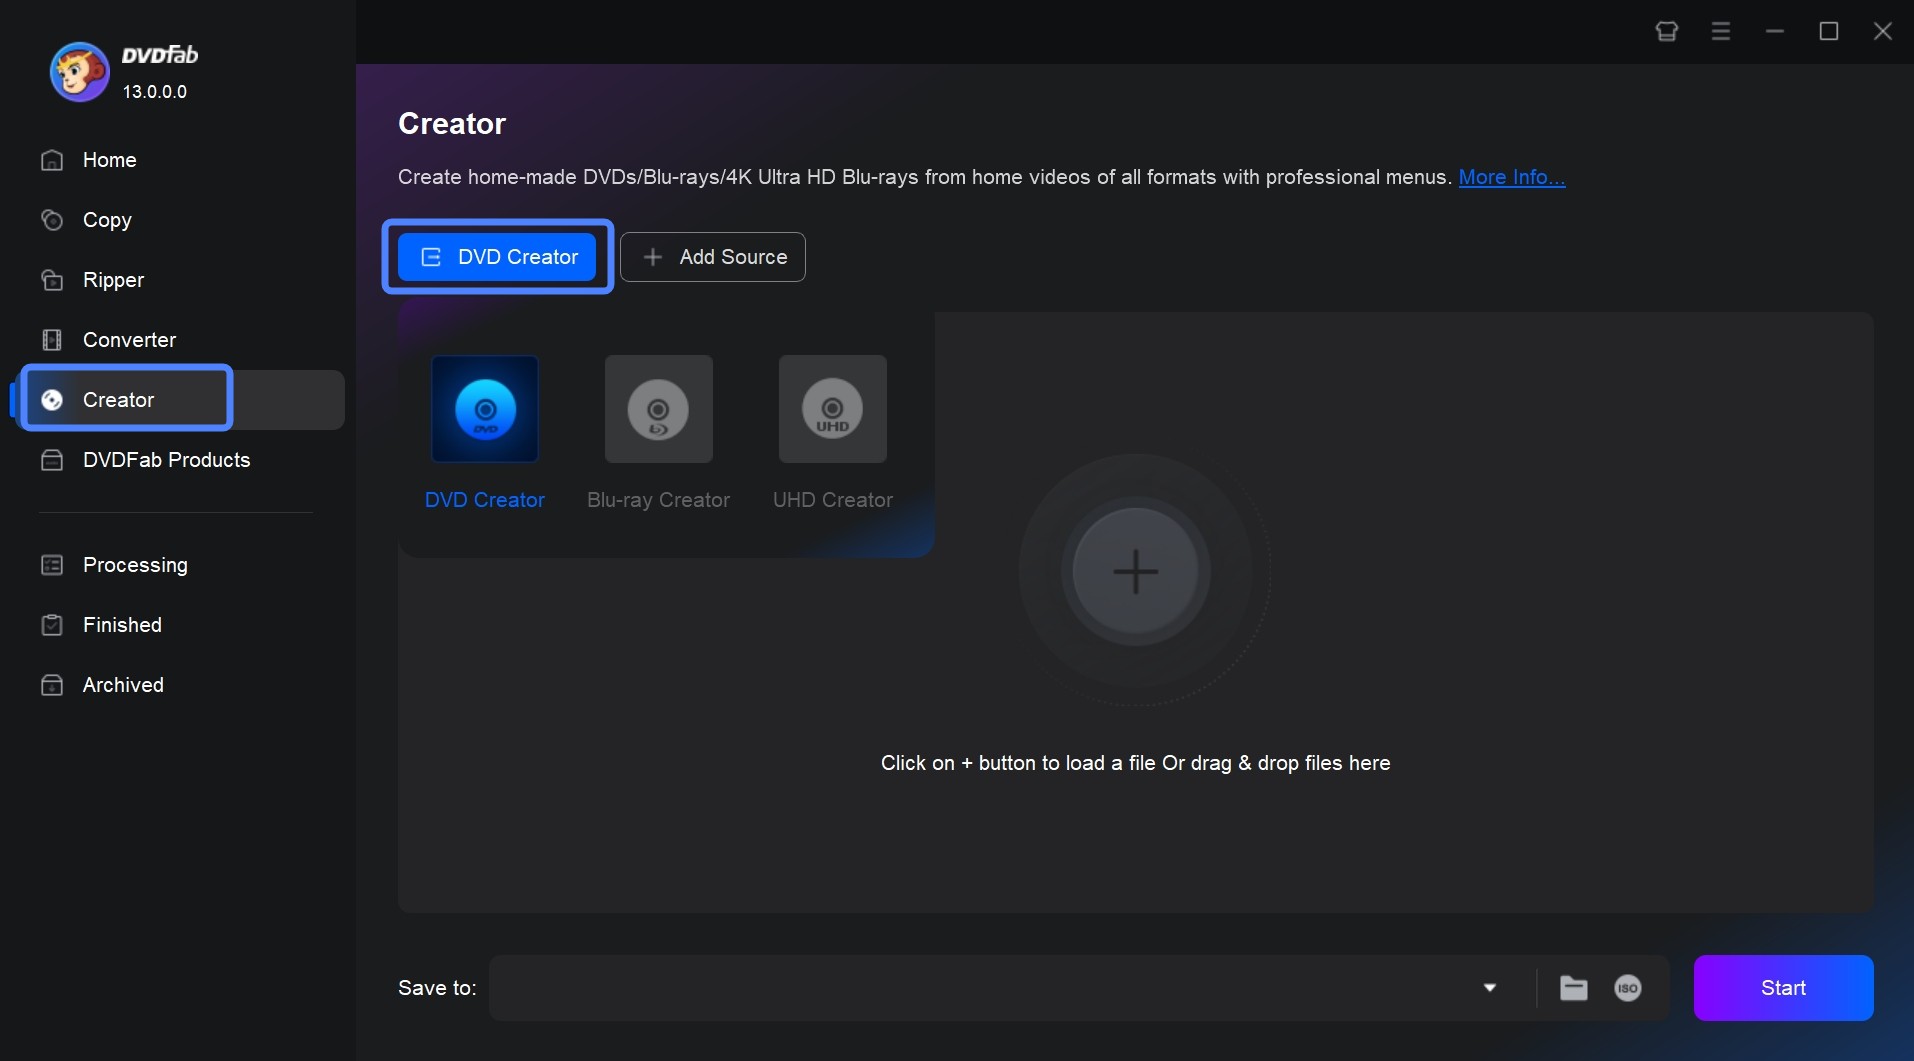
2. Launch DVDFab 13. In the left sidebar, select the Creator module.
3. Within the Creator module, switch to the DVD Creator feature.
Step 2: Import Video/Movie Files
1. Click "Add Source" in the interface to upload your video files from your local hard drive, or simply drag and drop your video files (such as MP4, MKV, AVI, MOV, etc.) directly into the center area of the program window.
2. Once imported, DVDFab will display your video information and the available functions for the next steps.
Step 3: Set Playback Options and Create a Menu
This step is really about matching the settings to how the disc will be used. For a single long video (say, a wedding recording you want to press Play and walk away from), skip the menu and set Playback Mode to "Play the first title" — that's autoplay. For a collection of clips or a family archive, keep the menu so viewers can jump around by chapter.
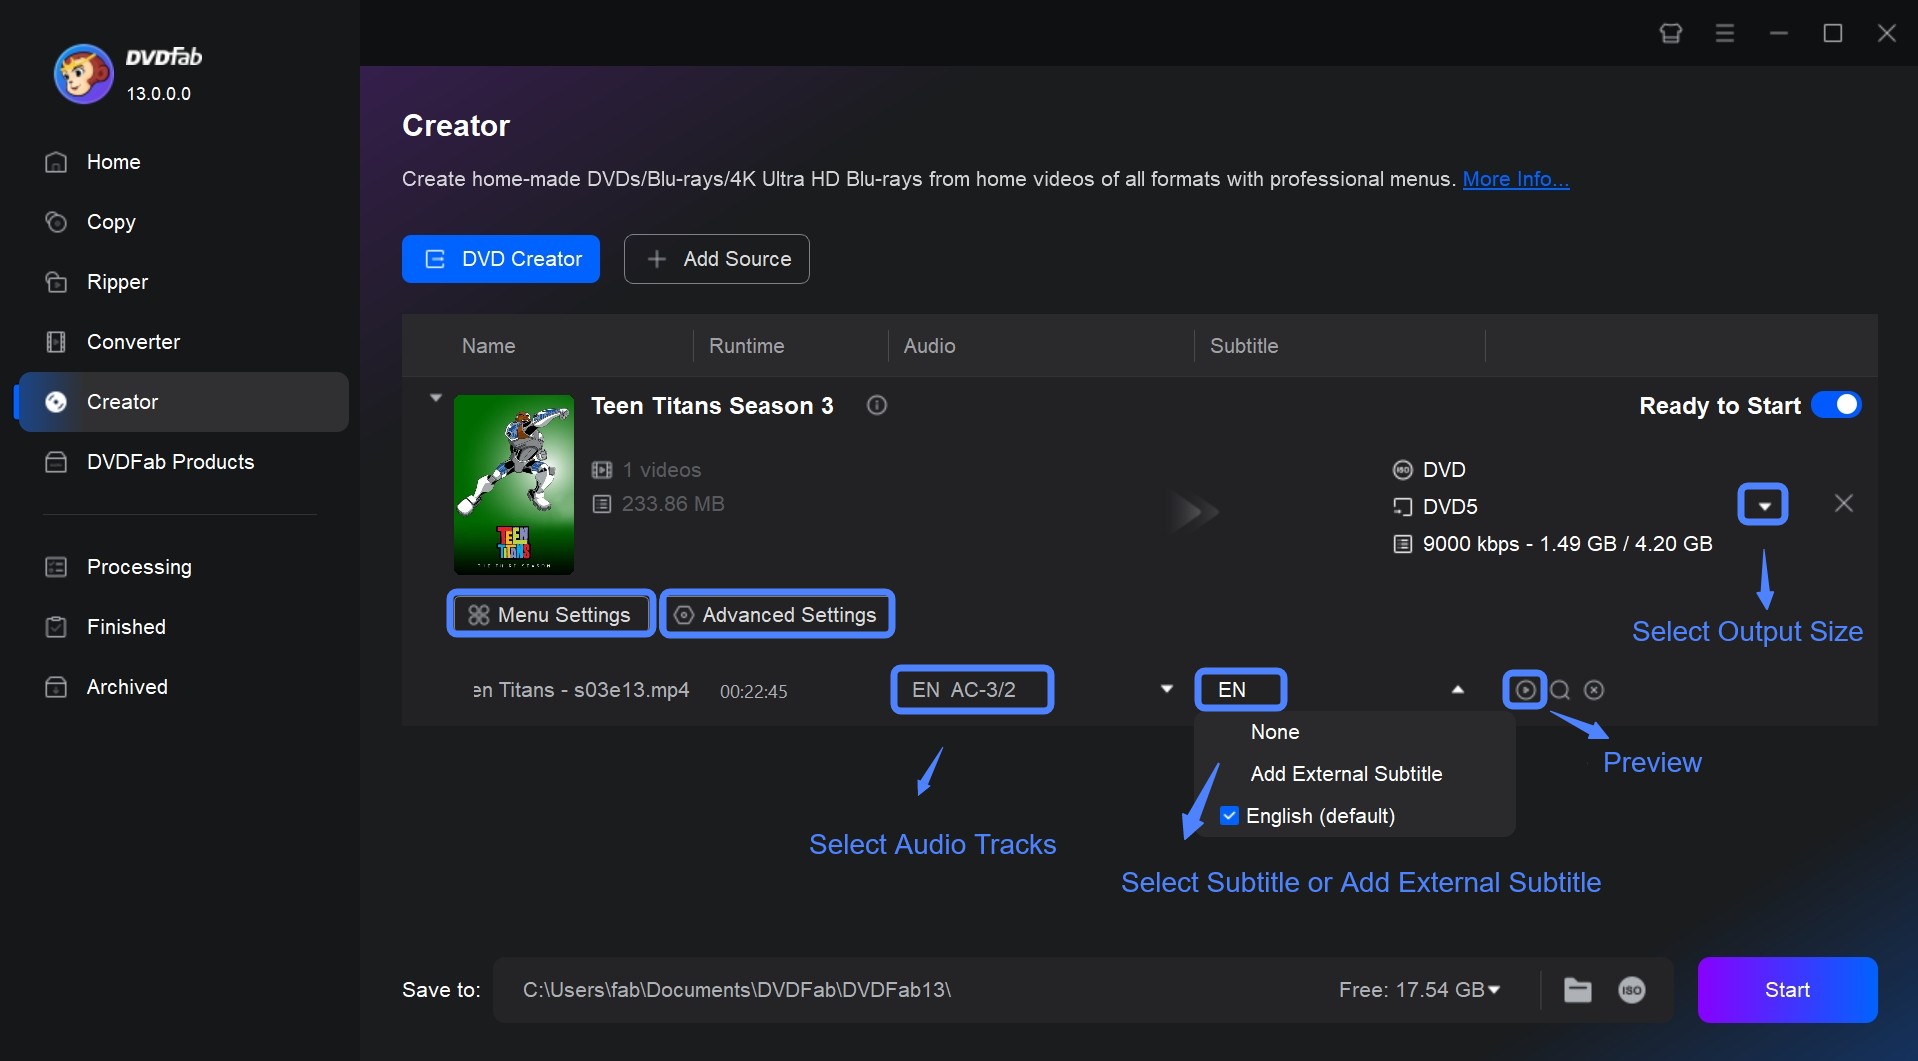
Advanced Settings: Set the Volume Label, Output Size (DVD-5 or DVD-9 based on runtime), Video Quality, television standard (NTSC for US playback, PAL elsewhere), Aspect Ratio (16:9 for widescreen, 4:3 for older 4:3 footage), and Playback Mode. Click OK to return.
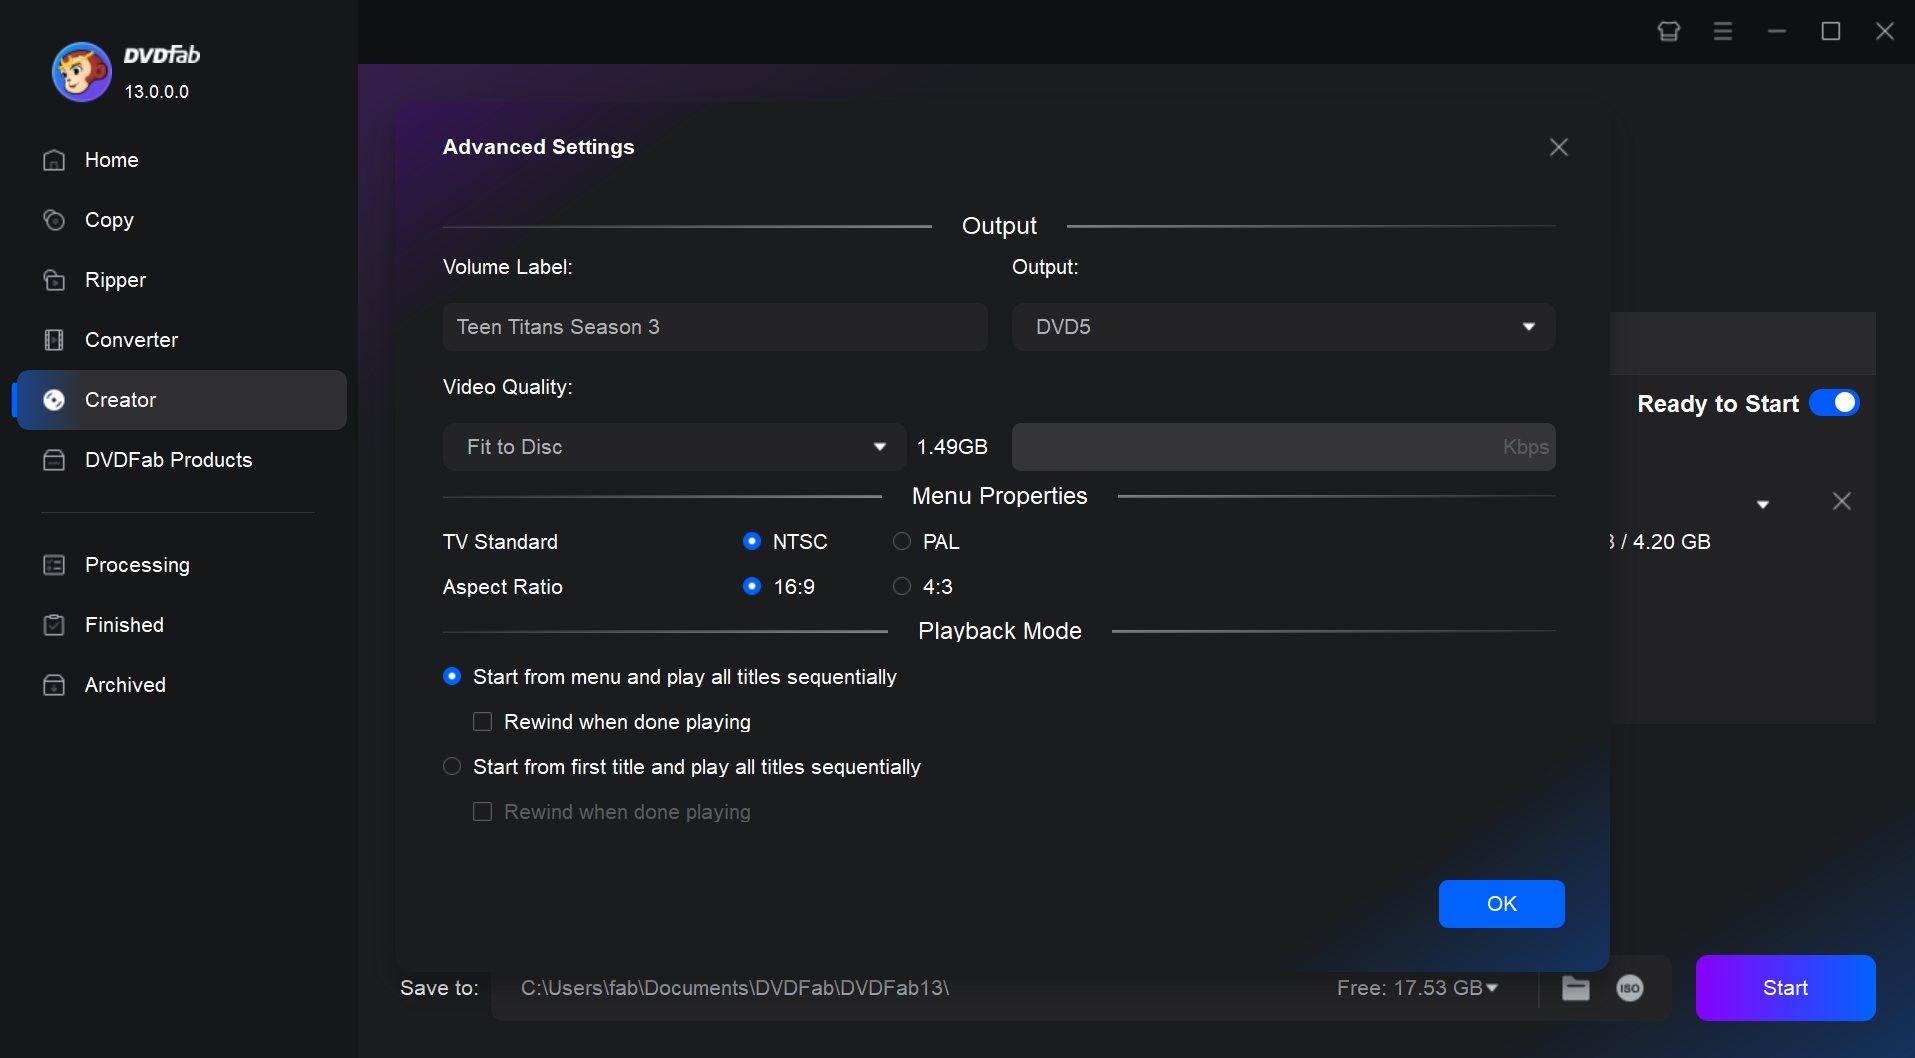
Menu Settings: Pick a template that matches the disc's purpose (standard, holiday, wedding, and similar themes are built in), then customize the background image, button text, and widget styles as needed. Click OK to return. Skip this section entirely if you chose autoplay above.
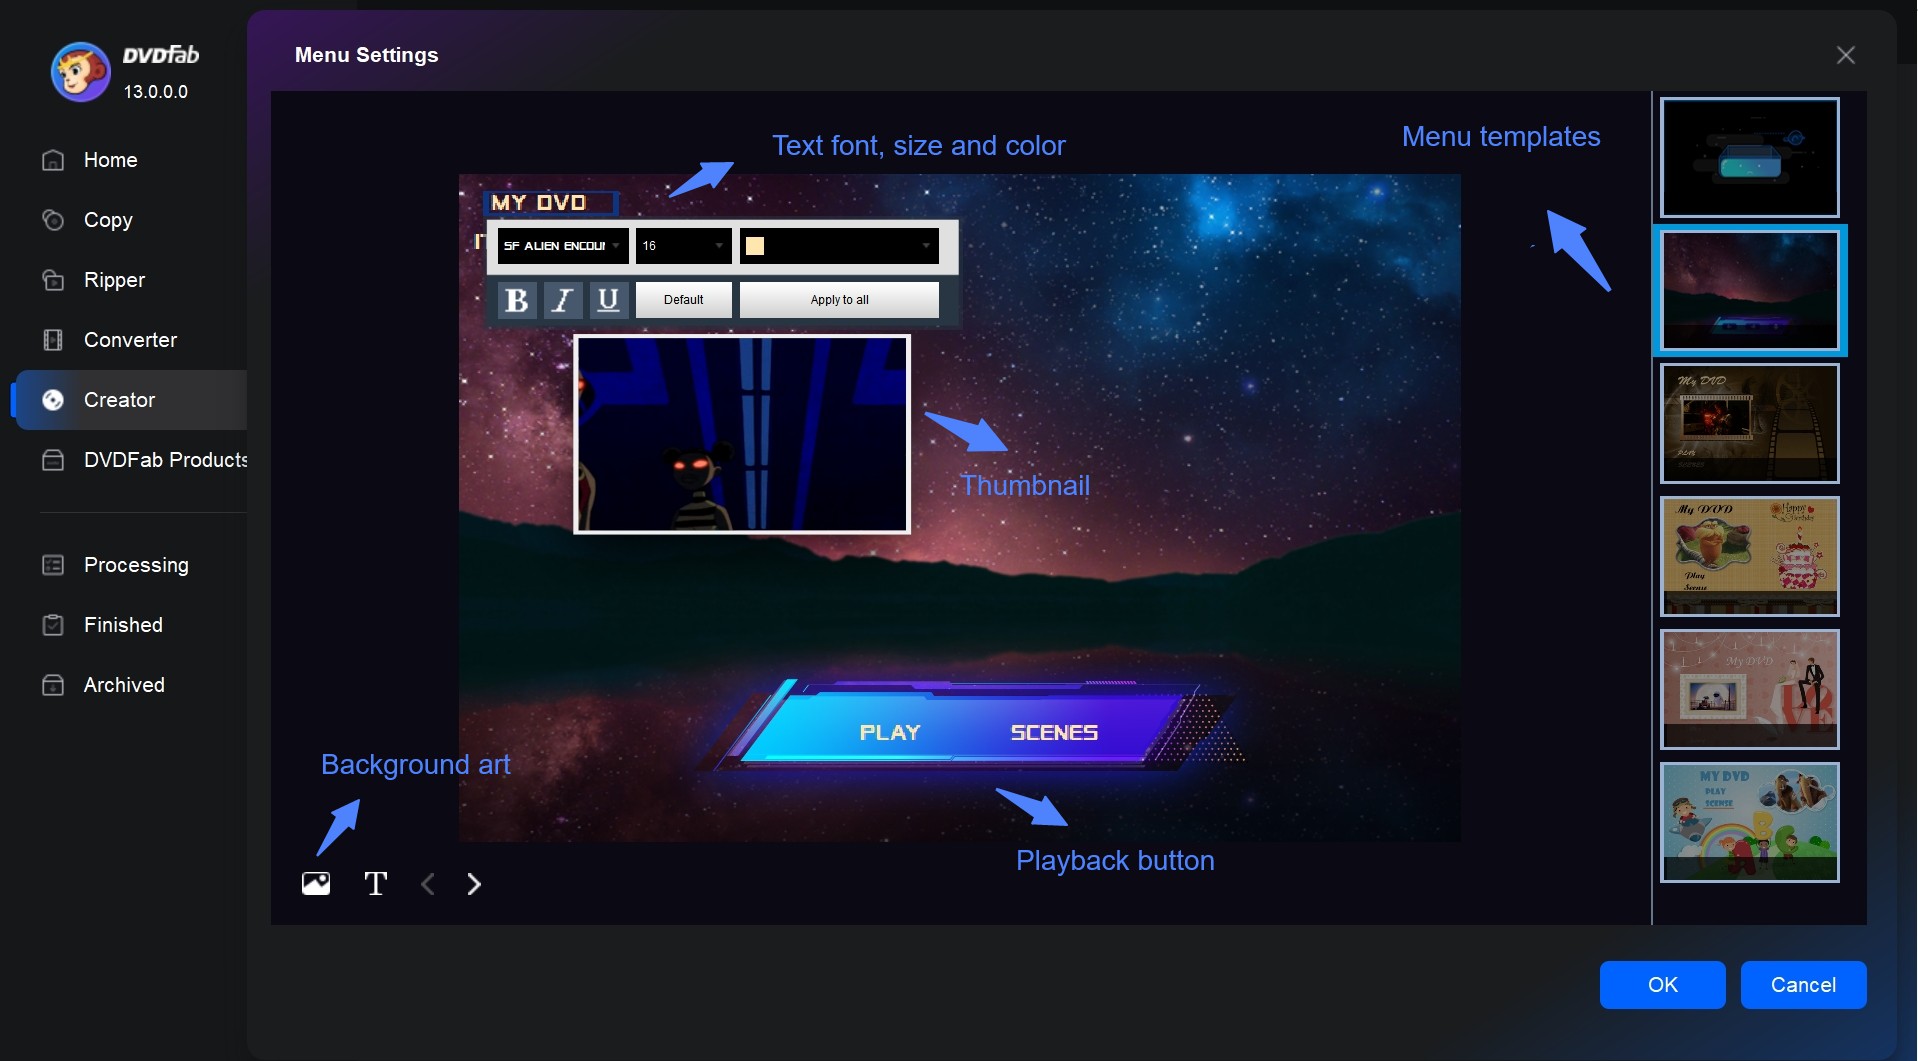
Subtitle Tracks: Open the subtitle track menu. Select the subtitle tracks you want to keep. If you want to add an external subtitle file, click "Add External Subtitles" and upload the SRT file.
Audio Tracks: Open the audio track menu and select the audio tracks you want to keep.
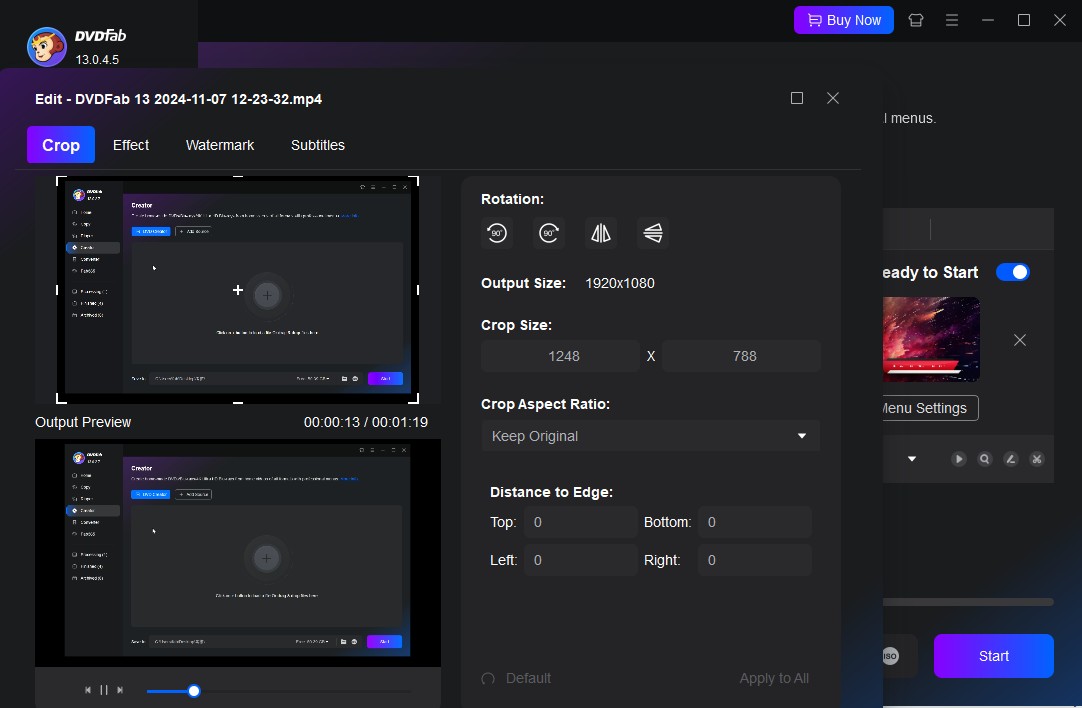
Video Editing: Click the "Video Edit" or "Trim" module. In the pop-up window, you can edit the video by cropping, rotating, trimming, adding watermarks and filters, adjusting color tone, designing subtitles, and customizing chapters. After editing, click OK to return to the main interface.
Step 4: Burn the Disc
1. Insert a blank DVD±R (single-use) or DVD±RW (rewritable) and select your DVD burner in the "Save to" bar. To output an ISO or folder instead of writing a physical disc, click the matching icon in the same bar and choose a save path.
2. Click Start. GPU acceleration (CUDA, AMD, Intel Quick Sync, or Apple VideoToolbox) kicks in automatically when your hardware supports it.
3. When the burn completes, don't just eject and file the disc away — head to the Finalize and Test section below and confirm it actually plays in the target player before you consider the job done.
How to Burn a Data DVD in Windows
File Explorer handles data discs on Windows 11, 10, 8, and 7 with essentially the same flow. The version-specific quirks (AutoPlay dialogs, driver differences on older builds) are worth checking against the dedicated Windows 10 disc burning walkthrough if you hit a wall. Remember: this creates a data disc only — a computer can read the files, but a DVD player will not.
Step 1: Insert the Disc and Choose the Burning Method
1. Insert the blank DVD into your computer's DVD drive. After insertion, Windows usually pops up an "AutoPlay" window. If it doesn't, open File Explorer.
2. In "This PC" (Windows 11/10/8) or "Computer" (Windows 7), locate and double-click your DVD drive icon.
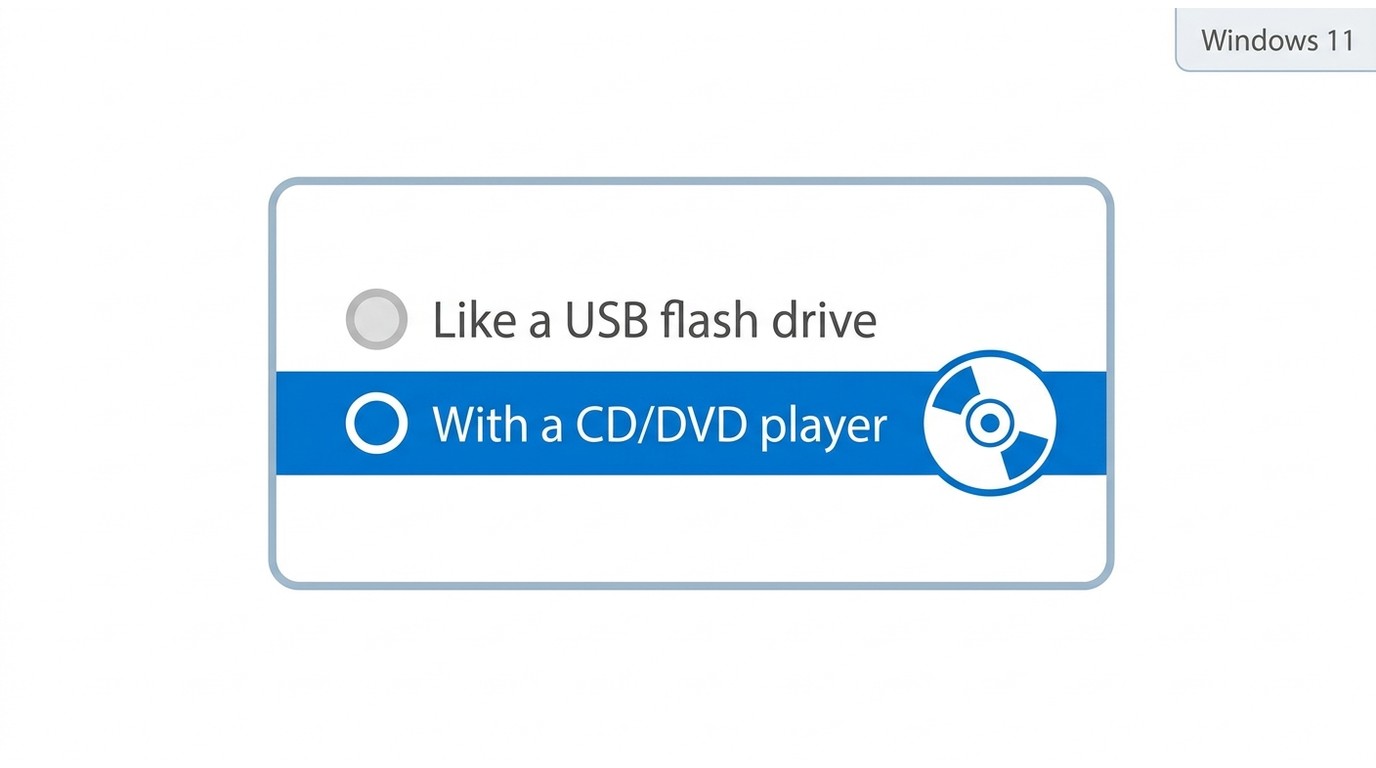
3. A dialog box named Burn a Disc will pop up, asking you to choose how you want to use the disc.
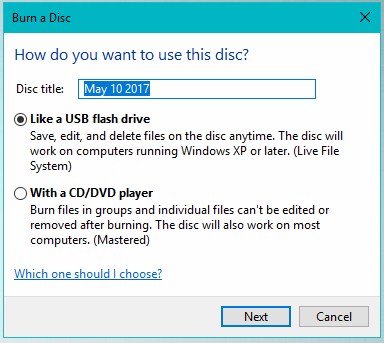
Option a: Like a USB flash drive
- This allows you to drag and drop files onto the disc multiple times, like a flash drive.
- Feature: This method has poor compatibility and may not be readable on other (especially older) computers. It will allow you to rewrite the disc, even if it isn't a rewriteable disc, but it will only work in Windows.
Option b: With a CD/DVD player
- You need to prepare all files at once and burn them together. Once burned, the disc is "Finalized" and no more files can be added.
- Feature: Excellent compatibility, readable by virtually all computers.
For data backup reliability and maximum compatibility, choose With a CD/DVD player. But do not be fooled by the name. Your final disc will still not play in a video DVD player. This is strictly a data disc.
4. After making your choice, click "Next".
Step 2: Add the Files You Want to Burn
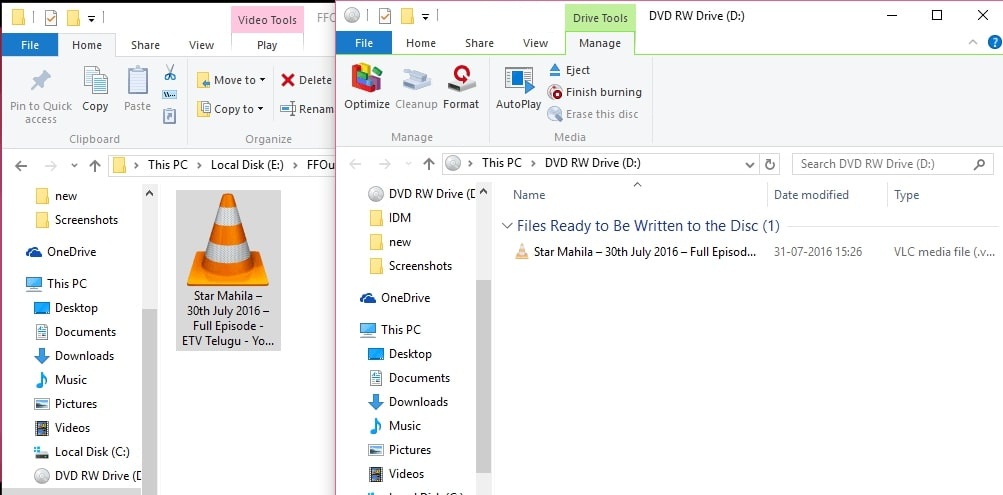
1. After choosing "With a CD/DVD player," the system will open a blank folder window. Do not close this window. This window represents the content of the disc you are about to burn.
2. Open another File Explorer window and locate the files or folders you want to back up (e.g., your "Documents" or "Pictures" folders).
3. Drag the files you need to back up into the blank disc window you just opened. You can also use copy and paste.
Note: Pay attention to the size of the files you are backing up; do not exceed the storage capacity of the DVD.
Step 3: Start Burning DVDs
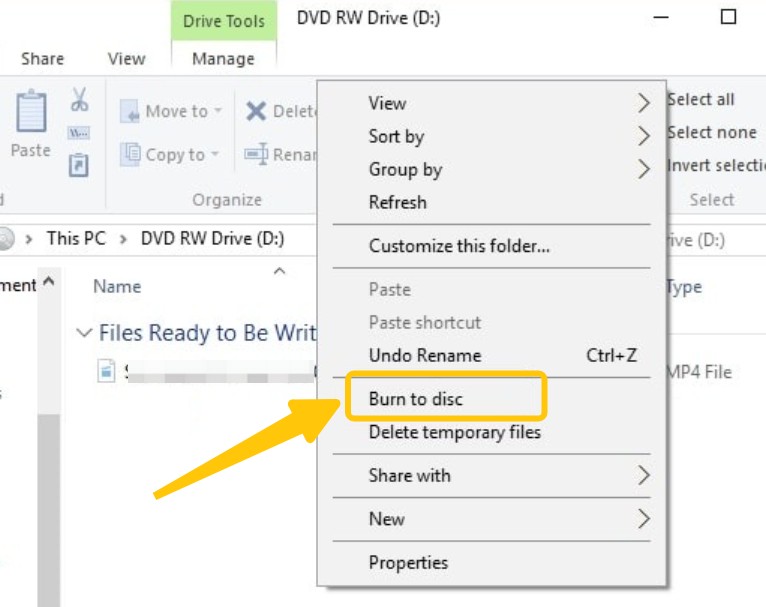
1. Once you have confirmed that all the files you want to back up have been added to the disc window, right-click on the blank space in the window and select "Burn to disc". A wizard window titled "Prepare to burn this disc" will pop up.
2. In the pop-up window, give your disc a title and choose the burning speed. Usually, keeping the default is fine. If the burn fails, you can try lowering the speed.
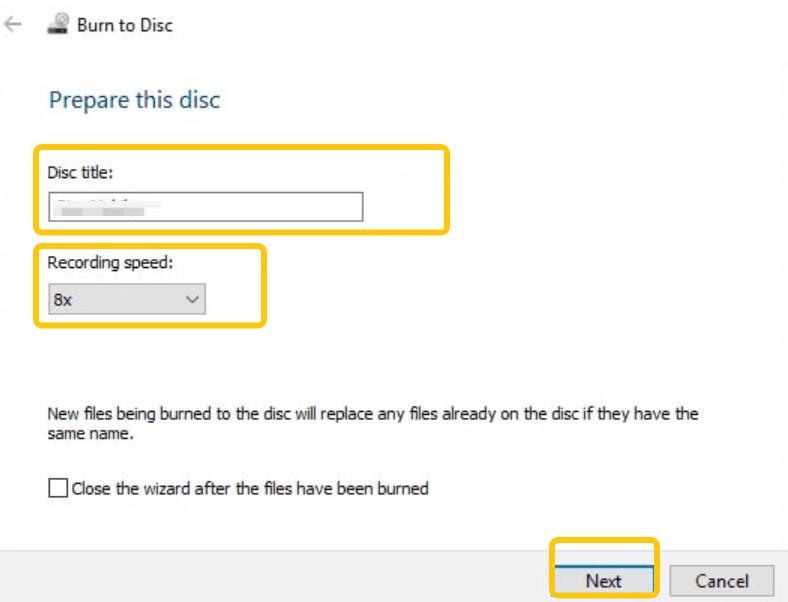
3. Click "Next". Windows will begin burning the disc. This process may take anywhere from a few minutes to a few hours, depending on the size of your files (from a few hundred MB to several GB) and the burning speed.
4. Once the burn is successful, the system will prompt, "You have successfully burned files to the disc." Safely eject your drive.
How to Burn a Data DVD on Mac
Finder handles data-disc burning natively, but it has the same limitation as File Explorer — it cannot produce a DVD-Video disc, so this route is for file archiving only. If you need Mac-specific authoring options or a comparison of DVD burning software for Mac, the dedicated Mac guide goes deeper.
Step 1: Insert the DVD and Open It in Finder
1. Insert the blank DVD disc into your optical drive.
2. macOS will recognize the blank disc and automatically pop up a dialog box asking what action you want to perform. Select "Open Finder".
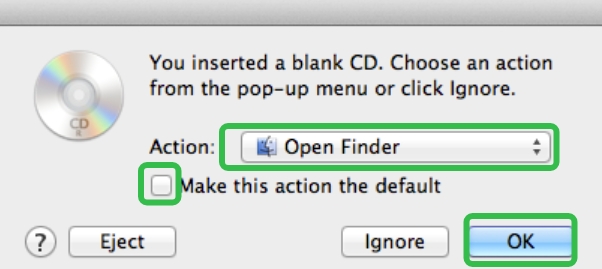
3. If you often burn discs, you can check "make this the default action" so you won't have to select it again.
4. Click "OK". The system will automatically open a new Finder window.
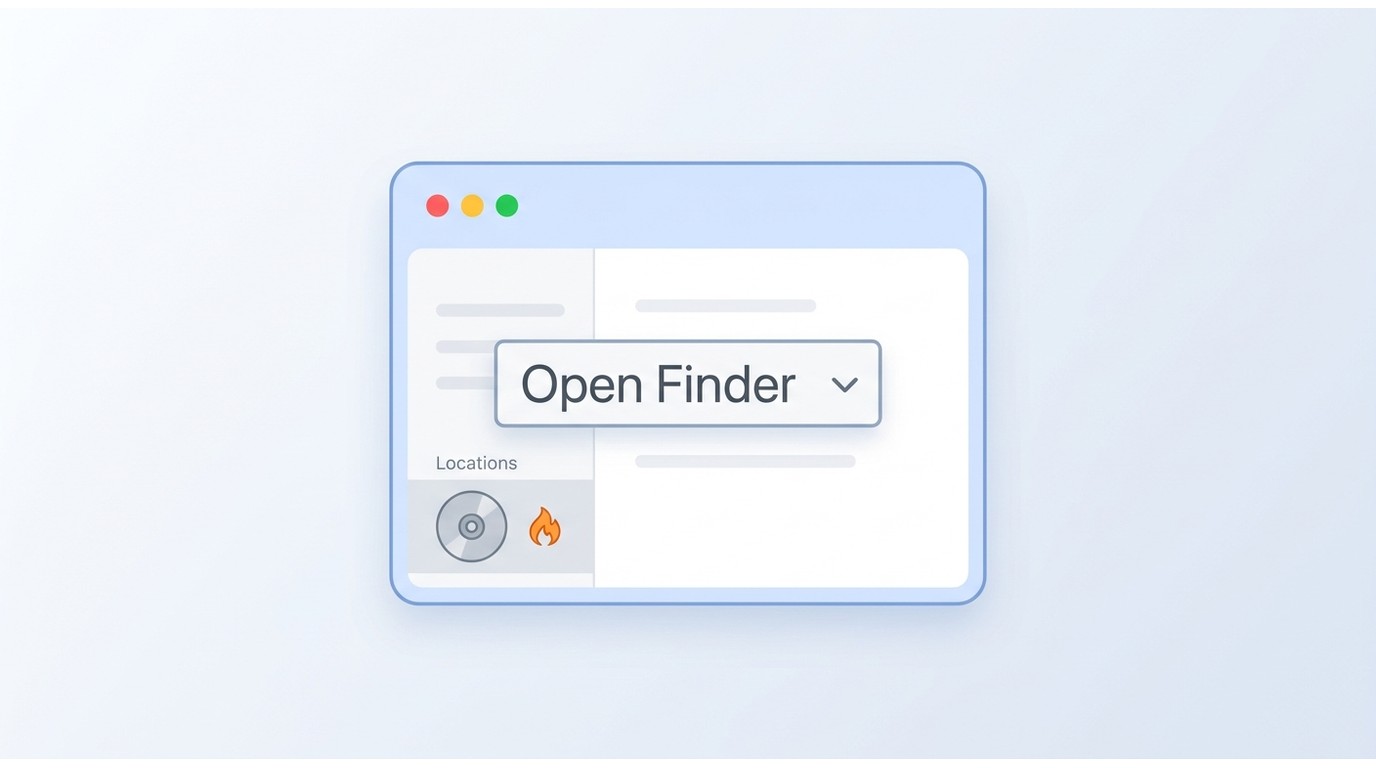
5. If the window does not pop up automatically, you can open any Finder window and click the disc icon with the burn symbol in the "Locations" sidebar on the left.
Step 2: Add the Files You Want to Burn
1. The Finder window you are now seeing (usually titled "Untitled DVD") displays the contents of your disc. Do not close this window.
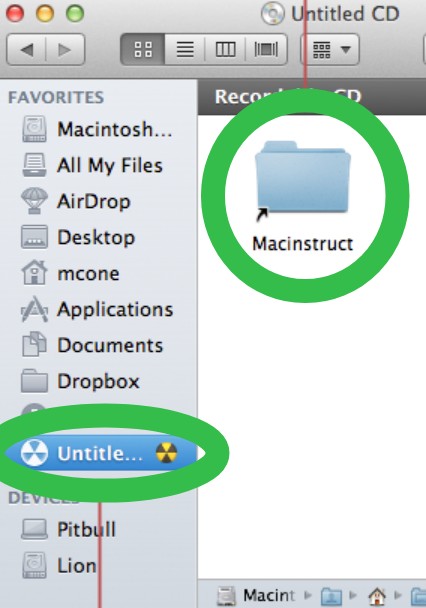
2. Open another Finder window and locate the files or folders you want to back up.
3. Drag these files one by one into the Finder window that represents your disc contents.
Note: Pay attention to the size of the files you need to back up; do not exceed the storage capacity of the DVD disc.
Step 3: Start the DVD Burning
1. Once you confirm that all the files you need to back up have been added, click the "Burn" button located at the top of the Finder window. A confirmation dialog box will pop up.
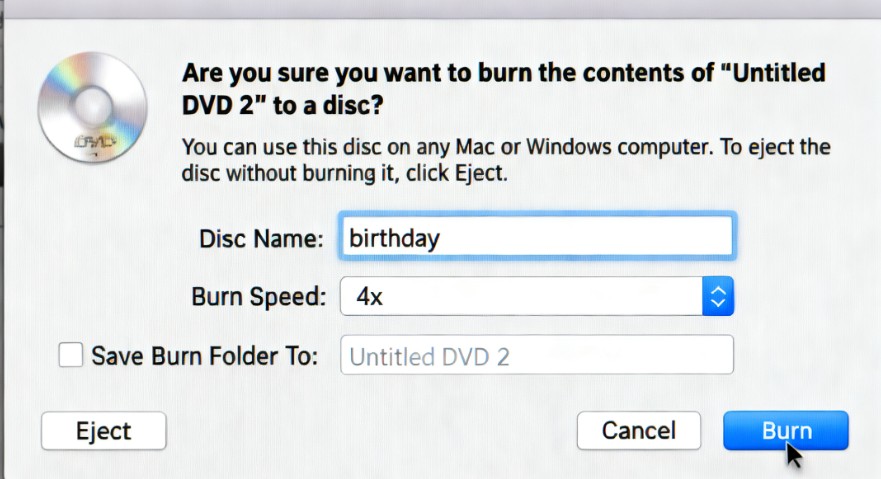
2. In the dialog box, name the DVD in the Disc Name field, and then adjust the burning speed. If the burn fails, you can try selecting a lower speed the next time to improve stability.
3. Click the "Burn" button in the lower right corner of the dialog box to start the burn. You will see a window displaying the progress and remaining time.
4. After the burning is complete, macOS typically performs a verifying step by default, which checks whether the data on the disc exactly matches the original files to ensure burn quality. After verification is complete, the system will chime, and you can automatically or manually eject the disc.
Note: You can burn any file to create a data DVD, but these DVDs cannot be played on a standard DVD player, even if the files you burned are MP4 videos. This is because the disc does not comply with the video disc structure. If you want to convert MP4 to DVD, see the tutorial on how to burn a DVD movie.
How to Burn an ISO Image to DVD
ISO burning is a fundamentally different job from authoring a movie disc. The disc structure already exists inside the .iso file (or VIDEO_TS folder) — you're restoring it to physical media, not building anything. That's why a copy tool like DVDFab DVD Copy fits here rather than a creator app. If your source is loose video files instead of a completed image, go back to the movie-DVD section — this workflow won't produce a playable disc from raw MP4 or MKV files.
Features:
- Burn existing ISO and VIDEO_TS folders (which contain the complete DVD structure) onto blank DVDs.
- Clone/Burn: Create a lossless DVD duplicate, keeping the menu, audio tracks, subtitle tracks, etc., intact.
- Convert DVD to ISO or folder in a few minutes.
- Burn an existing ISO or VIDEO_TS folder that you legally own or are authorized to use.
Below are the steps for how to burn a DVD with DVDFab DVD Copy.
Step 1: Launch DVDFab and Enter the DVD Copy Module
1. Download DVDFab 13 and follow the prompts to install it.
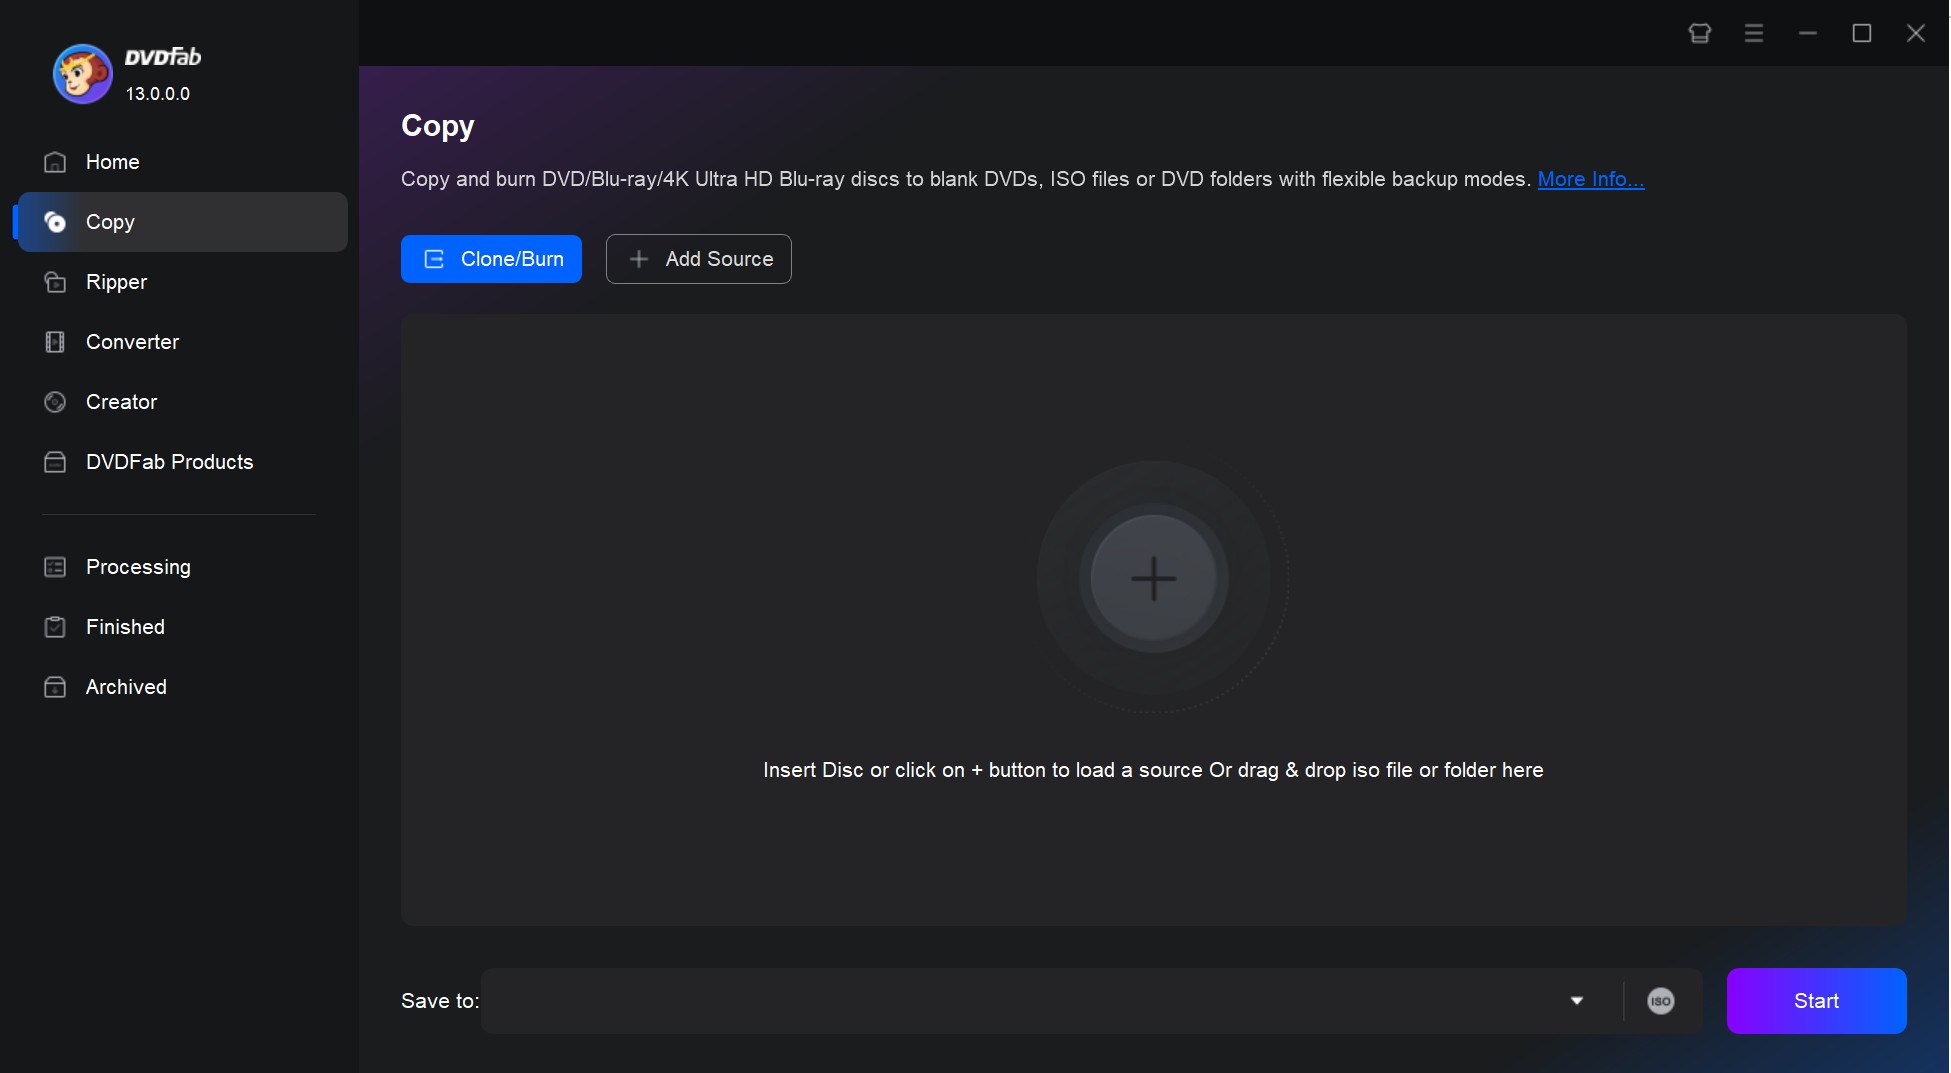
2. Launch DVDFab 13. In the left navigation bar, select Copy.
Step 2: Load the Image File (or Folder)
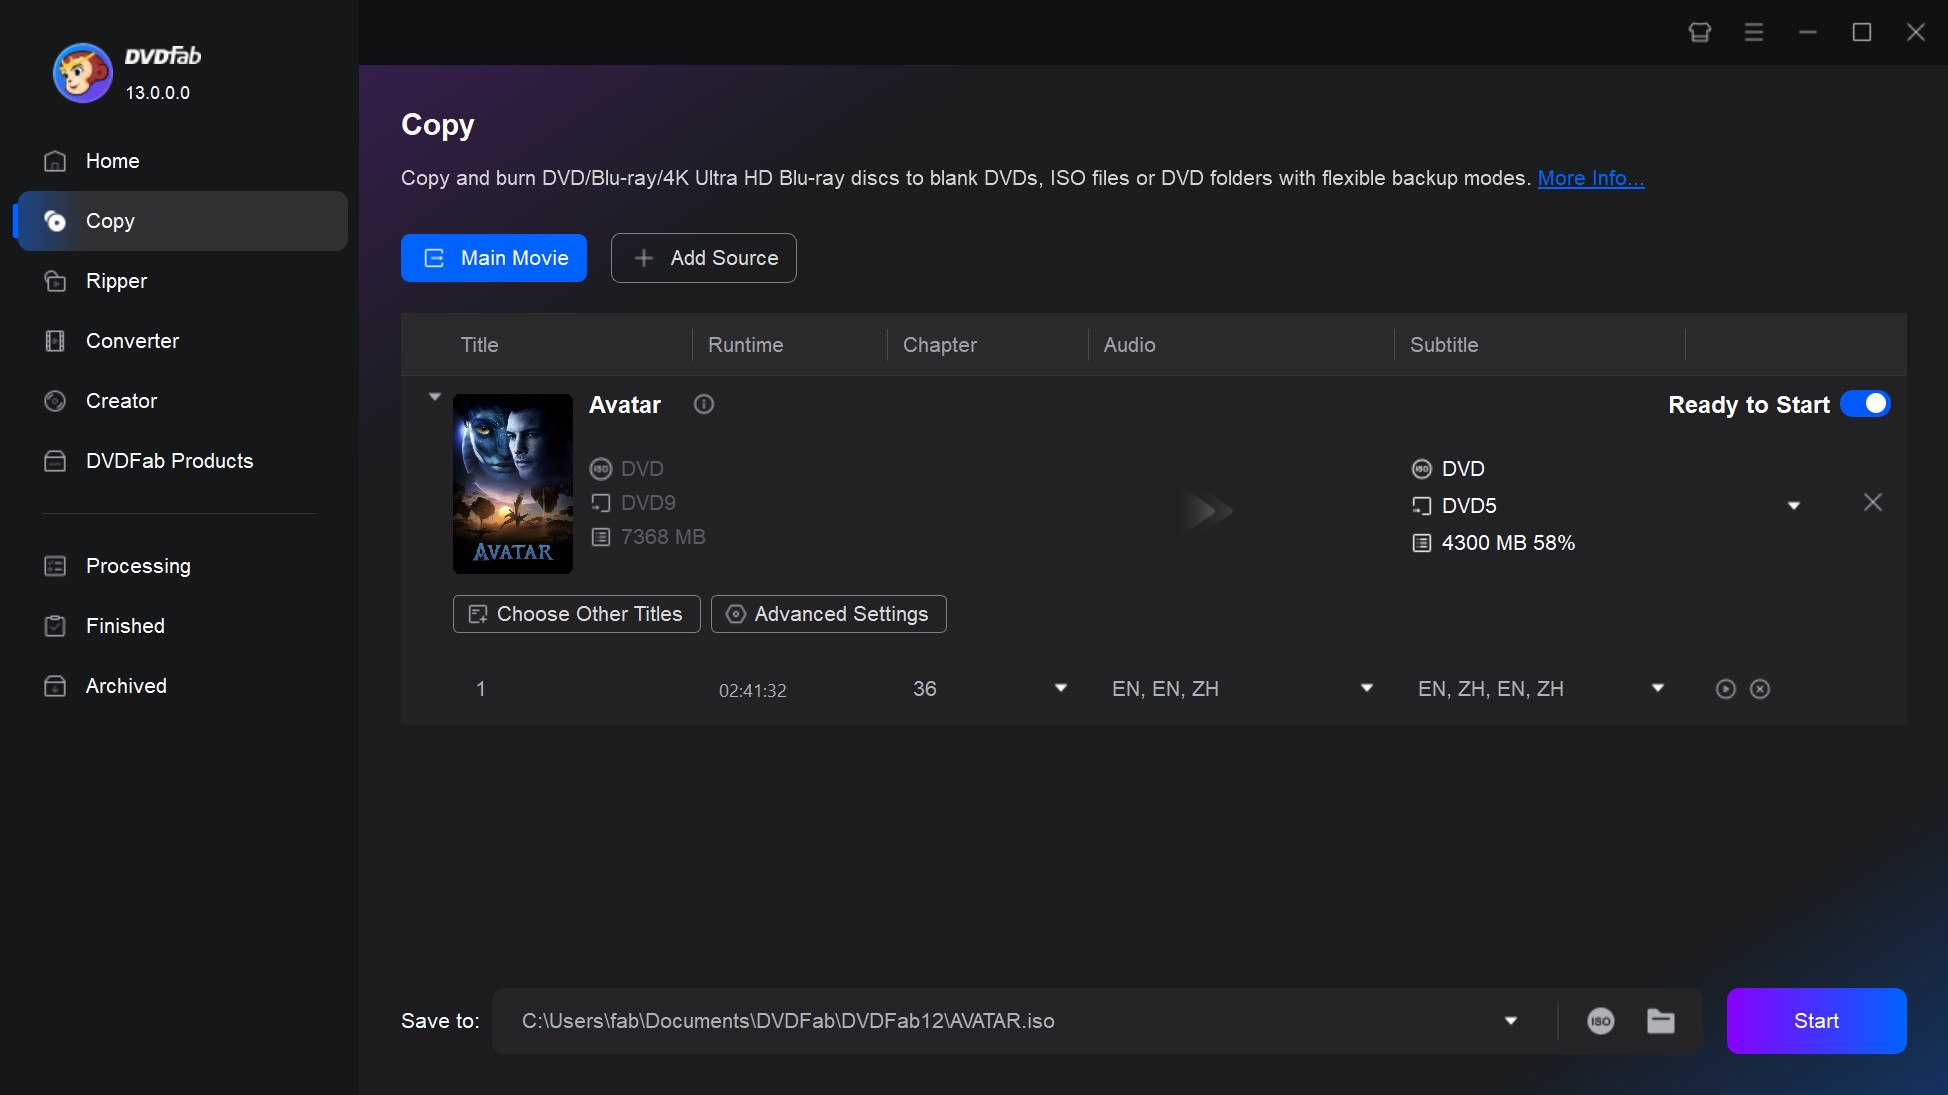
1. Click the "Add Source" button on the interface to upload your ISO file or VIDEO_TS folder. Alternatively, you can directly drag and drop these files into the program window.
2. DVDFab will recognize the ISO or VIDEO_TS folder as a complete DVD source and load its titles, chapters, audio, and subtitle tracks. Only process content you legally own or are authorized to use.
Step 3: Customize the Output DVD
1. Pick a copy mode that matches your goal: Full Disc or Clone/Burn to preserve the entire source; Main Movie to keep only the feature; Customize, Merge, or Split for finer control.
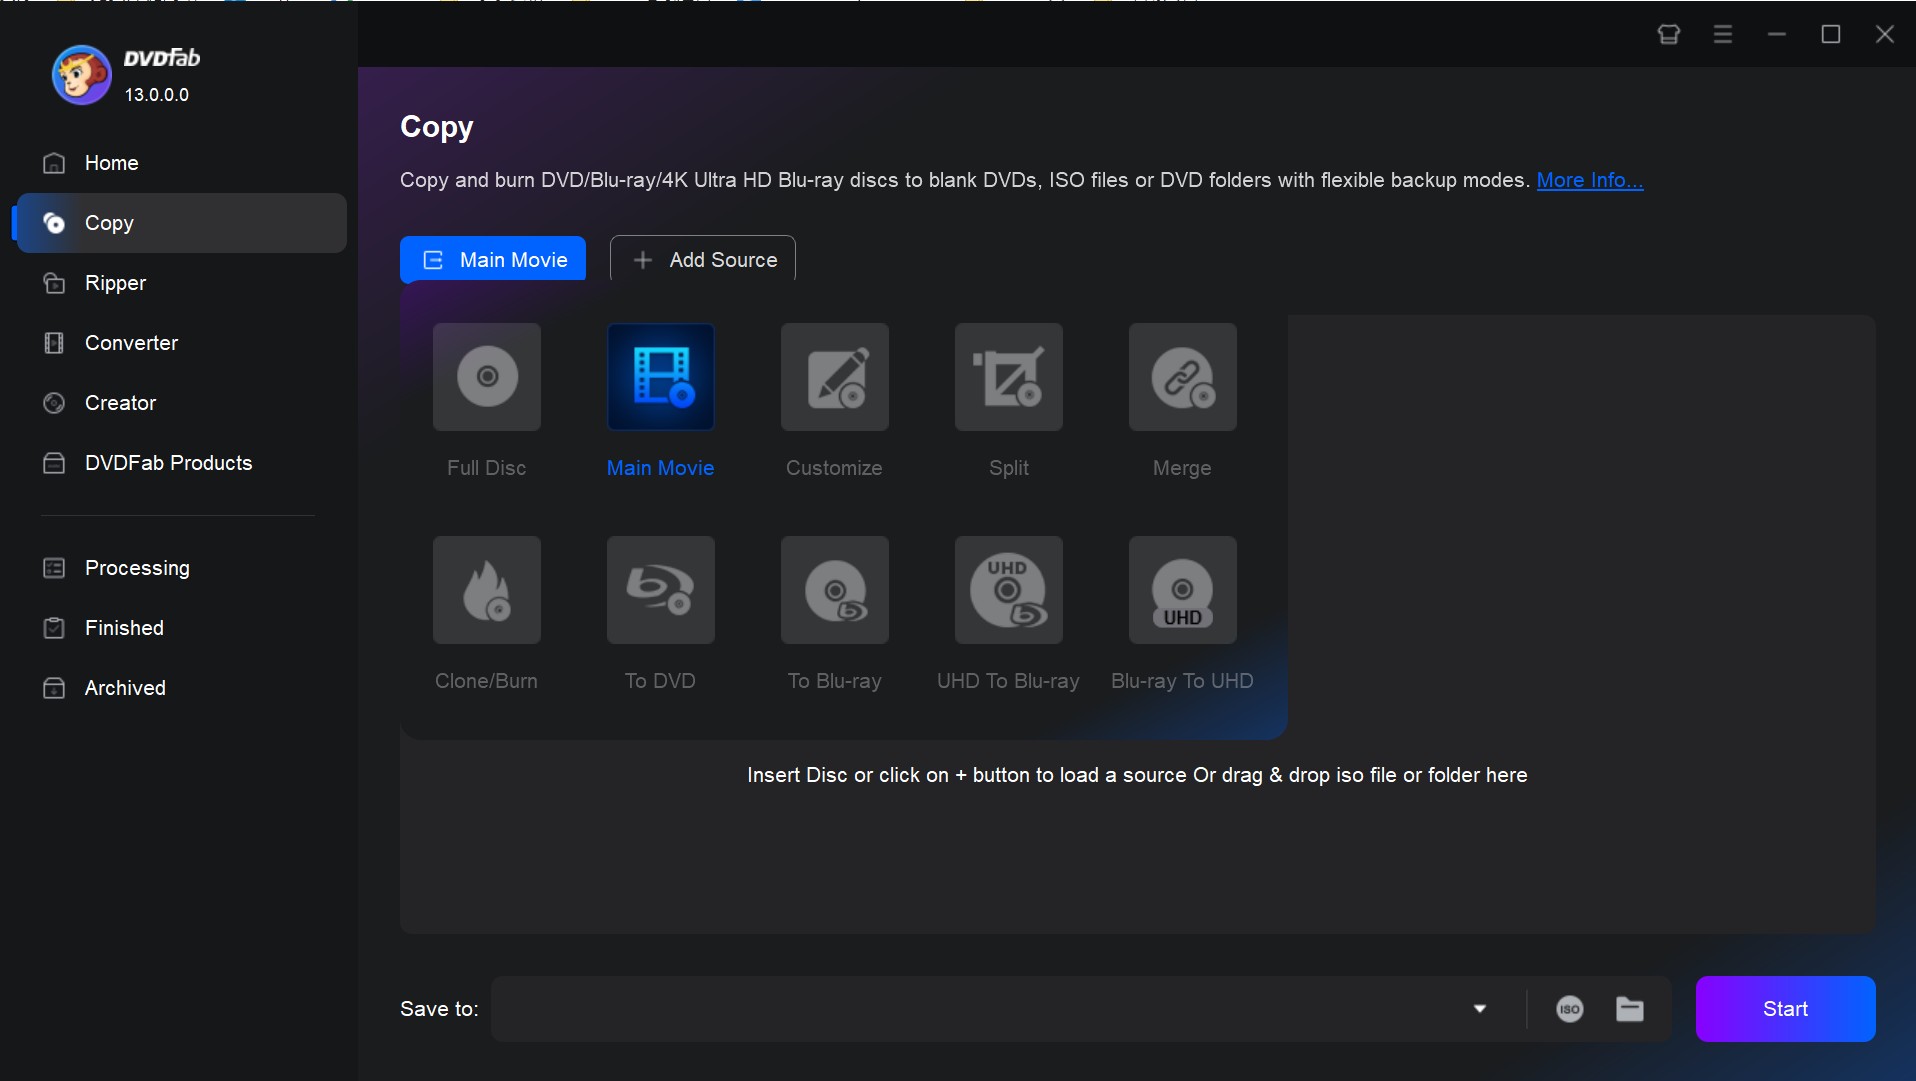
2. Open Advanced Settings if you need to adjust the Volume Label, Output Size (DVD-5 or DVD-9), or Video Quality, then use the Chapter, Audio Track, and Subtitle dropdowns on the main interface to keep only the tracks you want.
Step 4: Start Burning a DVD
1. Insert a blank DVD±R or DVD±RW disc into your DVD burner drive.
2. In the "Save to" bar, select your DVD burner as the output destination. If you wish to burn to an ISO or Folder, click the corresponding icon in the "Save to" bar and select the saving path.
3. Click the "Start" button to begin the burn.
4. When the burn finishes, eject via the System Tray — then move on to the verification step below.
Note: Writing to VIDEO_TS to DVD from an existing folder follows the same flow.
Finalize and Test the Disc
A "burn completed successfully" message from any software only means the write finished without a hardware error — it doesn't prove the disc plays in your target device. This is the step almost every failed disc I've seen skipped.
Quick verification checklist:
- Confirm the session is closed or finalized. Most burning tools do this automatically for "With a CD/DVD player" style burns; if your tool offers a separate finalize step, run it — an un-finalized disc often plays only on the burning computer.
- Eject and reinsert the disc on the same computer. Verify the files or VIDEO_TS folder are visible and the total size looks right.
- For a DVD-Video disc, open it in a software player first (VLC works). Check the menu loads, chapter navigation moves cleanly, subtitle and audio tracks switch correctly, and audio stays in sync a few minutes into playback.
- Then — and this is the one that matters — test it in the actual standalone DVD player or TV setup you built it for. Skip to a chapter partway in and near the end. A disc that plays on a computer but stalls on a set-top box usually points to a finalization or standard (NTSC vs PAL) issue, not a bad source video.
Fix Common DVD Burning Problems
Most burn failures are software-side, not hardware. Match the symptom to the likely cause below before you blame the drive or buy pricier media. And a broader point: a computer preview doesn't prove disc compatibility — always test in the target player.
Problem 1: My Burn Failed
| Solution | Details |
| Lower Burning Speed | Data DVD burning using free built-in tools like Windows File Explorer or Mac Finder can be unstable. If you fail repeatedly, try manually setting the speed to a mid-low rate, such as 4x or 8x. While high-speed burning is fast, it demands extremely high stability from the drive and disc. Lowering the speed significantly increases the success rate. If failures persist, switch to a third-party data disc burning tool, such as ImgBurn for Windows or Burn for Mac. |
| Close Resource-Heavy Programs | During the burning process, close all unnecessary background programs, especially large games, video editing software, or any application actively reading or writing files. This ensures that the CPU and memory resources are focused entirely on the burn process. |
Problem 2: My Computer Can't Find the Blank Disc
| Solution | Details |
| Check Drive Drivers | Open the Windows Device Manager. Locate "DVD/CD-ROM drives," right-click your drive's name, and select "Update driver." If the problem persists, try "Uninstall device" and then restart your computer, allowing Windows to automatically reinstall the driver. |
| Try DVD-R | Some older burners may have poor compatibility with DVD+R. If you are currently using a DVD+R, please try switching to a DVD-R disc. |
Problem 3: My DVD Won't Play in My DVD Player
| Solution | Details |
| Use DVD authoirng software | If this happens, it is likely that you mistakenly burned a video file onto a Data DVD. This means the disc only contains a single video file (like Disney movie.mkv). Home DVD players cannot recognize this simple file; they require the professional format containing the VIDEO_TS folder and structure. You must use specialized DVD creation software (like DVDFab DVD Creator) to perform DVD burning like AVI to DVD. |
FAQs
Can VLC burn a video directly to a playable DVD?
Not on its own. VLC is a media player and converter — it can prepare or transcode video files, but it does not provide a full DVD-Video authoring workflow (VIDEO_TS folder generation, menu creation, chapter marking, and session finalization). To produce a disc that plays in a standard DVD player, you'll pair VLC output with dedicated authoring software or use an authoring tool end-to-end.
How long does it take to burn a movie to DVD?
It depends on the video's runtime and bitrate, whether the file needs re-encoding to MPEG-2, the drive's write speed, the media grade, and whether GPU acceleration is available. A roughly two-hour source encoded and burned at a moderate speed usually lands somewhere in the 15 to 45 minute range on a modern machine. Budget extra time for the verification pass afterward — it's the step most people skip and later regret.
Can a DVD start playing automatically without a menu?
Yes. In authoring software, set the Playback Mode to "Play the first title" (or the equivalent autoplay option) and skip the menu template. The player will start the video as soon as the disc is recognized. This works best for a single long recording — an event, a lecture, a full movie — where menu navigation adds nothing. Test the finished disc in your target player to confirm autoplay behaves as expected, since a few older players still probe for a menu before starting playback.
Can I burn a DVD onto my computer without a blank disc?
Not to a physical disc — but you can output an ISO image or a VIDEO_TS folder to your hard drive using the same authoring or copy software, then write it to a blank DVD later when you have one. Most creator and copy tools expose "Save to ISO" and "Save to Folder" options alongside the physical burner. This is a good workflow if you want to prepare the disc structure now and burn multiple copies later.
How do I burn MP3 files to a DVD?
To burn MP3 to DVD, add the audio files to a disc-burning program, select the Data DVD option, arrange the tracks, and start burning. The result is a data disc rather than an Audio CD or DVD-Video disc, so confirm that the intended player supports MP3 playback from DVDs.
How do I burn a slideshow DVD?
You cannot directly drag and drop PowerPoint files (.ppt or .pptx) or image files (.jpg) onto a disc and expect a DVD player to recognize them. You need image burning software, such as Freemake Video Converter.
- Save your PowerPoint presentation as images (if applicable).
- Open Freemake Video Converter. Add photos that you want to use in your slideshow using the "+Photo" button.
- Click the "Edit" button to add music, set the time interval between slides, and rearrange the photos.
- Click the "to DVD" button, select the DVD disc destination, and then click "Burn" to start the process.
How do I transfer VHS tapes to DVD?
To transfer VHS to DVD, connect a working VCR to a computer through a USB capture card, record the tape as a digital video file, and then use DVD authoring software to burn the captured video to a blank DVD. A VCR/DVD recorder can also record directly to disc without a computer, but the transfer runs in real time and the finished DVD usually needs to be finalized before it will play on other devices.
Conclusion
The takeaway is simple: match the workflow to the outcome. For file archives, the built-in Windows or macOS tools do the job for free. For a disc that plays on a set-top DVD player, use dedicated authoring software like DVDFab DVD Creator. For cloning from an existing image, use a copy tool. And whichever path you take, test the finished disc in the actual player it's built for before you set it aside.
Disclaimer: This article is provided for informational and personal backup purposes only. Please read your local laws and regulations and strictly prohibit any commercial burning activities that infringe upon others' copyrights.

 7 Best & Free DVD Menu Creators in 2026: How to Make a DVD Menu on Windows & MacBy Diana Smith - Jul 16, 2026
 How to Make DVDs on Mac and Windows with Easy Steps?By Wenny Yan - Jul 13, 2026
 How to Burn MP3 to DVD: Best Audio DVD Creators Compared (2026)By Wenny Yan - Jul 10, 2026
 How to Burn Video_TS to DVD on Windows and Mac: 4 Methods That WorkBy Diana Smith - Jul 1, 2026