How to Rip 4K Blu-ray Disc with Lossless Quality on Windows & Mac?
Summary: To rip 4K Blu-ray discs losslessly for playback on Plex or 4K TVs, you will need a UHD-friendly drive, 50GB+ of storage, and robust decryption software. While this guide covers both free and professional tools for Windows and Mac, my tests show that DVDFab UHD Ripper is the most efficient choice. It bypasses strict AACS 2.0 protections, preserves HDR10/Dolby Vision and Atmos metadata, and leverages GPU acceleration to complete a 54GB lossless rip in under 12 minutes with a significantly optimized file size.
Table of Contents
Ripping a standard 1080p Blu-ray is straightforward, but moving to 4K UHD introduces a completely different set of hurdles. It isn't just about bypassing the newer AACS 2.0 encryption. Standard Blu-ray drives physically can't read high-density 100GB discs. Even if you get past the hardware locks, you still have to figure out how to handle massive file sizes without stripping away the HDR color depth or Dolby Atmos audio that make 4K worth watching.
If you want a digital backup for your media server that looks and sounds identical to the physical disc, the usual methods won't cut it. Based on my tests, this guide breaks down the workflow to solve these hardware and software issues for a perfect 4K rip.
What Do You Need to Rip 4K Blu-ray
Unlike standard Blu-rays, 4K UHD discs come with stricter encryption and require specialized hardware and software to extract their contents properly. To rip 4K UHD movies losslessly, you'll need to prepare a few tools.
- • 4K Blu-ray Ripping Software: 4K Blu-rays are protected by AACS 2.0, BD+ or higher, so you'll need a dedicated software to remove these protections.
- • High-capacity Storage: A full 4K rip can take up 50GB to 100GB. Consider an external drive or NAS for storage.
- • 4K Blu-ray Drive: You'll need a UHD-friendly drive—usually one with certain firmware versions that allow data extraction. Many users check whether the drive is LibreDrive-enabled in DVDFab UHD Drive Tool.
- 💡I found that sourcing a compatible drive can be the trickiest part of the process. While LG drives (like the WH16NS40) remain popular, many enthusiasts warn against newer Pioneer drives. Recent factory firmware updates (v1.03 and newer) have locked out the ability to downgrade them for LibreDrive compatibility. To avoid the hassle, I recommend buying pre-flashed drives from trusted forum sellers.
There are multiple programs available for ripping 4K Blu-ray discs, but choosing the right one is key to preserving quality and meeting your needs. Below, we'll introduce two powerful and reliable options to help you convert UHD discs losslessly.
How to Rip 4K Blu-ray with DVDFab UHD Ripper [Professional]

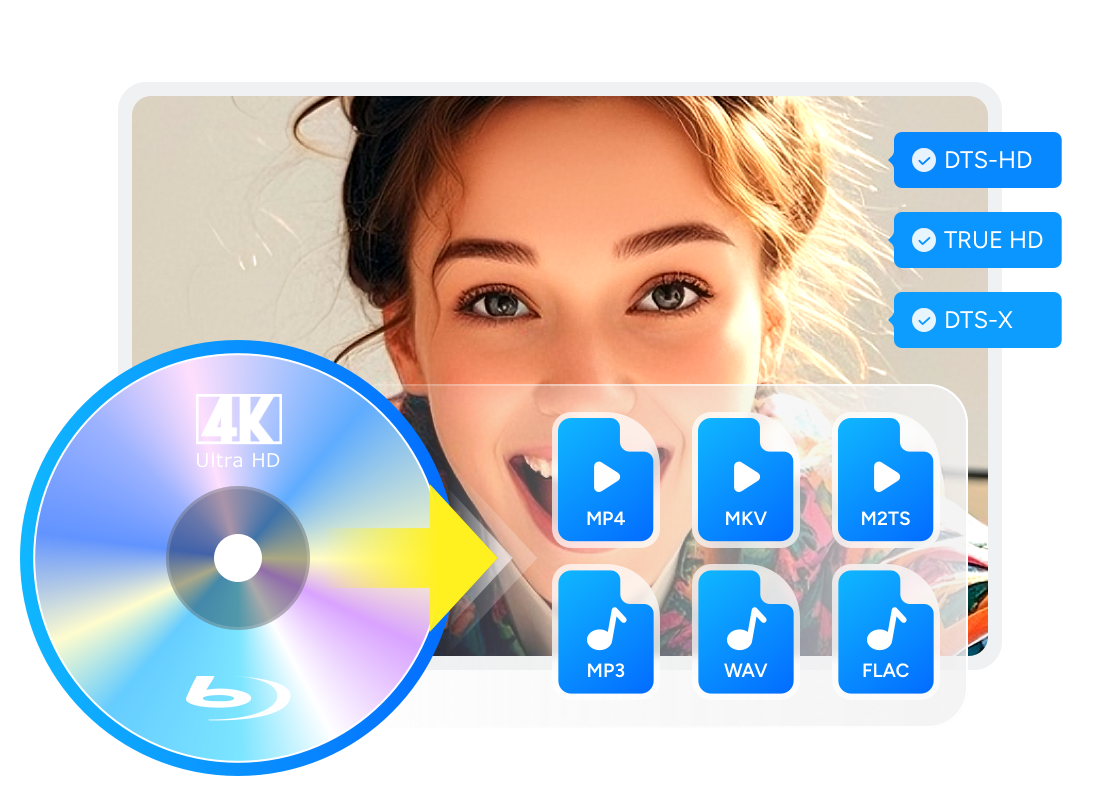
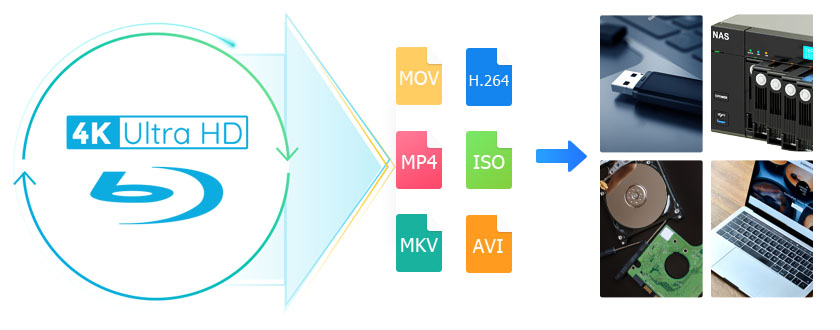
- Rip UHD movies to lossless video (MP4/MKV/M2TS Passthrough) and high-fidelity audio (DTS-HD, TrueHD and DTS:X)
- Provide a leading cloud decryption service to quickly remove any protection
- Compress UHD video while preserving high-quality visual and audio effects
- Customizable ripping settings: adjust codecs, frame rates, trim and merge video, etc
- Manage subtitles in a variety of ways, including converting them to SRT files
- Rip large 4K Blu-ray discs at ultra-high speeds with advanced hardware acceleration
💡Video tutorial
Step 1. Load Your 4K UHD Blu-ray Disc or ISO
Free download and open DVDFab 13 software. Select the Ripper module from the side menu. Insert a 4K Blu-ray disc and the software should automatically load it. Alternatively, you can click the + icon to load the UHD Blu-ray folder or ISO file.

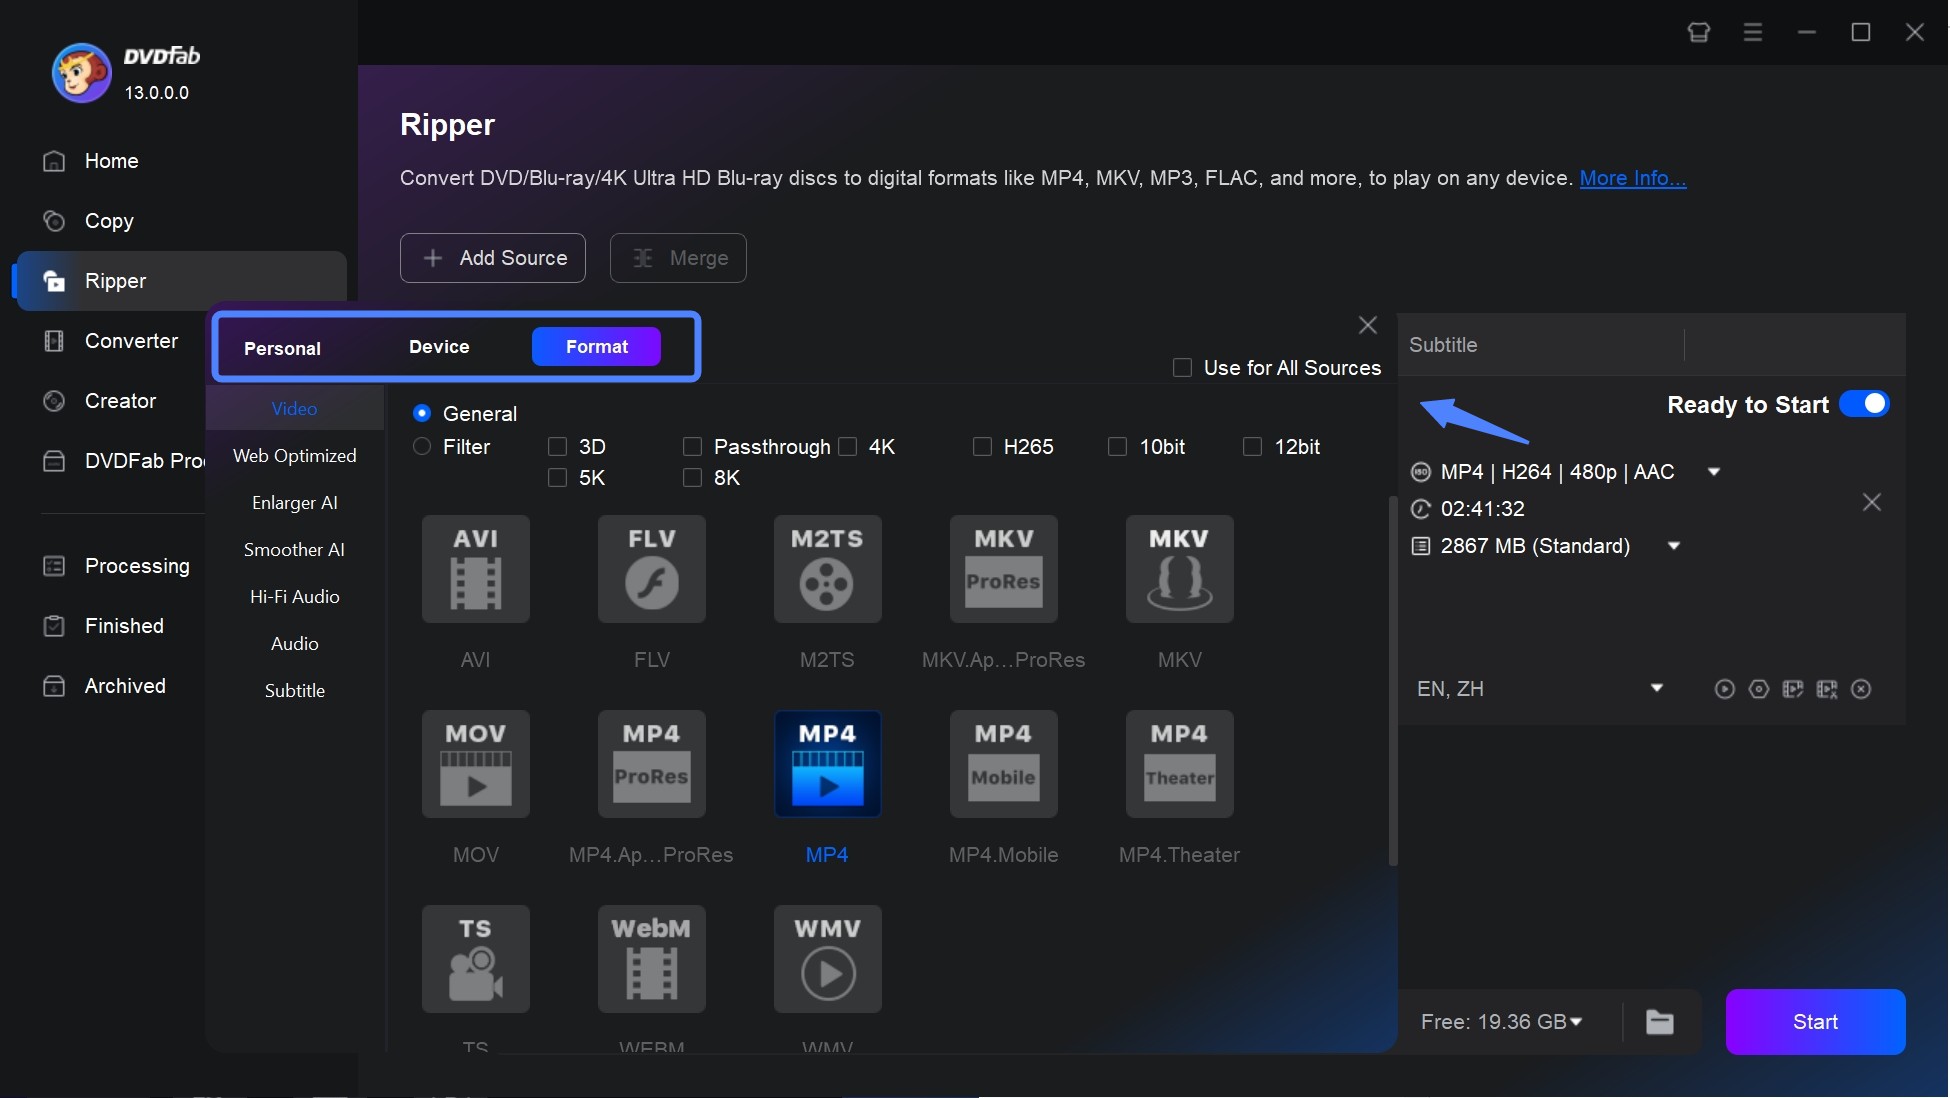
Step 2. Select a 4K Profile (MKV/MP4 Passthrough)
Locate and click on the Choose Other Profile option, after which a new window offers a large selection of audio and video formats. To find a specific configuration, such as 4K/8K/3D, use the filters at the top.
Step 3. Customize Audio Tracks, Subtitles, and HDR Settings
Before start ripping 4K Blu-ray movies, you may want to first customize it. For example, you can rename the output, pick the titles you want to rip, or add audio tracks and subtitles. You can also use the Advanced Settings and Edit options, to make additional changes like adding watermarks, cropping, or trimming the video, and changing the aspect ratio or the resolution, among others.
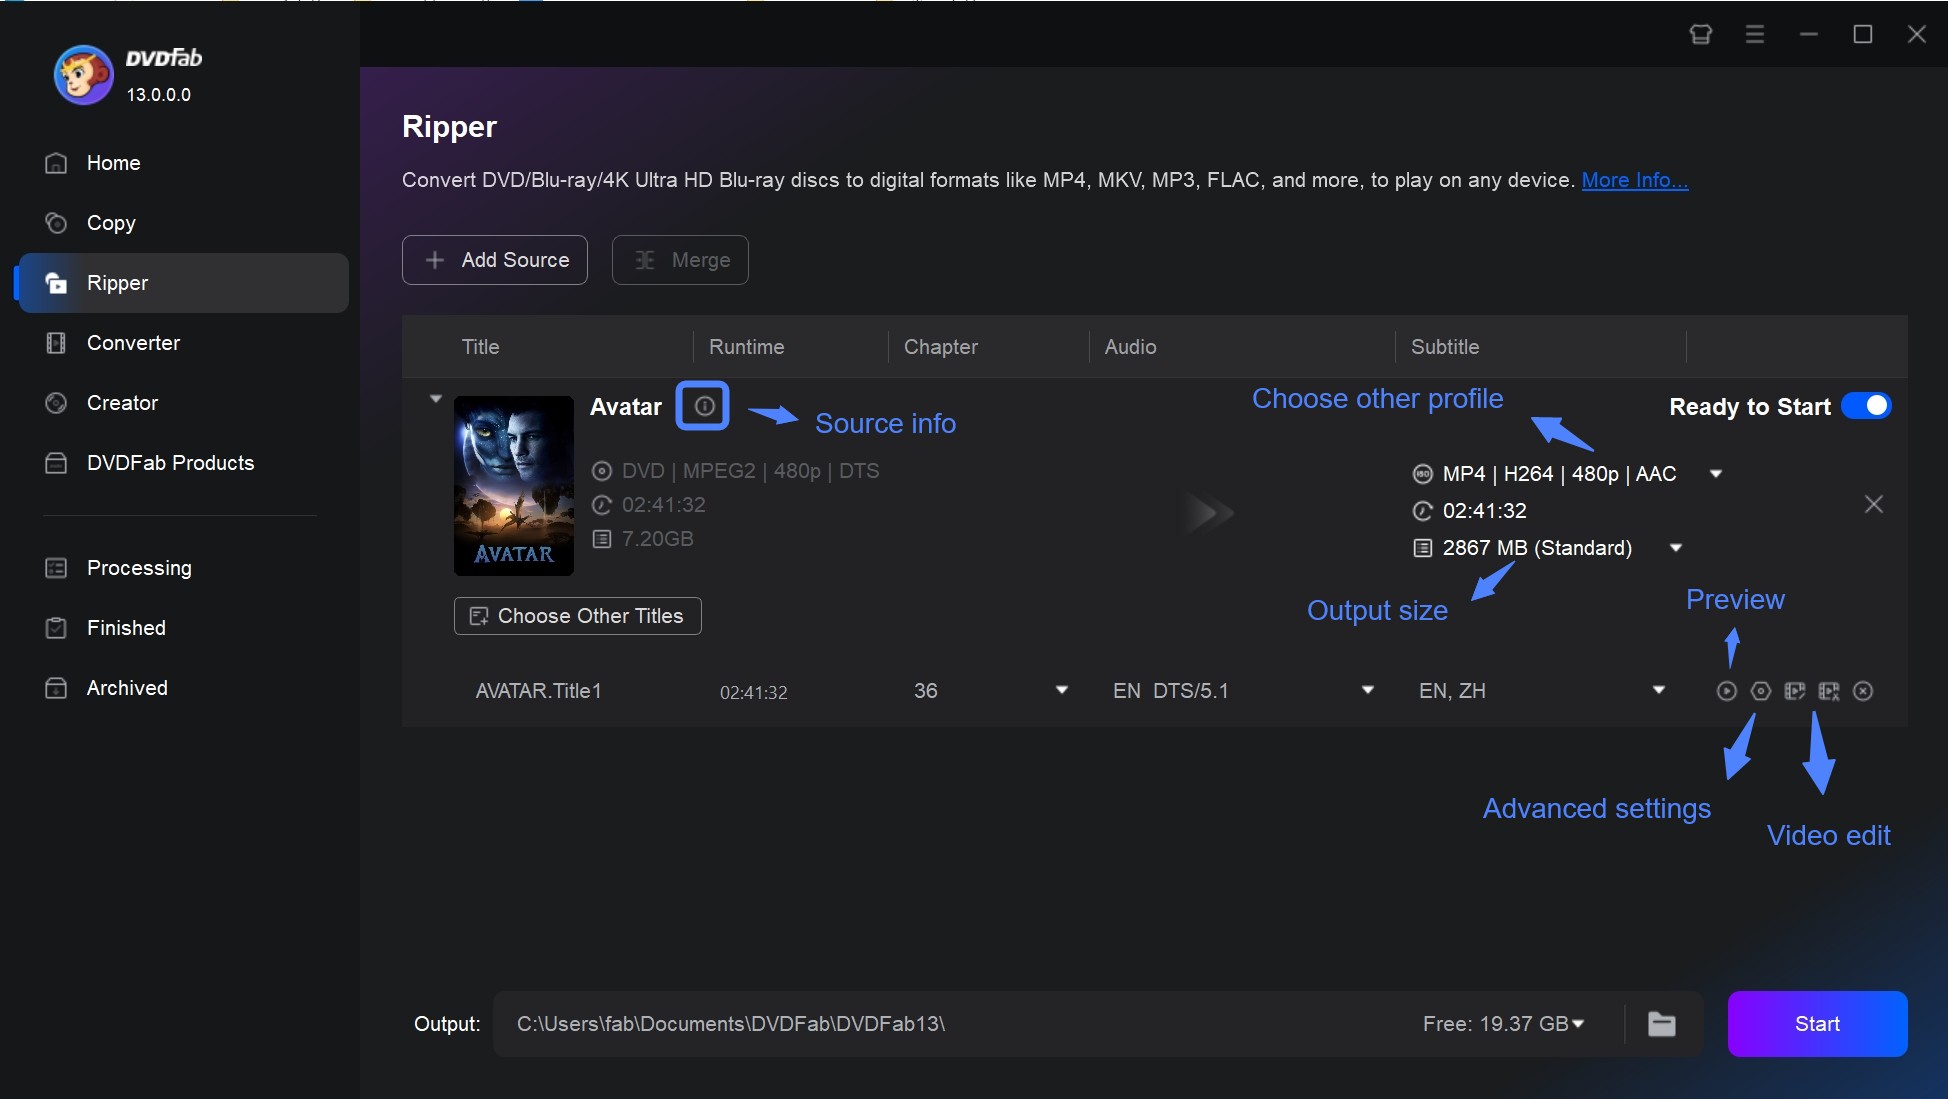
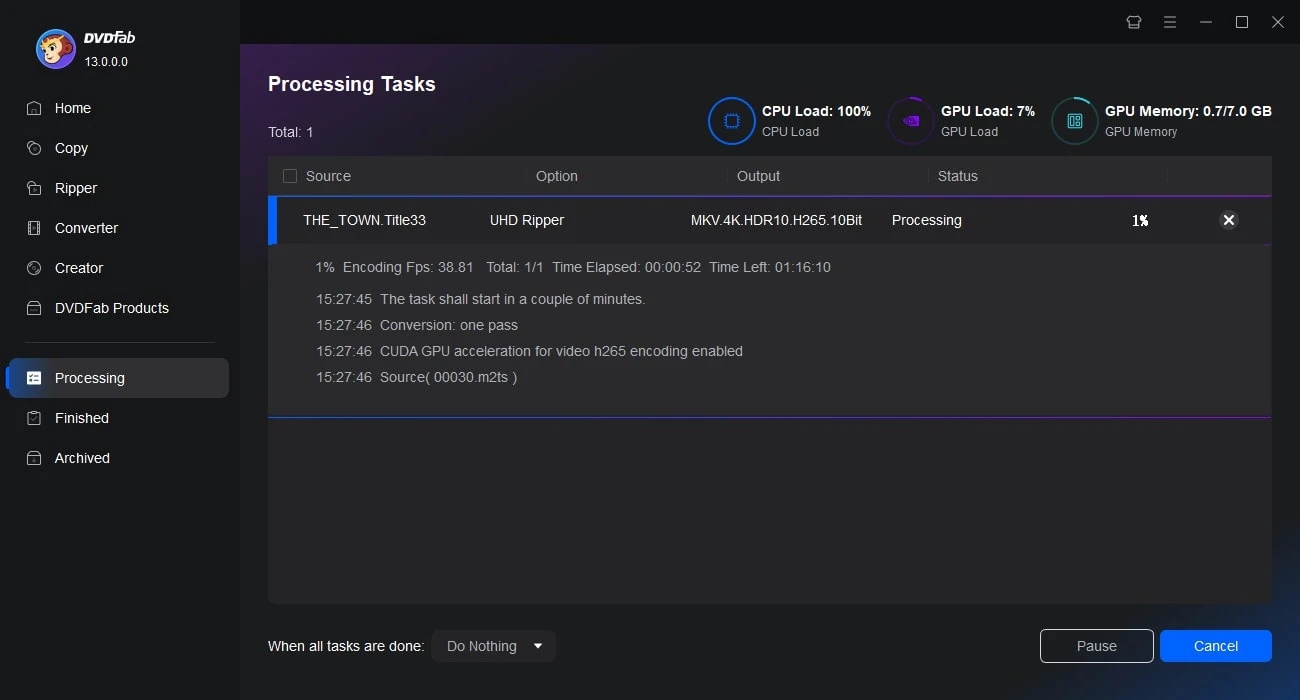
Step 4. Start the 4K Blu-ray Ripping Process
If necessary, change the default destination by clicking on the folder at the bottom of the menu. After finishing all the configurations, click the "Start" button at the bottom left corner. Once the movie is converted to 4K digital video, you can watch it on Kodi or VLC media player.
How to Rip 4K Blu-ray with MakeMKV [Free But Limited]
MakeMKV is a highly regarded, free software designed for ripping (4K UHD)Blu-ray discs with ease. Unlike many other tools, MakeMKV can handle both unprotected and encrypted Blu-ray discs, allowing you to bypass some copy protections. It rips Blu-ray discs into the MKV format, which retains the full video, audio, and subtitle tracks without any loss of quality.
More than just eliminating the need for additional decryption tools, MakeMKV offers great features for enthusiasts who want a straightforward ripping solution.
- Free for ripping 4K Blu-ray discs (no ongoing costs)
- Built-in LibreDrive , which bypasses some limitations of the drive's firmware
- Preserves original quality with video, audio and subtitles intact
- Smooth handling of partially encrypted discs
- MakeMKV beta needs to be updated regularly
- Only outputs MKV format, lacks mainstream options
- Lack advanced features like editing or menu customization
- Blu-ray menu and live preview are not supported
Step 1. Install MakeMKV and Check LibreDrive Compatibility
Visit the official MakeMKV website and download the correct version for your operating system. It is free to use during its public beta period, which is regularly extended. If prompted, you can enter the latest beta key available on their forum.
Step 2. Scan the 4K Blu-ray and Select Target Titles
Insert your 4K Blu-ray disc into your computer's Blu-ray drive. The software automatically detects the inserted disc and scans its contents.
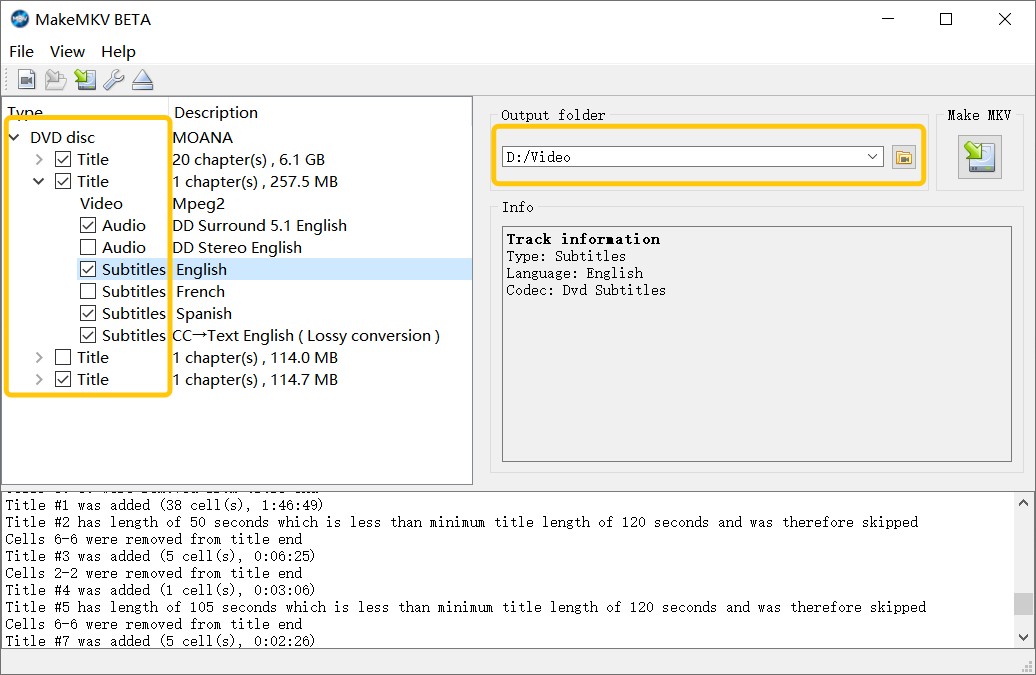
After the scan finishes, MakeMKV will list available titles, audio tracks, and subtitle streams. You can uncheck anything you don't want to include in the rip. For movie backups, the main feature is usually the longest title with the largest size.
If you want to keep original quality, select the main video track and at least one lossless audio track (for example, DTS-HD MA or Dolby TrueHD) instead of only lossy stereo tracks.
Step 3. Export to a Raw Lossless MKV File
Choose a destination folder with plenty of free space by clicking the output folder icon. When your selections are set, click the "Make MKV" button to start ripping.
The result is essentially a 1:1 file without re-encoding. For a full 4K movie, the output is often tens of gigabytes in size, and many UHD titles land in the 50–100 GB range. If you later want a smaller file, you'll need a separate tool to compress or transcode the MKV.
Comparison of the Best 4K Blu-ray Rippers
Feature Comparison: DVDFab vs MakeMKV
| Features | DVDFab UHD Ripper | MakeMKV |
| Rip Encrypted 4K Blu-ray | ✔️ | ✔️ |
| Output Formats | MKV, M2TS and MP4 | MKV only |
| Retain HDR10/Dolby Vision | ✔️ | ❌ |
| Lossless Quality | ✔️ | ✔️ |
| Compress Video Size | ✔️ | ❌ |
| Ripping Speed | Fast (GPU acceleration) | Moderate |
| Built-in Video Editor | ✔️ | ❌ |
DVDFab UHD Ripper gives you more control over output formats, compression, and editing, and it can keep HDR10/Dolby Vision while offering smaller, more manageable files when needed. MakeMKV focuses on simple MKV remuxing. It's a good choice if you only want a straightforward, lossless backup without changing formats or file size.
Performance Test
Beyond the feature comparison, I also ran a test to see how each tool performs in 4K Ultra HD Blu-ray ripping scenarios. I tested both software converting the 4K Blu-ray movie Life (2017), running 1:43:58 with an disc size of 54 GB. The test system was a Windows 10 PC with an Intel i7-6700 CPU, 16 GB RAM, and an NVIDIA RTX 4060 Ti GPU.
| Software | Output Format | Ripping Time | Output File Size | Quality |
| DVDFab UHD Ripper | MKV Passthrough | 11m 41s | 42.1 GB | 3840*2160 Dolby ATMOS 7.1 |
| MakeMKV | MKV Passthrough | 13m 33s | 50.6 GB | 3840*2160 Dolby ATMOS 7.1 |
DVDFab Stands Out in the Test:
- DVDFab UHD Ripper completed the ripping process about 14% faster than MakeMKV, benefiting from GPU acceleration.
- Although both Blu-ray Decrypters produced lossless 1:1 MKV outputs, DVDFab delivered a smaller file size. This is due to more efficient data handling rather than re-encoding.
- Both tools retained the original video and audio tracks, ensuring playback quality was identical to the source disc.
FAQs
Is it illegal to rip 4K Blu-ray Discs?
The legality of ripping 4K Blu-ray discs depends on where you live. In some countries, making a personal backup of discs you own may be tolerated or fall under "private copy" or similar exceptions, but circumventing copy protection (such as AACS 2.0) can still be restricted by law. Sharing, uploading, or selling copied files is almost always illegal.
Can you rip 4K Blu-ray with a regular Blu-ray drive?
No. Most standard Blu-ray drives cannot read 4K Ultra HD Blu-ray discs in a way that ripping tools can use. UHD discs use stricter AACS 2.0+ protection, and only certain UHD-friendly drives can provide accessible data for backup.
To check your setup:
- Use a tool such as DVDFab UHD Drive Tool to see whether your drive and firmware are recognized as UHD-friendly.
- Look up your drive model and firmware version in your operating system and compare it against known UHD-friendly drive lists from reliable forums or vendors.
Some users modify their drives by downgrading or cross-flashing the firmware to make them UHD-friendly. This is an advanced procedure and carries a real risk of damaging the drive, so always back up the original firmware first.
How much space does a ripped 4K Blu-ray take up?
A ripped 4K Blu-ray movie can take up anywhere from 50GB to 100GB of storage space, depending on the size of the original disc, how the content is encoded, and whether it's compressed or not. For example, the main video file and lossless audio track of Star Trek (BD-66GB disc) take up about 50-65GB.
To put the long-term storage cost into perspective, a Reddit user shared actual data: maintaining a library of roughly 700 1:1 lossless rips (a mix of 4K and standard Blu-rays) consumes about 25TB of NAS storage. If you are building a large media server for Plex or Jellyfin, plan your hard drive capacity accordingly.
When ripping a 4K Blu-ray, should I choose Remux or Transcode?
Once your 4K Blu-ray is loaded into the ripping software, you'll need to decide whether to create a Remux or a Transcode. A Remux takes the original video and audio tracks and places them into a new container. The quality remains the same as the disc and the process is faster. A Transcode re-encodes the video using a codec such as H.265 to reduce the file size. This process is slower, requires more CPU or GPU power, and may slightly reduce quality. For most users who want a lossless backup, MKV Remux is the best option. Choose Transcode only if you need smaller files or better compatibility with certain players or mobile devices.
What is the best drive for 4K Blu-ray Ripping?
Based on the feedback provided by users and combined with our tests, the following is the analysis and recommendation for 4K Blu-ray drives. Please note that compatibility depends heavily on firmware version, and some models may require a downgrade to become UHD-friendly.
| Model | No Firmware Flashing | UHD Support | Speed & Stability | Noise Control |
| Pioneer BDR-XS07UHD | √ | √ | High-speed writing, strong compatibility | Moderate |
| Archgon MD-8107S-U3 | √ | √ | Stable ripping, low noise | Excellent |
| Pioneer BDR-S06XLB | × | √ (after mod) |
Cost-effective, mature tech | Moderate |
| ASUS BW-16D1H-U Pro | × | √ (after mod) |
16X DVD writing, high durability | Excellent |
Conclusion
In short, there's no need to invest in a costly 4K Blu-ray player to enjoy your UHD movie collection. With a compatible UHD drive and reliable 4K Blu-ray ripping software, you can easily back up, archive, and watch your discs on TVs, media servers, or portable devices.
Based on our performance tests, DVDFab UHD Ripper clearly stands out with its powerful decryption, Dolby Vision preservation, fast 1:1 ripping, and customizable output formats.
 DVDFab UHD Ripper Review: Key Features Tested & How toBy Diana Smith - Jul 1, 2026