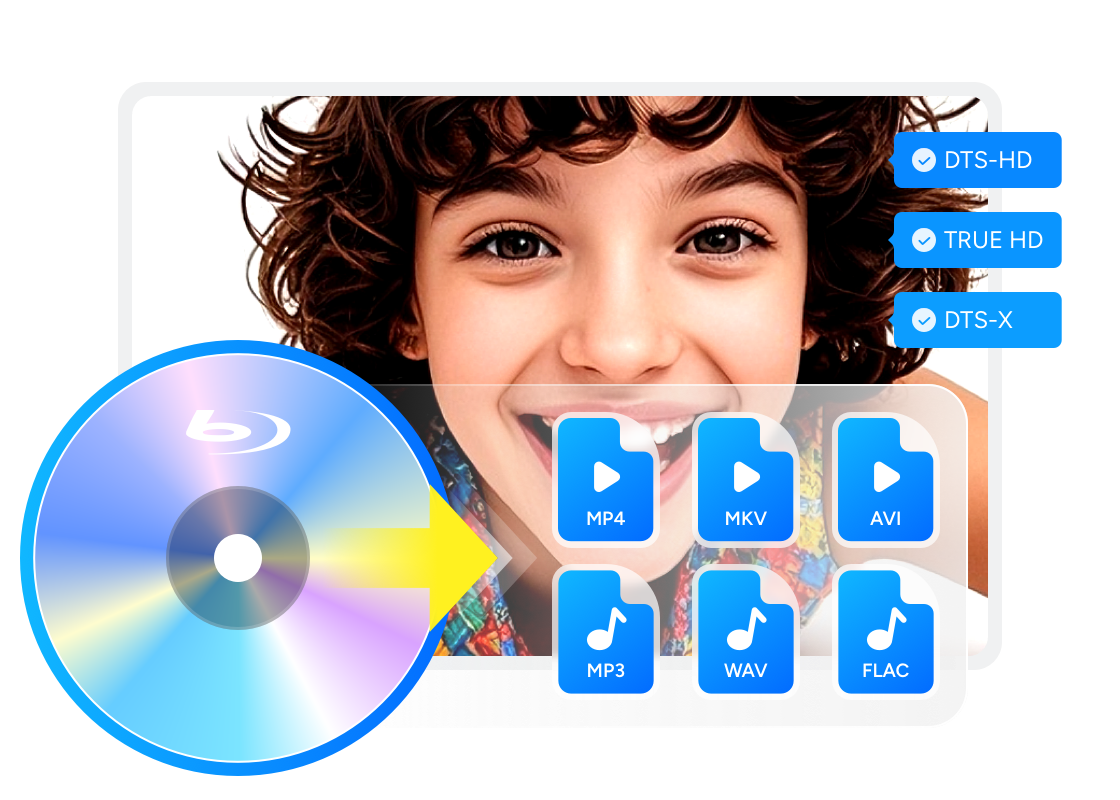
How to Rip and Extract Hi-Fi Audio from Blu-rays Easily? [2026 Update]
Summary: To rip audio from Blu-ray, you need a Blu-ray reader connected to your computer and software that can read the encrypted Blu-ray disc. The most direct method is to use a Blu-ray audio ripper such as DVDFab Blu-ray Ripper to choose the title, chapter range, and audio stream, then export the audio as FLAC, WAV, MP3, AAC, or another format. For Blu-ray Audio or concert discs, DVD Audio Extractor can also save the audio separately, while MakeMKV with MKVToolNix is better when you want to keep the original Blu-ray audio stream in an MKV first and extract it later.
Table of Contents
I often extract audio from Blu-ray movies and concert discs because I do not always want to load the disc just to hear the soundtrack, a live performance, or a favorite chapter again. Once the audio is saved as a separate file, I can play it on my phone, in the car, or on a media server without keeping the Blu-ray disc in the player.
Many people start by converting the disc to a video file first, but that is not always the most direct way to get the audio you want. In this guide, I will show you how to rip audio from Blu-ray discs, ISO files, and Blu-ray folders, how to choose the right output format, and what to check when you want to keep stereo or surround sound.

Before You Start: Choose the Right Blu-ray Audio Extractor
Before you rip Blu-ray audio, check what source you have and what output you need. This will help you choose the shortest method.
| Your Source | Recommended Tool | Use It For | Output You Can Expect |
|---|---|---|---|
| Protected Blu-ray disc, ISO image, or Blu-ray folder | DVDFab Blu-ray Ripper | Direct audio export from a Blu-ray source | FLAC, WAV, MP3, AAC, M4A, OGG, and other supported profiles |
| Homemade Blu-ray disc you want to save as MKV first | MakeMKV + MKVToolNix | Keeping original audio streams, chapters, and language information before extraction | MKV first, then extracted or converted audio |
| Blu-ray Audio disc, concert Blu-ray, or DVD-Audio disc | DVD Audio Extractor | Audio-first extraction with chapter selection | FLAC, WAV, MP3, OGG, or demuxed PCM, AC3, DTS, MLP, MPA streams |
How to Extract Blu-ray Audio with DVDFab Blu-ray Ripper?
DVDFab Blu-ray Ripper is a professional Blu-ray audio ripper that can extract audio from a Blu-ray disc, ISO image, or Blu-ray folder without first converting the whole movie to another video file. You can choose Hi-Fi Audio profiles for FLAC or WAV when you want to retain the lossless Dolby TrueHD or DTS-HD Master Audio quality, or switch to common audio formats such as MP3, AAC, M4A, and OGG when you need smaller files for everyday playback.
In my use, its main advantage is that the audio export settings are available before the ripping process starts, so I can choose the title, chapter range, and audio stream based on the disc content. This is especially helpful for concert discs and movie soundtracks, where I may only want one performance, one language mix, or separate files split by chapter instead of one long audio file. It also supports Blu-ray decryption, so I can easily extract my favorite movie soundtracks and add them to my music library.
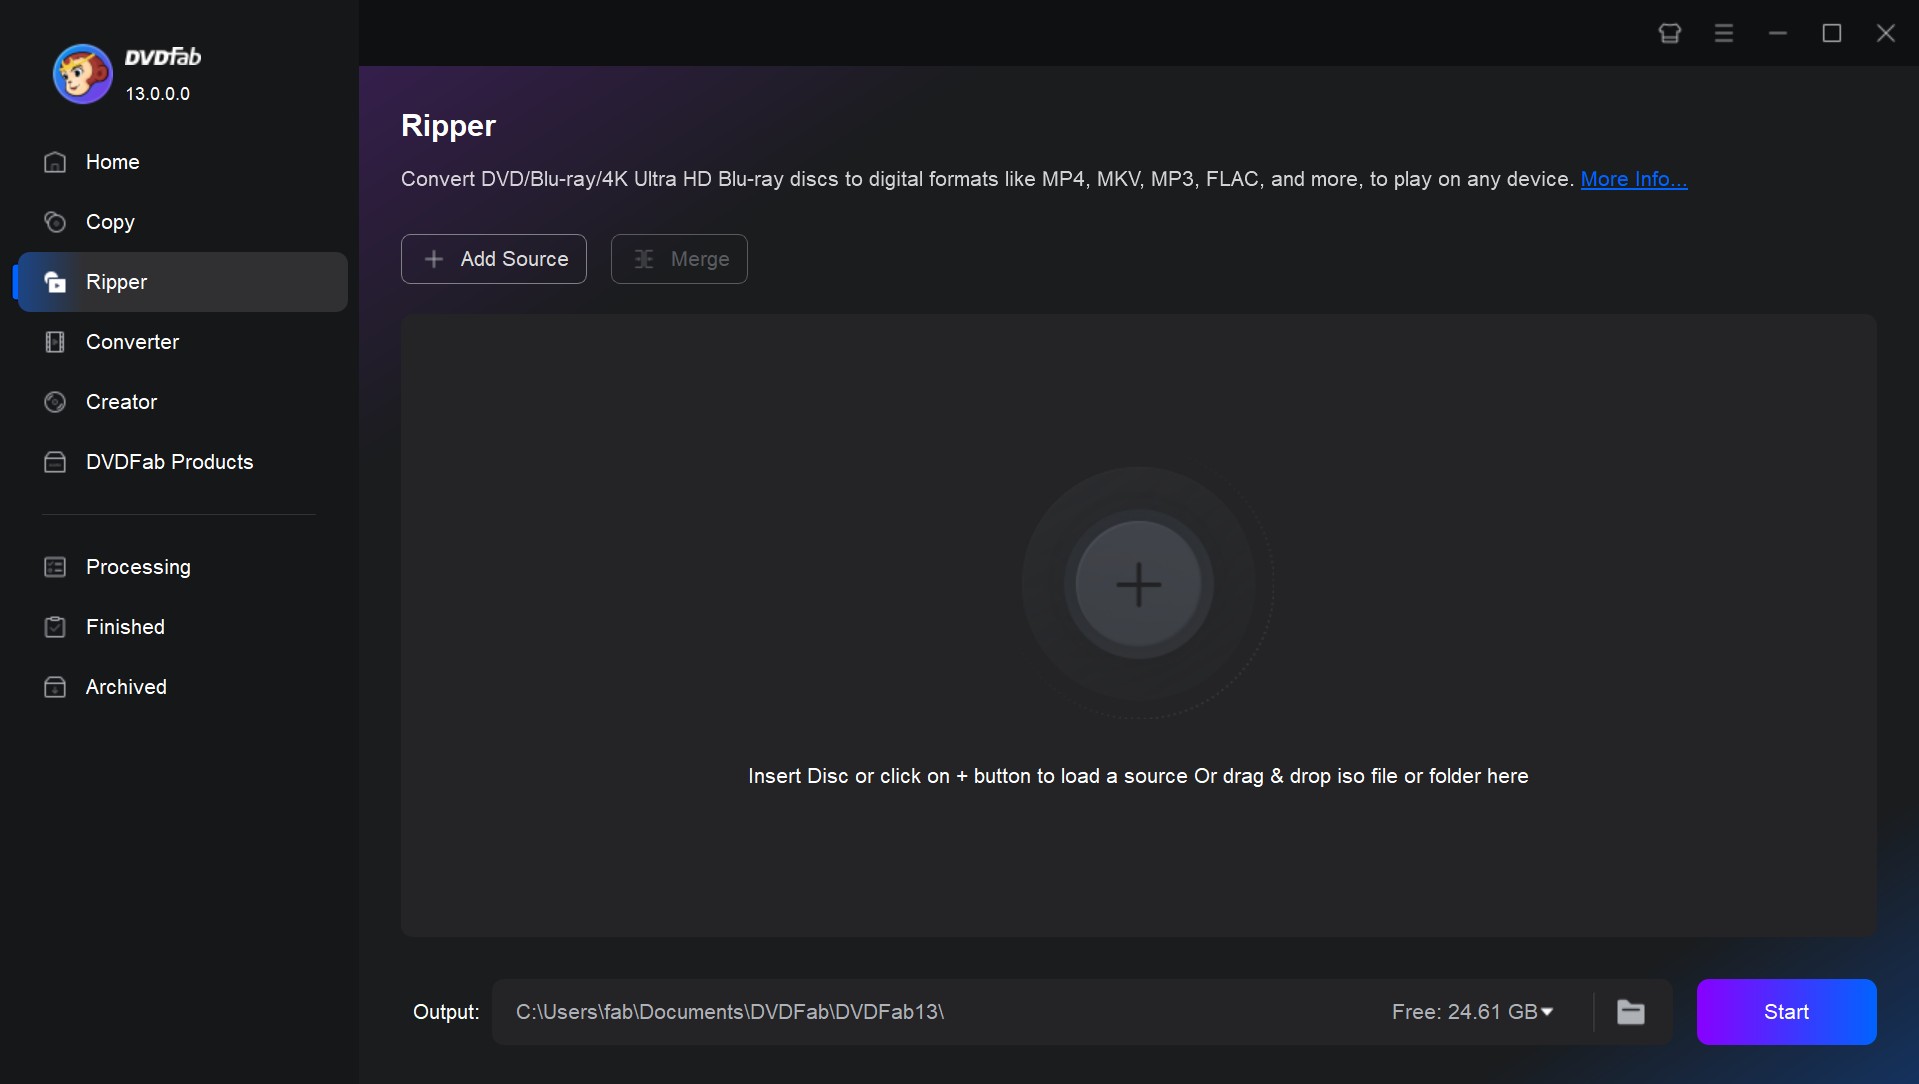
Step 1: Open DVDFab and Load Your Blu-ray Disc, ISO, or Folder
Download and install DVDFab 13. After that, run DVDFab and select Ripper from the menu.
Insert your Blu-ray into the optical drive, and DVDFab 13 will automatically load and decrypt the disc. If you're working with a Blu-ray ISO file or folder, click + or the +Add Source button to import them, or drag and drop the source anywhere in the main window.
Step 2: Choose a Hi-Fi Audio Profile
To choose the hi-fi output format, click Choose Other Profile > Format > Hi-Fi Audio.
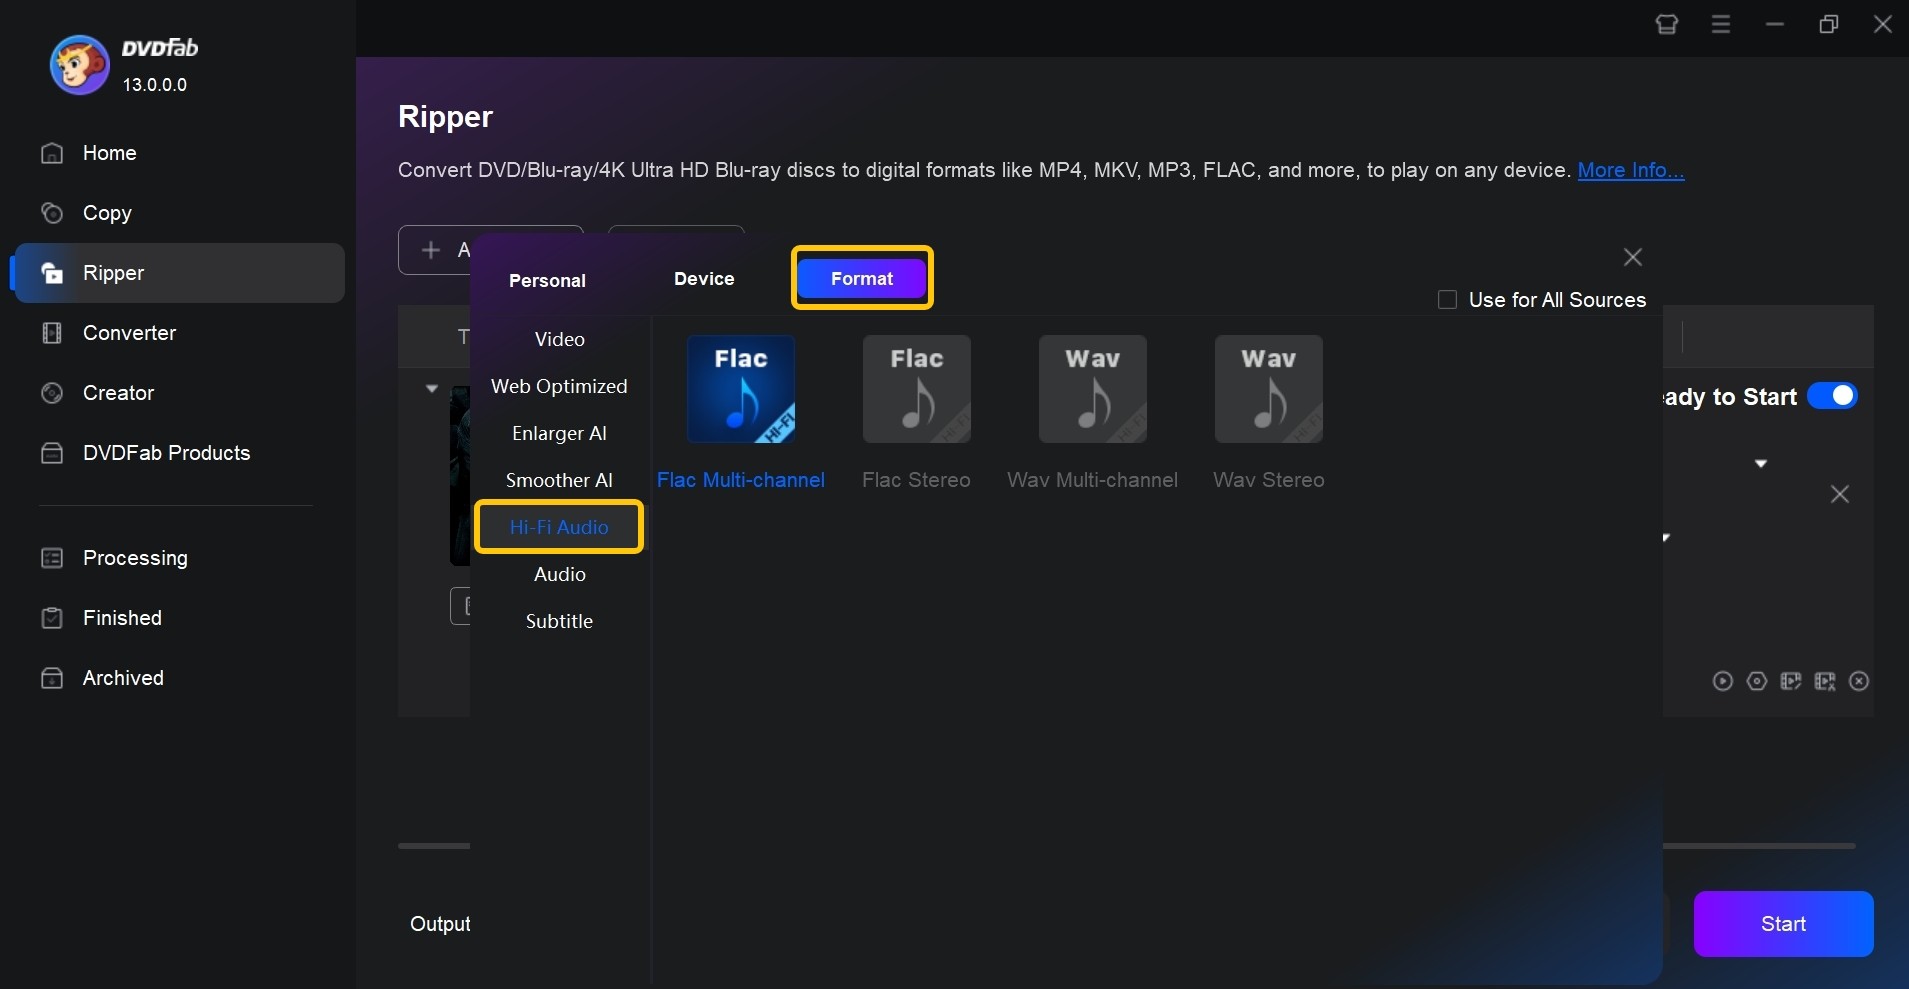
Here are four distinct conversion profiles: Flac Multi-channel, Flac Stereo, Wav Multi-channel, and Wav Stereo. To achieve the best possible quality, select the profile that best matches your sound system. If your system supports surround sound, you'll probably want to go with one of the multi-channel options.
- If you want a space-saving two-channel music library, choose FLAC Stereo.
- If you want true surround (5.1/7.1) while keeping file sizes smaller than WAV for home theater playback, choose FLAC Multi-channel.
- If you want maximum compatibility with pro tools or uncompressed PCM for editing in stereo, choose WAV Stereo.
- If you want uncompressed multichannel PCM for archival use and storage isn't a concern, choose WAV Multi-channel.
- If high-resolution audio isn't necessary, click Format > Audio. There are 16 audio options available, including MP3 and AAC. If you want to know which output format is most suitable, read Q2 in the FAQs of this article.
Step 3: Select the Title, Chapter Range, and Audio Stream
In the main interface, select titles, chapters, audio tracks and subtitles you want to keep in the output file. You're probably not going to use some of these options if you're converting a concert or album but they do come in handy when using the tool to rip audio from Blu-ray movies.
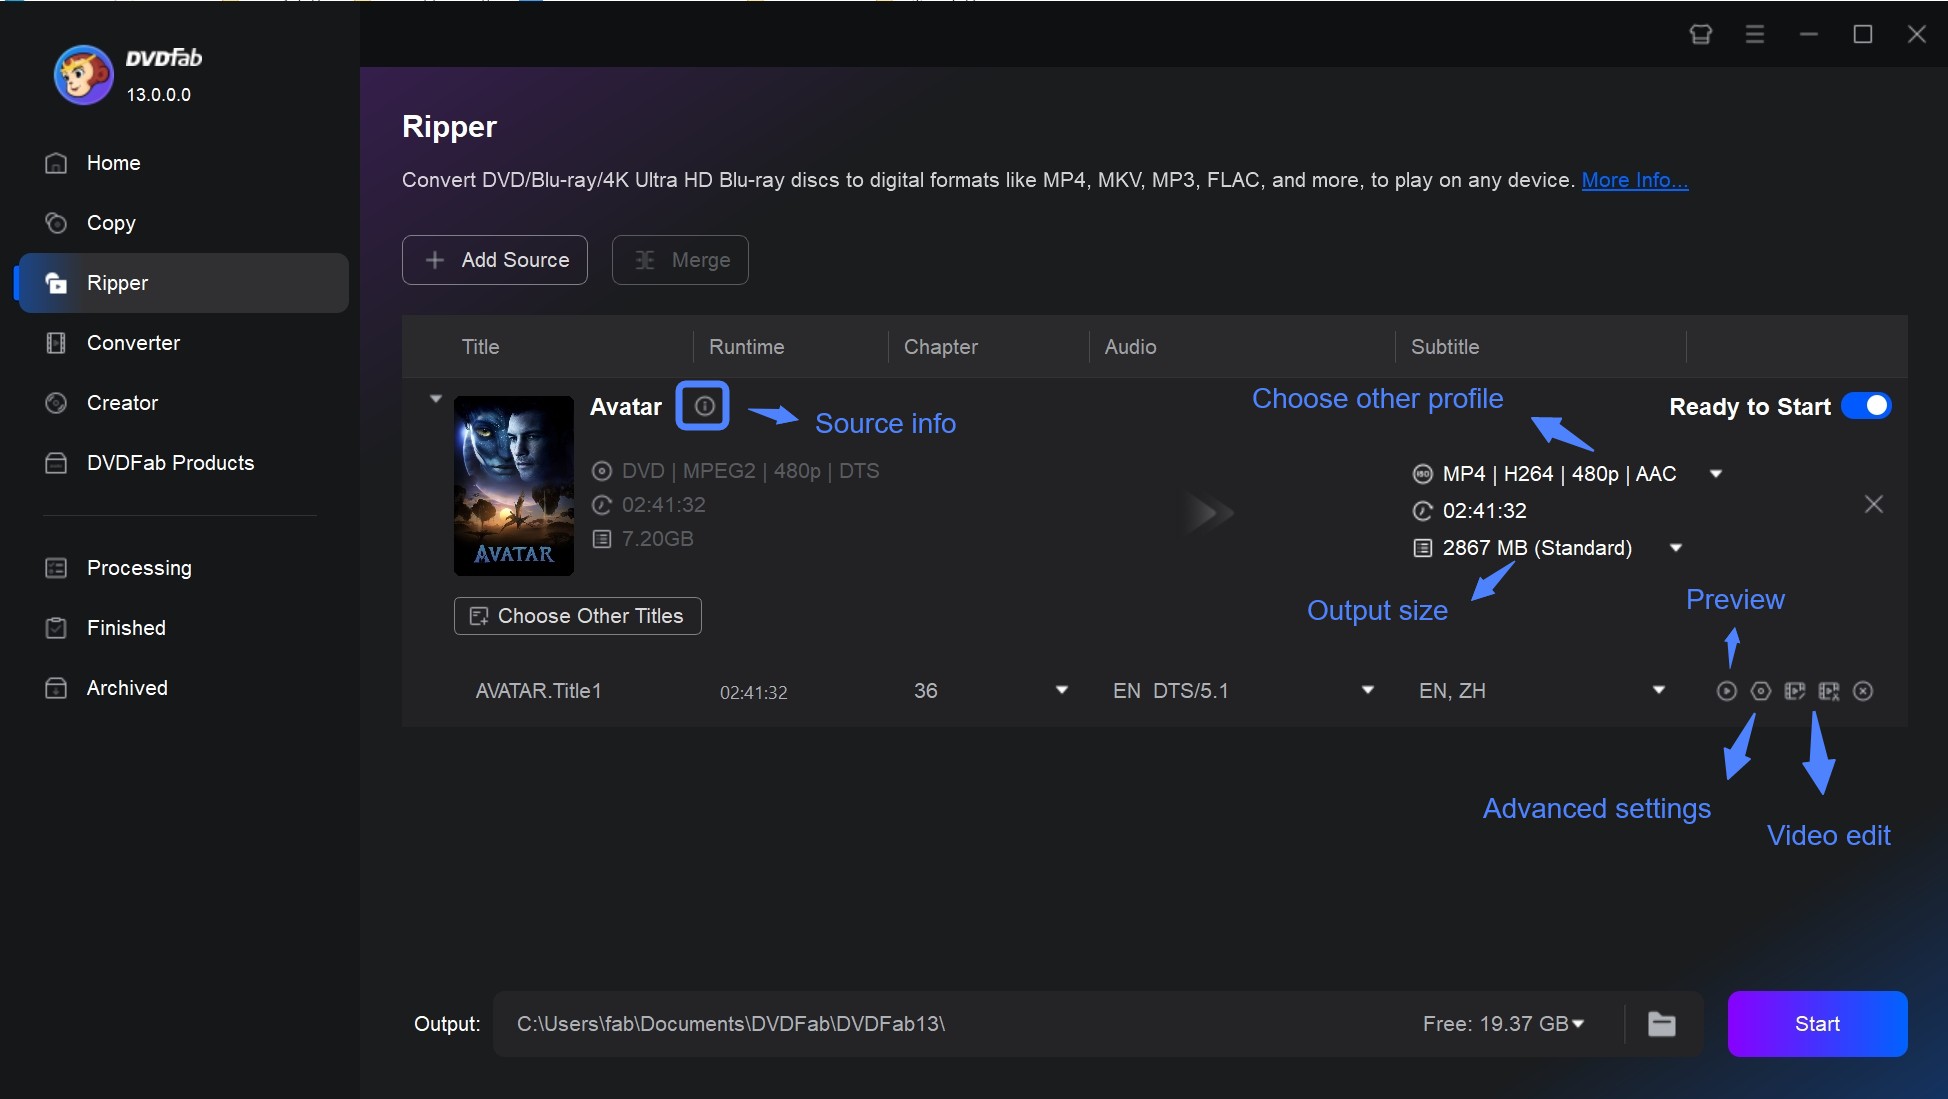
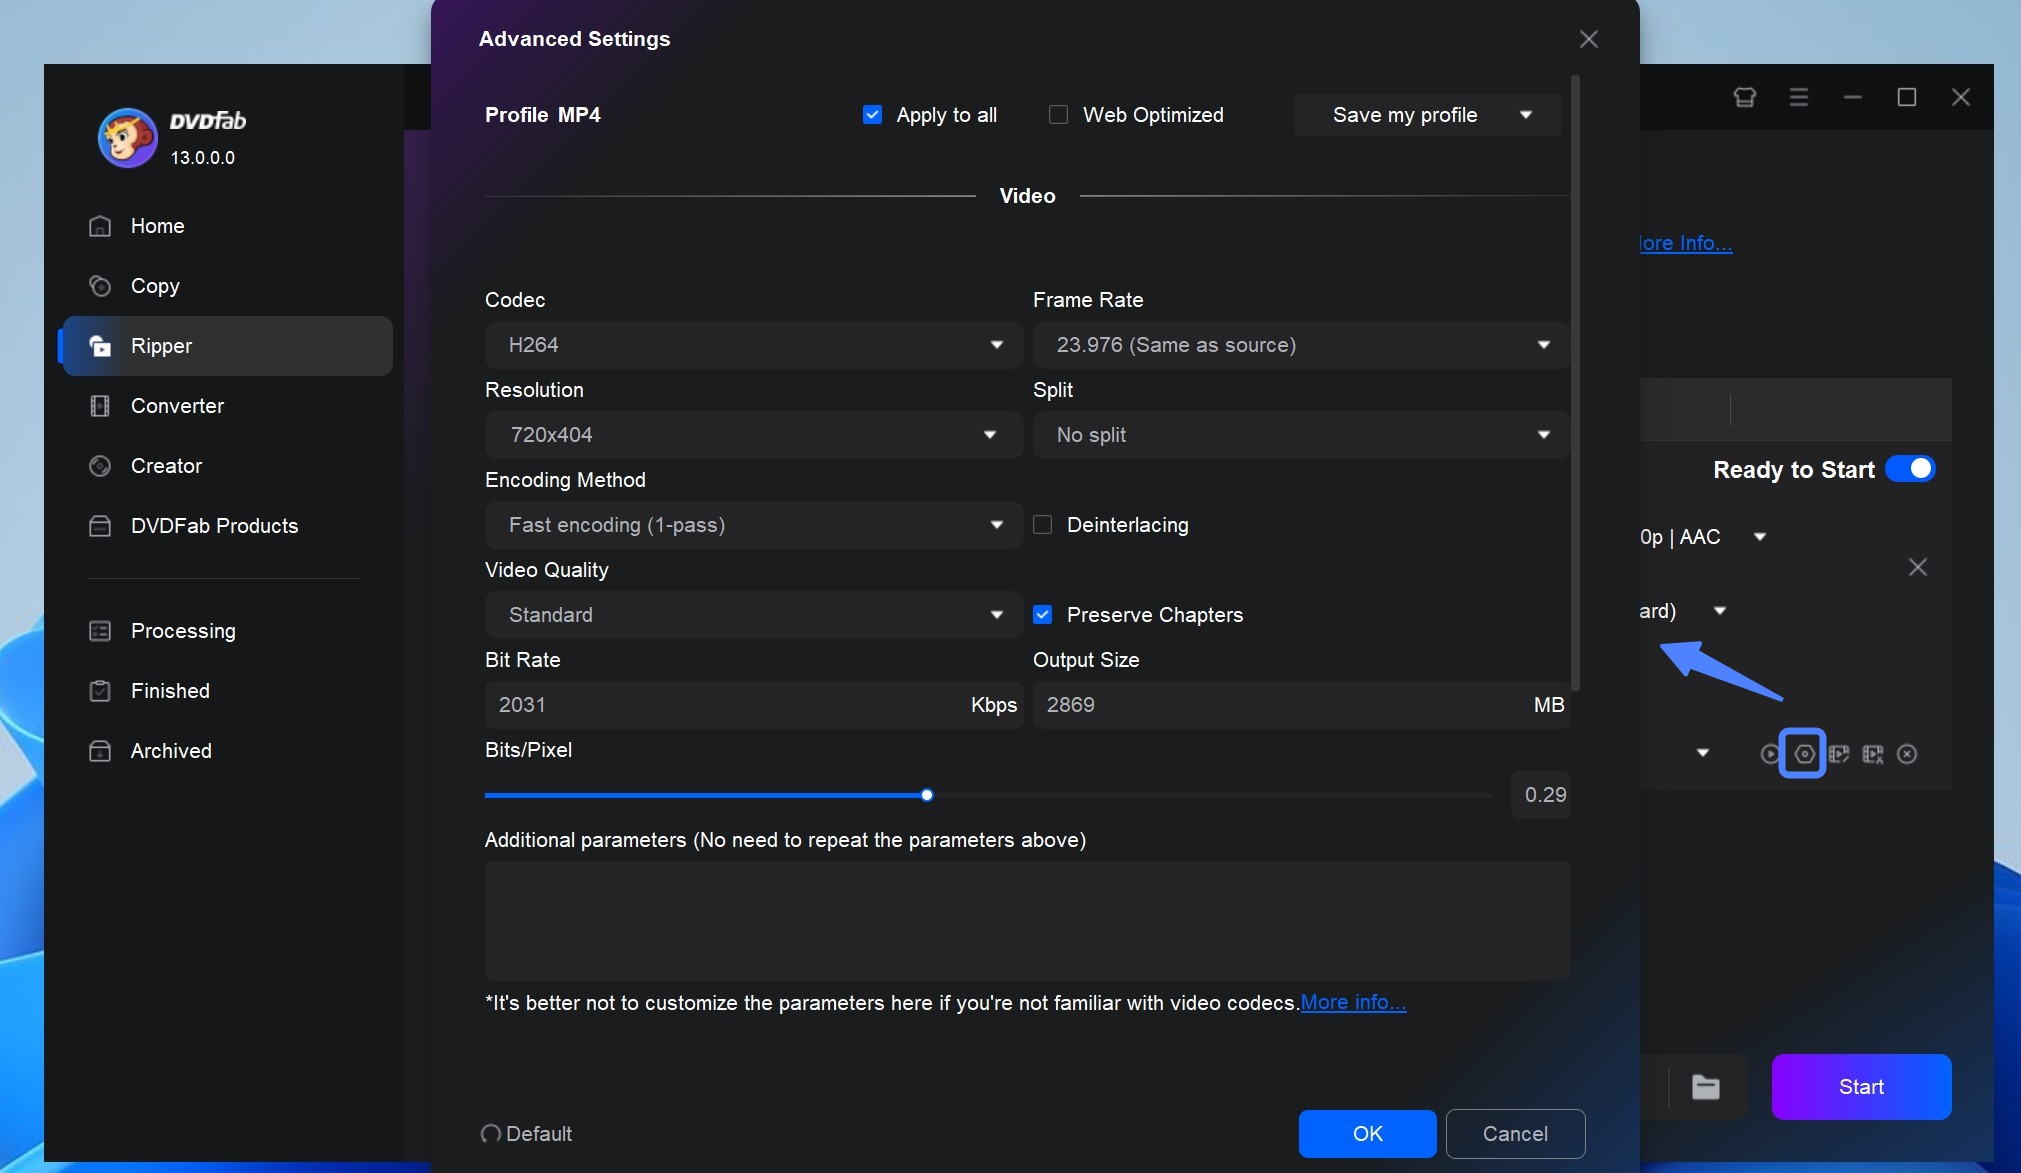
Step 4: Adjust Audio Settings
To further customize the properties of your output audio, click Advanced Settings (the wrench icon), and set a different sample rate (up to 192 kHz High-Definition Output), channels, and use the slider to adjust the volume. Some of the options found here are static, such as codec, bit rate or bit depth, since they are tied to the profile you pick and can't actually be modified.
To split the Blu-ray by chapters, turn on the Split. If you leave the "No Split" option on, DVDFab Hi-Fi Audio Extractor will output the entire contents of the Blu-ray onto a single audio file.
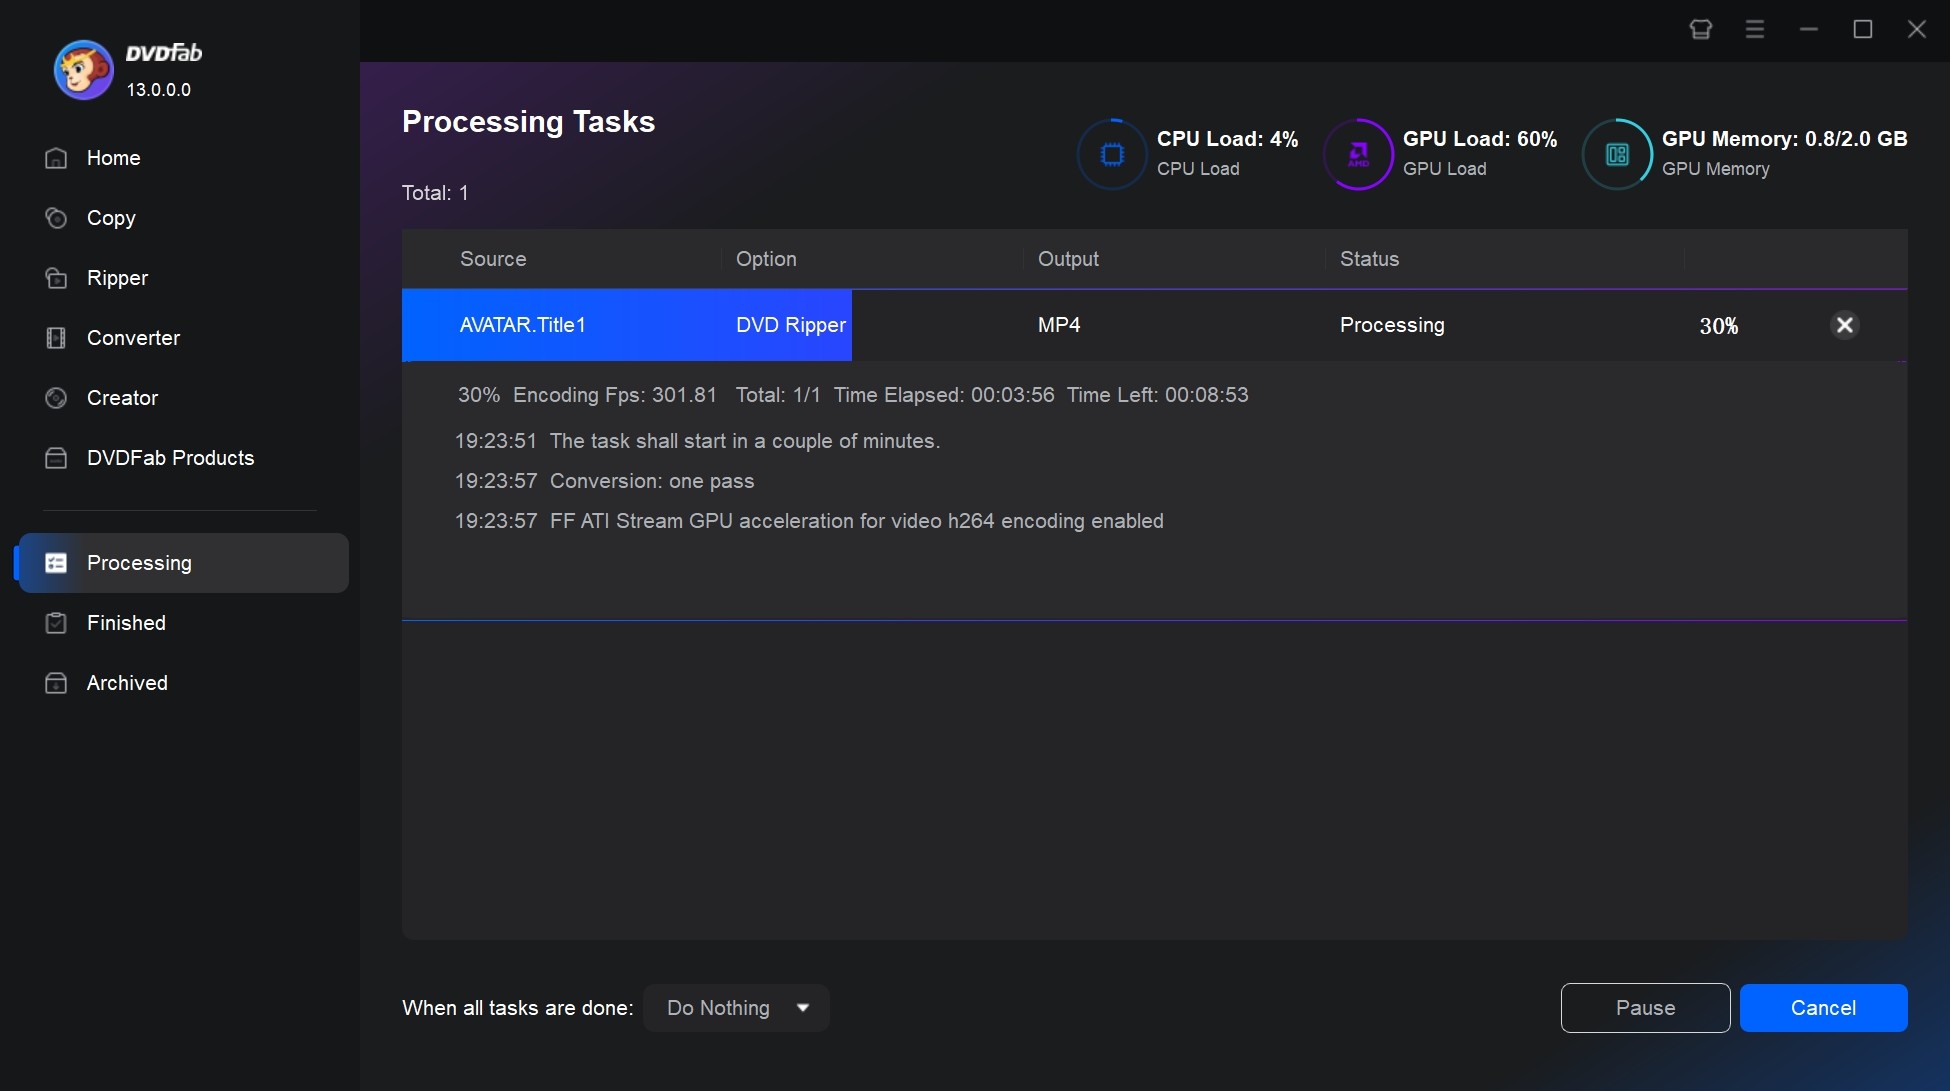
Step 5: Start to Rip Blu-ray Audio with DVDFab Blu-ray Ripper
In the output box, choose a destination for your hi-fi audio files. After that, click the "Start" button to initiate the audio extraction from Blu-ray.
How to Extract Blu-ray Audio with MakeMKV and MKVToolNix
MakeMKV is useful when you want to keep the original Blu-ray audio stream inside an MKV first. It can keep audio streams, HD audio, chapter information, and metadata in an MKV container. However, MakeMKV does not export a finished FLAC or WAV music file by itself.
After you rip Blu-ray to MKV file with MakeMKV, you'll need a second tool, such as MKVToolNix or mkvextract, to extract the DTS-HD Master Audio, Dolby TrueHD, AC3, DTS, or PCM stream. That extra step makes the process less convenient than using a dedicated Blu-ray audio extractor, and it cannot read advanced protected Blu-ray discs.
Step 1: Rip Blu-ray to MKV with MakeMKV
- Open MakeMKV and load the Blu-ray disc.
- Select the title that contains the movie, concert, or album program.
- Keep the audio stream you need. For surround sound, choose the HD audio stream when it is available.
- Save the selected title as an MKV file.
Step 2: Open the MKV in MKVToolNix
- Open MKVToolNix GUI and add the MKV file.
- Review the file items. You may see video, audio, subtitles, chapters, and attachments depending on the source.
- If you only want audio, keep the audio stream and chapter data, then remove items you do not need.
- Use chapter splitting if you want one file per song or chapter.
Step 3: Extract Blu-ray Audio from the MKV
MKVToolNix includes mkvextract, which can extract streams from Matroska files. If you need a separate FLAC or WAV file, you may need an audio converter after extraction, depending on the codec you extracted.
How to Rip Blu-ray Audio with DVD Audio Extractor
DVD Audio Extractor is mainly for extracting audio from discs, not converting a full Blu-ray movie. It can read Blu-ray, DVD-Audio, and DVD-Video sources, then export the audio as FLAC, WAV, MP3, OGG, or demuxed streams such as PCM, AC3, or DTS.
You can try this tool for a concert disc or Blu-ray Audio disc when the program can read the source and you want an audio file rather than a movie file. It is not the right choice if the Blu-ray is blocked by protection or if you also need a full video copy.
Here are the Steps to Extract Blu-ray Audio with DVD Audio Extractor:
- Install DVD Audio Extractor and open the program.
- Insert the Blu-ray disc, or load a Blu-ray folder if the program can read your source.
- Select the title that contains the music, concert, or movie audio you want.
- Choose the audio stream. For a movie disc, check the language and channel layout before exporting.
- Choose an output format. Use FLAC for a lossless music library, WAV for editing, MP3 or OGG for smaller files, or demux if you want to keep streams such as AC3 or DTS.
- Choose the output folder, then start the extraction.
FAQs
Can I rip just the audio from a DVD?
Yes. You can use a DVD audio extractor such as DVDFab DVD Ripper. The process is similar to ripping Blu-ray audio: load the DVD, select the title or chapter range, choose the audio track, and export it to an audio format. You can also read this guide on how to extract audio from DVDs.
What audio format should I choose when ripping Blu-ray audio?
There is no single right format for every Blu-ray audio rip. The better choice depends on whether you want a music library, an editing file, a smaller mobile copy, or the original home theater audio stream.
| Type | Format | Features | Use Cases |
|---|---|---|---|
| Lossy Compression | MP3 | Small file size and broad player support, but not lossless | Phones, car stereos, older players, and casual listening |
| AAC | Good quality at common bitrates and wide mobile device support | iPhone, iPad, Android devices, media apps, and portable playback | |
| WMA | Microsoft audio format mainly used in Windows environments | Windows Media Player and older Windows-based devices | |
| OGG | Open audio format with smaller files than WAV or FLAC | Players and apps that support OGG playback | |
| AC3 | Supports surround sound and is common on DVD and Blu-ray sources | AV receivers, home theater players, DVD, Blu-ray, and digital TV audio | |
| DTS | Surround sound format often used on Blu-ray and home theater discs | AV receivers and players that support DTS decoding | |
| Lossless Compression | FLAC | Lossless compression, metadata support, and smaller files than WAV | Music libraries, Blu-ray Audio discs, and players that support FLAC |
| Lossless Uncompressed | WAV | Uncompressed PCM audio with large file sizes | Audio editing, PCM playback, and software that works better with WAV |
Can I keep 5.1 or 7.1 sound when I extract audio from Blu-ray?
Yes, if the source contains 5.1 or 7.1 audio and you choose a multi-channel output profile. In DVDFab, use FLAC Multi-channel or WAV Multi-channel. After exporting, check the file with a player or media information tool to confirm the channel count.
What do I need to play Blu-ray audio?
To play Blu-ray audio from a disc, you need a Blu-ray player, an HDMI connection, and an audio device that supports the disc's audio format. For extracted audio files, the required setup depends on the format you choose.
- Blu-ray Player: Needed when playing the original Blu-ray disc. Many players can read Dolby TrueHD, DTS-HD Master Audio, and LPCM.
- Audio/Video Receiver (AVR): Needed if you want to decode and play surround formats such as Dolby TrueHD, DTS-HD Master Audio, AC3, or DTS through speakers.
- Speakers: Use stereo speakers for 2-channel audio, or a 5.1 / 7.1 speaker setup for multi-channel playback.
- HDMI Cable: Needed when sending Blu-ray video and audio from a player to an AVR or TV.
- Media Player: Needed when playing extracted FLAC, WAV, MP3, AAC, AC3, or DTS files on a computer, phone, media server, or home theater device.
If you do not want to use a Blu-ray player each time, you can extract audio from Blu-ray discs with DVDFab Blu-ray Ripper and play the exported files on supported devices.
Final Thoughts
Ripping audio from Blu-ray discs is a good way to keep the sound from your favorite concerts, movies, or albums available as separate audio files. Whether you need audio-only files or a complete Blu-ray to MKV conversion, DVDFab Blu-ray Ripper helps you save your disc collection in a audio or video format that fits how you plan to play it.
![Top 5 Free Blu-ray Decrypters for Legal Use [2026 Test]](https://r1.dvdfab.cn/upload/resource/how-to-decrypt-blu-ray-Row0.jpeg) Top 5 Free Blu-ray Decrypters for Legal Use [2026 Test]By Wenny Yan - Jun 26, 2026
Top 5 Free Blu-ray Decrypters for Legal Use [2026 Test]By Wenny Yan - Jun 26, 2026 Best Free Blu-ray Rippers in 2026: Tested Tools and Guide to Rip Blu-raysBy Wenny Yan - Jun 12, 2026
 How to Convert 3D Blu-ray to 2D Video: DVDFab 3D Converter GuideBy Diana Smith - Jun 10, 2026
 How to Rip Blu-ray to MKV on Windows & Mac: 4 Best Converters TestedBy Diana Smith - May 25, 2026