How to Edit a DVD with DVDFab DVD Ripper: Trim, Crop, Add Subtitles, and More
Summary: A DVD cannot normally be edited in place like an MP4 file. Load the disc, ISO image, or DVD folder into DVDFab DVD Ripper, select the correct title, apply edits such as trimming, cropping, subtitles, watermarks, or merging, and export the result as a new MP4 or MKV file. Creating another disc for a standard DVD player requires a separate DVD-authoring step.
A DVD stores its video, audio, subtitles, chapters, and navigation data in a disc structure rather than in one ordinary video file. To edit the content, you first need to read the DVD source, choose the title you want, apply the required changes, and export a new digital video.
The following steps use DVDFab DVD Ripper to trim scenes, crop or rotate the picture, adjust color, add subtitles or watermarks, merge clips, and save the edited DVD video.
Note: Edit only discs or recordings that you own or have permission to use, and follow the copyright rules that apply in your region.
Can You Edit a DVD Directly?
You cannot normally edit a read-only DVD in place. Unlike an MP4 file stored on a hard drive, a DVD contains titles, chapters, audio streams, subtitles, and navigation information arranged in a DVD-Video structure.
DVDFab DVD Ripper reads a selected title from a DVD disc, ISO image, or DVD folder and applies your editing settings while creating a separate digital video. It does not rewrite the original source.
| Source | What Is Edited | Result |
| DVD disc | A selected title and chapter range | A new MP4, MKV, or another selected digital format |
| ISO image | The selected DVD title inside the image | An edited digital video |
| DVD or VIDEO_TS folder | A selected title from the folder structure | An edited digital video |
| Edited file that must play in a DVD player | The exported video must be authored after editing | A new DVD-Video disc, ISO, or folder |
Choose the final result before you start. MP4 with H.264 is suitable for broad playback support and further editing. MKV is useful when you need several selectable audio or subtitle streams. If the result must work in a standard DVD player, export the edited video first and then create a new DVD-Video project.
DVD Editing Software Used in This Guide: DVDFab DVD Ripper
DVDFab DVD Ripper is dedicated DVD-ripping and editing software that converts homemade and supported copy-protected DVDs into digital video or audio files. It can preserve the original video and audio streams when you select a passthrough profile, while compressed profiles re-encode the content.
Before export, the built-in editor lets you crop, trim, and merge video, add watermarks or external subtitles, and adjust brightness, contrast, and saturation. You can also customize video and audio parameters. On supported hardware, acceleration from NVIDIA, AMD, Intel, or Apple VideoToolbox can reduce processing time, while the task queue processes multiple ripping jobs in sequence.
Free Download Windows 11/10/8.1/8/7
Free Download macOS 10.13 - 15.x
- Keep updating to support the newly-release encrypted DVDs.
- Support batch conversion and powerful GPU acceleration.
- Rip the edited DVD to various compatible formats and compress the big DVD videos.
- Serve as a DVD to MP3 converter and editor that extracts audio from DVD in high-quality.
- Convert DVDs to play on different devices like PlayStation 4, Xbox One, iOS, Android, etc.
- The metadata info. of the original DVD will be displayed on the media server when you play it.
- Clean cuts: Remove trailers/ads/outtakes; join chapters into one seamless movie.
- Perfect framing: Fix black bars, change aspect ratio, or crop for social-friendly sizes.
- Brand or protect content: Add logos or semi-transparent watermarks.
- Make it look right: Correct color cast, boost contrast, sharpen soft footage.
- Tell the story: Add and style subtitles; adjust timing to match dialogue.
- Sound your way: Extract audio (e.g., DVD to MP3) or export edited videos with your chosen codec/bitrate.
How to Edit a DVD Using DVDFab DVD Ripper
Step 1: Load the DVD Disc, ISO Image, or DVD Folder
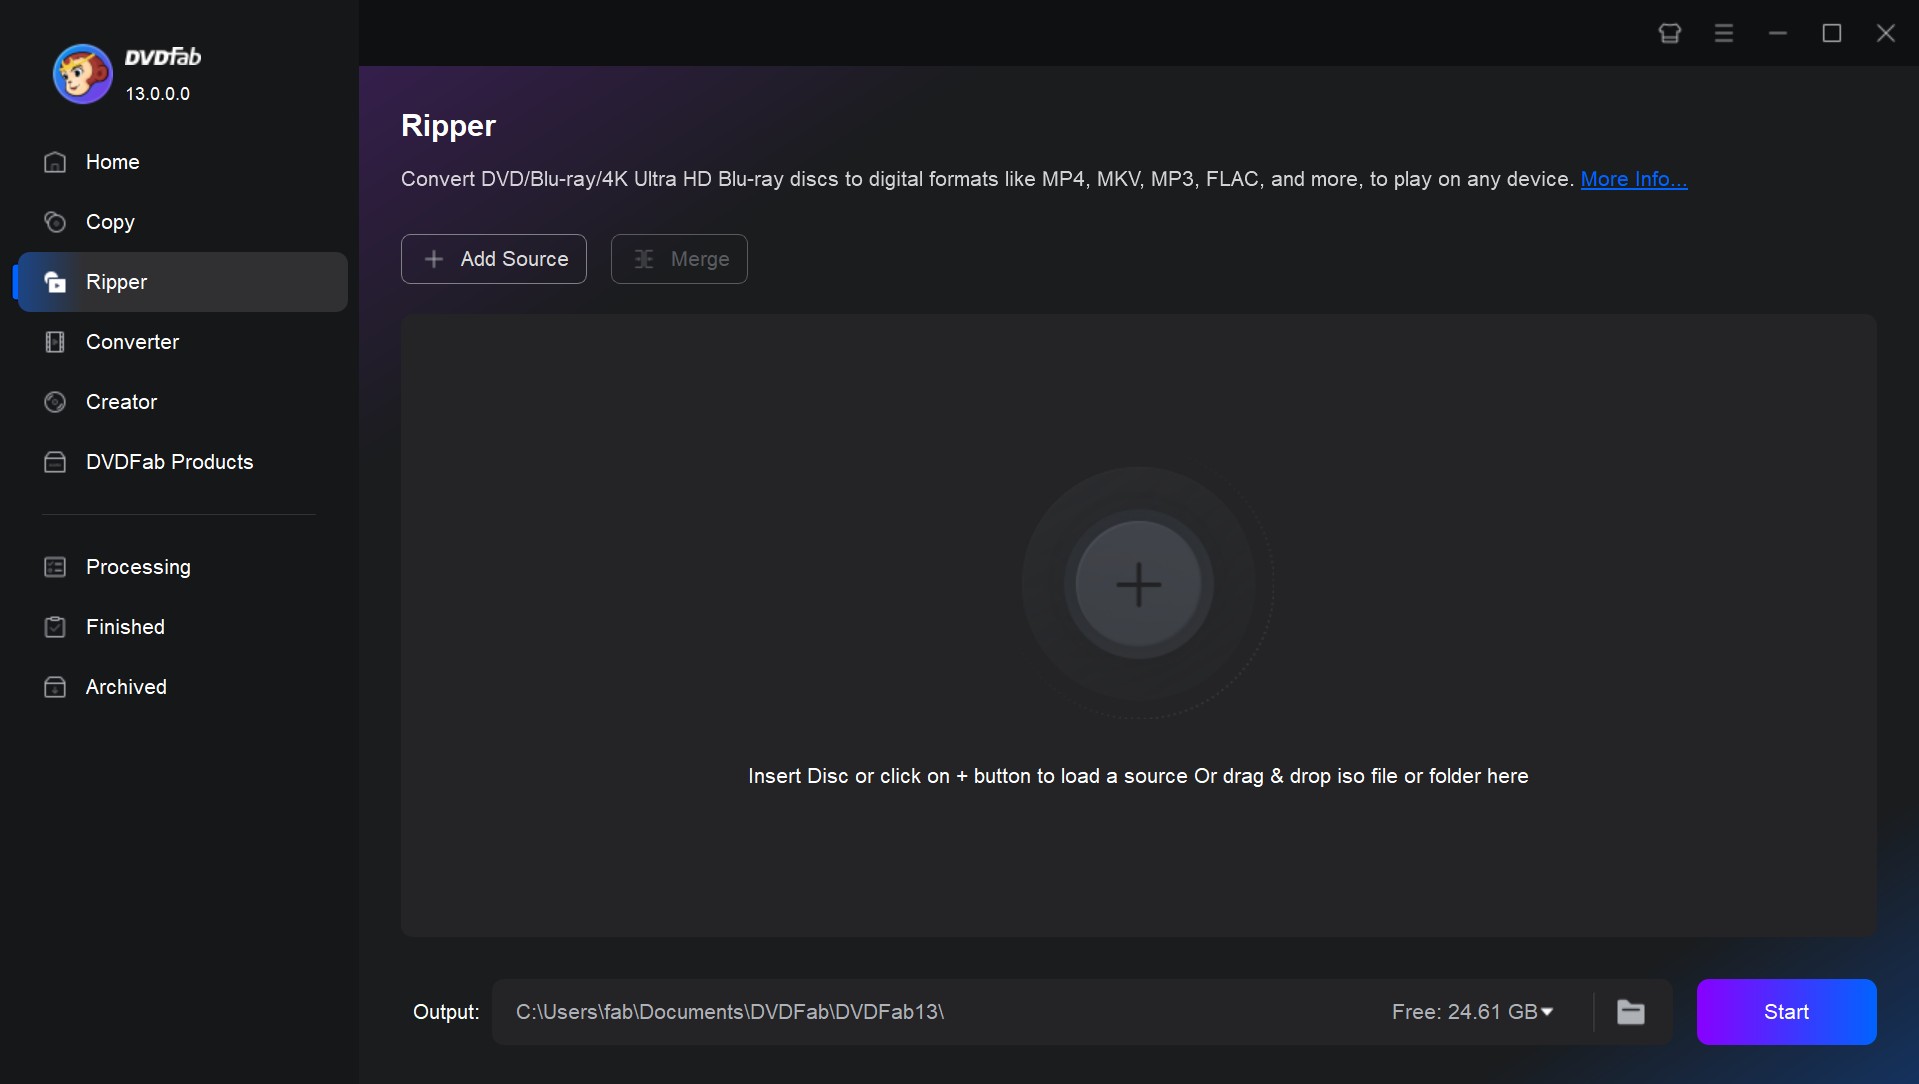
Open DVDFab 13 and select Ripper from the module bar.
- For a physical DVD, insert the disc into the connected optical drive.
- For an ISO image or DVD folder, click Add Source or drag the source into the main window.
- Wait until DVDFab finishes reading the source and displays the available titles.
Step 2: Select the Title, Chapters, Audio, and Subtitles
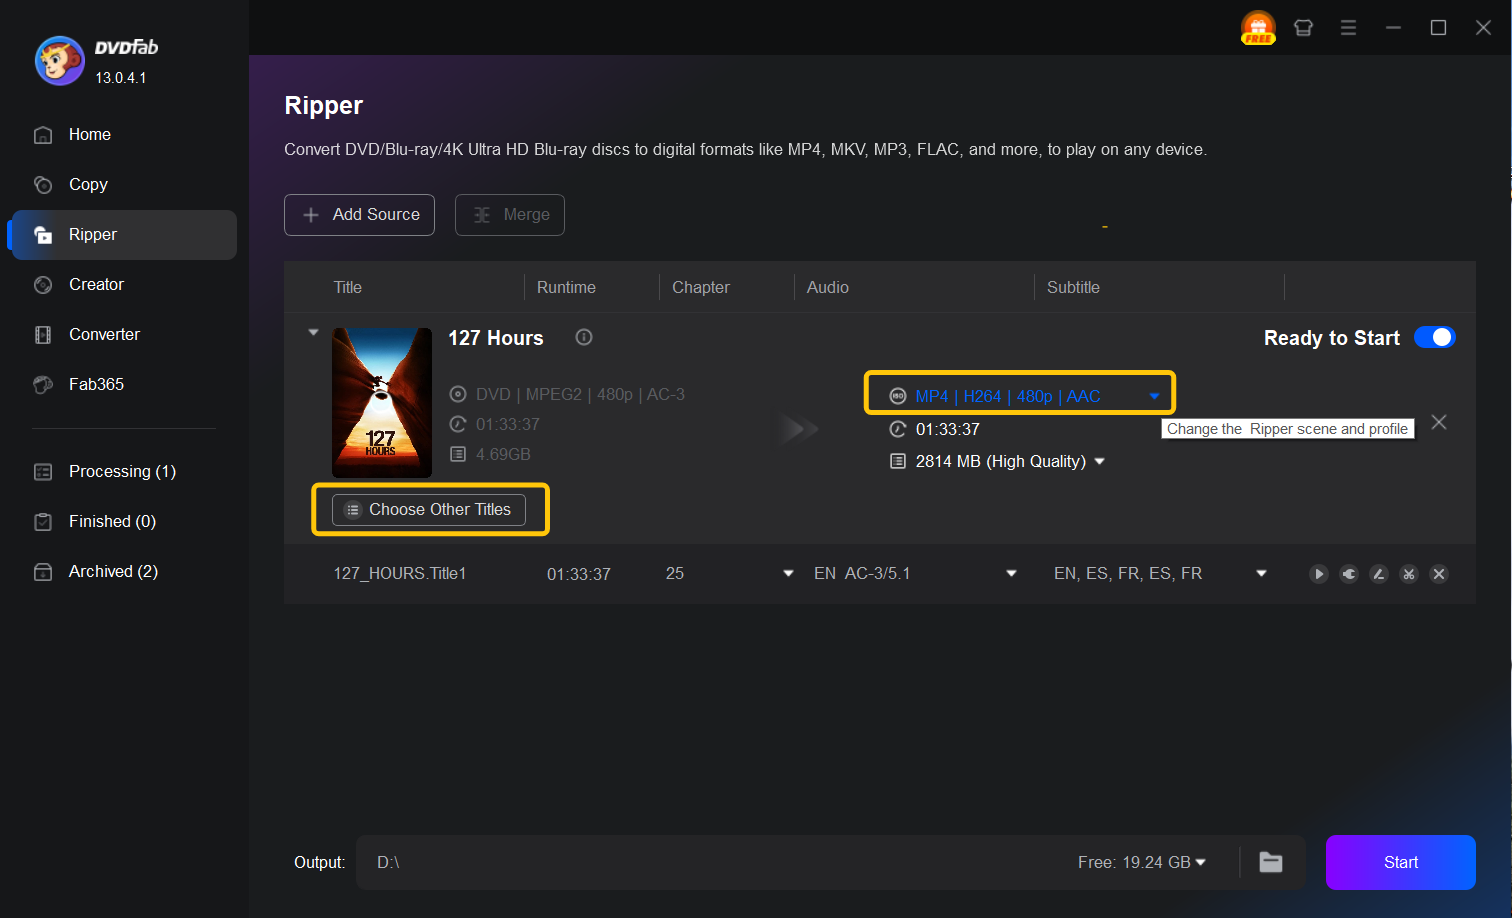
DVDFab selects a title after loading the source, but the default entry may not be the movie, episode, concert, or home recording you need. Open Choose Other Titles and compare the available durations.
- Preview the opening scene of the likely title.
- Check a point near the end to confirm that the full program is present.
- Select the required chapter range.
- Choose the correct audio language and audio mix.
- Select the DVD subtitle tracks that should remain in the output.
Step 3: Choose MP4 or MKV as the Output Format
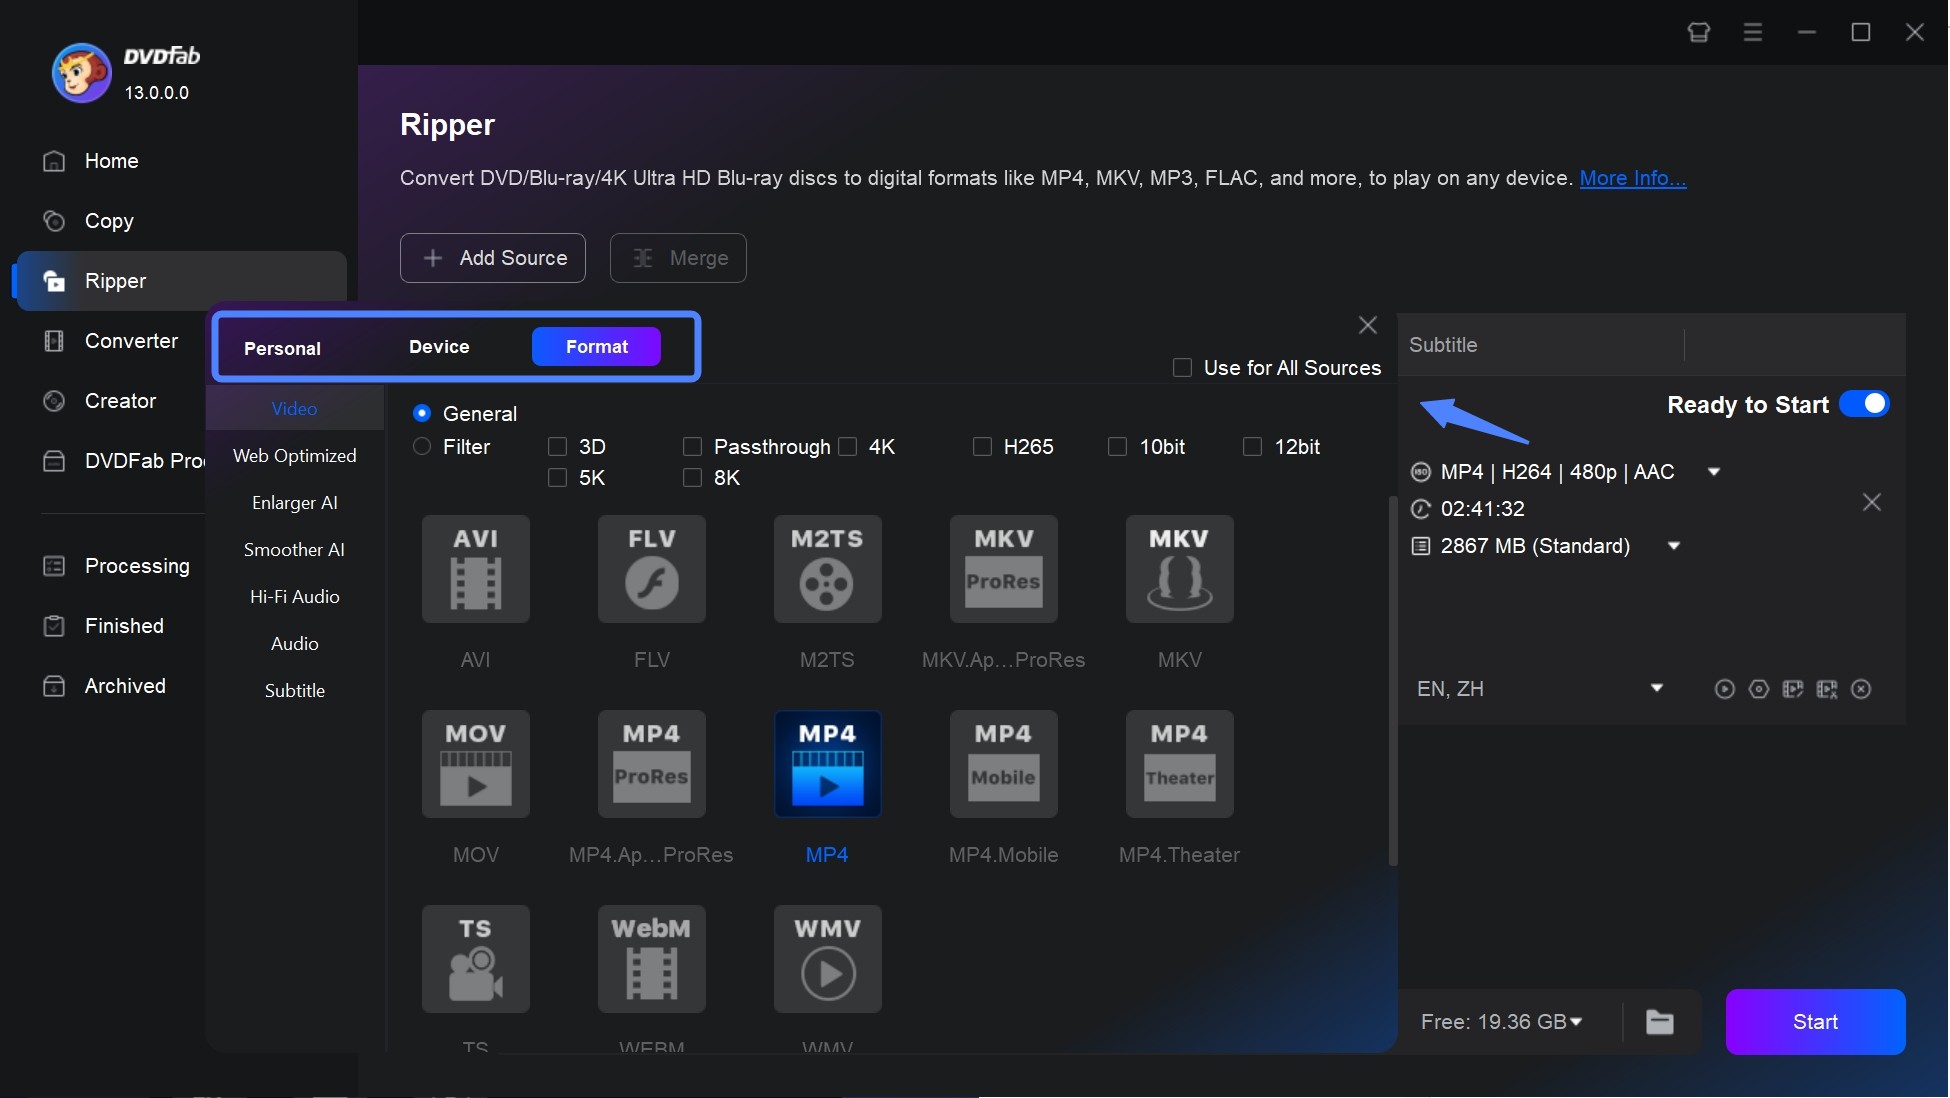
Click Choose Other Profile and select the output format before applying the edits.
- MP4 with H.264: Choose this for broad playback support, sharing, and import into another video editor.
- MKV: Choose this when you need several selectable audio or subtitle streams and your player supports MKV.
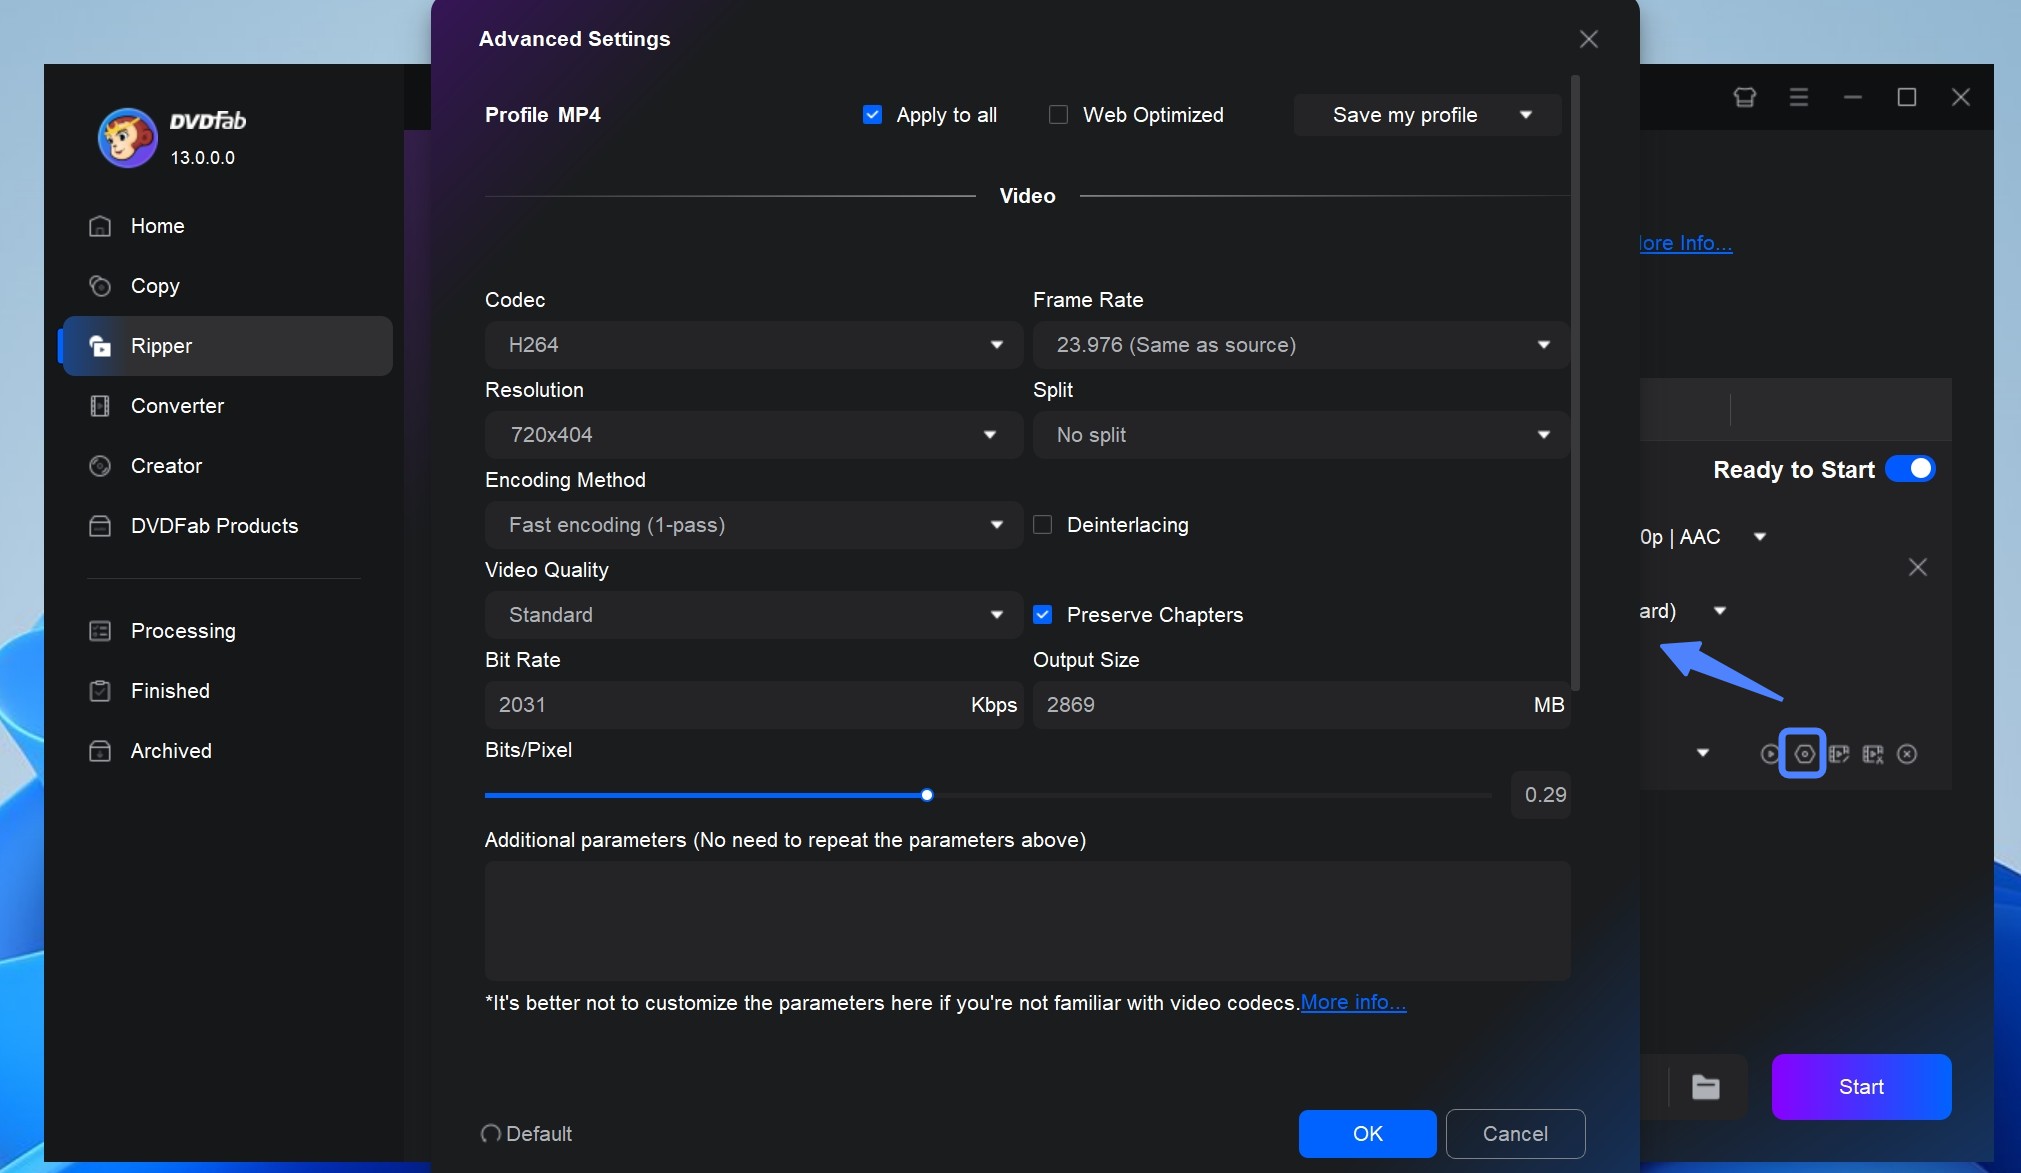
Open Advanced Settings to review the video codec, resolution, frame rate, bitrate, audio settings, and subtitle mode. Lower bitrates produce smaller files but may remove visible detail. Increasing the resolution above the DVD source does not recreate detail that is absent from the disc.
Step 4: Trim Unwanted DVD Scenes
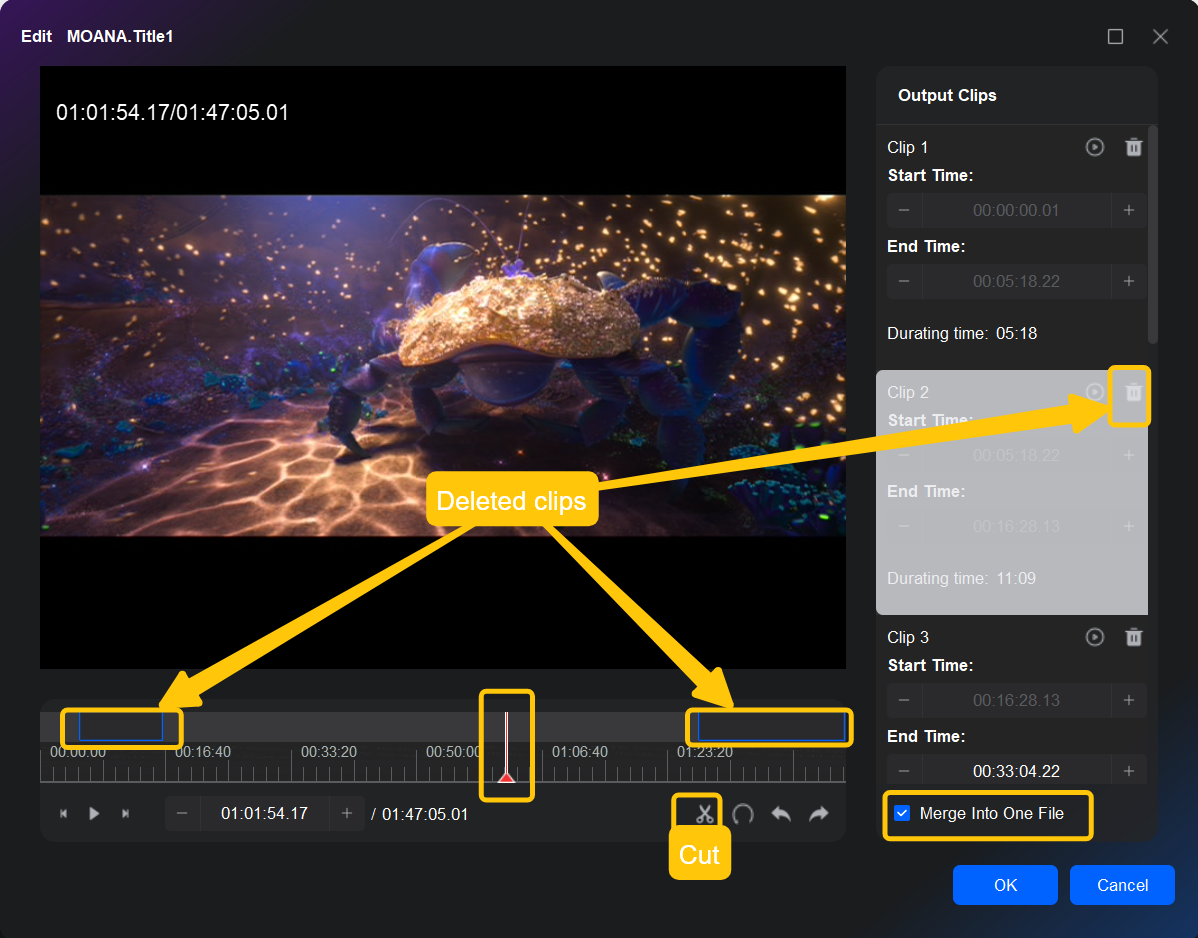
Use Trim to remove an unwanted introduction, advertisement, damaged section, long pause, closing credits, or another part of the selected title.
- Open Trim for the loaded title.
- Move the playhead to the first frame you want to keep.
- Set the start point.
- Move to the final frame you want to keep.
- Set the end point.
- Play across both cut points.
- Add another range when you need several separate sections.
- Save the trim after confirming which areas will be kept.
Do not judge a cut from one paused frame. Play several seconds before and after each edit point to confirm that the first word is complete, the final line is not cut short, and no required scene is missing. Trimming changes the duration of the exported file but does not delete content from the original DVD.
Step 5: Crop, Rotate, and Adjust the Picture
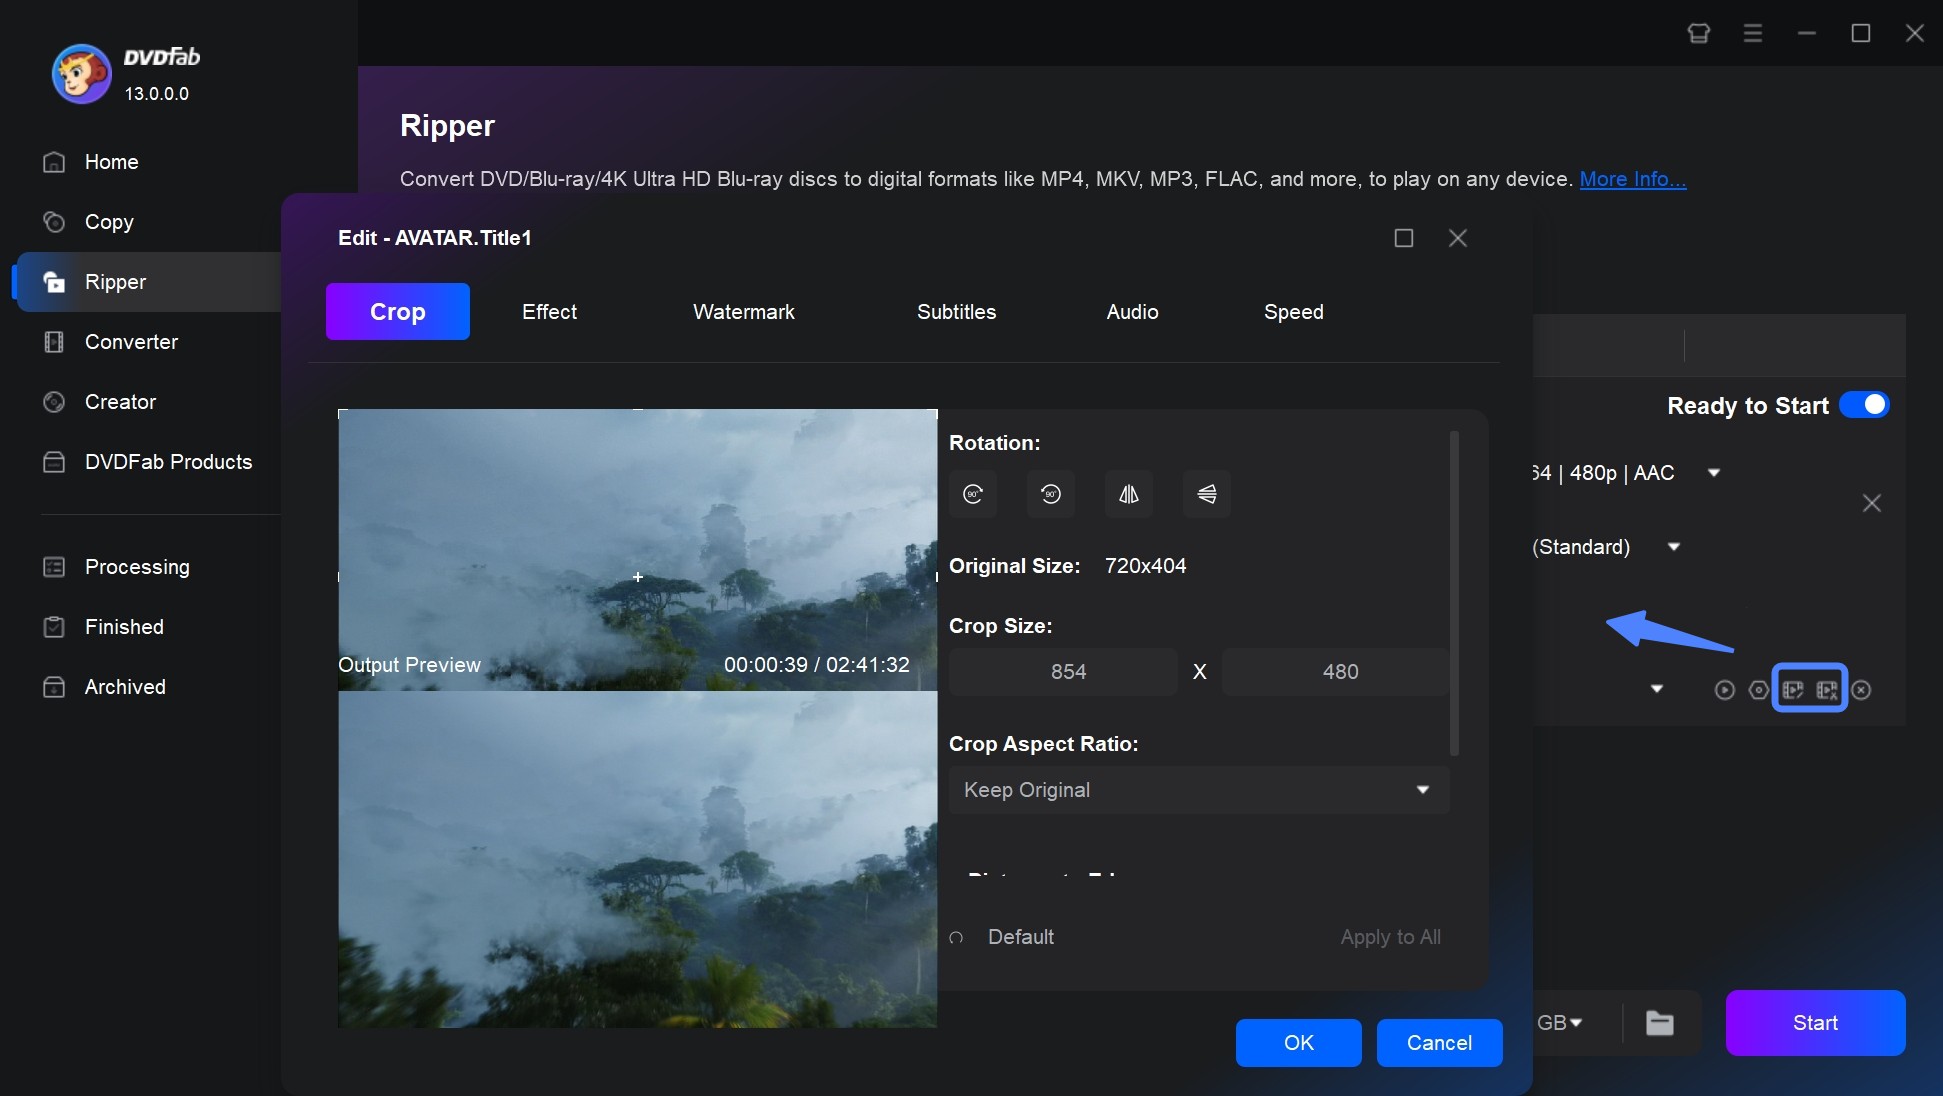
Open Video Edit for changes to the visible picture.
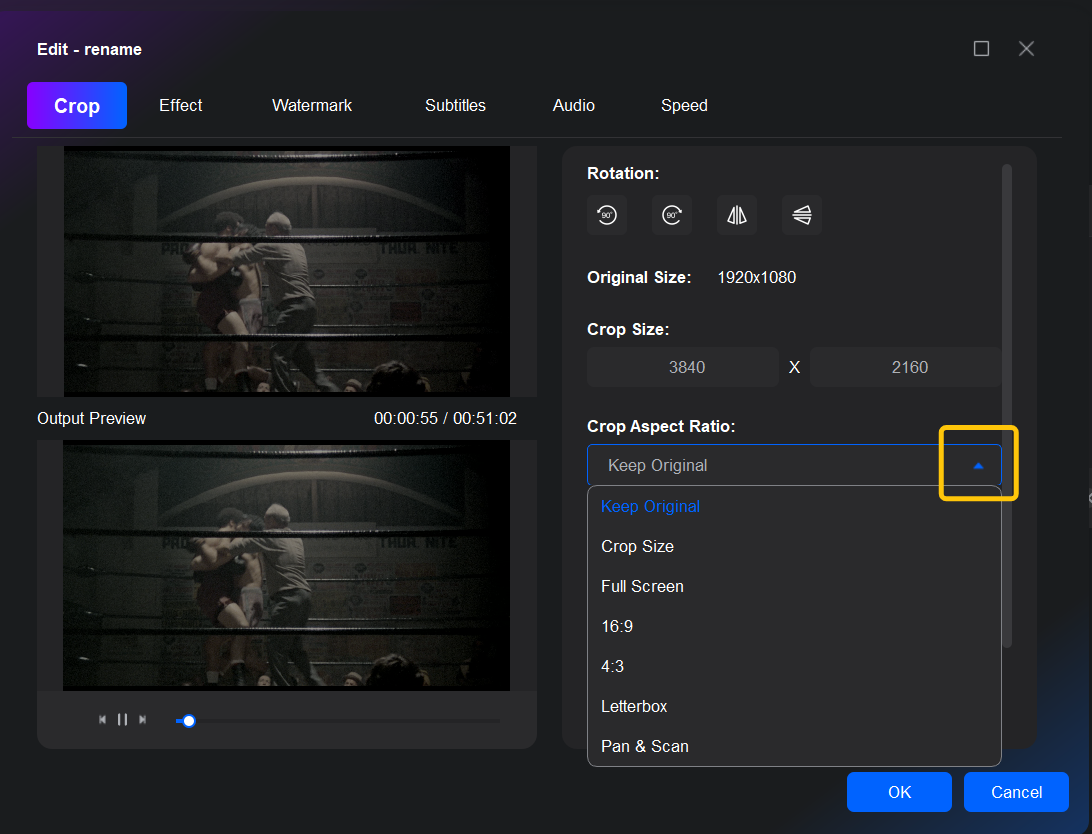
Crop black bars or unwanted edges
- Select Crop.
- Drag the crop borders around the picture you want to keep.
- Select an aspect ratio only when it matches the intended output.
- Compare the source and output previews.
- Check scenes containing subtitles, faces near the edge, and wide camera movement.
- Click OK after confirming that important picture information remains visible.
Do not remove all black bars automatically. A widescreen film may be wider than a 16:9 display, and filling the screen can remove picture information from both sides. Trim changes the running time, while Crop changes the visible frame.
Rotate a sideways video
Use the rotation control when a transferred or home-recorded video appears sideways. Rotate it left or right, then review the crop area again because the frame orientation has changed.
Adjust brightness, contrast, and saturation
- Brightness changes the overall light level.
- Contrast changes the difference between light and dark areas.
- Saturation changes the intensity of the colors.
Make small changes and compare several scenes. Check highlights, shadows, skin tones, white objects, and dark clothing before saving the adjustment. These controls cannot restore picture information that is missing from the DVD source.
Step 6: Add or Edit Subtitles
Keep an existing DVD subtitle
Open the subtitle menu on the title row and select the required language track. Check the subtitle mode in Advanced Settings:
- Remux into file: Keeps the subtitle as a selectable stream that a compatible player can turn on or off.
- Direct render to video: Places the subtitle permanently in the video picture.
Use a selectable stream when viewers may want to disable the subtitle. Use direct rendering when the subtitle must always remain visible or when the target player cannot display the selected subtitle stream correctly. Review the forced-subtitle option when the disc includes short translations for foreign-language dialogue or on-screen text.
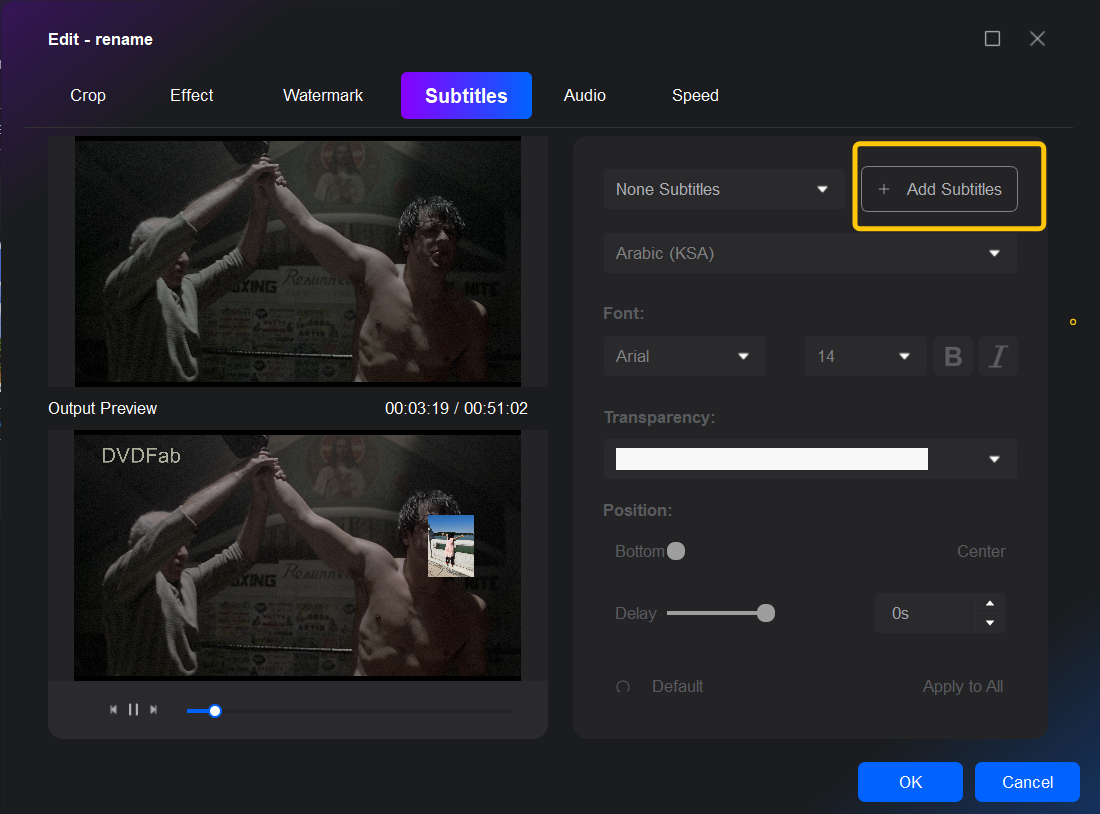
Add an external subtitle
- Open the subtitle menu.
- Select Add External Subtitle.
- Import the SRT or ASS file from your computer.
- Check the font, size, character set, color, style, and position.
- Play dialogue near the beginning, middle, and end of the title.
- Correct the timing before starting the full conversion.
If every subtitle appears early or late by the same amount, an offset adjustment may correct it. If the difference increases during playback, the subtitle may have been created for a different frame rate or version of the video and may need to be retimed.
Step 7: Add Text or an Image Watermark
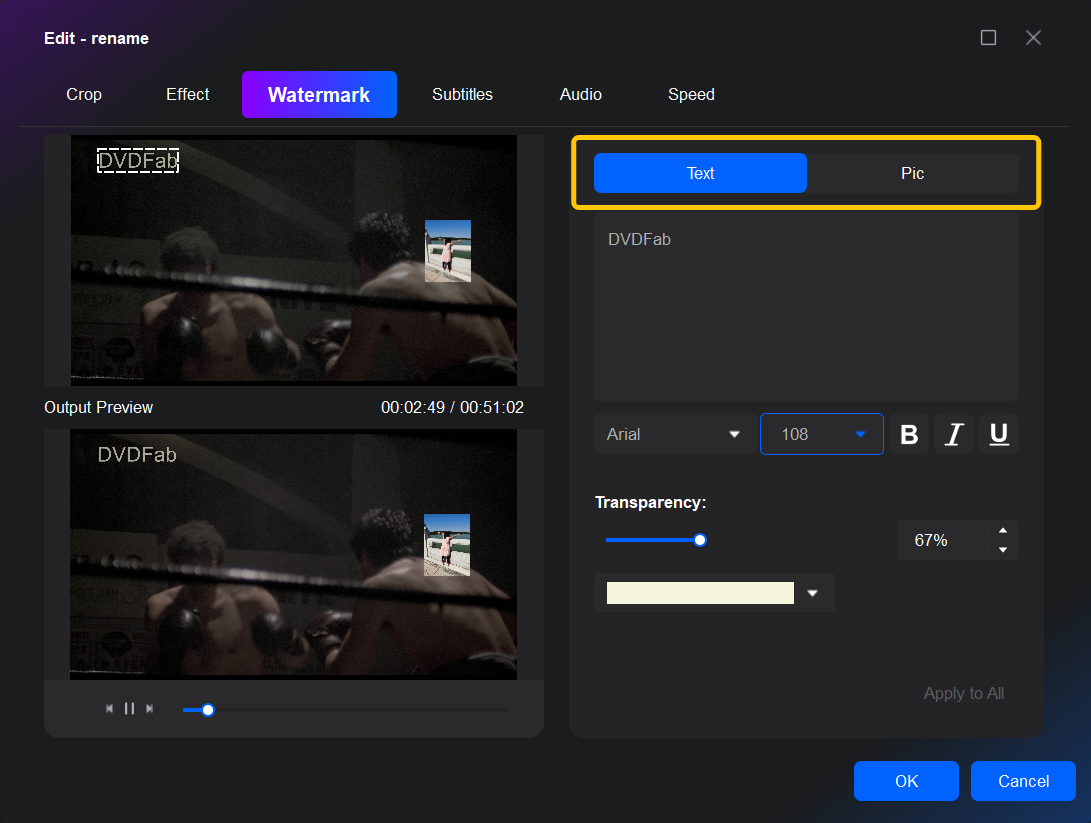
Open Video Edit and select the watermark control.
Add a text watermark
- Enter the required text.
- Set its font and size.
- Move it to the intended position.
- Check its visibility against light and dark scenes.
Add an image watermark
- Import the image.
- Resize it to fit the frame.
- Set its position and transparency.
- Preview scenes that already contain subtitles or on-screen titles.
Keep the watermark away from subtitles, faces, lower-third titles, and other important picture areas. Text and image watermarks become part of the exported picture and cannot be switched off during playback.
Step 8: Merge DVD Titles or Clips
Use Merge when several related titles or clips need to play as one continuous output file. This can help with a family-video DVD divided into several titles or short recordings from the same event.
- Add or select the required titles or clips.
- Open the merge control.
- Arrange the clips in the intended playback order.
- Preview the boundary between each pair of clips.
- Check for missing audio, an incorrect sequence, or an abrupt picture change.
Keep unrelated TV episodes as separate files when you plan to organize them in a media library. Individual files are easier to name, match, navigate, and play.
Step 9: Preview and Export the Edited DVD Video
Review the complete task before starting the conversion:
- The correct title and chapter range are selected.
- The trim ranges begin and end at the intended points.
- Cropping has not removed subtitles or important picture information.
- The picture orientation is correct.
- Brightness, contrast, and saturation remain consistent.
- The intended audio track plays.
- Subtitles are synchronized and correctly positioned.
- Text and image watermarks do not cover important content.
- Merged clips appear in the correct order.
- The output profile matches the intended player or editor.
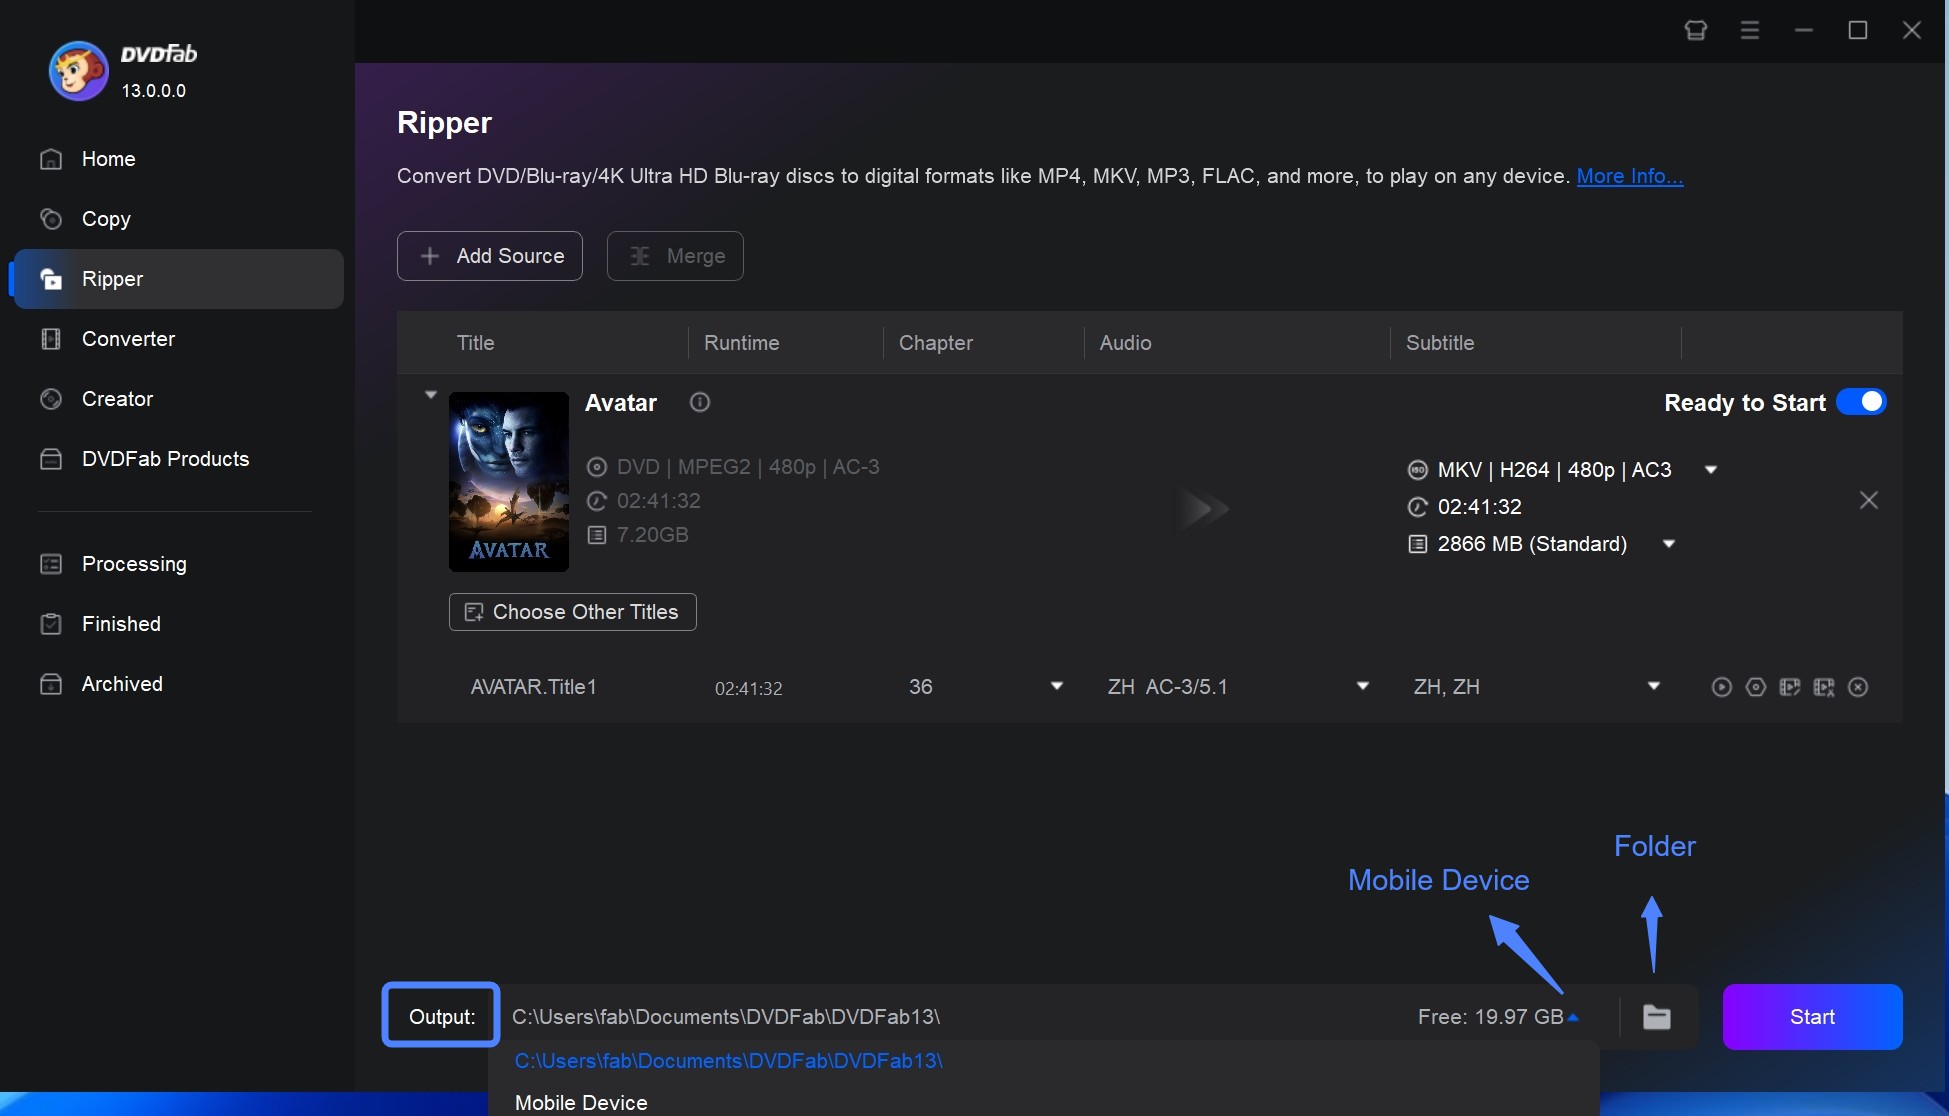
Return to the main Ripper window and locate Save to.
- Select a folder with enough free storage space.
- Confirm the file name and output profile.
- Click Start.
- Wait until the task finishes.
- Play the exported file at the beginning, around each edit point, and near the end.
FAQs About Editing a DVD
Can I edit the VOB files inside a VIDEO_TS folder directly?
Load the complete VIDEO_TS folder as a DVD source and export the selected title as a new file. Replacing individual VOB files can leave the original menu, chapter, and navigation references pointing to incorrect content.
Does trimming or cropping a DVD reduce video quality?
The result depends on the output profile and the edit. Cropping, color changes, watermarks, and permanently rendered subtitles require newly generated video frames, so check the selected codec, bitrate, and resolution rather than assuming that every edit is lossless.
Can I retain multiple audio tracks and subtitles?
Yes, when the selected profile and container support the required streams. MKV is generally the clearer choice when several selectable audio or subtitle tracks must remain in one file. Confirm every required stream before exporting.
Why did DVDFab select the wrong DVD title?
Open Choose Other Titles, compare the available durations, and preview the opening scene of each likely entry. For an episodic disc, select each episode individually instead of relying on the default title.
Can I save the edited video back to the original DVD?
A read-only DVD cannot be updated in place. Export the edited video first and create a new DVD-Video project when you need another playable disc.
Can I edit a DVD on Mac?
The main sequence is the same on macOS: open Ripper, load the source, select the title and output profile, apply the edits, and export the file. A Mac without a built-in optical drive requires a compatible external DVD drive for physical discs.
Can DVDFab perform advanced timeline editing?
DVDFab DVD Ripper covers conversion-stage edits such as trimming, cropping, merging, subtitles, watermarks, rotation, and picture adjustment. Export the title and use a full video editor when the project requires layered clips, complex transitions, detailed audio mixing, or a multitrack timeline.
Is it legal to edit a DVD?
Edit only media that you legally own or have permission to use. Copyright and anti-circumvention rules differ by region, so check the laws that apply where you live and review the DVDFab legal disclaimer.
Conclusion
A DVD must first be read as a disc source before its video can be edited. Load the DVD disc, ISO image, or DVD folder in DVDFab DVD Ripper, confirm the correct title, chapters, audio, and subtitles, and choose the output profile before making changes.
Use MP4 with H.264 for broad playback support and further editing. Choose MKV when multiple selectable audio or subtitle streams matter. Apply only the trim, crop, subtitle, watermark, color, or merge controls that the video needs, and inspect every change before clicking Start.
The finished result is a new digital file rather than a modified original disc. Create a separate DVD-Video project after export when the video must play in a standard DVD player.
![How to Rip DVDs for Plex: Guide to Formats, Tools, and Library Setup [2026]](https://images.dvdfab.cn/media/Screenshot_2026-09-08_at_18.53.34_j36v3l.png/public) How to Rip DVDs for Plex: Guide to Formats, Tools, and Library Setup [2026]By Diana Smith - Sep 8, 2026
How to Rip DVDs for Plex: Guide to Formats, Tools, and Library Setup [2026]By Diana Smith - Sep 8, 2026![Top 12 DVD to MP4 Converter Software for Win & Mac [2026 Tested]](https://r3.dvdfab.cn/upload/resource/convert-dvd-to-mp4-p2X3.jpeg) Top 12 DVD to MP4 Converter Software for Win & Mac [2026 Tested]By Diana Smith - Sep 4, 2026
Top 12 DVD to MP4 Converter Software for Win & Mac [2026 Tested]By Diana Smith - Sep 4, 2026 10 Best DVD Rippers for Windows & macOS: 2026 TestedBy Diana Smith - Sep 2, 2026
![How to Rip Audio from DVD with 5 Best Free DVD Audio Extractors [2026]](https://images.dvdfab.cn/media/how_to_rip_audio_from_dvd_5r8iyw.png/public) How to Rip Audio from DVD with 5 Best Free DVD Audio Extractors [2026]By Diana Smith - Aug 31, 2026
How to Rip Audio from DVD with 5 Best Free DVD Audio Extractors [2026]By Diana Smith - Aug 31, 2026